5.2 Configuring Federated Authentication
Federation allows a user to associate two accounts with each other. This allows the user to log into one account and access the resources of the other account without logging in to the second account. It is one method for providing single sign-on when a user has accounts in multiple user stores.
5.2.1 Configuring Federation
This section describes what is federation, how to configure federation, and how to set up federation with third-party providers. Topics include:
Understanding a Simple Federation Scenario
Suppose Company A has a centralized user store that does the authentication for most of the company’s internal resources on its inner Web site. But Company A also has a customer feedback application that employees and customers need access to, and for this application, a second user store has been created. This user store contains both employee and customer user accounts. The centralized user store cant be used, because it can contain only employee accounts. This means that the employee must log in to both accounts to access both the inner Web site and the customer feedback application. With federation, the employee can access the resources of both sites by using a single login.
Figure 5-18 illustrates such a network configuration where the user accounts of Site A are configured to federate with the user accounts at Site B.
Figure 5-18 Using Federated Identities
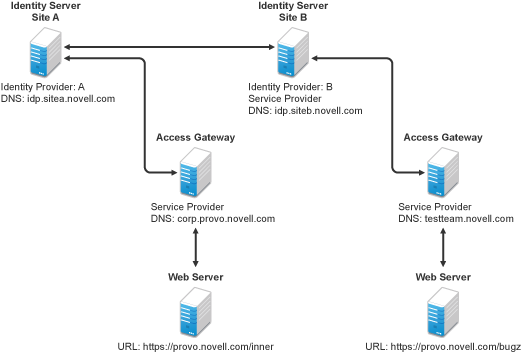
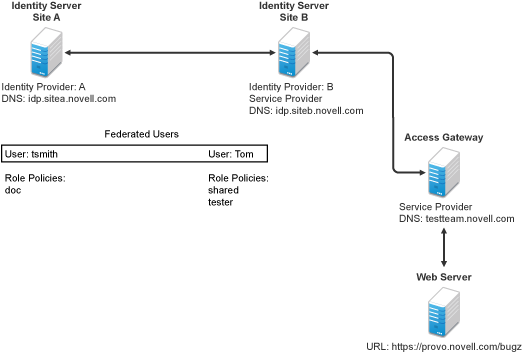
In this configuration, Site A is the Identity Server for the corporate resources, and the employees authenticate to this site and have access to the resources on the Web server with the URL of https://provo.novell.com/inner. Site B is the Identity Server for the Bugzilla application, and both employees and customers authenticate to this site to have access to the resources of the Web server with the URL of https://provo.novell.com/bugz. After an account has been federated, the user can log in to Site A and have access to the resources on the Web servers of both Site A and Site B.
In this scenario, Site B is not as secure a site as Site A, so federation is configured to go only one way, from Site A to Site B. This means that users who log in to Site A have access to the resources at Site A and B, but users who log in to Site B have access only to the resources at Site B. Federation can be configured to go both ways, so that it doesn’t matter whether the user logs into Site A or Site B. When federation is configured to be bidirectional, both sites need to be equally secure.
The Access Gateways in Figure 5-18 are service providers and are configured to use the Identity Servers as identity providers. The trusted relationship is automatically set up for you when you specify authentication settings for the Access Gateway and select an Identity Server Cluster.
Federation can be set up between providers in the same company or between providers of separate companies. For example, most companies have contracts with other companies for their user’s health benefits and retirement accounts. Their users have accounts with these companies. These accounts can be federated with the user’s employee account when both companies agree to set up the trusted relationship.
Configuring Federation
Federation requires the configuration of a trusted relationship between an identity provider and a service provider. Figure 5-19 illustrates setting up federation between two identity servers, because a NetIQ Identity Server can act as either an identity provider or a service provider.
Figure 5-19 Configuring Trust Between Site A and Site B
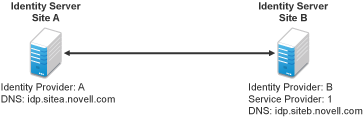
Site A must be configured to trust Site B as a service provider, and Site B must be configured to trust Site A as an identity provider. Until this two-way trust is established, federation cannot occur.
Before setting up a trusted relationship, you must make the following decisions:
Protocol: The Identity Server supports SAML 1.1, SAML 2.0, and Liberty. You need to decide which of these protocols to use. If no user interaction is needed, SAML 1.1 is probably a good choice. The SAML 2.0 and Liberty protocols permit user interaction when federating. The user decides whether to federate (link) the accounts and must be logged in at both sites to accomplish this. Liberty offers an additional service, not available with SAML 2.0, that allows the user to select attributes that can be shared with the service provider.
The instructions in this documentation, starting in Prerequisites, use the Liberty protocol. They also indicate how to configure for the SAML 2.0 and SAML 1.1 protocols.
Trust Relationship: You need to decide whether the trusted relationship is going to be from Site A to Site B, from Site B to Site A, or bidirectionally from Site A to Site B and from Site B to Site A. Federation is set up to go from the most secure site to the less secure site. The only time federation is set up to be bidirectional is when both sites are equally secure. The scenario described in Figure 5-18 is an example of a trusted relationship that you would want to go only one way, from Site A to Site B, because Site B is not as secure as Site A.
The instructions, starting in Prerequisites, explain how to set up the trusted relationship between Site A and Site B. You can easily modify them to set up the bidirectional trust relationships by substituting Site B for Site A (and vice versa) in the instructions and then repeating them for Site B
Attributes to Share: You need to decide whether there are user attributes or roles at Site A that you want to share with Site B. The attributes from Site A can be used to identify the users at Site B. Other attributes might be needed to access protected resources, for example, to satisfy the requirements of an Identity Injection policy.
For all the protocols, Sharing Roles explains how to share the roles at Site A with Site B. For the SAML 1.1 protocol, the instructions starting in Prerequisites use the LDAP mail attribute to share the user’s e-mail address.
User Identification: You need to decide how assertions can be used to map users from Site A to users at Site B. The Identity Server supports four methods:
-
Temporary: This method allows the user access to Site B solely from the credentials of Site A. No effort is made to map the user to a user account at Site B. A temporary account is set up for the user on Site B, and when the user logs out, the account is destroyed.
-
Login: This method requires that the user have login credentials at both Site A and Site B, and when logged in at both sites, the user can select to federate the accounts.
-
Mapped Attributes: This method requires that the sites share attributes and that these attributes are used to create a matching expression that determines whether the user accounts match. For an added security check, the first time the accounts are matched, the user is asked to verify the match by supplying the password for Site B.
If the match fails, you can allow the federation to fail or you can configure the method to allow the user to use the Login method or the Provisioning method.
-
Provisioning: This method allows the user to create a new, permanent account at Site B.
The configuration instructions, starting in Prerequisites, use the Login method for the SAML 2.0 and Liberty protocols and Mapped Attributes method for the SAML 1.1 protocol.
The instruction for setting up a trusted relationship between two NetIQ Identity Servers have been divided as follows:
Prerequisites
-
A basic Access Manager configuration with the Identity Server and Access Gateway configured for SSL.
This can be the one you set up using the instructions in either Section 3.0, Setting Up a Basic Access Manager Configuration or Section 3.12, Sample Configuration for Protecting an Application Through Access Manager. For SSL configuration, see Section 14.1, Enabling SSL Communication.
The Identity Server from this configuration becomes Site B in Figure 5-19.
-
A second Identity Server with a basic configuration, an LDAP user store, and SSL. This Identity Server is configured to be Site A in Figure 5-19.
-
Time synchronization must be set up for all the machines, or authentication can fail if assertions expire before they can be used.
-
A DNS server must be configured to resolve the DNS names of Site A, Site B, and the Access Gateways.
-
(Recommended) Logging has been enabled on the Identity Servers of Site A and Site B. See Section 17.3.1, Configuring Logging for Identity Server. Make sure that you enable at least application and protocol (Liberty, SAML 1, or SAML 2.0) logging at an Info level or higher.
Establishing Trust between Providers
To set up this very basic example of federation, complete the following tasks.
Configuring Site A to Trust Site B as a Service Provider
To establish trust between Site A and Site B, you must perform two tasks:
-
The providers must trust the certificates of each other so you need to import the trusted root certificate of Site B to Site A.
-
You must also import the metadata of Site B to Site A. The metadata allows Site A to verify that Site B is truly Site B when Site B sends a request to Site A.
The following instructions explain how to import the certificate and the metadata:
-
Log in to the Administration Console for Site A.
The configuration for Site A can be created in the same Administration Console as Site B; it cannot be configured to be a cluster member of Site B.
-
Import the trusted root certificate of Site B into the NIDP trust store of Site A:
-
Click > > > .
-
In the Trusted Roots section, click , then fill the following fields:
Server IP/DNS: Specify the IP address or DNS name of Site B. For Site B in Figure 5-19 specify the following:
idp.siteb.novell.com
Server Port: Specify 8443.
-
Click , then specify an alias for the certificate (for example, SiteB).
You will get two certificate options: Root CA Certificate andServer certificate. We recommend you to select Root CA Certificate.
-
Examine the trusted root that is selected for you.
If the trusted root is part of a chain, make sure you select the parent and all intermediate trusted roots.
-
Click .
The trusted root certificate of Site B is added to the NIDP trust store.
-
Click .
-
Click > then update the Identity Server.
Wait for the health status to return to green.
-
-
Configure a service provider for Site A:
-
Click > > [or or ].
-
Click , select , then fill the following fields:
Name: Specify a name for the provider. If you plan on configuring more than one protocol, include the protocol as part of the name, such as, SiteB_Liberty
Metadata URL: Specify the URL of the Liberty metadata on Site B. For Site B in Figure 5-19, specify the following:
http://idp.siteb.novell.com:8080/nidp/idff/metadata
This example uses port 8080 to avoid any potential certificate problems that occur when the Identity Server and the Administration Console are installed on separate machines.
SAML 2.0: If you are using SAML 2.0, the metadata path is /nidp/saml2/metadata. For Site B in Figure 5-19, specify the following for SAML 2.0:
http://idp.siteb.novell.com:8080/nidp/saml2/metadata
SAML 1.1: If you are using SAML 1.1, the metadata path is /nidp/saml/metadata. For Site B in Figure 5-19, specify the following for SAML 1.1:
http://idp.siteb.novell.com:8080/nidp/saml/metadata
-
Click > .
-
Update the Identity Server.
Wait for the health status to return to green.
-
-
Continue with Configuring Site B to Trust Site A as an Identity Provider.
Configuring Site B to Trust Site A as an Identity Provider
The following instructions explain how to import the trusted root certificate and metadata of Site A into the configuration for Site B.
-
Log in to the Administration Console for Site B.
The configuration of Site B can be created in the same Administration Console as Site A; it cannot be configured to be a cluster member of Site A.
-
Import the trusted root certificate of Site A into the NIDP trust store of Site B.
-
Click > > > .
-
In the Trusted Roots section, click , then fill the following fields:
Server IP/DNS: Specify the IP address or DNS name of Site A. For Site A in Figure 5-19, specify the following:
idp.sitea.novell.com
Server Port: Specify 8443.
-
Click , then specify an alias for the certificate (for example, SiteA).
You will get two certificate options: Root CA Certificate andServer certificate. We recommend you to select Root CA Certificate.
-
Examine the trusted root that is selected for you.
If the trusted root is part of a chain, make sure you select the parent and all intermediate trusted roots.
-
Click .
The trusted root certificate of Site A is added to the NIDP trust store.
-
Click .
-
Click > > .
Wait for the health status to return to green.
-
-
Configure an identity provider for Site B.
-
Click > > [or or ].
-
Click , select , then fill the following fields:
Name: Specify a name for the provider. If you plan on configuring more than one protocol, include the protocol as part of the name, such as SiteA_Liberty
Metadata URL: Specify the URL of the Liberty metadata on Site A. For Site A in Figure 5-19, specify the following:
http://idp.sitea.novell.com:8080/nidp/idff/metadata
This example uses port 8080 to avoid any potential certificate problems that occur when the Identity Server and the Administration Console are installed on separate machines.
SAML 2.0: If you are using SAML 2.0, the metadata path is /nidp/saml2/metadata. For Site A in Figure 5-19, specify the following for SAML 2.0:
http://idp.sitea.novell.com:8080/nidp/saml2/metadata
SAML 1.1: If you are using SAML 1.1, the metadata path is /nidp/saml/metadata. For Site B in Figure 5-19, specify the following for SAML 1.1:
http://idp.siteb.novell.com:8080/nidp/saml/metadata
-
Click .
-
To configure an authentication card, fill in the following:
ID: (Optional) Specify an alphanumeric number that identifies the card. If you need to reference this card outside of the Administration Console, you need to specify a value here. If you do not assign a value, the Identity Server creates one for its internal use.
Text: Specify the text that is displayed on the card to the user
Image: Specify the image to be displayed on the card. Select the image from the drop down list. To add an image to the list, click .
Login URL: (Conditional) If you are configuring an authentication card for SAML 1.1, specify an Intersite Transfer Service URL. For Figure 5-18, specify the following value:
https://idp.sitea.novell.com:8443/nidp/saml/idpsend?PID=https://idp.siteb.novell.com:8443/nidp/saml/metadata&TARGET=https://idp.siteb.novell.com:8443/nidp/app
For more information, see Specifying the Intersite Transfer Service URL for the Login URL Option.
Show Card: Determine whether the card is shown to the user. If this option is not selected, the card is only used when a service provider makes a request for the card. For this scenario, select this option.
Passive Authentication Only: Do not select this option.
-
Click .
-
Update the Identity Server.
Wait for the health status to return to green.
-
-
Continue with one of the following:
-
If you are using Liberty or SAML 2.0, continue with Verifying the Trust Relationship.
-
If you are using SAML 1.1, continue with Configuring SAML 1.1 for Account Federation.
-
Verifying the Trust Relationship
Before continuing with federation configuration, you need to verify that Site A and Site B trust each other.
-
To test the trusted relationship, log in to the user portal of Site B. For Site B in Figure 5-19, specify the following:
https://idp.siteb.novell.com:8443/nidp/app
The following login screen appears.
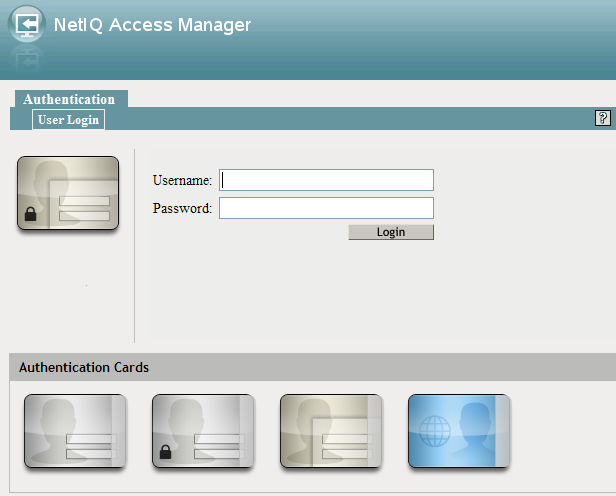
In this configuration, the customizable image was used for the Liberty authentication card.
-
Click the Liberty (or SAML 2.0) authentication card.
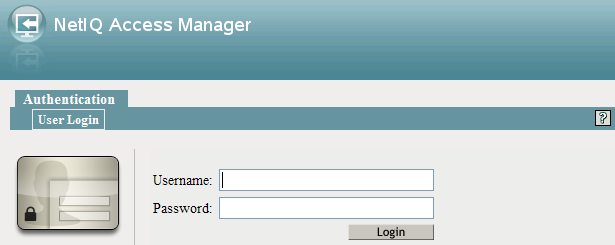
You are directed to Site A for login, with the default card selected for you. A screen similar to the following appears:
-
Enter the credentials for a user from Site A.
The Federation consent prompt appears.
-
Click .
You are returned to the login page for Site B.
-
Enter the credentials of a user from Site B that you want to federate with the user from Site A.
These two accounts are now federated. You can enter the URL to the user portal on Site A or Site B, and you are granted access without logging in again.
If you log out and log back in, the accounts are still federated, but you might be prompted for login credentials as you access resources on Site A and Site B. To enable a single sign-on experience, the Identity Server at Site A, the Identity Server at Site B, and the protected resources of the Access Gateways must be configured to share a contract.
-
To enable a single sign-on experience, continue with Configuring User Authentication.
Configuring User Authentication
The following instructions describe one way to enable single sign-on to the Identity Servers and Access Gateways in Figure 5-18. It explains how to configure all sites to use the same contract. The instructions explain the following tasks:
-
Selecting the contract for federation
-
Configuring the contract at Site B to allow authentication at Site A
-
Configuring Site A so its contract can satisfy the requirements of the contract at Site B
-
Configuring Site A and Site B to use this contract as their default contract
To configure the contracts:
-
Log in to the Administration Console for Site B.
-
Configure the authentication request:
-
Click > > > [or ] > > > .
-
(Liberty) Verify the settings of the following fields:
Allow federation: Make sure this option is selected. If this option is not selected, users cannot federate their accounts at Site A with an account at Site B.
After authentication: Make sure this option is selected. Enabling this option assumes that a user account exists at the service provider and that the account can be associated with a user’s account at the identity provider.
During authentication: Make sure this option is selected. Enabling this option allows federation to occur when the user selects the authentication card of the identity provider.
-
(SAML 2.0) Verify the settings of the following fields:
Persistent: Select this option to set up a persistent relationship between the two accounts.
After authentication: Make sure this option is selected. Enabling this option assumes that a user account exists at the service provider and that the account can be associated with a user’s account at the identity provider after authentication.
During authentication: Make sure this option is selected. Enabling this option allows federation to occur when the user selects the authentication card of the identity provider.
-
For , select .
-
(SAML 2.0) For Context Comparison, accept the default value of .
-
In the section, select the name of the contract used by the protected resources and move it to the section.
If the contract you require is not in the list, it has not been configured for federation. See step 3.
-
Click , then update the Identity Server configuration.
-
-
(Conditional) Configure the contract at Site B to allow federation:
-
Click > > > .
-
Record the URI for the contract you are using. This URI needs to exist as a contract on Site A. The name of the contract can be different at each site, but the URI must be the same.
NOTE:If site A only understands authentication class or type, select in the field and specify the authentication class in the field. Record the allowable class for the contract you are using. This allowable class should exist as a contract on site B. The name of the contract can be different at each site, but the allowable class must be the same.
-
Click the name of the contract.
-
Make sure the option is selected.
-
Click twice, then update the Identity Server if you made any changes.
-
Return to Step 2 to select the contract.
-
-
If Site A is configured as a SAML 2.0 identity provider, move the contract(s) from the list to the list.
This will automatically redirect the authentication request from Site B to Site A when this contract is executed. Note that you can have multiple contracts in the list.
-
Verify that Site A contains the same contract:.
-
Log in to the Administration Console for Site A.
-
Click > > > .
-
Match the URI from step 3b to a contract.
NOTE:Match the allowable class if you have selected in the field at site B.
If such a contract does not exist, you need to create it. For help, see Section 5.1.4, Configuring Authentication Contracts.
-
Click .
-
-
In the Administration Console for Site A, click > > > .
-
For the Authentication Contract, select the name of the contract from step 5c.
-
(Conditional) If you have multiple user stores, set the default contract for each user store.
-
Click , then update the Identity Server.
-
Test the configuration:
-
Enter the URL to the user portal of Site B.
-
Click the federated login link to Site A.
-
Enter the credentials for Site A and log in.
-
Enter the URL for a protected resource at Site B.
You are granted access without being prompted for credentials.
-
-
If you want to allow federated users to log in at Site A rather than using the card at Site B to redirect them to Site A, complete the following tasks:
-
In the Administration Console for Site B, click > > > > .
-
For the Authentication Contract, select the name of the contract whose URI matches the URI of the contract used by Site A.
-
Click [or > > > .
-
In the section, enable the option.
This enables single sign-on to Site B when the user has already federated the accounts at the two sites.
-
Click , then update the Identity Server.
-
To test single sign-on, log in to the user portal on Site A, then enter a URL for a protected resource at Site B.
-
Configuring SAML 1.1 for Account Federation
SAML 1.1 does not support user-controlled federation, but you can configure it so that accounts that match are automatically federated. The Liberty and SAML 2.0 protocols allow users to federate accounts without sharing any common attributes, but the SAML 1.1 protocol requires that the user accounts need to share some common attributes in order for SAML 1.1 to match them and allow federation.
Configuring User Account Matching
When federating with SAML 1.1, the security of a user matching method depends upon the accuracy of the mapping. You need to select an attribute or attributes that uniquely identify the user at both Site A and Site B. The attributes must identify only one user at Site A and match only one user at Site B. If the attributes match multiple users, you have a security problem,
The following steps use the e-mail address of the user and the LDAP mail attribute to set up a matching rule that matches one user account at Site A with one user account at Site B. To securely use such a matching rule, you need to have a rule in place at both Site A and Site B to ensure that all users have unique e-mail addresses.
Configuring Site B for User Account Matching
-
In the Administration Console of Site B, click > > > > > > .
-
For the option, select the contract that you want to use for single sign-on.
For this example, select .
-
Select .
The option is automatically selected. Leave this option enabled.
-
Click the icon.
-
Move the user store that you want to search for the attribute to the list.
-
For the , select .
-
Specify a name for the matching expression, such as email.
-
In , click the icon, select , then click .
The form allows you to create a very complex set of matching rules, with multiple conditions. This example uses one attribute, the simplest form of a matching expression.
-
Click , then select your matching expression for the .
-
Click .
-
Click twice, then update the Identity Server.
-
Continue with Configuring the Attribute for Sharing.
Configuring the Attribute for Sharing
-
In the Administration Console of the Site B (the service provider), click > > .
-
Click , then click .
-
Specify a , such as email, then click .
-
Click , then fill the options:
Local attribute: Select .
Remote attribute: Specify a name, such as email. Make sure you use the same remote name in the mapping for both Site B and Site A.
Leave the other options set to their default values.
-
Click , then click .
Your newly created attribute mapping appears in the list of Attribute Sets.
-
Repeat step1 through step 5 for Site A (the identity provider).
If Site A and Site B are imported into the same Administration Console, skip this step.
-
Continue with Configuring the Providers to Use the Shared Attribute.
Configuring the Providers to Use the Shared Attribute
You need to configure Site A to send the shared attribute with the authentication credentials, and you need to configure Site B to process the shared attribute that is included with the authentication credentials.
-
In the Administration Console for Site B, click > > > > > .
-
For the , select the set name you created in Configuring the Attribute for Sharing.
-
Move the email attribute so that it is obtained at authentication.
-
Click twice, then update the Identity Server.
-
In the Administration Console for Site A, click > > > > > .
-
For the , select the set name you created in Configuring the Attribute for Sharing.
-
Move the email attribute so that it is sent with authentication.
-
Click twice, then update the Identity Server.
-
Continue with Configuring the Default Contract for Single Sign-On
Configuring the Default Contract for Single Sign-On
The Identity Servers at Site A and Site B need to use the contract you specified in your user matching expression to be the default contract for Site A, Site B, and the protected resources of the Access Gateway.
For the user matching expression contract, see step 2 in Configuring Site B for User Account Matching.
To configure the default contracts for Site A and Site B:
-
In the Administration Console for Site B, click > > > > .
-
For the Authentication Contract, select the name of the contract used by the user matching expression.
-
Click , then update the Identity Server.
-
For Site A, repeat step 1 through step 3.
-
For the Access Gateway, review the contracts you have assigned to the protected resources:
-
In the Administration Console for Site B, click > > > > > .
-
For single sign-on, change the contract to match the contract for the user matching expression.
-
(Conditional) If you have multiple reverse proxies and proxy services, verify the contracts on all protected services that you want enabled for single sign-on.
-
Click to save your changes, then update the Access Gateway.
-
-
Continue with Verifying the Trust Relationship with SAML 1.1.
Verifying the Trust Relationship with SAML 1.1
-
To test the trusted relationship, enter the URL for the user portal of Site B. For Site B in Figure 5-19, you would specify the following:
https://idp.siteb.novell.com:8443/nidp/app
The following login screen appears:
Use the scroll bar to see all available cards.
-
Click the card you have configured for SAML 1.1 authentication.
You are directed to Site A for login.
-
Enter the credentials for Site A.
-
Enter the password for the user at Site B.
You are directed to the target page specified in the Login URL of the authentication card.
If you disabled the option on the User Identification page, the accounts are mapped without any user interaction.
-
(Conditional) If you receive an error, try one of the following:
-
If you are not redirected to the target URL on Site B, verify the value you enter for the Login URL option. See Step 3.d.
-
If you receive an authentication error at Site B, verify the user matching setup. See Configuring User Account Matching.
-
If you have enabled logging, open the logging file (catalina.out or stdout.log) and search for the error string. There should be additional information about the cause of the error in the error string entry as well as log entries before the error sting.
-
-
(Optional) If your protected resources on Site A and Site B use the same contract, enter the URLs of these resources.
You are granted access without entering any additional credentials.
Sharing Roles
When two Identity Servers are configured to trust each other, one as an identity provider and the other as a service provider, they can be configured so that roles are shared. The following instructions are written for when both the identity provider and the service provider are NetIQ Identity Servers. If you are using a third-party identity or service providers, you need to modify the instructions.
Figure 5-20 illustrates a configuration where Identity Server of Site A is acting as an identity provider for Site B. When you configure the Identity Servers correctly, the Access Gateway can use the roles defined for the users of Site A in its policies.
Figure 5-20 Two Federated Identity Servers
The key to sharing roles is to set up the configuration so that the SAML assertion that the identity provider (Site A) sends to the service provider (Site B) contains the roles that the user has been assigned. Site B evaluates the roles and assigns them to the federated users at Site B. The Access Gateway can use these roles in its policy evaluations, and grant or deny access based on the assigned roles.
For example, when user tsmith authenticates to Site A, tsmith is assigned the role of doc. Tom, a user at Site B, is federated with the tsmith user. The doc role is shared with Site B, and Site B contains a policy that assigns users with the shared doc role to the tester role. The Access Gateway is configured with an Authorization policy that grants access to a resource when the requester is assigned the tester role. However, Tom does not have the qualifications at Site B to be assigned the tester role.
In this scenario, when Tom requests access to the protected resource at Site B, a login page with a federated link to Site A is displayed. If Tom selects to log in to Site A, Site A assigns him to the doc role. The doc role is sent with tsmith’s authentication credentials to Site B. Site B evaluates the credentials and assigns Tom to the tester role because the following conditions are met:
-
Tom is federated with tsmith.
-
tsmith was assigned the doc role.
-
The shared role and tester policies on Site B qualify the user to be assigned the tester role.
When the Access Gateway evaluates the credentials of Tom, Tom is granted access to the protected resource because he now has the tester role.
This section describes how to set up such a configuration. It assumes that the following have already been done:
-
The trusted relationship between the identity provider and service provider is set up. For configuration instructions, see Establishing Trust between Providers.
-
The following policies have been created: the doc role policy at Site A, the tester role policy at Site B, and the Authorization policy (that uses the tester role) for the Access Gateway. For information about creating a Role policy, see Section 6.2, Role Policies, and for the Authorization policy, see Assigning an Authorization Policy to a Protected Resource. The following instructions explain how to set up the shared policy.
This section explains how to configure Site A and Site B so that Site A shares its roles with Site B.
Configuring Role Sharing
There are three major tasks for configuring role sharing. You need to configure a shared attribute for transferring the roles. You need to configure the identity provider and the service provider so that the role assignments can be added to the attribute and retrieved from the attribute. Finally, you need to create a shared Role policy for each role sent to the service provider. This policy defines how the role should be processed.
The following sections describe these configuration tasks:
Defining a Shared Attribute Set
-
In the Administration Console of the Site A (the identity provider), click > > .
-
Click , then .
-
Specify a , such as role_sharing, then click .
-
Click and fill the options:
Local attribute: Select .
Remote attribute: Specify a name, such as roles. Make sure you use the same remote name in the mapping for both the identity provider and the service provider.
Leave the other options set to their default values.
-
Click , then click .
Your newly created attribute mapping appears in the list of Attribute Sets.
-
Repeat Step 1 through Step 5 on Site B (the service provider).
-
Continue with Obtaining the Role Assignments.
Obtaining the Role Assignments
-
To export the roles from the identity provider, log in to the Administration Console for the identity provider. (In Figure 5-20, this is Site A.)
-
Click > > > > > .
If you are using SAML 2.0 or SAML 1.1 protocol, the steps are the same. You just need to click the appropriate tab after clicking . The path is the same for these protocols.
-
Select the attribute set you created, then move so this attribute is sent with authentication.
-
Click .
-
Update the Identity Server of Site A.
-
-
To import the roles from the identity provider to the service provider, log in to the Administration Console for the service provider. (In Figure Figure 5-20, this is Site B.)
-
Click > > > > > .
-
Select the attribute set you created, then move so this attribute is obtained with authentication.
-
Click .
-
Update the Identity Server of Site B.
-
Continue with Configuring Policies to Process Received Roles.
-
Configuring Policies to Process Received Roles
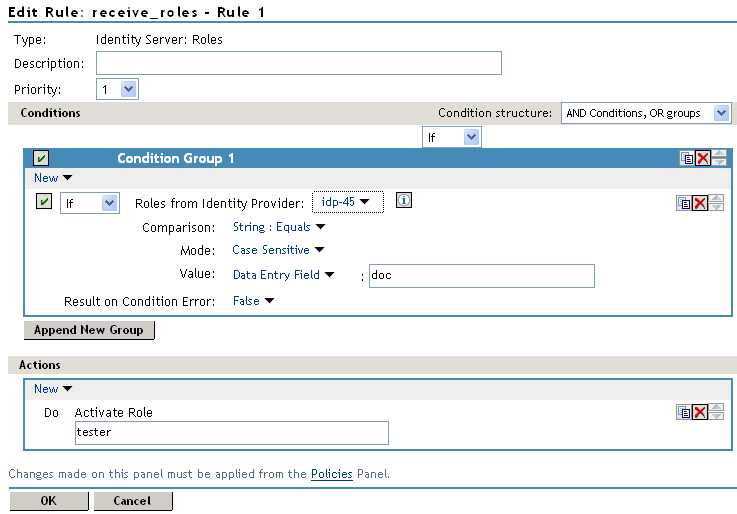
For each role that is sent from Site A, you need to create a Role policy that specifies the role that should be activated on Site B. For example, suppose the tsmith user from Site A is assigned the doc role at authentication. You can create a Role policy on Site B that assigns the tester role to anyone with the doc role from Site A.
-
Log in to the Administration Console for Site B.
-
Click > > .
-
Specify a name for the policy, select for the type, then click .
-
In the section, click , then select .
-
(Conditional) If you have federated with more than one identity provider, select the provider. If you have federated with only one identity provider, the provider is selected for you.
In this example, you have federated with only the identity provider at Site A, and it is selected for you.
-
For the value, select, then specify the name of a role that is assigned by Site A, for example doc.
If you leave set to , make sure you specify the case correctly.
-
In the section, specify the role to activate on Site B for the role received from Site A.
Your policy should look similar to the following:
-
Click twice, then click .
-
To enable the role for the Identity Server, click > > .
-
Select the role, then click .
-
(Optional) Repeat Step 2 through Step 10 for other roles assigned at Site A.
If you have other Role policies at Site A, you need to set up Role policies at Site B to have the roles activated. For example, if Site A had a Tester Role policy and you wanted users assigned to the Tester Role policy to also be assigned to the Tester Role policy at Site B, you could create a separate policy for this activation, or you could add an Or condition group with a value field of tester to the policy in Step 7. The policy would assign federated users who belonged to the doc or tester roles at Site A, to the tester role at Site B.
-
To test role sharing:
-
Enter the URL of a protected resource that requires a role for access. For the policy above, it would be a resource requiring the tester role.
-
Click the federated link to Site A.
-
Log in with the credentials of a user who is assigned the doc role.
You are granted access to the resource. If you are denied access, continue with Verifying the Configuration to discover the problem.
-
Verifying the Configuration
This section traces the role assignment from the Identity Server that assigns it to the user, through the Identity Server that receives the roles with the user’s authentication assertion, to the policy evaluation. If you are having trouble, this should help you determine the source of the problem.
The following procedures refer to the configuration displayed in Figure 5-20, Two Federated Identity Servers. A tsmith user from Site A, who is assigned the doc role, is federated with a Tom user at Site B. Site B does not assign Tom the tester role. The Web server has been configured to protect the bugz site, which requires the tester role.
To verify the configuration:
-
Make sure policy logging is enabled on the identity provider and the service provider. Make sure that you enable at least Application logging at an Info level.
For configuration procedures, see Section 17.3.1, Configuring Logging for Identity Server.
You can access log files for downloading and viewing by clicking > .
-
Have a user access a resource that is protected by a policy requiring a role from Site A.
For this trace, the tsmith user from Site A requests access to the bugz page. The user uses the federated link and logs in with the credentials of the tsmith user.
-
Verify that Site A is assigning the user the role.
-
View the catalina.out file (Linux) or the stdout.log file (Windows) of the Identity Server at Site A.
-
Search for the name of the role. You should find a line similar to the following:
<amLogEntry> 2009-08-22T20:30:19Z INFO NIDS Application: AM#500105013: AMDEVICEID#C5F467BA50B009AC: AMAUTHID#DEEF6BEC3655DEB71CA56832DDDF866E: Authenticated user cn=tsmith,o=novell in User Store sitea-nids-user-store with roles doc,authenticated. </amLogEntry>
If the role you need is not listed, look at the policy evaluation trace to discover why the user has not been assigned the role. For more information about how to understand role traces, see Role Assignment Traces.
-
-
Verify that Site A is sending an authentication assertion to Site B.
In the catalina.out file (Linux) or the stdout.log file (Windows) of the Identity Server from Site A, look for lines similar to the following:
<amLogEntry> 2009-08-22T20:30:19Z INFO NIDS Application: AM#500105018: AMDEVICEID#C5F467BA50B009AC: AMAUTHID#DEEF6BEC3655DEB71CA56832DDDF866E: Responding to AuthnRequest with artifact AAPLsCVpfv3ha9Mpn+cUiCXcf3D63sc0QfscL5mZaaygHBKVOOh9aPSQ </amLogEntry>

<amLogEntry> 2009-08-22T20:30:19Z INFO NIDS Application: AM#500105019: AMDEVICEID#C5F467BA50B009AC: AMAUTHID#F8B1C147EB3DDEFE9A3DB0827BA8E4A3: Sending AuthnResponse in response to artifact AAPLsCVpfv3ha9Mpn+cUiCXcf3D63sc0QfscL5mZaaygHBKVOOh9aPSQ </amLogEntry>
If you do not see these types of entries, verify that you have configured Site A to send the roles. See Obtaining the Role Assignments.
-
Verify that Site B is receiving the SAML assertion with the roles.
In the catalina.out file (Linux) or the stdout.log file (Windows) of the Identity Server from Site B, look for lines similar to the following:
<amLogEntry> 2009-08-22T20:30:19Z INFO NIDS Application: AM#500105020: AMDEVICEID#488475009C6D3DDF: AMAUTHID#0FBA0CF7E41E6C7F9121DABB918D34F4: Received and processing artifact from IDP - AAPLsCVpfv3ha9Mpn+cUiCXcf3D63sc0QfscL5mZaaygHBKVOOh9aPSQ </amLogEntry>

<amLogEntry> 2009-08-22T20:30:19Z INFO NIDS Application: AM#500105021: AMDEVICEID#488475009C6D3DDF: AMAUTHID#0FBA0CF7E41E6C7F9121DABB918D34F4: Sending artifact AAPLsCVpfv3ha9Mpn+cUiCXcf3D63sc0QfscL5mZaaygHBKVOOh9aPSQ to URL https://rholm.provo.novell.com:8443/nidp/idff/soap at IDP </amLogEntry>
The artifact ID should be the same as the artifact ID in Step 4.
If you do not see these types of entries, verify that you have configured Site B to receive the roles. See Obtaining the Role Assignments.
-
Verify that Site B is evaluating the received role assignments and activating the roles.
In the catalina.out file (Linux) or the stdout.log file (Windows) of the Identity Server from Site B, search for a policy evaluation for RolesFromIdentityProvider. You should find lines similar to the following:
~~CO~1~RolesFromIdentityProvider(6670):https://ipd.sitea.provo.novell.com:
8443/nidp/idff/metadata:TESTER,DOC,AUTHENTICATED~com.novell.nxpe.condition.
NxpeOperator@string-equals~(0):hidden-param:hidden-value:~~~True(69)

~~PA~ActionID_1203705845727~~AddRole~tester~~~Success(0)

<amLogEntry> 2009-08-22T20:30:20Z INFO NIDS Application: AM#500105013: AMDEVICEID#488475009C6D3DDF: AMAUTHID#0FBA0CF7E41E6C7F9121DABB918D34F4: Authenticated user cn=Tom,o=novell in User Store Internal with roles tester,authenticated. </amLogEntry>
The policy evaluation shows that the condition evaluates to true and that the tester role is activated. Tom is the user that is federated with the tsmith user, and the entry shows that Tom has been assigned the tester role.
If you do not see a policy evaluation for RolesFromIdentityProvider, make sure you have created such a Role policy and that you have enabled it. See Configuring Policies to Process Received Roles.
-
If the use has been assigned the correct role, the last step is to verify how the embedded service provider evaluated the policy protecting the resource.
In the catatina.out file of the ipd-esp file for the Access Gateway, search for lines similar to the following for the authorization policy trace:
<amLogEntry> 2009-08-22T20:30:20Z INFO NIDS Application: AM#501102050: AMDEVICEID#esp-2559E77C93738D15: AMAUTHID#BCF3CB40B51E8A0AF8582BEF762B4DDD: PolicyID#65LN233O-KN19-1L7M-176M-P942LMN6P832: NXPESID#1411: AGAuthorization Policy Trace:
 ~~RL~1~~~~Rule Count: 2~~Success(0)
 ~~RU~RuleID_1198874340999~Allow_Tester~DNF~~1:1~~Success(0)
 ~~CS~1~~ANDs~~1~~True(69)
 ~~CO~1~CurrentRoles(6660):no-param:TESTER,AUTHENTICATED~com. novell.nxpe.condition.NxpeOperator@string-substring~SelectedRole (6661):hidden-param:hidden-value:~~~True(69)
 ~~PA~1~~Permit Access~~~~Success(0)
 ~~PC~1~~Document=(ou=xpemlPEP,ou=mastercdn,ou=ContentPublisher Container,ou=Partition,ou=PartitionsContainer,ou=VCDN_Root,ou=accessManagerContainer,o=novell:romaContentCollectionXMLDoc),Policy=(Allow_Tester),Rule=(1::RuleID_1198874340999),Action=(Permit::1)~~~~Success(0)
 </amLogEntry>
If the PA line does not evaluate to Permit Access, then you need to review the Authorization policy and discover the conditions, other than the tester role, that must be met to permit access.
Setting Up Federation with Third-Party Providers
Setting up federation with providers other than NetIQ Identity Servers requires the same basic tasks as setting up federation with NetIQ Identity Servers, with some modifications.
When you set up federation with identity providers and service providers that are controlled by a single company, you have access to the Administration Consoles for both Identity Servers and know the admin credentials. When setting up federation with another company, additional steps are required.
-
You need to negotiate with the other company and gain approval for federation because metadata must be shared and both sites require configuration. You need to negotiate a schedule for these configuration changes.
-
The other site might not be using Access Manager for its identity or service provider. The basic tasks need to be modified to accommodate how that implementation shares metadata, authentication methods, and roles.
-
Many SAML 1.1 providers do not support a metadata URL, and the data must be imported manually.
For example, instead of sharing URLs that allow you to import metadata, you might need to share the actual metadata and paste it into the configuration. The NetIQ Identity Server validates the metadata of another identity provider or service provider; some implementations do not validate it. If the Identity Server determines that the metadata is invalid, you need to negotiate with the provider to send you metadata that has been validated.
-
Most third-party providers do not support authentication cards and contracts. However, most do support either authentication types or authentication URIs. You can use either of these to map from their authentication procedure to an Identity Server authentication contract.
For sample implementations with third-party providers that explain the modifications that were required to set up the federation, see the following:
5.2.2 Service Provider Brokering
The Service Provider Brokering (SP Brokering) feature enables the Identity Server to act as a federation gateway or a service provider broker. This federation gateway allows you to connect to different protocols such as Liberty, SAML 1.1, and SAML 2.0. You can use SP Brokering with the Intersite Transfer service of the identity provider. Intersite Transfer service enables authentication at a trusted service provider.SP Brokering helps companies establish trust between identity providers and their service providers that support different federation protocols. For example, an identity provider that supports SAML 2.0 can provide authentication to a Liberty or SAML 1.1 service provider by using SP broker.
SP Brokering helps reduce the number of trust relationships between an identity provider and their service provider. For example, identity providers can now provide authentication to their service providers by establishing a single trust relationship instead of multiple trust relationships. Similarly, a service provider must establish a single trust relationship with SP Broker to receive authentication from several identity providers.
You can control the authentication flow between several identity providers and service providers in a federation circle by allowing the administrator to configure policies that control Intersite Transfers. For example, an administrator can configure a policy with SP Broker that allows only certain users from an identity provider to be authenticated at a given service provider.
An Intersite Transfer URL has the following format: https://<identity provider>/idpsend?PID=<Service Provider ID>&TARGET=<final_destination_URL>
This Intersite Transfer URL consists of three parts:
-
https://<identity provider>: The user can authenticate at the identity provider.
-
/idpsend?PID=<Service Provider ID>: Authentication occurs at the service provider represented by the service provider ID at the identity provider.
-
&TARGET=<final_destination_URL: The user is finally redirected to the specified target URL associated with the service provider.
A Web page is created with many Intersite Transfer URLs for each combination of identity provider, service provider, and the target application.
For more information about the Intersite Transfer Service, see Section 3.9.10, Using the Intersite Transfer Service.
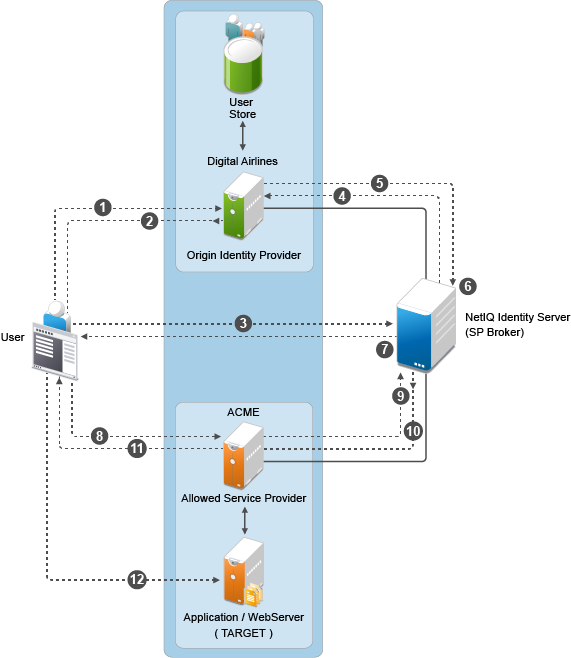
This following illustration explains the flow of providing access to the target URL by using SP Brokering:
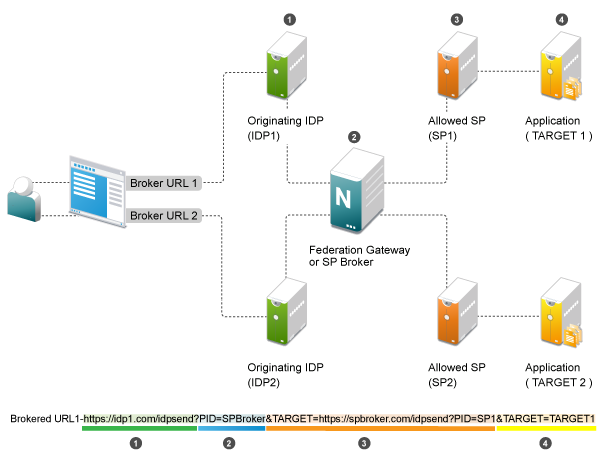
Web Page (User Portal): A Web page (user portal) is created with a list of URLs called Brokered URLs, which provide access to various target applications.
Originating Identity Providers: The Originating Identity Provider is the identity provider with which the user credentials are stored for authentication. The Origin IDP must be configured as a Liberty/SAML1.1/SAML2.0 trusted identity provider in the SP Broker.
Federation Gateway or SP Broker: The Federation Gateway or SP Broker is a NetIQ identity provider that can be configured to control the authentication between several Origin IDPs and Allowed SPs in a federation circle.
Allowed Service Provider: The Allowed SP is the service provider in which the SP Broker provides authentication. The allowed SP must be configured as a Liberty/SAML1.1/SAML2.0 trusted service provider on SP Broker.
Target Application: The target application is the application running on a Web Sever that is protected by the service provider.
Broker URL: A Broker URL is a specially designed Intersite Transfer URL, which consists of four parts. You can click the brokered URL, which results in the following:
-
You must authenticate with the Originating IDP (https://idp1.com/idpsend).
-
The Origin IDP causes an authentication to occur at the SP Broker (?PID=SPBroker).
-
The SP Broker causes an authentication to occur at the allowed SP (TARGET=https://spbroker.com/idpsend?PID=SP1).
-
You are redirected to the target application (?TARGET=TARGET1).
SP Brokering requests are the Intersite Transfers resulting from brokered URLs processed on the SP Broker. The SP Broker can control the brokering requests before providing an authentication to the service provider. The SP Broker enforces the policies configured by the administrator by either causing the authentication at the service provider or by denying the request.
The SP Broker provides the following options to configure policies that control SP brokering requests:
-
A set of SAML 1.1, SAML 2.0 and Liberty trusted identity providers and trusted service providers can be configured as a brokering group. The brokering request is allowed only if the Origin identity provider and Allowed service provider belong to the same brokering group. Brokering Request is not allowed from an Origin identity provider of one group to an Allowed service provider of another group.
-
In a brokering group, a set of brokering rules can be configured that provides granular control on the brokering requests. For example, a brokering rule can be configured to deny a brokering request from an Origin identity provider to an Allowed service provider, if the user satisfies a certain condition at the SP Broker.
SP brokering is enabled on the Identity Server only if at least one brokering group is enabled. If an Intersite Transfer request is received with neither the origin identity provider nor the Allowed service provider in any of the brokering group, the request is treated as a regular Intersite Transfer and SP brokering controls are not applied.
This chapter provides information about configuring the Access Manager SP Brokering functionalities, various deployment scenarios, and associated configuration details.
Configuring a SP Broker
This section describes how to configure the origin identity provider to act as a SP Broker or a federation hub and also control authentications provided by the Origin identity providers to their Allowed service providers.
Prerequisites
-
Identify the Origin identity providers and their Allowed service providers. For example, Company 1 establishes a business partnership with Partner 1, at which Company 1 users can access the application of Partner 1. In this case, identity provider at Company 1, is now the Origin identity provider and Allowed service provider is the service provider at Partner 1, and controls access to its applications.
-
Identify the federation protocols supported by the Origin identity providers and their Allowed service providers. NetIQ Identity Provider supports SP brokering for SAML 2.0, Liberty, or SAML 1.1 federations.
-
Identify whether Persistent or Transient federations needs to be established between Company 1 and Partner 1. For Persistent federation, the user that is authenticated at the Origin identity provider must be mapped to a valid user at their Allowed service provider. For Transient federation, the user is provided with a temporary identity at the Allowed service provider.
Configuration Flow
The following diagram depicts the various configuration steps involved in enabling the SP Brokering feature assuming SP Brokering is enabled between Company 1 and Partner 1:
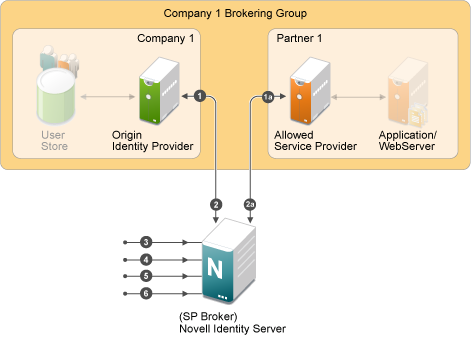
Step 1: Establish Federation at Origin Identity Providers to SP Broker
-
The SP Broker must be configured as the service provider at origin identity provider of Company 1.
For more information, see Creating a Trusted Service Provider for SAML 1.1.
If NetIQ identity provider is the Origin identity provider, refer.
For more information, see Creating a Trusted Service Provider for SAML 2.0.
Step 1a: Establish Federation at Allowed Service Providers to SP Broker
The SP Broker must be configured as the identity provider at the allowed service provider of Partner 1.
For more information, see Creating a Trusted Identity Provider.
If NetIQ identity provider is the allowed service provider, refer.
For more information, see Creating a Trusted Service Provider for SAML 2.0.
NOTE:Step 1 must be repeated for each of the origin identity provider in the federation circle and step 1a must be repeated for each of the allowed service provider in the federation circle.
Step 2: Establish Federations at SP Broker for Origin Identity Providers and their Allowed Service Providers
At the SP Broker, configure origin identity provider of Company 1 as the identity provider. The federation protocol (SAML 1.1/ SAML 2.0/ Liberty) and the federation type (Persistent or Transient) must match the federation protocol and federation type that is used for the respective origin identity provider in the step 1 above.
For more information, see Creating a Trusted Service Provider for SAML 1.1, Creating a Trusted Service Provider for Liberty, and Creating a Trusted Service Provider for SAML 2.0.
Step 2a:
At the SP Broker, configure the allowed service provider of Partner 1 as the service provider. The federation protocol (SAML 1.1/ SAML2.0/ Liberty) and the federation type (Persistent or Transient) must match the federation protocol and the federation type that is used for the respective allowed service provider in the Step1a above.
For more information, see Creating a Trusted Identity Provider.
For more information, see Creating a Trusted Service Provider for SAML 2.0.
NOTE:Step 2 must be repeated for each of the origin identity provider in the federation circle and Step 2a must be repeated for each of the allowed service provider in the federation circle.
Step 3: Configure the Attribute to be Cached at the SP Broker (Optional)
If the target applications require user information, then this information must be passed along with the authentication by the origin identity provider. At the SP Broker, these attributes that are received at the authentication must be cached and sent to the allowed service provider during authentication.
For more information, see Configuring the Attributes Obtained at Authentication.
For more information, see Configuring the Attributes Sent with Authentication.
Step 4: Create Brokering Group for the Federation Circle with the Origin Identity Providers and their Allowed Service Providers
Create a new brokering group in the SP Broker. Company 1 identity provider and Partner 1 service provider must be selected as the origin identity provider and their allowed service provider.
For more information, see Creating a Brokering Group.
The SP Brokering is enabled when at least one brokering group is enabled. Origin identity providers and their allowed service providers can either be added while creating the brokering group or added/deleted by editing the brokering group.
Step 5: Create Brokering Rules for the Brokering Group
Create brokering rules that provide granular control on the brokering requests. For example, a brokering rule can be configured which can deny a brokering request from an origin identity provider to an Allowed service provider, if the user satisfies a certain role at the SP Broker.
For more information, see Configuring Brokering Rules.
To use roles in the brokering rules, identity role policies must be configured on NetIQ identity provider acting as an SP Broker. Roles can be associated for the user at the SP Broker according to the various parameters that include roles sent by the origin identity provider, attribute values sent from the identity provider.
For more information, see Section 6.2.2, Enabling Role-Based Access Control.
Several rules can be configured for a brokering group. To help administrators understand how the rules are applied, a Rule Validation user interface is provided under each brokering group.
For more information, see Validating Brokering Rules.
Step 6: Create and Configure Brokering URLs
The users at Company 1 are provided with a portal page containing URLs to access the applications at the service provider of Partner 1. These URLs are called Brokering URLs and are designed to pass through the SP Broker. The URLs consists of information that are embedded and a tool is provided to construct these URLs. The administrator can create URLs from a given origin identity provider to their allowed service provider to access a given target application specified by a target URL. The URLs constructed are placed in the users’ portal page.
For more information, see Constructing Brokering URLs.
Configuring a Brokering for Authorization of Service Providers
Authorization rules for authorizing service provider requests must be configured from the Access Manager Brokering page. To configure authorization policy, configure the broker rule policy. Ensure that the service providers are configured to the local Identity Server that will be evaluated during authorization. Figure 5-21 displays the sample configuration.
Figure 5-21 SAMl2 Service Provider Initiated Authorization Rule Configuration
Creating and Viewing Brokering Groups
The identity server cluster configuration provides a tab that you can use to configure the groups and generate brokered URLs.
-
In the Administration Console, click > > .
-
The tab allows you to create new Groups as well as display the configured Groups.The Display Brokering Groups page displays the list of groups configured.
You can also create, delete, enable, and disable the brokering group on this page.
-
The Display Brokering Groups page displays the following information for each group:
Group Name: Specifies a unique name to identify the group. When you click on the hyperlink, you can view the Group Details page, where the Group configuration such as name and list of Identity Providers and Service Providers can be modified.
Enabled: A check mark indicates that brokering is enabled for the group by applying theconfigured rules. A blank means that brokering is disabled.
Identity Providers: Display the total number of Liberty/SAML1.1/SAML2 IDPs assigned to this group.
Service Providers: Display the total number of Liberty/SAML1.1/SAML2 SPs assigned to this group.
Brokering Rules: If the rules are not configured, then “No Rules Config” is displayed. The default rule allows for brokering between any IDP to any SP in the group. If new rules are configured, then the first rule name is displayed along with the count of total rules.
Creating a Brokering Group
When a brokering group is created while grouping the brokering feature, following rules are applicable:
-
Brokering is not allowed among different company groups.
The brokering is not allowed between the logical customers of Company 1 Brokering Group and Company 2 Brokering Group.
-
Brokering is allowed among different partners of the company group.
Brokering is allowed between the brokering groups of Company 1 Brokering Group and Company 2 Brokering Group.
-
Role based brokering is allowed among Company 1 and Partner 1 logical customers.
-
Role based brokering is allowed among Company 2 and Partner 2 logical customers.
-
-
Brokering is allowed among different partners based on roles and groups authentication of the company.
To create a new broker group follow these steps:
-
In the Administration Console, click > > .
-
Click. The Creating Brokering Group page displays.
-
Perform the following actions in the fields:
Display Name: Specify the brokering group display name.
Selected IDPs: Select at least one trusted IDP using navigation button.
Selected SPs: Select at least one trusted SP using navigation button.
Available Trusted IDPs: Displays Liberty/SAML1.1/SAML2.0 trusted IDP configured on the given IDP cluster (idp_cluster1).
Available Trusted SPs: Displays Liberty/SAML1.1/SAML2.0 Trusted Service Providers configured on the given Identity Provider Cluster (idp_cluster1).
-
Click to complete creation of the brokering group creation.
Configuring Trusted Identity Providers and Service Providers
You can configure the rules between the trusted identity providers and service providers by configuring rules, roles, and actions. You can view the configured rules, create new, delete the existing rule, edit the rules, enable and disable the configured rules.
You can configure the service providers and identity providers for all of the protocols in the Identity Server, which are configured in the Identity Server cluster. Using the brokering group, you can view the list of available service providers and identity providers in the selection box. Using the arrow keys, configure the trusted identity providers and trusted service providers for the respective brokering group.
-
In the Administration Console, click > > . The Configuration page displays the and tabs.
-
Click tab.
-
Specify the display name and configure the brokering groups.
Display Name: Specify the display name of the configuring brokering group.
Select IDPs: Configure the selected identity providers using the arrow keys from the available trusted IDPs.
Available Trusted IDPs: Configure the available trusted identity providers using the arrow keys from selection box.
Selected SPs: Configure the selected service providers using the arrow keys from the selection box.
Available Trusted SPs: Configure the available trusted service providers using the arrow keys from the selection box.
-
Click to continue and the configured service providers and identity providers details are displayed in the Brokering page.
-
Click to complete the rules configuration for the brokering group.
-
Click to see the configuration changes.
NOTE:When you log out from the Access Gateway device, then the logout is not propagated on the other Identity Servers if you have SAML 1.1 as one of the trusted provider in the brokering group.
Configuring Brokering Rules
You can create, edit, delete, enable, and the disable brokering rules.
-
In the Administration Console, click > > .
-
Click the existing or newly created Brokering Group hyperlink.
-
Click . The Brokering Group Rules page is displayed.
Name: Displays the rule name of the brokering group.
Enabled: Displays the status of the brokering group rule.
Identity Providers: Displays the number of identity providers configured to the brokering group.
Service Providers: Displays the number of service providers configured to the brokering group.
Priority: Displays the brokering group rule priority number.
Actions: Displays the configured brokering group rule action status either as permit or deny.
Role Conditions: Displays the brokering group role condition, such as manager and emplyee , configured on the rule page.
-
Click to continue and display the configured brokering group rule details on the Brokering Rules page.
-
Click to see the brokering rule configuration changes.
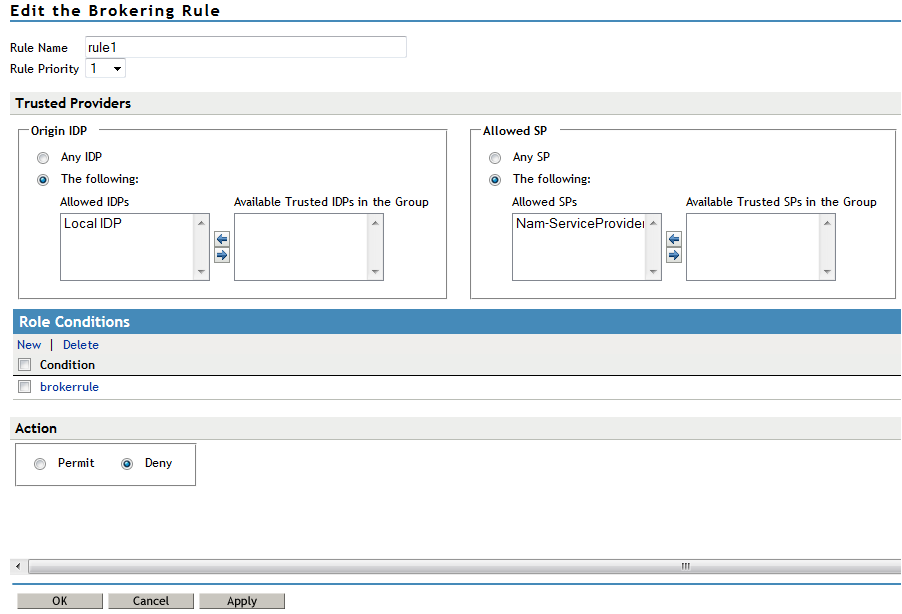
Creating a Brokering Rule
You can configure the rules to the created brokering groups.
-
In the Administration Console, click > > .
-
Click the existing or newly created Brokering Group hyperlink.
-
Click . The Creating Brokering Group page displays.
Rule Name: Specify the name of the rule.
Rule Priority: Select the rule priority from the drop-down list.
NOTE:The default rule specified during creation of the group has a priority of 1. Additional rules can be added, and existing rules can be deleted or modified. You can use the Edit Rules Page to modify the priority of the rules.
Origin IDP: Displays all Identity Servers or one or more Identity Servers that are available in the group.
Allowed SP: Displays all service providers or one or more service providers that are available in the group.
Role Conditions: Displays the brokering group role condition such as manager and employee, configured on the rule page.
Actions: Select the Permit or Deny action radio button for the rule you configure to the brokering group.
NOTE:By default, Access Manager allows any role. If you want to allow access to only particular roles, configure a permit condition for roles with higher priority and configure a deny condition in which no roles are defined with lower priority.
-
Click to complete configuration of rules for the brokering group.
Deleting a Brokering Rule
-
In the Administration Console, click > > > .
-
Select the check box of the brokering group rule you want to delete, then click . A message is displayed as “Delete selected brokering rule(s)?”.
-
Click to continue.
Enabling a Brokering Rule
-
In the Administration Console, click > > > > > .
-
Select the check box of the brokering group rule you want to enable.
-
Click .The selected brokering group is enabled.
Disabling a Brokering Rule
-
In the Administration Console, click > > > > > .
-
Select the check box of the brokering group you want to disable from the brokering group rule configuration.
-
Click . The selected brokering group is disabled.
Editing Brokering Rules
You can edit the group rules in the Brokering page.
-
In the Administration Console, click > > > .
-
Click the existing or newly created brokering group hyperlink.
-
Click tab.
-
Click the Brokering Rules hyperlink to edit the information. The Edit Brokering Rule page displays the information. You can also edit the information.
You can edit all the fields and modify the information about the Create Brokering Rule page. For more information about create brokering rule, see Creating a Brokering Rule
Constructing Brokering URLs
The Construct URL page helps you to create a URL, which you use in your application to navigate to your trusted partners.
You can generate the URL according to the origin and allowed service provider Identity Servers.
-
In the Administration Console, click > > .
-
Click the existing or newly created brokering group hyperlink.
-
Click .
IDP Type: Select the Identity Provider type from the drop-down list. The three types of IDP in the drop-down list are Local IDP, NetIQ IDP, and Other IDP. If you select NetIQ IDP as the IDP type, then you can select the Origin IDP from the drop-down list. If you select Other IDP as the IDP type, you can enter the Origin IDP URL and you can select the Origin IDP from the drop-down list.
Origin IDP: The Origin identity providers are the trusted providers. The drop-down list displays all the trusted providers created for the specific NetIQ brokering group. Select the Origin IDP from the drop-down list.
NOTE:If the Origin IDP drop-down list does not list any trusted providers, it is because a local Identity Server exists as a trusted provider. To resolve this, add another Identity Server to the NetIQ brokering group
Origin IDP URL: If you select Other IDP as the IDP type, you can enter the Origin IDP URL manually. The <OriginIDPURL> represents (protocol :// domain : port / path ? querystring).
Provider Parameter Name: If you select Other IDP as the IDP Type, you can enter the trusted provider parameter ID. For more information about Intersite Transfer Service target for a service provider, see Configuring an Intersite Transfer Service Target for a Service Provider
Target Parameter Name: If you select Other IDP as the IDP type, you can enter the target provider parameter name manually.
Allowed SP: The allowed service providers are the selected service providers of the trusted roviders. The drop-down list displays all the service providers created for the specific brokering group. Select the service providers from the drop-down list.
Target URL: Specify the target URL for the specific trusted providers and service provider pair. This URL will be appended to the login URL. Click to generate the login URL
Login URL: The login URL consists of Origin IDP URL and the target URL.
-
Click to close the Construct URL page.
Validating Brokering Rules
The rule validation page helps you to validate the Origin identity providers and the allowed service provider rule according to the role associated with the respective trusted partners.
-
In the Administration Console, click > > .
-
Click on the existing or newly created brokering group hyperlink.
-
Click the tab.
Origin IDP: The Origin identity providers are the trusted providers. The drop-down list displays all the trusted providers created for the specific NetIQ brokering group. Select the Origin identity providers from the drop-down list.
Allowed SP: The Allowed SPs are the selected SPs of the trusted providers. The drop-down list displays all the service providers created for the specific brokering group. Select the service providers from the drop-down list
Role: Specify the role you want to validate for the selected Origin identity trusted providers and allowed SP. Click the Validate Rule.
A list is displayed according to the rule validation for the selected trusted providers, role, and permission.
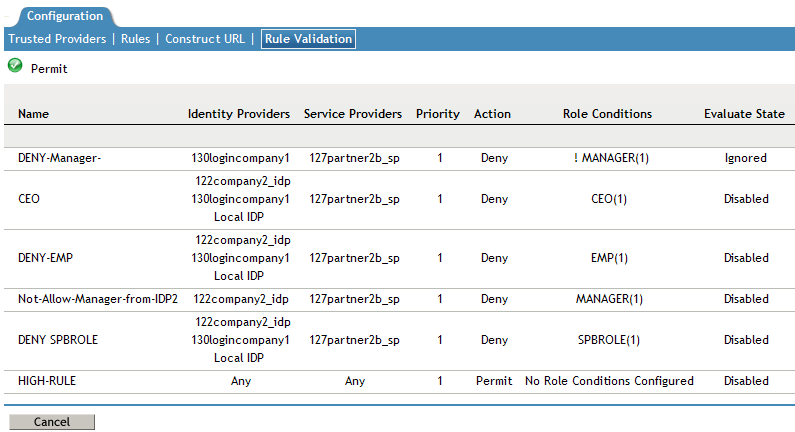
Name: Displays the role name of the selected trusted providers.
Identity Providers: Displays the identity provider name.
Service Providers: Displays the service provider name.
Priority: In ascending order, displays the priority number of the rule validation of the selected trusted providers.
Action: Displays the permission action for validation of the selected trusted providers rule validation.
Role Conditions: Displays the role conditions for the selected trusted providers rule validation. Denial takes precedence over Permit.
Evaluate State: Displays the role conditions evaluate state for the selected trusted providers rule validation. You can see diffferent evaluation states in the role conditions.
Pass 1: If the rule matches the Origin identity provider, allowed service provider or any roles mentioned.
Pass2: If the rule matches the Origin identity provider, allowed service provider or any specific role mentioned.
Ignored: If the rule does not match either Pass 1 or Pass 2 .
Not Executed: The default state of all the roles.
NOTE:If the rule has the evaluate State as Pass 1 action as Deny, then the remaining rules are in the non-executed state.
After a rule has the evaluate state as Pass 2, regardless of the action, the remaining rules are in the non-executed state.
The rules before Pass 1, should have the evaluate state of Ignored. All these ignored rules should have the role condition as , without specifying any role condition.
Pass 1 evaluation stops, as soon as a match for the Origin identity provider and allowed service provider is found with specific to some role condition.
-
Click to close the Rule Validation page.
Generating the Brokering URLs by Using an ID and Target in the Intersite Transfer Service
You can generate the brokering URL’s using the ID of the target. You can use this value to simplify the Intersite Transfer Service URL that must be configured at the service provider. For more information, see Configuring an Intersite Transfer Service Target for a Service Provider.
-
In the Administration Console, click or click > >.
-
ID: Specify the ID value of the target.
-
Target: Specify the URL of the page that you want to display to users when they authenticate with an Intersite Transfer URL.The behavior of this option is influenced by the option. If you are using the target ID as part of the Intersite Transfer URL and did not specify a target in the URL, you need to specify the target in this field. For example, if you enter the target URL as it appears below, then it will be displayed when you select option.
https://login.company1.com:8443/nidp/saml2/idpsend?id=217ID&TARGET=https%3A%2F%2FSPBROKER1.labs.blr.novell.com%3A8443%2Fnidp%2Fsaml2%2Fidpsend%3FPID%3Dhttps%3A%2F%2Flogin.partner2B.com%3A8443%2Fnidp%2Fsaml2%2Fmetadata%26TARGET%3Dhttps%3A%2F%2Fpartner2b.com
-
Allow any Target: Select this option to use the target that was specified in the Intersite Transfer URL. If this option is not selected, the target value in the Intersite Transfer URL is ignored and you can see the URL specified in the option.
Assigning The Local Roles Based On Remote Roles And Attributes
You are able to configure the attributes based on the roles you select in the Attribute set field. You are able to log in and authenticated based on roles federated in the Origin Identity Provider, Target Service Provider and the Brokering Service Provider configuration.
Origin Identity Provider Role Attribute Configuration
-
In the Administration Console, click > > The window displays.
-
Select the local attribute name from the drop-down list
-
Enter the remote attribute name for the selected local attribute.
-
Click to add the remote attribute name. The newly added attribute displays in the Mapping list.
-
In the Administration Console, click
-
Select the role from drop-down list in the .
-
Using the arrows map the attributes in the and .
-
Click to map the set role and attribute of the origin Identity Provider.
Target Identity Provider Role Attribute Configuration
-
In the Administration Console, click > > The window displays.
-
Select the local attribute name from the drop-down list
-
Enter the remote attribute name for the selected local attribute.
-
Click to add the remote attribute name. The newly added attribute displays in the Mapping list.
-
In the Administration Console, click
-
Select the role from drop-down list in the .
-
Using the arrows map the attributes in the and .
-
Click to map and set the attribute changes to the selected role of the target Identity Service Provider.
Brokering Service Provider Role Attribute Configuration
The roles set and the attribute configured in origin identity provider and the target service provider is added and mapped in the brokering service provider attribute configuration.
-
In the Administration Console, click > > The window displays.
-
Select the local attribute name from the drop-down list
-
Enter the remote attribute name for the selected local attribute.
-
Click to add the remote attribute name. The newly added attribute displays in the Mapping list.
-
In the Administration Console, click or click
-
Select the role from drop-down list in .
-
Using the arrows map the attributes in and .
-
Click to set the role and configure the attribute mappings.
SP Brokering Example
This example explains how SP Brokering works. Let us assume that two companies Digital Airlines and ACME are business partners. There are certain applications that users of both Digital Airlines and ACME require to access.
With SP Brokering, users in Digital Airlines are provided with an intersite transfer URL that allows users to authenticate at Digital Airlines, set the assertion at ACME, and give access to the target application. With this approach, users do not have to choose from different authentication cards.
The following diagram depicts the SP Brokering workflow:
Workflow:
-
A user is authenticated at Digital Airlines identity provider. The user clicks Broker URL. Digital Airlines checks if this user is authenticated. If not, it asks for user credentials and authenticates the user.
-
Digital Airlines identity provider processes an intersite URL and creates an assertion for SP Broker (NetIQ Identity Server).
-
SP Broker receives the assertion and validates that this assertion is received from a trusted identity provider.
-
SP Broker checks if the trusted identity provider and the service provider (available in the target URL) belong to the same group. SP Broker denies the request if both do not belong to same group.
-
SP Broker sends a request to Digital Airlines identity provider to resolve the artifact.
-
SP Broker receives the SAML assertion from Digital Airlines identity provider and caches attributes/roles received. SP Broker applies any Role policies that have been enabled.
-
SP Broker performs intersite transfer. In the processing of intersite transfer, SP Broker checks if this user was a result of SP Brokering (step 4 earlier). SP Broker enforces the SP Brokering rules check: if any of the rules result in deny, an error page is displayed.
-
SP Broker creates an assertion for ACME.
-
ACME sends a request to SP Broker to resolve the artifact.
-
ACME receives the SAML assertion from the SP Broker along with roles/attributes.
-
ACME sends a redirect to the final target URL. (Note: Redirect happens from ACME’s ESP to ACME’s identity provider where the user is already authenticated.)
-
The user accesses the target application.
5.2.3 Configuring User Identification Methods for Federation
Configuring authentication involves determining how the service provider interacts with the identity provider during user authentication and federation. Three methods exist for you to identify users from a trusted identity provider:
-
You can identify users by matching their authentication credentials
-
You can match selected attributes and then prompt for a password to verify the match, or you can use just the attributes for the match.
-
You can assume that the user does not have an account and create new accounts with user provisioning. You can also allow for provisioning when the matching methods fail. If there are problems during provisioning, you see error messages with more information.
The following sections describe how to configure these methods:
Defining User Identification for Liberty and SAML 2.0
Selecting a User Identification Method for Liberty or SAML 2.0
User identification determines how an account at the identity provider is matched with an account at the service provider. If federation is enabled between the two, the user can set up a permanent relationship between the two accounts. If federation is not enabled (see Configuring a SAML 2.0 Authentication Request and Configuring a Liberty Authentication Request), you cannot set up a user identification method.
-
In the Administration Console, click > > > > > .
-
Specify how users are identified on the SAML 2.0 or Liberty provider. Select one of the following methods:
-
Authenticate: Select this option when you want to use login credentials. This option prompts the user to log in at both the identity provider and the service provider on first access. If the user selects to federate, the user is prompted, on subsequent logins, to authenticate only to the identity provider.
-
Allow ‘Provisioning’: Select this option to allow users to create an account when they have no account on the service provider.
This option requires that you specify a user provisioning method.
-
-
Provision account: Select this option when the users on the identity provider do not have accounts on the service provider. This option allows the service provider to trust any user that has authenticated to the trusted identity provider
This option requires that you specify a user provisioning method.
-
Attribute matching: Select this option when you want to use attributes to match an identity server account with a service provider account. This option requires that you specify a user matching method.
-
Prompt for password on successful match: Select this option to prompt the user for a password when the user’s name is matched to an account, to ensure that the account matches.
-
NOTE:If you have selected Transient user mapping while configuring the name identifier format, the and options are not displayed for SAML 2.0.
-
-
Select one of the following:
-
If you selected the option, select a method, then click . If you have not created a matching method, continue with Configuring the Attribute Matching Method for Liberty or SAML 2.0.
-
If you selected the option, select a method, then click . If you have not created a provisioning method, continue with Defining the User Provisioning Method.
-
If you selected the option with the option, select a method, then click . If you have not created a provisioning method, continue with Defining the User Provisioning Method.
-
If you selected the option without the option, click .
-
-
Configure the post authentication method.
Selected Methods: Using the arrow keys to move methods from the list to the Selected list. The selected method is executed when post remote authentication completes.
For example if you select the passwordfetch method, this method is executed at the service provider after the identity provider authentication and federation completes.
Logout on method execution failure: If you select this check box, then whenever there is a session failure, the user is logged out automatically.
-
Configure the session options.
Allow IDP to set session timeout: Select Allow Identity Provider to set session timeout between the principal identified by the subject and the SAML authority based on attribute in SAML assertion of .
Overwrite Temporary User: If you select this check box, then the temporary user credentials profile got form previous authentication method in the same session will be overwritten with real user credentials profile got from this authentication method.
Overwrite Real User: If you select this check box, then the real user credentials profile got form previous authentication method in the same session will be overwritten with real user credentials profile got from this authentication method
Assertion Validity Window: You can manually set the assertion validity time for SAML Service Provider (SP) to accommodate clock skew between Service Provider and SAML Identity (IDP) Server.
-
Click twice, then update the Identity Server.
Configuring the Attribute Matching Method for Liberty or SAML 2.0
If you enabled the option when selecting a user identification method, you must configure a matching method.
The Liberty Personal Profile is enabled by default. If you have disabled it, you need to enable it. See Managing Web Services and Profiles.
-
In the Administration Console, click > > > > > > .
-
Click .
-
Select and arrange the user stores you want to use.
Order is important. The user store at the top of the list is searched first. If a match is found, the other user stores are not searched.
-
Select a matching expression, or click to create a look-up expression. For information about creating a look-up expression, see Section 3.5.3, Configuring User Matching Expressions.
-
Specify what action to take if no match is found.
-
Do nothing: Specifies that an identity provider account is not matched with a service provider account. This option allows the user to authenticate the session without identifying a user account on the service provider.
IMPORTANT:Do not select this option if the expected name format identifier is persistent. A persistent name format identifier requires that the user be identified so that information can be stored with that user. To support the option and allow anonymous access, the authentication response must be configured for a transient identifier format. To view the service provider configuration, see Section 3.9.8, Configuring an Authentication Response for a Service Provider.
-
Prompt user for authentication: Allows the user to specify the credentials for a user that exists on the service provider. Sometimes users have accounts at both the identity provider and the service provider, but the accounts were created independently, use different names (for example, joe.smith and jsmith) and different passwords, and share no common attributes except for the credentials known by the user.
-
Provision account: Assumes that the user does not have an account at the service provider and creates one for the user. You must create a provisioning method.
-
-
Click .
-
(Conditional) If you selected when no match is found, select the icon. For information about this process, see Defining the User Provisioning Method.
-
Click twice, then update the Identity Server.
Defining User Identification for SAML 1.1
Selecting a User Identification Method for SAML 1.1
Two methods exist for identifying users from an identity provider when using the SAML 1.1 protocol. You can specify that no account matching needs to occur, or you can configure a match method. You configure a match method when you want to use attributes from the identity provider to uniquely identify a user on the service provider.
-
In the Administration Console, click > > > > > .
-
In the option, specify the contract that can be used to satisfy the assertion received from the identity provider. Because SAML 1.1 does not use contracts and because the Identity Server is contract-based, this setting permits an association to be made between a contract and a SAML 1.1 assertion.
Use caution when assigning the contract to associate with the assertion, because it is possible to imply that authentication has occurred, when it has not. For example, if a contract is assigned to the assertion, and the contract has two authentication methods (such as one for name/password and another for X.509), the server sending the assertion might use only name/password, but the service provider might assume that X.509 took place and then incorrectly assert it to another server.
-
Select one of the following options for user identification:
-
Do nothing: Specifies that an identity provider account is not matched with a service provider account. This option allows the user to authenticate the session without identifying a user account on the service provider.
-
Attribute matching: Authenticates a user by matching a user account on the identity provider with an account on the service provider. This option requires that you set up the match method.
-
Prompt for password on successful match: Specifies whether to prompt the user for a password when the user is matched to an account, to ensure that the account matches.
-
-
-
Select one of the following:
-
If you selected , continue with Step 6.
-
If you selected , continue with Configuring the Attribute Matching Method for SAML 1.1.
-
-
You can also configure the assertion time manually.
-
Assertion Validity Window: You can manually set the assertion validity time for SAML Service Provider (SP) to accommodate clock skew between Service Provider and SAML Identity (IDP) Server.
-
-
Click twice.
-
Click to make the user identification configuration changes.
-
Update the Identity Server.
Configuring the Attribute Matching Method for SAML 1.1
A user matching expression is a set of logic groups with attributes that uniquely identify a user. User matching expressions enable you to map the Liberty attributes to the correct LDAP attributes during searches. You must know the LDAP attributes that can be used to identify unique users in the user store.
To use user matching, the Personal Profile must be enabled. It is enabled by default. If you have disabled it, you need to enable it. See Managing Web Services and Profiles.
-
In the Administration Console, click > > > > > >
-
To configure the match method, click .
-
Select and arrange the user stores you want to use.
Order is important. The user store at the top of the list is searched first. If a match is found, the other user stores are not searched.
-
Select a matching expression, or click to create a look-up expression. For information about creating a look-up expression, see Section 3.5.3, Configuring User Matching Expressions.
-
Click .
-
Update the Identity Server.
Defining the User Provisioning Method
If you have selected as the user identification method or have created an attribute matching setting that allows for provisioning when no match is found, you need to create a provision method. This procedure involves selecting required and optional attributes that the service provider requests from the identity provider during provisioning.
IMPORTANT:When a user object is created in the directory, some attributes are initially created with the value of NAM Generated. Afterwards, an attempt is made to write the required and optional attributes to the new user object. Because required and optional attributes are profile attributes, the system checks the write policy for the profile’s Data Location Settings (specified in > ) and writes the attribute in either LDAP or the configuration store. In order for the LDAP write to succeed, each attribute must be properly mapped as an LDAP Attribute. Additionally, you must enable the read/write permissions for each attribute in the Liberty/LDAP attribute maps. See Mapping LDAP and Liberty Attributes.
To configure user provisioning:
-
In the Administration Console, click > > > > > > .
-
Click the icon.
-
Select the required attributes from the list and move them to the list.
Required attributes are those used in the creation of a user name, or that are required when creating the account.
-
Click .
-
Select optional attributes from the list and move them to the list.
This step is similar to selecting required attributes. However, the user provisioning request creates the user account whether or not the optional attributes exist on the service provider.
-
Click .
-
Define how to create the username.
You can specify whether users are prompted to create their own usernames or whether the system automatically creates usernames. Selecting an attribute for the username segments from the required attributes list improves the chances that a new username is successfully created.
Maximum length: The maximum length of the user name. This value must be between 1 and 50.
Prompt for user name: Enables users to create their own usernames.
Automatically create user name: Specifies that the system creates usernames. You can configure the segments for the system to use when creating usernames and configure how the names are displayed.
For example, if you are using the required attributes of Common First Name and Common Last Name, a username for Adam Smith might be generated as A.Smith_02, as shown in the following illustration:
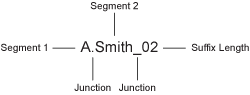
Use the following settings to specify how this is accomplished:
-
Segment 1: The required attribute to use as the first segment for the user name. The values displayed in this drop-down menu correspond to the required attributes you selected. For example, you might select Common First Name to use for .
-
Length: The length of the first attribute segment. For example, if you selected Common First Name for the value, setting the length to 1 specifies that the system uses the first letter of the Common First Name attribute. Therefore, Adam Smith would be ASmith.
-
Junction: The type of junction to use between the attributes of the user name. If a period is selected, Adam Smith would display as A.Smith.
-
Segment 2: The required attribute to use as the second segment for the user name. The values displayed in this drop-down menu correspond to the required attributes you selected. For example, you might select Common Last Name to use for .
-
Length: The length of the second attribute segment. For example, if you selected Common Last Name for the value, you might set the length to , so that the full last name is displayed. However, the system does not allow more than 20 characters for the length of segment 2.
-
Ensure name is unique: Applies a suffix to the colliding name until a unique name is found, if using attributes causes a collision with an existing name. If no attributes are provided, or the lengths for them are 0, and this option is selected, the system creates a unique name.
-
-
Click .
-
Specify password settings.
Use this page to specify whether to prompt the user for a password or to create a password automatically.
Min. password length: The minimum length of the password.
Max. password length: The maximum length of the password.
Prompt for password: Prompts the user for a password.
Automatically create password: Specifies whether to automatically create passwords.
-
Click .
-
Specify the user store and context in which to create the account.
User Store: The user store in which to create the new user account.
Context: The context in the user store you want accounts created.
The system creates the user within a specific context; however, uniqueness is not guaranteed across the directory.
Delete user provisioning accounts if federation is terminated: Specifies whether to automatically delete the provisioned user account at the service provider if the user terminates his or her federation between the identity provider and service provider.
-
Click .
-
Click twice, then update the Identity Server.
User Provisioning Error Messages
The following error messages are displayed for the end user if there are problems during provisioning:
Table 5-13 Provisioning Error Messages
|
Error Message |
Cause |
|---|---|
Username length cannot exceed (?) characters. |
The user entered more characters for a user name than is allowed, as specified by the administrator. |
Username is not available. |
The user entered a name that already exists in the directory. |
Passwords don't match. |
The user provided two password values that do not match. |
Passwords must be between (x) and (y) characters in length. |
The user provided password values that are either too short or too long. |
Username unavailable. |
The provisioned user account was deleted without first defederating the user. Remove orphaned identity objects from the configuration datastore. IMPORTANT:Only experienced LDAP users should remove orphaned identity objects from the configuration datastore. You must ensure that the objects you are removing are orphaned. Otherwise, you create orphaned objects by mistake. |
Unable to complete authentication request. |
The password provided does not conform to the Windows password complexity policy in Active Directory. Ensure that Active Directory is configured to use a secure port, such as 636, and that the user’s password conforms to the complexity policy. If you encounter this error, you must reset the password on the Windows machine. Can occur when users are allowed to create accounts from a service provider’s login page, when the service provider uses Active Directory for the user store. |
5.2.4 Configuring SAML 2.0
This section explains how to use the SAML 2.0 protocol to set up the trust with internal and external identity providers, service providers, and Embedded Service Providers (ESPs). Topics include:
-
Executing Authorization Based Roles Policy During SAML 2.0 Service Provider Initiated Request
-
Defining Session Synchronization for the A-Select SAML 2.0 Identity Provider
-
Configuring Multiple SAML 2.0 Service Providers on the Same Host for a Single SAML Identity Provider
-
Configuring Active Directory Federation Services with SAML 2.0 for Single Sign-On
Understanding How Access Manager Uses SAML
Security Assertions Markup Language (SAML) is an XML-based framework for communicating security assertions (user authentication, entitlement, and attribute information) between trusted identity providers and trusted service providers. For example, an airline company can make assertions to authenticate a user to a partner company or another enterprise application, such as a car rental company or hotel.
The Identity Server allows SAML assertions to be exchanged with trusted service providers that are using SAML servers. Using SAML assertions in each Access Manager component protects confidential information by removing the need to pass user credentials between the components to handle session management.
An identity provider using the SAML protocol generates and receives assertions for authentication, according to the SAML 1.0, 1.1, and 2.0 specifications described on the Oasis Standards Web site.
This section describes how Access Manager uses SAML. It includes the following topics:
Attribute Mapping with Liberty
Attribute-based involves one Web site communicating identity information about a subject to another Web site in support of some transaction. However, the identity information might be some characteristic of the subject, such as a role. The attribute-based is important when the subject’s identity is either not important, should not be shared, or is insufficient on its own.
In order to interoperate with trusted service providers through the SAML protocol, the Identity Server distinguishes between different attributes from different SAML implementations. All of the SAML administration is done with Liberty attributes. When you specify which attributes to include in an assertion, or which attributes to use when locating the user from an assertion, these attributes should always be specified in the Liberty format.
In an attribute map, you convert SAML attributes from each vendor’s implementation to Liberty attributes. (See Section 3.5.1, Configuring Attribute Sets.)
You can find detailed information about SAML 2.0 on the OASIS Standards Web site.
Trusted Provider Reference Metadata
Metadata is generated by the Identity Server and is used for server communication and identification. Metadata can be obtained via URL or XML document, then entered in the system when you create the reference. Metadata is traded with federation partners and supplies various information regarding contact and organization information located at the Identity Server. Metadata is generated automatically for SAML 2.0. You enter it manually for SAML 1.1.
IMPORTANT:The SAML 2.0 and Liberty 1.2 protocols define a logout mechanism whereby the service provider sends a logout command to the trusted identity provider when a user logs out at a service provider. SAML 1.1 does not provide such a mechanism. For this reason, when a logout occurs at the SAML 1.1 service provider, no logout occurs at the trusted identity provider. A valid session is still running at the identity provider, and no credentials need to be entered. In order to log out at both providers, users must navigate to the identity provider that authenticated them to the SAML 1.1 service provider and log out manually.
Identity Provider Process Flow
The following illustration provides an example of an Identity Server automatically creating an authenticated session for the user at a trusted SAML service provider. PP indicates a Personal Profile Service as defined by the Liberty specification.
Figure 5-22 SAML Service Provider Process Flow

-
A user is logged in to the Identity Server at abc.com (the user’s identity provider) and clicks a link to xyz.com, a trusted SAML service provider.
The Identity Server at abc.com generates the artifact. This starts the process of generating and sending the SAML assertion. The HREF would look similar to the following:
http://nidp.com/saml/genafct?TARGET=http://xyz.com/index.html&AID=XYZ
-
The Identity Server processes attributes as follows:
-
The server looks up LDAP or Liberty-LDAP mapped attributes. (See Mapping LDAP and Liberty Attributes.) In this example, you use Liberty attributes such as PP: sn instead of surname. PP: sn and PP: ph# are attributes that you are sending to xyz.com.
-
The Identity Server processes these attributes with a SAML implementation-specific attribute.
Because the identity provider must interoperate with other SAML service providers that probably do not use consistent attribute names, you can map the service provider attributes to your Liberty and LDAP attributes on the Identity Server. In this example, the service provider names for the Liberty PP: sn and PP: ph# attributes are lastname and phonenumber, respectively. (See Configuring the Attributes Obtained at Authentication.)
-
The Identity Server uses the PP service to look up the values for the user’s PP: sn and PP: ph# attributes.
The Identity Server recognizes that the values for the user’s PP: sn and PP: ph# attributes are Jones and 555-1212, respectively.
-
-
The Identity Server sends an HTTP redirect with an artifact.
The Identity Server now has the information to generate a SAML assertion. The Identity Server sends an HTTP redirect containing the artifact back to the browser. The redirect looks similar to the following:
http://xyz.com/auth/afct?TARGET=http://xyz.com/index.html&SAMLArtifact =<<artifact>>
-
The remote SAML server requests the assertion.
The HTTP redirect results in the browser sending the artifact to the SAML server at xyz.com. The SAML server at xyz.com requests the SAML assertion from the Identity Server.
-
The Identity Server sends the assertion to the remote SAML server.
The remote SAML server receives the artifact and looks up the assertion.The assertion is sent to the SAML server at xyz.com in a SOAP envelope. The assertion contains the attributes lastname=Jones and phonenumber=555-1212.
The user now has an authenticated session at xyz.com. The xyz.com SAML server redirects the user’s browser to http://xyz.com/index.html, which was referenced in the original HREF in Step 1.
SAML Service Provider Process Flow
The following illustration provides an example of the authentication process on the consumer side, when a user clicks a link at the SAML service provider (xyz.com) in order to begin an authentication session with an identity provider (such as abc.com). PP indicates a Personal Profile Service as defined by the Liberty specification.
Figure 5-23 SAML Consumer Process Flow
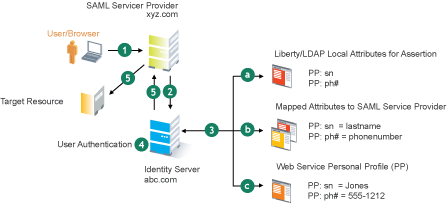
-
The user clicks a link at xyz.com.
This generates a SAML assertion intended for the Identity Server at abc.com, which is the identity provider in an Access Manager configuration. After the SAML server generates the artifact, it sends the browser a redirect containing the artifact. The browser is redirected to the identity provider, which receives the artifact. The URL sent to the Identity Server would look similar to the following:
http://nidp.com/auth/afct?TARGET=http://abc.com/index.html&SAMLArtifact =<<artifact>>
-
The Identity Server at abc.com receives the assertion.
The assertion is sent to the Identity Server packaged in a SOAP envelope. In this example, the assertion contains the attributes lastname=Jones, and phonenumber=555-1212.
-
The Identity Server determines which attributes to use when locating the user.
The Identity Server must determine how to locate the user in the directory. When you created the SAML service provider reference for xyz.com, you specified which Liberty attributes should be used for this purpose. In this case, the you specified that PP: sn and PP: ph# should be used.
-
The Identity Server processes the Liberty attribute map (see Mapping LDAP and Liberty Attributes) to the SAML implementation-specific attributes (see Configuring the Attributes Obtained at Authentication).
Because this SAML implementation must interoperate with other SAML implementations that probably do not use consistent attribute names, you can map the attributes used by each third-party SAML implementation to Liberty attributes on the Identity Server.
-
The Identity Server receives implementation-specific SAML attribute names.
The trusted service provider’s names for the Liberty PP: sn and PP: ph# attributes are returned. Using the attribute map, the Identity Server knows that the service provider’s names for these attributes are lastname and phonenumber, respectively.
-
The Identity Server uses the PP service to lookup the values for the user’s PP: sn and PP: ph# attributes.
The Identity Server now recognizes that the values for the user’s PP: sn and PP: ph# attributes are Jones and 555-1212, respectively. The user’s DN is returned to the Identity Server, and the user is authenticated.
-
-
The user’s DN is returned to the Identity Server, and the user is authenticated.
-
The user is redirected to the target resource at xyz.com.
Configuring a SAML 2.0 Profile
You can configure the methods of communication that are available at the server for requests and responses sent between providers. These settings affect the metadata for the server and should be determined prior to publishing to other sites.
Profiles control the methods of communication that are available for SAML 2.0 protocol requests and responses sent between trusted providers. These settings affect the metadata for the server and should be determined prior to publishing to other sites. The identity provider uses the incoming metadata to determine how to respond.
All available profile bindings are enabled by default. SOAP is used when all are enabled (or if the service provider has not specified a preference), followed by HTTP Post, then HTTP Redirect.
-
In the Administration Console, click > > > > .
-
Configure the following fields for identity providers and identity consumers (service providers):
Artifact Resolution: Specify whether to enable artifact resolution for the identity provider and identity consumer.
The assertion consumer service at the service provider performs a back-channel exchange with the artifact resolution service at the identity provider. Artifacts are small data objects pointing to larger SAML protocol messages. They are designed to be embedded in URLs and conveyed in HTTP messages.
Login: Specifies the communication channel to use when the user logs in. Select one or more of the following:
-
Post: A browser-based method used when the SAML requester and responder need to communicate using an HTTP user agent. This occurs, for example, when the communicating parties do not share a direct path of communication. You also use this when the responder requires user interaction in order to fulfill the request, such as when the user must authenticate to it.
-
Redirect: A browser-based method that uses HTTP 302 redirects or HTTP GET requests to communicate requests from this identity site to the service provider. SAML messages are transmitted within URL parameters.
Single Logout: Specifies the communication channel to use when the user logs out. Select one or more of the following:
-
HTTP Post: A browser-based method used when the SAML requester and responder need to communicate by using an HTTP user agent. This occurs, for example, when the communicating parties do not share a direct path of communication. You also use this when the responder requires user interaction in order to fulfill the request, such as when the user must authenticate to it.
-
HTTP Redirect: A browser-based method that uses HTTP 302 redirects or HTTP GET requests to communicate requests from this identity site to the service provider. SAML messages are transmitted within URL parameters.
-
SOAP: Uses SOAP back channel over HTTP messaging to communicate requests from this identity provider to the service provider.
NOTE:If option is enabled with HTTP Post profile, logout request from service provider does not complete. This is due to the difference in the HTTP method used in the logout request. It is recommended to use HTTP Redirect method when is enabled.
Name Management: Specifies the communication channel for sharing the common identifiers for a user between identity and service providers. When an identity provider has exchanged a persistent identifier for the user with a service provider, the providers share the common identifier for a length of time. When either the identity or service provider changes the format or value to identify the user, the system can ensure that the new format or value is properly transmitted. Select one or more of the following:
-
HTTP Post: A browser-based method used when the SAML requester and responder need to communicate using an HTTP user agent. This occurs, for example, when the communicating parties do not share a direct path of communication. You also use this when the responder requires user interaction in order to fulfill the request, such as when the user must authenticate to it.
-
HTTP Redirect: A browser-based method that uses HTTP 302 redirects or HTTP GET requests to communicate requests from this identity site to the service provider. SAML messages are transmitted within URL parameters.
-
SOAP: Uses SOAP back channel over HTTP messaging to communicate requests from this identity provider to the service provider.
-
-
Click , then update the Identity Server.
-
(Conditional) If you have set up trusted providers and have modified these profiles, the providers need to reimport the metadata from this Identity Server.
Creating a Trusted Service Provider for SAML 2.0
You can configure the Identity Server to trust a service provider or an identity provider.
-
When you create a trusted identity provider, you are allowing that identity provider to authenticate the user and the Identity Server acts as a service provider.
-
When you create a trusted service provider, you are configuring the Identity Server to provide authentication for the service provider and the Identity Server acts as an identity provider.
Both of these types of trust relationships require the identity provider to establish a trusted relationship with the service provider and the service provider to establish a trusted relationship with the identity provider.
Prerequisites
Before you can create a trusted provider, you must complete the following tasks:
-
Imported the trusted root of the provider’s SSL certificate into the NIDP trust storeFor instructions, see Section 8.4.4, Managing the Keys, Certificates, and Trust Stores..
-
Shared the trusted root of the SSL certificate of your Identity Server with the other provider so that the administrator can imported it into the provider’s trust store.
-
Obtained the metadata URL from the other provider or an XML file with the metadata.
-
Shared the metadata URL of your Identity Server with the other provider or sent an XML file with the metadata.
-
Enabled the protocol. Click > > , and on the Configuration page, verify that the required protocol in the Enabled Protocols section has been enabled.
Procedure
-
In the Administration Console, click > > > .
For the protocol, click .
-
Click , then click .
NOTE:By default, the > is selected. You can configure an Identity Server to trust a service provider to establish federation with external service providers. For more information on pre-configured metadata for Google Applications, Office 365, and Salesforce.com, see Section 5.2.11, Configuring Authentication Through Federation for Specific Providers.
-
Select one of the following sources for the metadata:
Metadata URL: Specify the metadata URL for a trusted provider. The system retrieves protocol metadata by using the specified URL.
Examples of metadata URLs for an Identity Server acting as a trusted provider with an IP address 10.1.1.1:
-
Liberty: http://10.1.1.1:8080/nidp/idff/metadata
-
Liberty: https://10.1.1.1:8443/nidp/idff/metadata
-
SAML 2.0: http://10.1.1.1:8080/nidp/saml2/metadata
-
SAML 2.0: https://10.1.1.1:8443/nidp/saml2/metadata
-
OIOSAML: http://10.1.1.1/nidp/saml2/metadata_oiosaml
-
OIOSAML: https://10.1.1.1/nidp/saml2/metadata_oiosaml
The default values nidp and 8080 are established during product installation; nidp is the Tomcat application name. If you have set up SSL, you can use https and port 8443.
If your Identity Server and Administration Console are on different machines, use HTTP to import the metadata. If you are required to use HTTPS with this configuration, you must import the trusted root certificate of the provider into the trust store of the Administration Console. You need to use the Java keytool to import the certificate into the cacerts file in the security directory of the Administration Console.
Linux: /opt/novell/java/jre/lib/security
Windows Server 2008: \Program Files (x86)\Novell\jre\lib\security
If you do not want to use HTTP and you do not want to import a certificate into the Administration Console, you can use the option. In a browser, enter the HTTP URL of the metadata. View the text from the source page, save the source metadata, then paste it into the option.
Metadata Text: An editable field in which you can paste copied metadata text from an XML document, assuming you obtained the metadata via e-mail or disk and are not using a URL. If you copy metadata text from a Web browser, you must copy the text from the page source.
Manual Entry: Allows you to enter metadata values manually. When you select this option, the system displays the page to enter the required details. See Editing a SAML 2.0 Service Provider’s Metadata.
Metadata Repositories: Allows you to configure several identity and/or service providers using a multi-entity metadata file available in a central repository. For more information about creating Identity and/or Service Providers see, Creating Identity Providers and Service Providers.
-
-
In the option, specify a name by which you want to refer to the provider.
-
Click .
-
Review the metadata certificates and click . The system displays the trusted provider on the protocol page.
-
Click , then update the Identity Server.
The wizard allows you to configure the required options and relies upon the default settings for the other federation options. For information about how to configure the default settings and how to configure the other available options, see Section 3.9.4, Modifying a Trusted Provider.
Executing Authorization Based Roles Policy During SAML 2.0 Service Provider Initiated Request
Access Manager service provider federation profiles do not currently allow control based on authorization policies. Usually the service providers enforce authorization rules. However, not all service providers have this flexibility. It is recommended not to trust the service provider to enforce such rules. You can now apply an authorization policy to a configured service provider to either allow or not to allow access to the service provider. The Identity Server will evaluate the service provider and will generate the successful/unsuccessful assertions.
Use Case: Company xyz.com uses a CRM application that is protected through the SAML 2.0 service provider. This application should only be accessible to the sales team and not to any other teams. Whenever a user accesses the application through the service provider, it redirects to the Identity Server for validating the user.
Figure 5-24 Executing Authorization Policy Based on Role
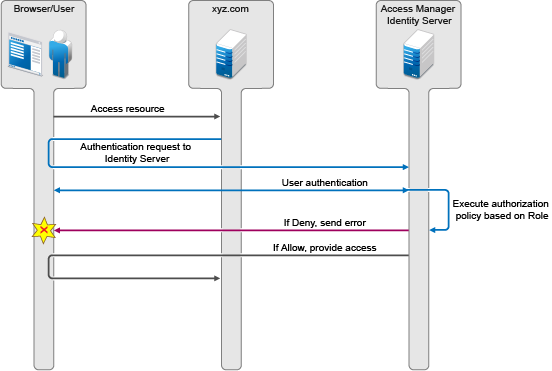
The Identity Server should authenticate the user and then check if the user is member of the sales team. If the user is a member, then the Identity Server sends a successful assertion to the service provider. Else, the Identity Server sends an error response to the service provider.
By default, the Identity Server executes these authorization policies after a user is authenticated during spsend. Adding the ALLOW_AUTH_POLICY_EXECUTION=false option in the nidp.properties file will not allow the Identity Server to execute the authorization policies.
If the authorization policy is to deny execution, the Identity Server sends the following message as part of an assertion response. <samlp:Status> <samlp:StatusCode Value="urn:oasis:names:tc:SAML:2.0:status:Responder"> <samlp:StatusCodeValue="urn:oasis:names:tc:SAML:2.0:status:RequestDenied" /> </samlp:StatusCode> <StatusMessage>Authorization is failed</StatusMessage> </samlp:Status>
For more information about, configuring a brokering for authorization of service providers see Configuring a Brokering for Authorization of Service Providers.
Contracts Assigned to SAML 2.0 Service Provider
During federation, when a service provider initiates an authentication request, contract information may not be available. If the contract information is not available, the Identity Server executes a default contract for validating the user. The step up authentication feature enables you to assign a default contract for service providers in such scenarios.
The following scenario helps you understand the execution of contracts that are assigned to the SAML 2.0 service provider.
Figure 5-25 Step Up Authentication example with two applications:
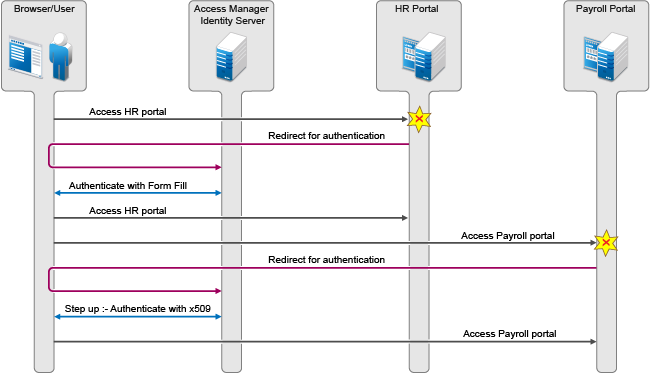
There are two applications Payroll and HR web applications protected through different service providers and are using Access Manager Identity Server as identity provider. The user wants to use the name/password form contract whenever the user accesses the HR application and wants to use the higher level contract say X509 for the Payroll application. The Identity Server provides ability to execute the appropriate contract that has been assigned to the service provider instead of executing the default contract.
The following procedure allows you to assign a specific contract to the service provider.
-
Click on > > > .
-
Click on configured service provider.
-
Go to > contracts and select the contracts from the list.
The following table lists the behavior of a service provider request.
|
Service Provider Request |
Result (Identity Server Response if the user is not authenticated) |
|---|---|
|
Service provider request has no contract information to be executed at the Identity Server. |
|
|
1. Identity Server has no contracts set for this service provider as in Step 3. |
Execute default contract for validating the user and default contract name will be sent in the response. |
|
2. Identity Server has contract C1 set for this service provider as in Step 3. |
C1 will be executed for validating the user and C1 will be sent in response. |
|
Service provider requests execution of contract C1 at the Identity Server. |
|
|
1. Identity Server has no contracts set for this service provider as in Step 3. |
C1 will be executed for validating the user and C1 will be sent in response. |
|
2. Identity Server has contract C1 set for this service provider as in Step 3. |
C1 will be executed for validating the user and C1 will be sent in response. |
|
3. Identity Server has contract C2 set for this service provider. C2 has trust level check disabled. |
C2 will be executed for validating the user and C2 will be sent in response. (Note: This is as good as C1 not available at the Identity Server) |
|
4. Identity Server has contract C2 set for this service provider. C2 has trust level check enabled. |
If trust level of C2 >= trust level of C1, then C2 will be executed and C2 will be sent in response. If trust level of C2 < trust level of C1, then C1 will be executed and C1 will be sent in response as in the previous Access Manager 3.2 release. If C1 is not available at Identity Server, then C2 is executed and C2 is sent in the response. |
Configuring Communication Security for a SAML 2.0 Identity Provider
The security settings control the direct communication between the Identity Server and the identity provider across the SOAP back channel.
-
In the Administration Console, click > > > .
-
Click the name of an identity provider.
-
On the Trust page, fill in the following fields:
Name: Specify the display name for this trusted provider. The default name is the name you entered when creating the trusted provider.
The section specifies how to validate messages received from trusted providers over the SOAP back channel. Both the identity provider and the service provider in the trusted relationship must be configured to use the same security method.
Encrypt name identifiers: Specifies whether you want the name identifiers encrypted on the wire.
Select one of the following security methods:
-
Message Signing: Relies upon message signing using a digital signature.
-
Mutual SSL: Specifies that this trusted provider provides a digital certificate (mutual SSL) when it sends a SOAP message.
SSL communication requires only the client to trust the server. For mutual SSL, the server must also trust the client. For the client to trust the server, the server’s certificate authority (CA) certificate must be imported into the client trust store. For the server to trust the client, the client’s CA certificate must be imported into the server trust store.
-
Basic Authentication: Specifies standard header-based authentication. This method assumes that a name and password for authentication are sent and received over the SOAP back channel.
Send: The name and password to be sent for authentication to the trusted partner. The partner expects this password for all SOAP back-channel requests, which means that the name and password must be agreed upon.
Verify: The name and password used to verify data that the trusted provider sends.
Certificate Revocation Check Periodicity: Specifies if the certificate is valid or not. You can define periodicity to validate on start up, on assertion level, or set frequency to hourly/daily.
-
-
Click twice.
-
Update the Identity Server.
Configuring Communication Security for a SAML 2.0 Service Provider
The security settings control the direct communication between the Identity Server and the service provider across the SOAP back channel.
-
In the Administration Console, click > > > .
-
Click the name of a service provider.
-
On the Trust page, fill in the following fields:
Name: Specify the display name for this trusted provider. The default name is the name you entered when creating the trusted provider.
The section specifies how to validate messages received from trusted providers over the SOAP back channel. Both the identity provider and the service provider in the trusted relationship must be configured to use the same security method.
Encrypt assertions: Specifies whether you want the assertions encrypted on the wire.
Encrypt name identifiers: Specifies whether you want the name identifiers encrypted on the wire.
Certificate Settings: All service providers use the default signing and encryption certificates of the identity provider. Specify custom certificates for a service provider as follows:
-
Identity Provider Signing Certificate: Select a certificate from the keystore and assign it to the service provider.
-
Identity Provider Encryption Certificate: Select a certificate from the keystore and assign it to the service provider.
NOTE:When you assign custom certificates to each service provider while configuring the identity server, ensure that you export these certificates and custom metadata to the service provider. To retrieve the metadata, click on the metadata link. (This link is available in the note on the page).
For example, the default certificates will have the following default metadata URL: <IDP URL>/nidp/saml2/metadata.
The custom certificates will have the following custom metadata URL for a service provider: <IDP URL>/nidp/saml2/metadata?PID=<SP Entity ID >
-
Certificate Revocation Check Periodicity: Specifies if the certificate is valid or not. You can define periodicity to validate on start up, on assertion level, or set frequency to hourly/daily.
SOAP Back Channel Security Method: Select one of the following security methods.
-
Message Signing: Relies upon message signing using a digital signature.
-
Mutual SSL: Specifies that this trusted provider provides a digital certificate (mutual SSL) when it sends a SOAP message.
SSL communication requires only the client to trust the server. For mutual SSL, the server must also trust the client. For the client to trust the server, the server’s certificate authority (CA) certificate must be imported into the client trust store. For the server to trust the client, the client’s CA certificate must be imported into the server trust store.
-
Basic Authentication: Specifies standard header-based authentication. This method assumes that a name and password for authentication are sent and received over the SOAP back channel.
Send: The name and password to be sent for authentication to the trusted partner. The partner expects this password for all SOAP back-channel requests, which means that the name and password must be agreed upon.
Verify: The name and password used to verify data that the trusted provider sends.
-
-
Click twice.
-
Update the Identity Server.
Editing a SAML 2.0 Service Provider’s Metadata
Access Manager allows you to obtain metadata for SAML 2.0 providers. However, metadata for SAML 2.0 might not be available for some service providers, so you can enter the metadata manually. The page for this is available if you clicked the option when you created the trusted provider.
For conceptual information about how Access Manager uses SAML, see Understanding How Access Manager Uses SAML.
-
In the Administration Console, click > > > > > .
You can reimport the metadata (see Step 2) or edit it (see Step 3).
-
To reimport the metadata, click on the View page.
Follow the on-screen instructions to complete the steps in the wizard.
-
To edit the metadata manually, click .
-
Fill in the following fields:
Provider ID: (Required) Specifies the SAML 2.0 metadata unique identifier for the provider. For example, https://<dns>:8443/nidp/saml2/metadata. Replace <dns> with the DNS name of the provider.
In the metadata, this is the entityID value.
Metadata expiration: Specifies the date upon which the metadata is no longer valid.
Want assertion to be signed: Specifies that authentication assertions from the trusted provider must be signed.
Artifact consumer URL: Specifies where the partner receives incoming SAML artifacts. For example, https://<dns>:8443/nidp/saml2/spassertion_consumer. Replace <dns> with the DNS name of the provider.
In the metadata, this URL value is found in the AssertionConsumerService section of the metadata.
Post consumer URL: Specifies where the partner receives incoming SAML POST data. For example, https://<dns>:8443/nidp/saml2/spassertion_consumer. Replace <dns> with the DNS name of the provider.
In the metadata, this URL value is found in the AssertionConsumerService section of the metadata.
Service Provider: Specifies the public key certificate used to sign SAML data. You can browse to locate the service provider certificate.
-
Click .
Configuring a SAML 2.0 Authentication Request
You can configure how an authentication request is federated. When users authenticate to a service provider, they can be given the option to federate their account identities with the preferred identity provider. This process creates an account association between the identity provider and service provider that enables single sign-on and single log-out.
The authentication request specifies how you want the identity provider to handle the authentication process so that it meets the security needs of the Identity Server.
-
In the Administration Console, click > > > > > >
-
Configure the name identifier format:
Persistent: A persistent identifier federates the user profile on the identity provider with the user profile on the service provider. It remains intact between sessions.
The persistent identifier is saved to the user data store and hides the user’s identity to prevent tracking of user activities across different relying parties.
-
After authentication: Specifies that the persistent identifier can be sent after the user has authenticated (logged in) to the service provider. When you set only this option, users must log in locally. Because the user is required to authenticate locally, you do not need to set up user identification.
-
During authentication: Specifies that the persistent identifier can be sent when the user selects the authentication card of the identity provider. Typically, a user is not authenticated at the service provider when this selection is made. When the identity provider sends a response to the service provider, the user needs to be identified on the service provider. If you enable this option, ensure that you configure a user identification method. See Selecting a User Identification Method for Liberty or SAML 2.0.
Transient: Specifies that a transient identifier, which expires between sessions, can be sent.
Unspecified: Allows either a persistent or a transient identifier to be sent.
-
-
Select one of the following options for the option:
Do not specify: Specifies that the identity provider can send any type of authentication to satisfy a service provider’s request, and instructs a service provider to not send a request for a specific authentication type or contract.
Use Types: Specifies that authentication types should be used.
Select the type of comparison (for more information, see Understanding Comparison Contexts):
-
Exact: Indicates that the class or type specified in the authentication statement must be an exact match to at least one contract.
-
Minimum: Indicates that the contract must be as strong as the class or type specified in the authentication statement.
-
Better: Indicates the contract that must be stronger than the class or type specified in the authentication statement.
-
Maximum: Indicates that contract must as strong as possible without exceeding the strength of at least one of the authentication contexts specified.
Select the types from the field to specify which type to use for authentication between trusted service providers and identity providers. Standard types include Name/Password, X.509, Token, and so on.
Use Contracts: Specifies that authentication contracts should be used.
Select the type of comparison (for more information, see Understanding Comparison Contexts):
-
Exact: Indicates that the class or type specified in the authentication statement must be an exact match to at least one contract.
-
Minimum: Indicates that the contract must be as strong as the class or type specified in the authentication statement.
-
Better: Indicates the contract that must be stronger than the class or type specified in the authentication statement.
-
Maximum: Indicates that contract must as strong as possible without exceeding the strength of at least one of the authentication contexts specified.
Select the contract from the list. For a contract to appear in the list, the contract must have the option enabled. To use the contract for federated authentication, the contract’s URI must be the same on the identity provider and the service provider. For information about contract options, see Section 5.1.4, Configuring Authentication Contracts.
Most third-party identity providers do not support contracts.
-
-
Configure the options:
Response protocol binding: Select or or . Artifact and Post are the two methods for transmitting assertions between the authenticating system and the target system.
If you select , the binding is selected based on the profile that is enabled at Identity Provider and the binding selected in the service provider.
NOTE:The post binding can be configured to be sent as a compressed option. Perform the following steps to achieve this:
-
Open the nidpconfig.properties file located in /opt/novell/nam/idp/webapps/nidp/WEB-INF/classes.
-
Modify the following:
SAML2_POST_DEFLATE_TRUSTEDPROVIDERS: Enter trusted providerʹs name, metadata URI, or provider ID. You can specify multiple trusted providers in a comma separated format. These are the trusted providers who expect SAML2 POST messages in deflated format. In other words, this provider has to send deflated SAML2 POST messages to the listed trusted providers.
IS_SAML2_POST_INFLATE: Specify True, if this provider will receive deflated SAML2 POST messages from its trusted providers.
-
Restart the Identity Server by using this command: /etc/init.d/novell-idp restart.
Allowable IDP proxy indirections: Specifies whether the trusted identity provider can proxy the authentication request to another identity provider. A value of specifies that the trusted identity provider cannot redirect an authentication request. Values 1-5 determine the number of times the request can be proxied. Select to let the trusted identity provider decide how many times the request can be proxied
Force authentication at Identity Provider: Specifies that the trusted identity provider must prompt users for authentication, even if they are already logged in.
Use automatic introduction: Attempts single sign-on to this trusted identity provider by automatically sending a passive authentication request to the identity provider. (A passive requests does not prompt for credentials.) The identity provider sends one of the following authentication responses:
-
When the federated user is authenticated at the identity provider: The identity provider returns an authentication response indicating that the user is authenticated. The user gains access to the service provider without entering credentials (single sign-on).
-
When the federated user is not authenticated at the identity provider: The identity provider returns an authentication response indicating that the user is not logged in. The user can then select a card for authentication, including the card for the identity provider. If the user selects the identity provider card, an authentication request is sent to the identity provider. If the credentials are valid, the user is also authenticated to the service provider.
IMPORTANT:Enable the option only when you are confident the identity provider will be up. If the server is down and does not respond to the authentication request, the user gets a page-cannot-be-displayed error. Local authentication is disabled because the browser is never redirected to the login page.
This option should be enabled only when you know the identity provider is available 99.999% of the time or when the service provider is dependent upon this identity provider for authentication.
-
-
Click twice, then update the Identity Server.
Understanding Comparison Contexts
When a service provider makes a request for an identity provider to authenticate a user, the authentication request can contain a class or type and a comparison context. The identity provider uses these to determine which authentication procedure to execute. There are four comparison contexts:
-
Exact: Indicates that the class or type specified in the authentication statement must be an exact match to at least one contract.
For example, when the comparison context is set to exact, the identity provider uses the URI in the request to find an authentication procedure. If an exact URI match is found, the user is prompted for the appropriate credentials. If an exact match is not found, the user is denied access.
-
Better: Indicates the contract that must be stronger than the class or type specified in the authentication statement.
If the identity provider is a NetIQ Identity Server, the Identity Server first finds the specified class or type and its assigned authentication level. It then uses this information to find a contract that matches the conditions. For example if the authentication level is set to 1 for the class or type, the identity provider looks for a contract with an authentication level that is higher than 1. If one is found, the user is prompted for the appropriate credentials. If more than one is found, the user is presented with the matching cards and is allowed to select the contract. If a match is not found, the user is denied access.
-
Minimum: Indicates that the contract must be as strong as the class or type specified in the authentication statement.
If the identity provider is a NetIQ Identity Server, the Identity Server first finds the specified class or type and its assigned authentication level. It then uses this information to find a contract that matches the conditions. For example if the authentication level is set to 1 for the class or type, the identity provider looks for a contract with an authentication level of 1 or higher. If one is found, the user is prompted for the appropriate credentials. If more than one is found, the user is presented with the matching cards and is allowed to select the contract. If a match is not found, the user is denied access.
-
Maximum: Indicates that contract must as strong as possible without exceeding the strength of at least one of the authentication contexts specified.
If the identity provider is a NetIQ Identity Server, the Identity Server first finds the specified classes or types and their assigned authentication levels. It then uses this information to find a contract that matches the conditions. For example if the authentication level is set to 1 for some types and 3 for other types, the identity provider looks for contracts with an authentication level of 3. If a match or matches are found, the user is presented with the appropriate login prompts. If there are no contracts defined with a authentication level of 3, the identity provider looks for a match with an authentication level of 2, or if necessary, level 1. It cannot search below the lowest level of class in the authentication request or higher than the highest level of a class in the authentication request.
When you configure the authentication request, you specify the comparison context for a type or a contract.
Configuring the SAML 2.0 Authentication Response
After you create a trusted service provider, you can configure how your Identity Server responds to authentication requests from the service provider.
-
In the Administration Console, click > > > > > .
-
Select the binding method.
If the request from the service provider does not specify a response binding, you need to specify a binding method to use in the response. Select to provide an increased level of security by using a back-channel means of communication between the two servers. Select to use HTTP redirection for the communication channel between the two servers. If you select , you might want to require the signing of the authentication requests. See Configuring the General Identity Provider Options.
NOTE:The post binding can be configured to be sent as a compressed option. Perform the following steps to achieve this:
-
Open the nidpconfig.properties file located in /opt/novell/nam/idp/webapps/nidp/WEB-INF/classes.
-
Modify the following:
SAML2_POST_DEFLATE_TRUSTEDPROVIDERS: Enter trusted providerʹs name, metadata URI, or provider ID. You can specify multiple trusted providers in a comma separated format. These are the trusted providers who expect SAML2 POST messages in deflated format. In other words, this provider has to send deflated SAML2 POST messages to the listed trusted providers.
IS_SAML2_POST_INFLATE: Specify True, if this provider will receive deflated SAML2 POST messages from its trusted providers.
-
Restart the Identity Server by using this command: /etc/init.d/novell-idp restart.
-
-
Specify the identity formats that the Identity Server can send in its response. Select the box to choose one or more of the following:
-
Persistent: Specifies that a persistent identifier, which is written to the directory and remains intact between sessions, can be sent.
-
Transient: Specifies that a transient identifier, which expires between sessions, can be sent.
-
E-mail: Specifies that an e-mail attribute can be used as the identifier.
-
Kerberos: Specifies that a Kerberos token can be used as the identifier.
-
X509: Specifies that an X.509 certificate can be used as the identifier.
-
Unspecified: Specifies that an unspecified format can be used and any value can be used. The service provider and the identity provider need to agree on the value that is placed in this identifier.
-
-
Use the button to select the name identifier that the Identity Server should send if the service provider does not specify a format.
If you select E-mail, Kerberos, x509, or unspecified as the default format, you should also select a value. See Step 5.
IMPORTANT:If you have configured the identity provider to allow a user matching expression to fail and still allow authentication by selecting the option, you need to select as the default value. Otherwise the users who fail the matching expression are denied access. To view the identity provider configuration, see Defining User Identification for Liberty and SAML 2.0.
-
Specify the value for the name identifier.
The persistent and transient formats are generated automatically. For the others, you can select an attribute. The available attributes depend upon the attributes that you have selected to send with authentication (see Configuring the Attributes Obtained at Authentication). If you do not select a value for the E-mail, Kerberos, X509, or Unspecified format, a unique value is automatically generated.
-
To specify that this Identity Server must authenticate the user, disable the option. When the option is disabled and the Identity Server cannot authenticate the user, the user is denied access.
When this option is enabled, the Identity Server checks to see if other identity providers can satisfy the request. If one or more can, the user is allowed to select which identity provider performs the authentication. If a proxied identity provider performs the authentication, it sends the response to the Identity Server. The Identity Server then sends the response to the service provider.
-
When the option is enabled, the Identity Server sends the Identity Server session time out value to the service provider in the assertion.
-
You can manually set the assertion validity time for the SAML service provider in the field to accommodate clock skew between the service provider and SAML Identity Server (IDP).
-
Click twice, then update the Identity Server.
Defining Options for SAML 2.0
OIOSAML enables service providers to use external authentication services, implements single sign-on across disparate systems, and establishes a foundation for federated identity management. OIOSAML enables reuse of authentication services and consistent application of security technology.
You can implement the Single Logout Profile of OIOSAML. This profile enables you to logout from all service providers whose session originate from a particular identity provider. For using this profile, you should use a front channel binding.
Defining Options for SAML 2.0 Identity Provider
-
In Administration Console, click > > > > > > .
-
Select the required options:
OIOSAML Compliance: Enable this option to make the identity provider OIOSAML compliant.
Enable Front Channel Logout: After this option is enabled, the service provider initiates a logout at the identity provider by using the HTTP Redirect method.
-
Click .
Defining Options for SAML 2.0 Service Provider
NetIQ Access Manager can be used as an identity provider for several service providers.You can configure a specific authentication contract that is required for a Service provider. If more than one authentication contract is configured for a service provider, the contract having minimum level will be selected.
When providing authentication to a service provider, the identity server ensures that the user is authenticated by the required contract. When a user is not authenticated or when user is authenticated, but the authenticated contracts do not satisfy the required contracts, user will be prompted to authenticate with required contract. This is called step up authentication.
If no required contract is configured, then the default contract is executed.
NOTE:This step up authentication is supported only for Intersite Transfer Service (identity provider initiated) requests on Liberty and works for both identity and service provider initiated requests for SAML 2.0.
To Define Options for SAML 2.0 Service Provider
-
In Administration Console, click > > > > > > .
-
Select to make the service provider OIOSAML compliant. The OIOSAML attribute set is automatically populated with the required attributes to send with authentication after selecting this check box.
-
Select the required step up authentication contracts from the list and move them to the list. This is to provide the step up authentication for the service provider.
NOTE:The contract that is configured first in the list will only be executed. This is applicable only for SAML 2.0.
-
Click .
Defining Session Synchronization for the A-Select SAML 2.0 Identity Provider
If a user session is active on the Service Provider, the service provider periodically sends session synchronization to the Identity Server to maintain the session. You must configure the properties for the session synchronization between the service provider and the target Identity provider.
-
In the Administration Console, click > > > > > >
-
Click > , then specify the following values:
Property Name: Specify
Property Value: Specify.
-
For session synchronization, add two options, one to enable the session synchronization and the other to provide the URL to which synchronization message should be sent.
The session synchronization message is sent from the Access Manager Service Provider to the A-Select Identity Provider, in tandem with the Access Gateway ESP's activity update. The session synchronization message is sent only if the user session is active at the Access Gateway portal, which is the ESP to the Access Manager Service Provider. If you log in directly to the Access Manager Service Provider, even if the session is active, the session synchronization message is not sent to the A-Select Identity Provider.
-
Click then update the Identity Server.
Configuring the Liberty or SAML 2.0 Session Timeout
When you are active on a session on the service provider and a timeout occurs, the service provider initiates a logout.You can configure this timeout by using the web.xml parameter in the Access Gateway ESP, then ESP initiates a logout message to the Access Manager Service Provider over the SOAP back channel when the timeout is reached. After the Service Provider receives this message, it creates a SAML 2.0 logout request to the remote Identity Provider over SOAP.
To send session timeout message:
-
Open the web.xml file located at:
Linux: /opt/novell/nam/idp/webapps/nidp/WEB-INF/
Windows Server 2008: \Program Files (x86)\Novell\Tomcat\webapps\nidp\WEB-INF/
-
Add the following lines to the file:
        <context-param>
                <param-name>notifysessionTimetoIDP</param-name>
                <param-value>true</param-value>
        </context-param>
ESP will send a ESP session timeout message then on timeout, the service provider will send a samlp:LogoutRequest xmlns:samlp="urn:oasis:names:tc:SAML:2.0:protocol request to the remote Identity provider.
-
Save the file, then copy it to each Identity Server in the cluster.
-
Restart Tomcat on each Identity Server in the cluster using the following command:
Linux: Enter the following command:
/etc/init.d/novell-idp restart
Windows: Enter the following commands:
net stop Tomcat7
net start Tomcat7
Session Termination
If you set the session synchronization between the Service Provider and remote Identity Provider, then the remote Identity Provider never sends the logout request to the active Service Provider.
Modifying the Authentication Card for Liberty or SAML 2.0
When you create an identity provider, you must also configure an authentication card. After it is created, you can modify it.
-
In the Administration Console, click > > > >
-
Modify the values in one or more of the following fields:
ID: If you have need to reference this card outside of the user interface, specify an alphanumeric value here. If you do not assign a value, the Identity Server creates one for its internal use. The internal value is not persistent. Whenever the Identity Server is rebooted, it can change. A specified value is persistent.
Text: Specify the text that is displayed on the card to the user. This value, in combination with the image, should identify to the users, which provider they are logging into.
Image: Specify the image to be displayed on the card. Select the image from the drop-down list. To add an image to the list, click .
Show Card: Determine whether the card is shown to the user, which allows the user to select and use the card for authentication. If this option is not selected, the card is only used when a service provider makes a request for the card.
NOTE:Do not disable the option for default contracts.
Passive Authentication Only: Select this option if you do not want the Identity Server to prompt the user for credentials. If the Identity Server can fulfill the authentication request without any user interaction, the authentication succeeds. Otherwise, it fails.
Satisfies Contract: Select the required contracts from the list and move them to the list. This creates a mapping between external provider class reference to local authentication contracts.
-
Click twice, then update the Identity Server.
Enabling or Disabling SAML Tags
Enabling or Disabling SAML Tags by using the Administration Console
To enable SAML tags in the Administration Console, perform the following steps:
-
In the Administration Console, click > > > > .
-
Based on whether the tag is for a service provider or an identity provider, select or and then select .
-
Click and specify and .
You can enable the following SAML tags in the Administration Console:
Property Name
Value
Description
SAML2_SEND_ACS_INDEX
True
Set the value to true to send AssertionConsumerServiceIndex with AuthnRequest.
SAML2_SEND_ACS_URL
True
Set the value to true to send AssertionConsumerServiceURL with AuthnRequest.
Extensions
<samlp:Extensions><OnBehalfOf xmlns="https://idporten.difi.no/idporten-extensions">interaktor</OnBehalfOf></samlp:Extensions>
After setting this value, Access Manager acting as a SAML 2.0 service provider makes an OnBehalfOf authentication request by using SAML extensions.
SAML2_POST_SIGN_RESPONSE_TRUSTEDPROVIDERS
True/False
For identity providers: Set the value to true to send the signed SAML 2.0 post responses to trusted providers.
For service providers: Set the value to true to verify the signed SAML 2.0 post responses.
SAML2_AVOID_NAMEIDPOLICY
True/False
Set the value to true to not include NameIDPolicy in the SAML 2.0 request.
SAML2_SIGN_METHODDIGEST_SHA256
True/False
Set the value to true to use SHA256 algorithm as signing algorithm for assertions.
SAML2_AVOID_ISPASSIVE
True/False
Set the value to true to not include IsPassive as part of the SAML 2.0 request.
SAML2_AVOID_CONSENT
True/False
Set the value to true to not include Consent as part of the SAML 2.0 request.
SAML2_AVOID_PROTOCOLBINDING
True/False
Set the value to true to not include ProtocolBinding as part of the SAML 2.0 request
SAML2_AVOID_PROXYCOUNT
True/False
Set the value to true to not include ProxyCount in the SAML 2.0 request
Enabling or Disabling SAML Tags by Using nidpconfig.proprteties
Enable or disable the following SAML Authentication Request tags by using the nidpconfig.properties file. These properties will be set at the Access Manager Identity Server when it is configured as a SAML 2.0 service provider. Restart or wait until Access Manager refreshes the nidpconfig.properties file.
|
Property Name |
Description |
|---|---|
|
SAML2_ATTRIBUTE_CONSUMING_INDEX |
The value is of format {SPProviderID}->{numeric value}. {SPProviderID} will be replaced by the actual provider id of this service provider. This will set the AttributeConsumingIndex of SAML 2.0 requests to the numeric value specified here. For example, https://nam.rtreyresearch.net:8443/nidp/saml2/metadata->2. |
|
SAML2_AVOID_SPNAMEQUALIFIER |
If set to true, SPNameQualifier is not included as part of SAML 2.0 request. |
|
SAML2_CHANGE_ISSUER |
The value is of format {SPProviderID}->{issuer name}. {SPProviderID} will be replaced by the actual provider ID of the service provider. This will set the issuer of SAML 2.0 requests to the issuer name specified here. For example, https://nam.rtreyresearch.net:8443/nidp/saml2/metadata->https://saml.mariagerfjord.dk:8443/nidp/saml2/metadata. |
|
SAML2_AVOID_SPNAMEQUALIFIER_TO |
Set the value to true to send SPNAMEQUALIFIER in NAMEIDENTIFER with assertion. You can set this key in the nidpconfig.properties file in the following format: https://<host>:<port>/nidp/saml2/metadata ->true,https://<host>:<port>/nidp/saml2/metadata/spnameidentifier ->false,https://<host>:<port>/nidp/saml2/metadata/spnameidentifier ->true |
|
SAML_ASSERTION_INCLUDE_MILLISECS |
Set the value to true to get SAML responses or requests including the timestamp with millisecond in IssueInstant. |
|
SAML2_NAMEID_ATTRIBUTE_NAME |
Set the ldapattribute name to send the SAML response with the LDAP attribute value in nameidentifier. |
|
SAML2_AVOID_AUDIENCE_RESTRICTION |
Set the value to true to avoid sending the audience restriction information with assertion. |
Sample XML File When All SAML Tags Are Set to True
The following sample xml file will be displayed when all the SAML tags are set to true and SAML2_CHANGE_ISSUER and SAML2_ATTRIBUTE_CONSUMING_INDEX tags are not set.
<samlp:AuthnRequest xmlns:samlp="urn:oasis:names:tc:SAML:2.0:protocol" xmlns:saml="urn:oasis:names:tc:SAML:2.0:assertion" AssertionConsumerServiceIndex="2" ForceAuthn="false" ID="id5R6u1JFtay7eK.il97Q3eRl34u8" IssueInstant="2013-01-18T06:11:26Z" Version="2.0">
<saml:Issuer> >
</samlp:AuthnRequest>
Sample XML File When All SAML Tags Are Set to False
The following sample xml file will be displayed when all the SAML tags are set to false and SAML2_CHANGE_ISSUER and SAML2_ATTRIBUTE_CONSUMING_INDEX properties are set in the nidpconfig.properties file.
<samlp:AuthnRequest xmlns:samlp="urn:oasis:names:tc:SAML:2.0:protocol"xmlns:saml="urn:oasis:names:tc:SAML:2.0:assertion" AssertionConsumerServiceIndex="0" AttributeConsumingServiceIndex="2"Consent="urn:oasis:names:tc:SAML:2.0:consent:unavailable" ForceAuthn="false" ID="idoeZTKq7FOs5MsCigBBCwp30lqD0" IsPassive="false"IssueInstant="2013-01-23T05:25:32Z"ProtocolBindingProtocolBinding="urn:oasis:names:tc:SAML:2.0:bindings:HTTP-POST"Version="2.0">
<saml:Issuer> >
<samlp:NameIDPolicyAllowCreate="true"Format="urn:oasis:names:tc:SAML:2.0:nameid-format:persistent"SPNameQualifier="https://nam.rtreyresearch.net:8443/nidp/saml2/metadata"/><samlp:Scoping ProxyCount="5"/>
</samlp:AuthnRequest>
Configuring Multiple SAML 2.0 Service Providers on the Same Host for a Single SAML Identity Provider
When the same Access Manager server hosts more than one SAML service provider and federate with another Access Manager acting as an identity provider for these service providers, Access Manager should send different sets of attributes in SAML 2.0 assertions to these service providers.
Perform the following steps to create multiple service providers on the same Access Manager host:
-
To create multiple service providers from the same identity provider metadata, manually modify the identity provider's metadata's entityID for each service provider. You can import the metadata text that was edited into the Access Manager configuration to create service providers with different entity IDs.
For more information about how to create a SAML 2.0 service provider, see Creating a Trusted Service Provider for SAML 2.0.
-
In the Administration Console of the SAML 2.0 identity provider, click > > > > > > .
-
Set the SAML2_AVOID_AUDIENCE_RESTRICTION property to true. Setting this property to true avoids audience restriction in the SAML 2.0 assertion.
-
To avoid the spnamequalifier attribute in nameidentifier of the assertion, do the following:
-
Go to Access Manager Identity Server of the SAML 2.0 service provider and open the nidpconfig.properties file.
Linux: /opt/novell/nids/lib/webapp/WEB-INF/classes/nidpconfig.properties
Windows: Novell\Tomcat\webapps\nidp\WEB-INF\classes\nidpconfig.properties
-
Add the following:
SAML2_AVOID_SPNAMEQUALIFIER_TO = <entityID of the service provider>->true
For example, if you have configured three service provider and you want to avoid sending assertion to the service provider with entity ID "https://<service provider host>:<port>/nidp/saml2/metadata/spnameidentifier2" then add the following entry:
SAML2_AVOID_SPNAMEQUALIFIER_TO = https://< service provider host>:<port>/nidp/saml2/metadata/spnameidentifier1->true,https://< service provider host>:<port>/nidp/saml2/metadata/spnameidentifier2->true,https://< service provider host>:<port>/nidp/saml2/metadata/spnameidentifier3->true
-
-
Restart the Identity Server.
NOTE:This is possible only when the identity provider and service providers are deployed on Access Manager.
Configuring Active Directory Federation Services with SAML 2.0 for Single Sign-On
This section describes step-by-step instructions for configuring a basic identity federation deployment between Microsoft Active Directory Federation Services 2.0 (AD FS 2.0) and Access Manager by using the Security Assertion Markup Language (SAML) 2.0 protocol, specifically its Web Browser SSO Profile and HTTP POST binding.
You can configure AD FS 2.0 as the claims provider and Access Manager as the relying party, or you can configure Access Manager as the claims provider and AD FS 2.0 as the relying party or service provider.
Prerequisites and Requirements
-
Two servers, one to host AD FS 2.0 and the other to host Access Manager.
-
AD FS 2.0 is deployed.
-
ADFS 2.0 with WIF is deployed.
The test deployment that was created in the AD FS 2.0 Federation with a Windows Identity Foundation (WIF) application is used as starting point for this deployment. A single Windows Server 2008 R2 instance (fsweb.contoso.com) is used to host both the AD FS 2.0 federation server and a WIF sample application. It presumes the availability of a Contoso.com domain, in which fsweb.contoso.com is a member server. The same computer can act as the domain controller and federation server in the test deployments.
-
ADFS 2.0 with SharePoint 2010 is deployed.
The test deployment that was created in Configuring SharePoint 2010 AAM applications with AD FS 2.0 is used as starting point for this deployment. A single Windows Server 2008 R2 instance (fsweb.contoso.com) is used to host the AD FS 2.0 federation server and a Windows Server 2008 R2 instance (SP2010) is used to host the SharePoint 2010 application. It presumes the availability of a Contoso.com domain, in which fsweb.contoso.com is a member server. The same computer can act as the domain controller and federation server in the test deployments.
-
Access Manager is deployed.
The Access Manager environment in this deployment is hosted by a fictitious company called nam.example.com. Only the Identity Server component of Access Manager is required for this federation. For more information about installation and deployment of Access Manager, see the Access Manager documentation.
NOTE:You can download the evaluation version of Access Manager from NetIQ’s download portal.
Linux Environment
-
Access Manager 3.1 SP4, 3.1 SP5, 3.2.x, or 4.0.
-
SUSE Linux Enterprise Server (SLES) 11 SP1 64-bit or a higher version.
NOTE:Access Manager supports both Windows and Linux. This section discusses only the Linux environment.
IP Connectivity
Ensure that the Access Manager (nam.example.com) and AD FS 2.0 (fsweb.contoso.com) systems have IP connectivity between them. The Contoso.com domain controller, if it is running on a separate computer, does not require IP connectivity to the Access Manager system. If the Access Manager firewall is set up, open the ports required for the Identity Server to communicate with the Administration Console.
For more information about these ports, see Setting Up Firewalls in the NetIQ Access Manager 4.1 Installation and Upgrade Guide.
For HTTPS communication, the Access Manager Identity Server uses TCP 8443 by default. Your browsers need to access this port when using the HTTP POST Binding. Or, you can change this port to 443 by using iptables. See Translating the Identity Server Configuration Port in the NetIQ Access Manager 4.1 Installation and Upgrade Guide.
For back-channel communication with cluster members, you need to open two consecutive ports for the cluster, such as 7801 and 7802. The initial port (7801) is configurable. See Configuring a Cluster with Multiple Identity Servers.
All federation servers (AD FS and Access Manager) need access to a reliable Network Time Protocol (NTP) time source.
Name Resolution
The hosts file on the AD FS 2.0 computer (fsweb.contoso.com) is used to configure name resolution of the partner federation servers and sample applications.
Clock Synchronization
Federation events have a short time to live (TTL). To avoid errors based on time-outs, ensure that both computers have their clocks synchronized.
NOTE:For information about how to synchronize a Windows Server 2008 R2 domain controller to an Internet time server, see article 816042 in the Microsoft Knowledge Base.
On SLES 11 SP1 64-bit or a higher version, use the command sntp -P no -p pool.ntp.org to synchronize time with the Internet time server.
Configuring Access Manager as a Claims or Identity Provider and AD FS 2.0 as Relying Party or Service Provider
This section explains how to configure a setup in which an Access Manager user gets federated access to the WIF sample application or SharePoint 2010 through AD FS 2.0. This setup uses the SAML 2.0 POST profile.
Configuring Access Manager
NOTE:To deploy this identity federation for Access Manager 3.1 SP4 or higher, create a new contract with the “urn:oasis:names:tc:SAML:2.0:ac:classes:Password” URI and with the name password form method. Configure this contract as the default contract.
Using Metadata to Add a New Service Provider Connection
The first step in configuring Access Manager is to use the AD FS metadata to add a service provider for Access Manager.
Getting the AD FS 2.0 Metadata
-
Access the AD FS server metadata URL at https://<<ADFS (hostname or IP)/FederationMetadata/2007-06/FederationMetadata.xml.
-
Save the AD FS metadata file.
-
Open the saved AD FS metadata file in Notepad, WordPad, or in any XML editor.
-
Remove the <RoleDescriptor> tags from the metadata. For example, remove the following tags:
<RoleDescriptor xsi:type="fed:ApplicationServiceType" protocolSupportEnumeration=http://..................... ……> ……….</RoleDescriptor>
<RoleDescriptor xsi:type="fed:SecurityTokenServiceType" protocolSupportEnumeration=http://..... ………> </RoleDescriptor>
-
Save the changes.
Using the Metadata to Add a New Service Provider Connection
-
In the Access Manager Administration Console, click > > > .
-
Click > .
-
In the field, specify a name by which you want to refer to the provider.
-
Select from the list.
-
Paste the copied AD FS metadata that you saved in Step 5 into the field.
-
Click > .
-
Update the Identity Server.
Adding an AD FS Server Trusted Certificate
-
Download the certificate authority (CA) certificate from the AD FS server.
-
In the Access Manager Administration Console, click > > .
-
Click .
-
Specify a name for the certificate and browse for the ADFS certificate.
-
Click .
-
Click .
-
Click and select .
-
Update the Identity Server.
Creating an Attribute Set in Access Manager
-
In the Access Manager Administration Console, click > > > > click .
-
Provide the attribute set name as adfs-attributes.
-
Click with the default selections.
-
In the section, click .
-
Select from the list.
-
Specify in the field.
-
Select from the list.
-
Click .
-
Click .
-
Select from the list.
-
Specify roles in the field.
-
Select from the list.
-
Click .
-
Update the Identity Server.
Configuring the Service Provider in Access Manager
-
In the Access Manager Administration Console, select the ADFS service provider in the tab.
-
Click .
-
Select .
-
Specify the name identifier format default value and select along with the defaults.
-
Click .
-
Select from the list.
-
Select the required attributes to be sent with authentication. For example, the mail and cn attributes.
-
Click .
-
Update the Identity Server.
Exporting the Identity Provider Metadata to a File
Access https://<<Identity server IP / dns name>>:8443/nidp/saml2/metadata in a browser and save the page as an XML file, such asnam_metadata.xml. AD FS 2.0 uses this file to automate the setup of the Access Manager Claims Provider instance.
Configuring AD FS 2.0
Using Metadata to Add Claims Provider
You need to use the metadata import capabilities of AD FS 2.0 to create the Example.com claims provider. The metadata includes the public key that is used to validate security tokens signed by Access Manager.
Using Metadata to Add a Relying Party
-
In AD FS 2.0, in the console tree, right-click the folder, then click to start the Add Claims Provider Trust Wizard.
-
Click .
-
On the Select Data Source page, select .
-
In the field, click .
-
Navigate to the location where you saved nam_metadata.xml, click , then click .
-
On the Specify Display Name page, type NAM Example.
-
Click > > .
Editing Claim Rules for the Claims Provider Trust
The following claim rule describes how the data from Access Manager is used in the security token that is sent to the WIF sample application or SharePoint 2010.
-
In AD FS 2.0, click , right click , and then click .
or
In the AD FS 2.0 center pane, under , right-click , then click .
-
On the tab, click .
-
On the Select Rule Template page, select the option.
-
Click .
-
On the Configure Claim Rule page, use the following values:
Name
Value
Claim rule name
Name ID Rule
Incoming claim type
Name ID
Incoming name ID format
Unspecified
-
Select the option and click .
-
Click .
-
On the Select Rule Template page, select the option.
-
Click .
-
On the Configure Claim Rule page, under , use the following values:
Name
Value
Claim rule name
Name Rule
Incoming claim type
Name
-
Leave the option selected and click .
-
To acknowledge the security warning, click .
-
Click .
-
Click .
-
On the Select Rule Template page, select the option.
-
Click .
-
On the Configure Claim Rule page, in the field, use the following values:
Name
Value
Claim rule name
Email Rule
Incoming claim type
E-Mail Address
-
Leave the option selected and click .
-
To acknowledge the security warning, click .
-
Click .
Editing Claim Rules for the WIF Sample Application
At this point, incoming claims have been received at AD FS 2.0, but rules that describe what to send to the WIF sample application have not yet been created. You need to edit the existing claim rules for the sample application to take into account the new Access Manager external claims provider.
-
In AD FS 2.0, click .
-
Right-click , then click .
-
On the tab, click .
-
On the Select Rule Template page, click > .
-
On the Configure Claim Rule page, enter the following values:
Name
Value
Claim rule name
Pass Name Rule
Incoming claim type
Name
-
Leave the option selected, then click .
-
On the tab, click .
-
On the Select Rule Template page, click .
-
Click .
-
On the Configure Claim Rule page, enter the following values:
Name
Value
Claim rule name
Pass Name ID Rule
Incoming claim type
Name ID
Incoming Name ID format
Unspecified
-
Leave the option selected, then click .
-
Click .
NOTE:If you changed the rules while federating AD FS 2.0 with the WIF sample application, ensure that you add the Permit All Users issuance rules back to the WIF sample application. See Step 6: – Change Rules in the AD FS 2.0 Federation with a WIF Application Step-by-Step Guide.
Or, as an alternative, add a new Permit or Deny Users Based on an Incoming Claim rule allowing incoming Name ID = john@example.com to access the application.
Editing Claim Rules for the SharePoint 2010 Application
At this point, incoming claims have been received at AD FS 2.0, but the rules that describe what to be sent to the SharePoint 2010 application have not yet been created. You need to edit the existing claim rules for the SharePoint 2010 application, which is added as relying party to ADFS 2.0, to configure the new Access Manager external claims provider.
Editing the Claim Rules for the SharePoint 2010 Application
-
In AD FS 2.0, click .
-
Right-click , then click
-
On the tab, click .
-
On the Select Rule Template page, click > .
-
On the Configure Claim Rule page, enter the following values:
Name
Value
Claim rule name
Pass eMail Rule
Incoming claim type
Email Address
-
Leave the option selected and click .
Changing the AD FS 2.0 Signature Algorithm
By default, Access Manager uses the Secure Hash Algorithm 1 (SHA-1) for signing operations. By default, AD FS 2.0 expects partners to use SHA-256. Complete the following steps to set AD FS 2.0 to expect SHA-1 for interoperability with Access Manager.
NOTE:The same procedure is recommended for AD FS 2.0 relying party trusts that use Access Manager. If the Access Manager SP signs authnRequests, artifact resolution requests, or logout requests, AD FS 2.0 errors occur unless this signature algorithm setting is changed.
-
In AD FS 2.0, click .
-
Right-click > .
-
On the tab, select in the list.
-
Click .
Using Certificates and Certificate Revocation Lists
For security reasons, production federation deployments require the use of digitally signed security tokens, and optionally allows encryption of the security token contents. Self-signed private key certificates, which are generated from inside the AD FS 2.0 and Access Manager products, are used for signing security tokens.As an alternative, organizations can use a private key certificate that is issued by a certificate authority (CA) for signing and encryption. The primary benefit of using CA-issued certificates is the ability to check for possible certificate revocation against the certificate revocation list (CRL) from the issuing CA. Also, to avoid the untrusted certificate messages in browsers, the trusted root certificate of the CA must also be imported into your browsers. Many well-known CA's trusted roots are included with common browsers. Using one of these existing CAs to mint your certificates also prevents the untrusted certificate messages.
In AD FS 2.0 and in Access Manager, CRL checking is enabled by default for all partner connections, if the certificate being used by the partner includes a CRL Distribution Point (CDP) extension. This has implications in federation deployments between Access Manager and AD FS 2.0:
-
If a signing/encryption certificate provided by one side of a federation includes a CDP extension, that location must be accessible by the other side's federation server. Otherwise, CRL checking fails, resulting in a failed access attempt. The CDP extensions are added by default to certificates that are issued by Active Directory Certificate Services (AD CS) in Windows Server 2008 R2.
-
If the signing/encryption certificate does not include a CDP extension, no CRL checking is performed by AD FS 2.0 or Access Manager.
Disabling CRL Checking in the Linux Identity Server
-
In Access Manager 3.1 SP4 or 3.1 SP5, modify the /opt/novell/nam/idp/conf/tomcat7.conf file and add JAVA_OPTS="${JAVA_OPTS} -Dcom.novell.nidp.serverOCSPCRL=false"
or
In Access Manager 3.2.x or 4.0, modify /opt/novell/nam/idp/conf/tomcat7.conf and add JAVA_OPTS="${JAVA_OPTS} -Dcom.novell.nidp.serverOCSPCRL=false"
-
To apply the changes, restart the Identity Server by running the /etc/init.d/novell-idp restart command.
Disabling CRL Checking in AD FS 2.0
-
Click > > .
-
Enter the following command at the PowerShell command prompt:
set-ADFSClaimsProviderTrust -TargetName "NAM Example"
-SigningCertificateRevocationCheck None
NOTE:You can make many configuration changes to AD FS 2.0 by using the Windows PowerShell command line and scripting environment. For more information, see the AD FS 2.0 Windows PowerShell Administration section of the AD FS 2.0 Operations Guide and the AD FS 2.0 Cmdlets Reference.
Example Scenario: Access Manager as the Claims Provider and AD FS 2.0 as the Relying Party
Accessing the WIF Sample Application
In this scenario, John from Example.com accesses the Contoso WIF sample application.
NOTE:Clear all the cookies in the Internet Explorer on the AD FS 2.0 computer (fsweb.contoso.com). To clear the cookies, click > > under , and then select cookies for deletion.
-
On the AD FS 2.0 computer, open a browser window, then navigate to https://fsweb.contoso.com/ClaimsAwareWebAppWithManagedSTS/default.aspx.
The first page prompts you to select your organization from a list.
-
Select , then click to sign in.
When only one Identity Provider is available, AD FS 2.0 forwards the request to that Identity Provider by default.
-
The NAM login page appears. Type the user name john, type the password test, then click .
Accessing the SharePoint 2010 Application
The user's email ID is used as the mapped attribute to access the SharePoint 2010 application. Assume that a user is created in the NetIQ Identity Server. The email ID configured for this user is namuser1@namidp.com.
NOTE:Clear all the cookies in the Internet Explorer on the AD FS 2.0 computer (fsweb.contoso.com). To clear the cookies, click > > under , then select cookies for deletion.
-
Ensure that an email ID has been configured for the user in the Access Manager user store.
For this example, use namuser1@namidp.com.
-
Access the SharePoint 2010 application.
The user is redirected to AD FS 2.0.
-
Select .
The user is redirected to the NAM IDP nidp page for authentication.
-
Provide namuser1 as the username and password.
After authentication, the user is redirected to the SharePoint application.
Configuring AD FS 2.0 as the Claims or Identity Provider and Access Manager as the Relying Party or Service Provider
This section explains how to configure an application through AD FS 2.0 that gets federated access to an application by using Access Manager. The setup uses the SAML 2.0 POST profile.
Configuring Access Manager
The AD FS metadata is used to add an Identity Provider to Access Manager.
Getting the AD FS 2.0 Metadata
-
Access the AD FS server metadata by going to https://<<ADFS hostname or IP/FederationMetadata/2007-06/FederationMetadata.xml
-
Save the AD FS metadata data.
-
Open the AD FS metadata file in Notepad, WordPad, or an XML editor).
-
Remove the <RoleDescriptor> tags from the metadata.
For example, remove the following tags:
  "<RoleDescriptor xsi:type="fed:ApplicationServiceType"
              protocolSupportEnumeration=http://..................... ……> ……….</RoleDescriptor>
"<RoleDescriptor xsi:type="fed:SecurityTokenServiceType" protocolSupportEnumeration=http://..... ………> </RoleDescriptor> -
Save the changes.
Using the Metadata to Add a New Identity Provider Connection
-
In the Access Manager Administration Console, select > .
-
Click .
-
Select .
-
Click > .
-
Specify the name as in the field.
-
Select from the list.
-
Paste the copied ADFS metadata that you saved in Step 5 into the field.
-
Click .
-
Specify an alphanumeric value that identifies the card in the field.
-
Specify the image to be displayed on the card in the field.
-
Update the Identity Server.
Adding the AD FS Server Trusted Certificate
-
Retrieve the AD FS server's CA trusted root certificate.
-
In the Access Manager Administration Console, select > .
-
Select .
-
Click .
-
Specify the certificate name, and browse for the AD FS certificate authority.
-
Click .
-
Click .
-
Click .
-
Update the Identity Server.
Configuring the Identity Provider in Access Manager
-
Select the in the tab.
-
Click > .
-
Select .
-
Select .
-
Click .
-
Update the Identity Server.
Configuring AD FS 2.0
Using the Metadata to Add a Relying Party
The metadata import capability of AD FS 2.0 is used to create a relying party. The metadata includes the public key that is used to validate security tokens signed by Access Manager.
-
In AD FS 2.0, right-click the folder, then click to start the Add Relying Party Trust Wizard.
-
Click .
-
On the Select Data Source page, select .
-
In the section, click .
-
Navigate to the location where you saved nam_metadata.xml earlier, select the file, then click > .
-
On the Specify Display Name page, specify NAM Example.
-
Click > > .
Editing Claim Rules for a Relying Party Trust
The data from AD FS is used in the security token that is sent to Access Manager.
-
The Edit Claim Rules dialog box should already be open. If not, in the AD FS 2.0 center pane, under , right-click , then click.
-
On the tab, click .
-
On the Select Rule Template page, leave the option selected, then click .
-
On the Configure Claim Rule page, specify Get attributes in the field.
-
Select from the list.
-
In the section, create the following mappings:
LDAP Attribute
Outgoing Claim Type
User-Principal-Name
UPN
E-Mail-Address
E-Mail Address
-
Click .
-
Click > OK.
-
On the tab, click .
-
On the Select Rule Template page, select , then click .
-
On the Configure Claim Rule page, use the following values:
Name
Value
Claim rule name
Mapping To Transient Name Identifier
Incoming Claim Type
UPN
Outgoing Claim Type
Name ID
Outgoing name ID format
Transient Identifier
-
Select , then click .
-
Click > .
Changing the AD FS 2.0 Signature Algorithm
By default, Access Manager uses the Secure Hash Algorithm 1 (SHA-1) for signing operations. By default, AD FS 2.0 expects partners to use SHA-256.
Perform the following steps to setup AD FS 2.0 to expect SHA-1 for interoperability with the Access Manager Identity Provider:
-
In AD FS 2.0, click > right-click > .
-
On the tab, select in the list.
-
Click .
Disabling the Certificate Revocation List
For more information about signing and encryption certificates, see Using Certificates and Certificate Revocation Lists.
Disabling the CRL Checking Option in the Linux Identity Provider
In Access Manager 3.1 SP4 or 3.1 SP5, modify the /opt/novell/nam/idp/conf/tomcat7.conf file and add JAVA_OPTS="${JAVA_OPTS} -Dcom.novell.nidp.serverOCSPCRL=false"
In Access Manager 3.2.x or 4.0, modify /opt/novell/nam/idp/conf/tomcat7.conf and add JAVA_OPTS="${JAVA_OPTS} -Dcom.novell.nidp.serverOCSPCRL=false"
Disabling the CRL Checking Option in AD FS 2.0
-
Click > > .
-
Enter the following command at the PowerShell command prompt:
set-ADFSRelyingPartyTrust -TargetName "NAM Example"
-SigningCertificateRevocationCheck None
AD FS 2.0 Encryption Strength
In AD FS 2.0, encryption of the outbound assertions is enabled by default. Assertion encryption occurs for any relying party or service provider for which AD FS 2.0 possesses an encryption certificate. AD FS 2.0 uses 256-bit Advanced Encryption Standard (AES) keys or AES-256 for encryption. In contrast, Failing to reconcile these conflicting defaults can result in the failed SSO attempts. To resolve this issue, disable the encryption in AD FS 2.0.
-
In AD FS 2.0, click > > .
-
Enter the following command in at the PowerShell command prompt:
set-ADFSRelyingPartyTrust -TargetName "NAM Example"
-EncryptClaims $False
AD FS 2.0 Basics
Configuring the Token-Decrypting Certificate
-
Open the AD FS 2.0 Management tool, then click > > .
-
In the left pane, expand the folder and click .
-
In the section, select .
-
(Conditional) If you see an error prompting you to run certain commands during the token-decrypting process, run the following PowerShell commands:
Add-PSSnapin Microsoft.Adfs.PowerShell
Set-ADFSProperties -AutoCertificateRollover $false
These commands allow you to select other certificates. The certificate must be installed on the server. The certificates are configured on the IIS Manager.
-
Click >> .
-
Click .
-
Click in the IIS section.
Adding CA Certificates to AD FS 2.0
-
In Windows, > > .
-
Attach snapshot certificates as service.
-
Select .
-
Import the CA certificate to trusted authorities.
Debugging AD FS 2.0
-
In the , click > . You can access the troubleshooting help at Troubleshooting certificate problems with AD FS 2.0.
Power Shell Commands Help:
5.2.7 Configuring Liberty Web Services
A Web service uses Internet protocols to provide a service. It is an XML-based protocol transported over SOAP, or a service whose instances and data objects are addressable via URIs.
Access Manager consists of several elements that comprise Web services:
-
Web Service Framework: Manages all Web services. The framework defines SOAP header blocks and processing rules that enable identity services to be invoked via SOAP requests and responses.
-
Web Service Provider: An entity that provides data via a Web service. In Access Manager, Web service providers host Web service profiles, such as the Employee Profile, Credential Profile, Personal Profile, and so on.
-
Web Service Consumer: An entity that uses a Web service to access data. Web service consumers discover resources at the Web service provider, and then retrieve or update information about a user, or on behalf of a user. Resource discovery among trusted partners is necessary because a user might have many kinds of identities (employee, spouse, parent, member of a group), as well as several identity providers (employers or other commercial Web sites).
-
Discovery Service: The service assigned to an identity provider that enables a Web Service Consumer to determine which Web service provider provides the required resource.
-
LDAP Attribute Mapping: Access Manager’s solution for mapping Liberty attributes with established LDAP attributes.
This section describes the following topics:
For additional resources about the Liberty Alliance specifications, visit the Liberty Alliance Specification page.
Web Services Framework
The Web Services Framework page lets you edit and manage all the details that pertain to all Web services. This includes the framework for building interoperable identity services, permission-based attribute sharing, identity service description and discovery, and the associated security mechanisms.
-
In the Administration Console, click > > Edit > .
-
Fill in the following fields:
Enable Framework: Enables Web Services Framework.
Axis SOAP Engine Settings: Axis is the SOAP engine that handles all Web service requests and responses. Web services are deployed using XML-based files known as Web service deployment descriptors (WSDD). On startup, Access Manager automatically creates the server-side and client-side configuration for Axis to handle all enabled Web services.
If you need to override this default configuration, use the field and the field to enter valid WSDD XML. If either or both of these controls contain valid XML, then Access Manager does not automatically create the configuration (server or client) on startup.
-
Click .
Managing Web Services and Profiles
After a service has been discovered and data has been received from a trusted identity provider, the Web service consumer can invoke the service at the Web service provider. A Web service provider is the hosting or relying entity on the server side that can make access control decisions based on this data and upon its business practices and preferences.
-
In the Administration Console click > Edit > .
-
Select one of the following actions
New: To create a new Web service, click . This activates the Create Web Service Wizard. You can create a new profile only if you have deleted one.
Delete: To delete an existing profile, select the profile, then click .
Enable: To enable a profile, select the profile, then click .
Disable: To disable a profile, select the profile, then click .
Edit a Policy: To edit the policy associated with a profile, click the link. For configuration information, see Editing Web Service Policies.
Edit a profile: To edit a profile, click the name of a profile. For information about configuring the details, see Modifying Service and Profile Details for Employee, Custom, and Personal Profiles and Modifying Details for Authentication, Discovery, LDAP, and User Interaction Profiles.
For information about modifying the description, see Editing Web Service Descriptions.
The Identity Server comes with the following Web service profile types:
Authentication Profile: Allows the system to access the roles and authentication contracts in use by current authentications. This profile is enabled by default so that Embedded Service Providers can evaluate roles in policies. This profile can be disabled. When it is disabled, all devices assigned to use this Identity Server cluster configuration cannot determine which roles a user has been assigned, and the devices evaluate policies as if the user has no roles.
WARNING:Do not delete this profile. In normal circumstances, this profile is used only by the system.
Credential Profile: Allows users to define information to keep secret. It uses encryption to store the data in the directory the user profile resides in.
Custom Profile: Used to create custom attributes for general use.
Discovery: Allows requesters to discover where the resources they need are located. Entities can place resource offerings in a discovery resource, allowing other entities to discover them. Resources might be a personal profile, a calendar, travel preferences, and so on.
Employee Profile: Allows you to manage employment-related information and how the information is shared with others. A company address book that provides names, phones, office locations, and so on, is an example of an employee profile.
LDAP Profile: Allows you to use LDAP attributes for and general use.
Personal Profile: Allows you to manage personal information and to determine how to share that information with others. A shopping portal that manages the user’s account number is an example of a personal profile.
User Interaction: Allows you to set up a trusted user interaction service, used for identity services that must interact with the resource owner to get information or permission to share data with another Web service consumer. This profile enables a Web service consumer and Web service provider to cooperate in redirecting the resource owner to the Web service provider and back to the Web service consumer.
-
Click .
-
On the Servers page, update the Identity Server.
Modifying Service and Profile Details for Employee, Custom, and Personal Profiles
The settings on the Details page are identical for the Employee, Custom, and Personal Profiles. This page allows you to specify the display name, resource ID encryption, and how the system reads and writes data.
-
In the Administration Console, click > > Edit > .
-
Click , , or , depending on which profile you want to edit.
-
Click the tab (it is displayed by default).
-
Specify the general settings, as necessary:
Display Name: The Web service name. This specifies how the profile is displayed in the Administration Console.
Have Discovery Encrypt This Service’s Resource Ids: Specifies whether the Discovery Service encrypts resource IDs. A resource ID is an identifier used by Web services to identify a user. The Discovery Service returns a list of resource IDs when a trusted service provider queries for the services owned by a given user. The Discovery Service has the option of encrypting the resource ID or sending it unencrypted.
-
Specify data location settings:
Selected Read Locations: The list of selected locations from which the system reads attributes containing profile data. If you add multiple entries to this list, the system searches attributes in each location in the order you specify. When a match is found for an attribute, the other locations are not searched. Use the up/down and left/right arrows to control which locations are selected and the order in which to read them. Read locations can include:
-
Configuration Datastore: Liberty attribute values can be stored in the configuration store of the Administration Console. If your users have access to the User Portal, they can add values to a number of Liberty attributes.
-
LDAP Data Mappings: If you have mapped a Liberty attribute to an LDAP attribute in your user store, the values can be read from the LDAP user store. To create LDAP attribute maps, see Mapping LDAP and Liberty Attributes.
-
Remote Attributes: If you set up federation, the Identity Server can read attributes from these remote service providers. Sometimes, the service provider is set up to push a set of attribute values when the user logs in. These pushed attributes are cached, and the Identity Server can quickly read them. If a requested attribute has not been pushed, a request for the Liberty attribute is sent to remote service provider. This can be time consuming, especially if the user has federated with more than one remote service provider. should always be the last item in this list.
Available Read Locations: The list of available locations from which the system can read attributes containing profile data. Locations in this list are currently not being used.
Selected Write Locations: The list of selected locations to write attribute data to. If you add multiple entries to this list, the system searches attributes in each location in the order you specify. When a match is found for an attribute, the other locations are not searched. Use the up/down and left/right arrows to control which locations are selected and the order in which they are selected.
-
Configuration Datastore: Liberty attribute values can be stored in the configuration store of the Administration Console. The Identity Server can write values to these attributes. If this location appears first in the list of , all Liberty attribute values are written to this location. If you want values written to the LDAP user store, the location must appear first in the list.
-
LDAP Data Mappings: If you have mapped a Liberty attribute to an LDAP attribute in your user store, the Identity Server can write values to the attribute in the LDAP user store. To create LDAP attribute maps, see Mapping LDAP and Liberty Attributes.
Available Write Locations: The list of available locations to write attributes containing profile data. Locations in this list are currently not being used.
-
-
(Optional) Specify data model extensions.
Data Model Extension XML: The data model for some Web services is extensible. You can enter XML definitions of data model extensions in this field. Data model extensions hook into the existing Web service data model at predefined locations.
All schema model extensions reside inside of a schema model extension group. The group exists to bind model data items together under a single localized group name and description. Schema model extension groups can reside inside of a schema model extension root or inside of a schema model extension. There can only be one group per root or extension. Each root is hooked into the existing Web service data model. Multiple roots can be hooked into the same location in the existing Web service data model. This conceptual model applies to the structure of the XML that is required to define data model extensions.
See Section B.0, Data Model Extension XML for more information.
-
Click , then click on the Web Service Provider page.
-
Update the Identity Server.
Modifying Details for Authentication, Discovery, LDAP, and User Interaction Profiles
This page allows you to specify information for Discovery, LDAP, and User Interaction Web service profiles. If you are creating a Web service type, this is Step 2 of the Create Web Service Wizard.
For conceptual information about profiles, see Managing Web Services and Profiles.
-
In the Administration Console, click > > Edit > > .
-
Click or , depending on which profile you want to edit.
-
Configure the following fields:
Display name: The Web service name. This specifies how the profile is displayed in the Administration Console.
Have Discovery Encrypt This Service’s Resource Ids: (Not applicable for the Discovery profile) Specifies whether the Discovery Service encrypts resource IDs. A resource ID is an identifier used by Web services to identify a user. The Discovery Service returns a list of resource IDs when a trusted service provider queries for the services owned by a given user. The Discovery Service has the option of encrypting the resource ID or sending it unencrypted. This ID is encrypted with the public key of the resource provider generated at installation. Encrypting resource IDs is turned off by default.
-
Click .
Editing Web Service Descriptions
All of the Description pages on each profile are identical. You can define how a service provider gains access to portions of the user’s identity information that can be distributed across multiple providers. The service provider uses the Discovery Service to ascertain the location of a specific identity service for a user. The Discovery Service enables various entities to dynamically and securely discover a user’s identity service, and it responds, on a permission basis, with a service description of the desired identity service.
-
In the Administration Console, click > > Edit > .
-
Click the profile or service.
-
Click .
-
Click the description name, or click .
-
Fill in the following fields:
Name: The Web Service Description name.
Security Mechanism: (Required) Liberty uses channel security (TLS 1.0) and message security in conjunction with the security mechanism. Channel security addresses how communication between identity providers, service providers, and user agents is protected. For authentication, service providers are required to authenticate identity providers by using identity provider server-side certificates. Identity providers have the option to require authentication of service providers by using service provider client-side certificates.
Message security addresses security mechanisms applied to the discrete Liberty protocol messages passed between identity providers, service providers, and user agents.
Select the mechanism for message security. Message authentication mechanisms indicate which profile is used to ensure the authenticity of a message.
-
X.509: Used for message exchanges that generally rely upon message authentication as the principle factor in making decisions.
-
SAML: Used for message exchanges that generally rely upon message authentication as well as the conveyance and attestation of information.
-
Bearer: Based on the presence of the security header of a message. In this case, the bearer token is verified for authenticity rather than proving the authenticity of the message.
-
-
Under , select either or .
Brief Service Access Method: Provides the information necessary to invoke basic SOAP-over-HTTP-based service instances without using WSDL.
-
EndPoint URL: This is the SOAP endpoint location at the service provider to which Liberty SOAP messages are sent. An example of this for the Employee Profile is [BASEURL]/services/IDSISEmployeeProfile. If the service instance exposes an endpoint that is different from the logically generated concrete WSDL, you must use the WSDL URI instead.
A WSF service description endpoint cannot contain double-byte characters.
-
SOAP Action: The SOAP action HTTP header required on HTTP-bound SOAP messages. This header can be used to indicate the intent of a SOAP message to the recipient.
WSDL Service Access Method: Specify the method used to access the WSDL service. WSDL (Web Service Description Language) describes the interface of a Web service.
-
Service Name Reference: A reference name for the service.
-
WSDL URI: Provides a URI to an external concrete WSDL resource containing the service description. URIs need to be constant across all implementations of a service to enable interoperability.
-
-
Click .
-
Update the Identity Server configuration.
Editing Web Service Policies
Web Service policies are permission policies (query and modify) that govern how identity providers share end-user data with service providers. Administrators and policy owners (users) can control whether private information is always allowed to be given, never allowed, or must be requested.
As an administrator, you can configure this information for the policy owner, for specific service providers, or globally for all service providers. You can also specify what policies are displayed for the end user in the User Portal, and whether users are allowed to edit them.
-
In the Administration Console, click > > Edit >
-
Click the link next to the service name.
-
Click the category you want to edit.
All Trusted Providers: Policies that are defined by the service provider’s ability to query and modify the particular Liberty attributes or groups of attributes for the Web service. When All Trusted Providers permissions are established, and a service provider needs data, the system first looks here to determine whether user data is allowed, never allowed, or must be asked for. If no solution is found in All Trusted Providers, the system examines the permissions established within the specific service provider.
Owners: Policies that limit the end user’s ability to modify or query data from his or her own profile. The settings you specify in the group are reflected on the My Profile page in the User Portal. Portal users have the authority to modify the data items in their profiles. The data items include Liberty and LDAP attributes for personal identity, employment, and any customized attributes defined in the Identity Server configuration. Any settings you specify in the Administration Console override what is displayed in the User Portal. Overrides are displayed in the column.
If you want the user to have Write permission for a given data item, and that data item is used in an LDAP Attribute Map, then you must configure the LDAP Attribute Map with Write permission.
-
On the All Service Policy page, select the policy’s check box, then click .
This lets you modify the parent service policy attribute. Any selections you specify on this page are inherited by child policies.
Query Policy: Allows the service provider to query for the data on a particular attribute. This is similar to read access to a particular piece of data.
Modify Policy: Allows the service provider to modify a particular attribute. This is similar to write access to a particular piece of data.
Query and Modify: Allows you to set both options at once.
-
To edit child attributes of the parent, click the policy.
In the following example, child attributes are inheriting Ask Me permission from the parent attribute. The attribute, however, is modified to never allow permission for sharing.
If you click the attribute, you can see that all of its child attributes have inherited the setting. You can specify different permission attributes for (for example), but the inherited policy still overrides changes made at the child level, as shown below.
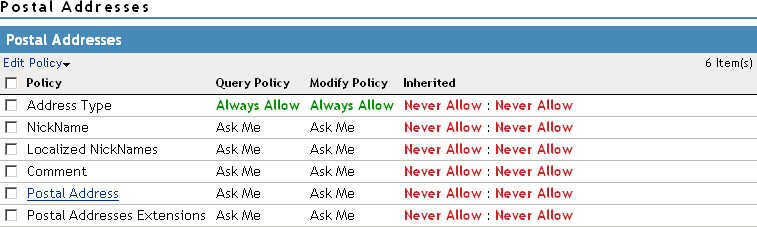
The interface allows these changes to simplify switching between configurations if, for example, you want to remove an inherited policy.
Inherited: Specifies the settings inherited from the parent attribute policy, when you view a child attribute. In the User Portal, settings displayed under are not modifiable by the user. At the top-level policy in the User Portal, the values are inherited from the settings in the Administration Console. Thereafter, inheritance can come from the service policy or the parent data item’s policy.
Ask Me: Specifies that the service provider requests from the user what action to take.
Always Allow: Specifies that the identity provider always allows the attribute data to be sent to the service provider.
Never Allow: Specifies that the identity provider never allows the attribute data to be sent to the service provider.
When a request for data is received, the Identity Server examines policies to determine what action to take. For example, if a service provider requires a postal address for the user, the Identity Server performs the following actions:
-
Checks the settings specified in .
-
If no solution is found, checks for the policy settings configured for the service provider.
-
-
Click until the Web Service Provider page is displayed.
-
Click , then update the Identity Server as prompted.
Create Web Service Type
This page allows you to create a Web service profile type. This is Step 1 of the Create Web Service Wizard. Access Manager comes with several Web service profiles, but if you have deleted a profile type, you can create it again.
-
In the Administration Console, click > Edit > >
-
Select the Web service type from the drop-down list, then click .
-
Continue with one of the following:
Configuring Credential Profile Security and Display Settings
On the Credential Profile Details page, you can specify whether this profile is displayed for end users, and determine how you control and store encrypted secrets. You can store and access secrets locally, on remote eDirectory servers that are running Novell SecretStore, or on a user store that has been configured with a custom attribute for secrets.
For more information about storing encrypted secrets, see the following:
-
For information about how to configure Access Manager for secrets, see Configuring a User Store for Secrets.
-
For general information about Novell SecretStore, see the Novell SecretStore Administration Guide.
-
For information about creating shared secrets for Form Fill and Identity Injection policies, see Section 6.5.4, Creating and Managing Shared Secrets.
To configure the Credential Profile:
-
In the Administration Console, click > > Edit > .
-
Click .
-
On the Credential Profile Details page, fill in the following fields as necessary:
Display name: The name you want to display for the Web service.
Have Discovery Encrypt This Service’s Resource Ids: Specify whether the Discovery Service encrypts the resource IDs. A resource ID is an identifier used by Web services to identify a user. The Discovery Service returns a list of resource IDs when a trusted service provider queries for the services owned by a given user. The Discovery Service has the option of encrypting the resource ID or sending it unencrypted. Encrypting resource IDs is disabled by default.
-
Under , enable the following option if necessary:
Allow End Users to See Credential Profile: Specify whether to display or hide the Credential Profile in the Access Manager User Portal. Profiles are viewed on the My Profile page, where the user can modify his or her profile.
-
Specify how you want to control and store secrets:
-
To locally control and store secrets, configure the following fields:
Encryption Password Hash Key: (Required) Specify the password that you want to use as a seed to create the encryption algorithm. To increase the security of the secrets, ensure that you change the default password to a unique alphanumeric value.
Preferred Encryption Method: Specify the preferred encryption method. Select the method that complies with your security model:
-
Password Based Encryption With MD5 and DES: MD5 is an algorithm that is used to verify data integrity. Data Encryption Standard (DES) is a widely used method of data encryption that uses a private key.
-
DES: Data Encryption Standard (DES) is a widely used method of data encryption that uses a private key. Like other private key cryptographic methods, both the sender and the receiver must know and use the same private key.
-
Triple DES: A variant of DES in which data is encrypted three times with standard DES by using two different keys.
-
-
Specify where to store secret data. (For more information about setting up a user store for secret store, see Configuring a User Store for Secrets.)
-
To have the secrets stored in the configuration database, do not configure the list in the section. You only need to configure the fields in Step 5.a.
-
To store the secrets in your LDAP user store, click in and configure the following fields:
User Store: Select a user store where secret data is stored.
Attribute Name: Specify the LDAP attribute of the User object that can be used to store the secrets. When a user authenticates by using the user store specified here, the secret data is stored in an XML document of the specified attribute of the user object. This attribute should be a single-valued case ignore string that you have defined and assigned to the user object in the schema.
NOTE:Do not use this LDAP attribute in Policy configuration as shared secrets. Instead you create the shared secrets attributes. The Shared secret attributes are populated in the configured LDAP attribute, and are used by policy for mapping. For more information about how to create shared secret, see Section 6.5, Form Fill Policies.
-
To use Novell SecretStore to remotely store secrets, click under
Click the user store that you have configured for SecretStore.
Secure LDAP must be enabled between the user store and the Identity Server to add this user store reference.
-
-
Click twice.
-
-
On the Identity Server page, update the Identity Server.
Customizing Attribute Names
You can change the display names of the attributes for the Credential, Custom, Employee, and Personal profiles. The customized names are displayed on the My Profile page in the User Portal. The users see the custom names applicable to their language. Custom Attributes are displayed on the My Profile page in the User Portal in place of the corresponding English attribute name when the language in the drop-down list is the accepted language of the browser.
-
In the Administration Console, click > > Edit > > > .
-
Click the data item name to view the customized attribute names.
-
Click to create a new custom name.
-
Type the name and select a language.
-
Click .
-
On the Custom Attribute Names page, click .
-
On the Web Service Provider page, click .
-
Update the Identity Server configuration on the Servers page.
Configuring the Web Service Consumer
The Web service consumer is the component within the identity provider that requests attributes from Web service providers. The identity provider and Web services consumer cooperate to redirect the user or resource owner to the identity provider, allowing interaction. You can configure an interaction service, which allows the identity provider to pose simple questions to a user. This service can be offered by trusted Web services consumers, or by a dedicated interaction service provider that has a reliable means of communication with the users.
-
In the Administration Console, click > > Edit >
The following general settings configure time limits and processing speed:
Protocol Timeout (seconds): Limits the time the transport protocol allows.
Provider Timeout (seconds): Limits the request processing at the Web service provider. This value must always be equal to or greater than the value.
Attribute Cache Enabled: A subsystem of the Web service consumer that caches attribute data that the Web service consumer requests. For example, if the Web service consumer has already requested a first name attribute from a Web service provider, the Web service consumer does not need to request the attribute again. This setting improves performance when enabled. However, you can disable this option to increase system memory.
-
Specify how and when the identity provider interacts with the user:
Always Allow Interaction: Allows interaction to take place between users and service providers.
Never Allow Interaction: Never allows interaction between users and service providers.
Always Allow Interaction for Permissions, Never for Data: Allows interaction for permissions, never for data.
Maximum Allowed Interaction Time: Specifies the allowed time (in seconds).
-
To specify the allowable methods that a Web service provider can use for user interaction, click one of the following options:
Redirect to a User Interaction Service: Allows the Web service consumer to redirect the user agent to the Web service provider to ask questions. After the Web service provider has obtained the information it needs, it can redirect the user back to the Web service consumer.
Call a Trusted User Interaction Service: Allows the Web service provider to trust the Web service consumer to act as proxy for the resource owner.
-
Under , fill in the following fields:
WSS Security Token Type: Instructs the Web service consumer/requestor how to place the token in the security header as outlined in the Liberty ID-WSF Security Mechanisms.
Signature Algorithm: The signature algorithm to use for signing the payload.
-
Click , then update the Identity Server configuration as prompted.
Mapping LDAP and Liberty Attributes
You can create an LDAP attribute map or edit an existing one. To create an attribute map, you specify how single-value and multi-value data items map to single-value and multi-value LDAP attributes. A single-value attribute can contain no more than one value, and a multi-value attribute can contain more than one. An example of a single-value attribute might be a person’s gender, and an example of a multi-value attribute might be a person’s various e-mail addresses, phone numbers, or titles.
-
In the Administration Console, click > > > >.
-
Select one of the following actions:
New: Allows you create an LDAP attribute mapping. Select from the following types:
-
One to One: Maps a single Liberty attribute to a single LDAP attribute. See Configuring One-to-One Attribute Maps.
-
Employee Type: Maps the Employee Type attribute to an LDAP attribute, then maps the possible Liberty values to LDAP values. See Configuring Employee Type Attribute Maps.
-
Employee Status: Maps the Employee Status attribute to an LDAP attribute, then maps the possible Liberty values to LDAP values. See Configuring Employee Status Attribute Maps.
-
Postal Address: Maps the Postal Address attribute to either multiple LDAP attributes or a delimited LDAP attribute. See Configuring Postal Address Attribute Maps.
-
Contact Method: Maps the Contact Method attribute to multiple LDAP attributes. See Configuring Contact Method Attribute Maps.
-
Gender: Maps the Gender attribute to an LDAP attribute, then maps the possible Liberty values to LDAP values. See Configuring Gender Attribute Maps.
-
Marital Status: Maps the Marital Status attribute to an LDAP attribute, then maps the possible Liberty values to LDAP values. See Configuring Marital Status Attribute Maps.
Delete: Deletes the selected mapping.
Enable: Enables the selected mapping.
Disable: Disables the selected mapping. When the mapping is disabled, the server does not load the definition. However, the definition is not deleted.
-
-
Click , then update the Identity Server.
Configuring One-to-One Attribute Maps
A one-to-one map enables you to map single-value and multiple-value LDAP attribute names to standard Liberty attributes. A default one-to-one attribute map is provided with Access Manager, but you can also define your own.
An example of a one-to-one attribute map might be the single-valued Liberty attribute Common Name (CommonName) used by the Personal Profile that is mapped to the LDAP attribute givenName. You can further configure the various Liberty values to map to any LDAP attribute names that you use.
-
In the Administration Console, click > > > > > > .
-
Configure the following fields:
Type: Displays the type of mapping you are modifying or creating:
Name: The name you want to give the map.
Description: A description of the map.
Access Rights: A drop-down menu that provides the broadest control for the page. If you set this to , you can specify rights for individual data items.
For user provisioning to succeed, you must select from the drop-down menu for any maps that use an attribute during user provisioning.
User Stores: The user store that a map applies to. If a user logs into a user store that is not in the map’s user store list, that map is not used to read or write attributes for that user.
-
Use the following guidelines to configure the map:
-
Mapping Personal Profile Single-Value Data Items to LDAP Attributes
-
Mapping Personal Profile Multiple-Value Data Items to LDAP Attributes
-
Mapping Employee Profile Single-Value Data Items to LDAP Attributes
-
Mapping Employee Profile Multiple-Value Data Items to LDAP Attributes
-
Mapping Custom Profile Single-Value Data Items to LDAP Attributes
-
Mapping Custom Profile Multiple-Value Data Items to LDAP Attributes
-
-
After you create the mapping, click .
-
On the LDAP Attribute Mapping page, click .
-
Update the Identity Server.
Mapping Personal Profile Single-Value Data Items to LDAP Attributes
The data items displayed are single-value Liberty Personal Profile attributes that you can map to the single-valued LDAP attributes that you have defined for your directory.

Mapping Personal Profile Multiple-Value Data Items to LDAP Attributes
Use the fields on this page to map multiple-value attributes from the Liberty Personal Profile to the multiple-value LDAP attributes you have defined for your directory. For example, you can map the Liberty attribute Alternate Every Day Name (AltCN) to the LDAP attribute you have defined for this purpose in your directory.

Mapping Employee Profile Single-Value Data Items to LDAP Attributes
Map the Liberty Employee Profile single-value attributes to the LDAP attributes you have defined in your directory for entries such as ID, Date of Hire, Job Start Date, Department, and so on.
Mapping Employee Profile Multiple-Value Data Items to LDAP Attributes
Map the Liberty Employee Profile multiple-value attributes to the LDAP attributes you have defined in your directory.
Mapping Custom Profile Single-Value Data Items to LDAP Attributes
Map custom Liberty profile single-value attributes to LDAP attributes you have defined in your directory. These attributes are customizable strings associated with the Custom Profile.

Customizable String (1 - 10): The Custom Profile allows custom single-value and multiple-value attributes to be defined without using the Data Model Extension XML to extend a service’s schema. To use a customizable attribute, navigate to the tab on the Custom Profile Details page (see Customizing Attribute Names). Use the page to customize the name of any of the predefined single-value or multiple-value customizable attributes in the Custom Profile. After you customize a name, you can use that attribute in the same way you use any other profile attribute.
Mapping Custom Profile Multiple-Value Data Items to LDAP Attributes
Customizable Multi-Valued Strings (1 - 5): Similar to customizable strings for single-value attributes, except these attributes can have multiple values. Use this list of fields to map directory attributes that can have multiple values to multiple-value strings from the Custom Profile.
Configuring Employee Type Attribute Maps
You can map the LDAP attribute name and values to the Liberty profile values for Employee Type. This is an Employee Profile attribute. Examples of Liberty values appended to this attribute include Contractor Part Time, Contractor Full Time, Full Time Regular, and so on.
-
In the Administration Console, click > > > > > > .
-
Configure the following fields:
Name: The name you want to give the map.
Description: A description of the map.
Access Rights: A drop-down menu that provide the broadest control for the page. If you set this to , you can specify rights for individual data items.
For user provisioning to succeed, you must select from the drop-down menu for any maps that use an attribute during user provisioning.
User Stores: The user store that a map applies to. If a user logs into a user store that is not in the map’s user store list, that map is not used to read or write attributes for that user.
-
In the field, type the LDAP attribute name that you want to map to the Liberty Employee Type attribute.
-
In the fields, type the predefined LDAP attribute values that you want to map to the values.
These are the values that you want to store in the LDAP attribute for each given Liberty attribute value. The LDAP attribute map then maps the actual Liberty URI value, back and forth, to this supplied value.
-
Click .
-
On the LDAP Attribute Mapping page, click .
-
Update the Identity Server.
Configuring Employee Status Attribute Maps
You can map the LDAP attribute name and values to the Liberty profile values for Employee Status. This is an Employee Profile attribute. Examples of the values appended to this Liberty attribute include Active, Trial, Retired, Terminated, and so on.
-
In the Administration Console, click > > > > > > .
-
Configure the following fields:
Name: The name you want to give the map.
Description: A description of the map.
Access Rights: A drop-down menu that provide the broadest control for the page. If you set this to , you can specify rights for individual data items.
For user provisioning to succeed, you must select from the drop-down menu for any maps that use an attribute during user provisioning.
User Stores: The user store that a map applies to. If a user logs into a user store that is not in the map’s user store list, that map is not used to read or write attributes for that user.
-
In the field, type the LDAP attribute name that you want to map to the element.
-
In the fields, type the predefined LDAP attribute values that you want to map to the values.
These are the values that you want to store in the LDAP attribute for each given Liberty attribute value. The LDAP attribute map then maps the actual Liberty URI value, back and forth, to this supplied value.
-
Click .
-
On the LDAP Attribute Mapping page, click .
-
Update the Identity Server.
Configuring Postal Address Attribute Maps
You can map the LDAP attribute name and values to the Liberty profile values for Postal Address. The PostalAddress element refers to the local address, including street or block with a house number, and so on. This is a Personal Profile attribute.
-
In the Administration Console, click > > > > > > .
-
Configure the following fields:
Name: The name you want to give the map.
Description: A description of the map.
Access Rights: A drop-down menu that provide the broadest control for the page. If you set this to , you can specify rights for individual data items.
For user provisioning to succeed, you must select from the drop-down menu for any maps that use an attribute during user provisioning.
User Stores: The user store that a map applies to. If a user logs into a user store that is not in the map’s user store list, that map is not used to read or write attributes for that user.
-
In the drop-down menu, select either or .
Multiple LDAP Attributes: Allows you to map multiple LDAP attributes to multiple Liberty Postal Address elements. When you select this option, the following Liberty Postal Address elements are displayed under the group. Type the LDAP attributes that you want to map to the Liberty elements.
-
Postal Address
-
Postal Code
-
City
-
State
-
Country
Single Delimited LDAP Attributes: Allows you to specify one LDAP attribute that is used to hold multiple elements of a Liberty Postal Address in a single delimited value. When you select this option, the page displays the following fields:
-
Delimited LDAP Attribute Name: The delimited LDAP attribute name you have defined for the LDAP postal address that you want to map to the Liberty Postal Address attribute.
-
Delimiter: The character to use to delimit single-value entries. A $ sign is the default delimiter.
-
-
(Single Delimited LDAP Attributes mode) Under , specify the order in which the information is contained in the string. Select 1 for the value that comes first in the string, 2 for the value that follows the first delimiter, etc.
-
(Multiple LDAP Attributes mode) Under , fill in the following options:
Nickname: (Required) A Liberty element name used to identify the Postal Address object.
Contact Method Type: Select the contact method type, such as , , , and so on.
-
Click .
-
On the LDAP Attribute Mapping page, click .
-
Update the Identity Server.
Configuring Contact Method Attribute Maps
You can map the LDAP attribute you have defined for contact methods to the Liberty attribute Contact Method (MsgContact).
-
In the Administration Console, click > > > > > > .
-
Configure the following fields:
Name: The name you want to give the map.
Description: A description of the map.
Access Rights: A drop-down menu that provide the broadest control for the page. If you set this to , you can specify rights for individual data items.
For user provisioning to succeed, you must select from the drop-down menu for any maps that use an attribute during user provisioning.
User Stores: The user store that a map applies to. If a user logs into a user store that is not in the map’s user store list, that map is not used to read or write attributes for that user.
-
Under , fill in the following fields to map to the Liberty Contact Method attribute:
Provider LDAP Attribute: Maps to the Liberty attribute MsgProvider, which is the service provider or domain that provides the messaging service.
Account LDAP Attribute: Maps to the Liberty attribute MsgAccount, which is the account or address information within the messaging provider.
SubAccount LDAP Attribute: Maps to the Liberty MsgSubaccount, which is the subaccount within a messaging account, such as the voice mail box associated with a phone number.
-
Under , specify the settings for the following Liberty attribute values:
Nickname: Maps to the Liberty attribute Nick, which is an informal name for the contact.
Type: Maps to the Liberty attribute MsgType (such as Mobile, Personal, or Work).
Method: Maps to the Liberty MsgMethod (such as Voice, Fax, or E-mail).
Technology: Maps to the Liberty attribute MsgTechnology (such as Pager, VOIP, and so on).
-
Click .
-
On the LDAP Attribute Mapping page, click .
-
Update the Identity Server.
Configuring Gender Attribute Maps
You can map the LDAP attribute name and values to the Liberty profile values for the Gender attribute. You can use gender to differentiate between people with the same name, especially in countries where national ID numbers cannot be collected. This is a Personal Profile attribute.
-
In the Administration Console, click > > > > > > .
-
Configure the following fields:
Name: The name you want to give the map.
Description: A description of the map.
Access Rights: A drop-down menu that provide the broadest control for the page. If you set this to , you can specify rights for individual data items.
For user provisioning to succeed, you must select from the drop-down menu for any maps that use an attribute during user provisioning.
User Stores: The user store that a map applies to. If a user logs into a user store that is not in the map’s user store list, that map is not used to read or write attributes for that user.
-
In the field, type the LDAP attribute name that you want to map to the Liberty element Gender.
-
In the fields, type the predefined LDAP attribute values that you want to map to the Gender values.
These are the values that you want to store in the LDAP attribute for each given Liberty attribute value. The LDAP attribute map then maps the actual Liberty URI value, back and forth, to this supplied value.
-
Click .
-
On the LDAP Attribute Mapping page, click .
-
Update the Identity Server.
Configuring Marital Status Attribute Maps
You can map the LDAP marital status attribute to the Liberty attribute. The Liberty Marital Status (MaritalStatus) element includes appended values such as single, married, divorced, and so on. For example, urn:liberty:id-sis-pp:maritalstatus:single. This is a Personal Profile attribute.
-
In the Administration Console, click > > > > > > .
-
Configure the following fields:
Name: The name you want to give the map.
Description: A description of the map.
Access Rights: A drop-down menu that provide the broadest control for the page. If you set this to , you can specify rights for individual data items.
For user provisioning to succeed, you must select from the drop-down menu for any maps that use an attribute during user provisioning.
User Stores: The user store that a map applies to. If a user logs into a user store that is not in the map’s user store list, that map is not used to read or write attributes for that user.
-
In the field, type the LDAP attribute name that you want to map to the Liberty element Marital Status (MaritalStatus).
-
In the fields, type the predefined LDAP attribute values that you want to map to the MaritalStatus values.
These are the values that you want to store in the LDAP attribute for each given Liberty attribute value. The LDAP attribute map then maps the actual Liberty URI value, back and forth, to this supplied value.
-
Click .
-
On the LDAP Attribute Mapping page, click .
-
Update the Identity Server.
5.2.8 Configuring WS Federation
The first two topics in this section describe two different methods for setting up federation with a SharePoint server. The next sections describe how you can manage and modify WS Federation providers and configure Security Token Service (STS). STS is used to process authentication requests received at the Identity Server for the WS Federation protocol.
Using the Identity Server as an Identity Provider for ADFS
The Identity Server can provide authentication for resources protected by an Active Directory Federation Services (ADFS) server. This allows the Identity Server to provide single sign-on to Access Manager resources and ADFS resources, such as a SharePoint server. Figure 5-26 illustrates this configuration.
Figure 5-26 Accessing SharePoint Resources with an Identity Server
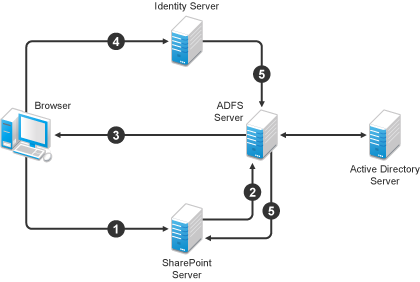
In this scenario, the following exchanges occur:
-
The user requests access to a SharePoint server protected by the ADFS server.
-
The resource sends an authentication request to the ADFS server.
-
The ADFS server, which has been configured to use the Identity Server as an identity provider, gives the user the option of logging in to the Identity Server.
-
The user logs in to the Identity Server and is provided a token that is sent to the ADFS server and satisfies the request of the resource.
-
The user is allowed to access the resource.
The following section describe how to configure your servers for this scenario:
Configuring the Identity Server
Prerequisites
-
You have set up the Active Directory Federation Services, Active Directory, and SharePoint servers and the client as described in the ADFS guide from Microsoft. See the “Step-by-Step Guide for Active Directory Federation Services”.
-
You have set up the NetIQ Access Manager 4.0 system with a site configuration that is using SSL in the Identity Server's base URL. See Section 14.0, Enabling SSL Communication.
Creating a New Authentication Contract
The Microsoft ADFS server rejects the contract URI names of the default Access Manager contracts, which have a URI format of secure/name/password/uri. The ADFS server expects the URI to look like a URL.
We suggest that you use the following format for the URI of all contracts that you want to use with the ADFS server:
<baseurl>/name/password/uri
If the DNS name of your Identity Server is idp-50.amlab.net, the URI would have the following format:
https://idp-50.amlab.net:8443/nidp/name/password/uri
This URL doesn't resolve to anything because the Identity Server interprets it as a contract URI and not a URL.
To create a new authentication contract:
-
In the Administration Console, click > > > > .
-
Click , then fill in the following fields:
Display name: Specify a name, for example WS-Fed Contract.
URI: Specify a URI, for example https://idp-50.amlab.net:8443/nidp/name/password/uri.
Satisfiable by External Provider: Enable this option. The ADFS server needs to satisfy this contract.
-
Move to the list.
-
Click , then fill in the following fields:
ID: Leave this field blank. You only need to supply a value when you want a reference that you can use externally.
Text: Specify a description that is available to the user when the user mouses over the card.
Image: Select an image, such as . This is the default image for the Name/Password - Form contract.
Show Card: Enable this option so that the card can be presented to the user as a login option.
-
Click .
-
Continue with Setting the WS-Fed Contract to Be the Default Contract.
Setting the WS-Fed Contract to Be the Default Contract
It is not possible to specify the contract to request from the ADFS service provider to the Identity Server. You must either set the contract for WS-Fed to be the default, or have your users remember to click that contract every time.
-
On the Local page of the Identity Server, click .
-
For the option, select the WS-Fed Contract.
-
Click .
-
Continue with Enabling the WS Federation Protocol.
Enabling the WS Federation Protocol
Access Manager ships with only SAML 1.1, Liberty, and SAML 2.0 enabled by default. To use the WS Federation protocol, you must enable it on the Identity Server.
-
Click the tab.
-
In the section, select WS Federation.
-
Click .
-
Update the Identity Server.
-
Continue with Creating an Attribute Set for WS Federation.
Creating an Attribute Set for WS Federation
The WS Federation namespace is http://schemas.xmlsoap.org/claims. With WS Federation, you need to decide which attributes you want to share during authentication. This scenario uses the LDAP mail attribute and the All Roles attribute.
-
On the Identity Servers page, click .
-
To create a new attribute set, click , then fill in the following fields:
Set Name: Specify a name that identifies the purpose of the set, for example, wsfed_attributes.
Select set to use as template: Select .
-
Click .
-
To add a mapping for the mail attribute:
-
Click .
-
Fill in the following fields:
Local attribute: Select .
Remote attribute: Specify . This is the attribute that this scenario uses for user identification.
Remote namespace: Select the radio button by the text box, then specify the following namespace:
http://schemas.xmlsoap.org/claims
-
Click .
-
-
To add a mapping for the All Roles attribute:
-
Click .
-
Fill in the following fields:
Local attribute: Select .
Remote attribute: Specify . This is the name of the attribute that is used to share roles.
Remote namespace: Select the radio button by the text box, then specify the following namespace:
http://schemas.xmlsoap.org/claims
-
Click .
-
-
Click .
-
Continue with Enabling the Attribute Set.
Enabling the Attribute Set
Because the WS Federation protocol uses STS, you must enable the attribute set for STS to use it in an WS Federation relationship.
-
On the Identity Servers page, click >> >.
-
Move the WS Federation attribute set to the list.
-
Select the WS Federation attribute set and use the up-arrow to make it first in the list.
-
Click , then update the Identity Server.
Creating a WS Federation Service Provider
To establish a trusted relationship with the ADFS server, you need to set up the Trey Research site as a service provider. The trusted relationship allows the service provider to trust the Identity Server for user authentication credentials.
Trey Research is the default name for the ADFS resource server. If you have used another name, substitute it when following these instructions. To create a service provider, you need to know the following about the ADFS resource server.
Table 5-15 ADFS Resource Server Information
|
What You Need to Know |
Default Value and Description |
|---|---|
|
Provider ID |
Default Value: urn:federation:treyresearch This is the value that the ADFS server provides to the Identity Server in the realm parameter of the query string. This value is specified in the Properties of the Trust Policy page on the ADFS server. The parameter label is . |
|
Sign-on URL |
Default Value: https://adfsresource.treyresearch.net/adfs/ls/ This is the value that the identity provider redirects the user to after login. Although it is listed as optional, and is optional between two NetIQ Identity Servers, the ADFS server doesn't send this value to the identity provider. It is required when setting up a trusted relationship between an ADFS server and a NetIQ Identity Server. This URL is listed in the Properties of the Trust Policy page on the ADFS server. The parameter label is . |
|
Logout URL |
Default Value: https://adfsresource.treyresearch.net/adfs/ls/ This parameter is optional. If it is specified, the user is logged out of the ADFS server and the Identity Server. |
|
Signing Certificate |
This is the certificate that the ADFS server uses for signing. You need to export it from the ADFS server. It can be retrieved from the properties of the on the ADFS Server on the tab.This certificate is a self-signed certificate that you generated when following the Active Directory step-by-step guide. |
To create a service provider configuration:
-
On the Identity Servers page, click > .
-
Click > , then fill in the following fields:
Name: Specify a name that identifies the service provider, such as TreyResearch.
Provider ID: Specify the provider ID of the ADFS server. The default value is urn:federation:treyresearch.
Sign-on URL: Specify the URL that the user is redirected to after login. The default value is https://adfsresource.treyresearch.net/adfs/ls/.
Logout URL: (Optional) Specify the URL that the user can use for logging out. The default value is https://adfsresource.treyresearch.net/adfs/ls.
Service Provider: Specify the path to the signing certificate of the ADFS server.
-
Click , confirm the certificate, then click .
-
Continue with Configuring the Name Identifier Format.
Configuring the Name Identifier Format
The Unspecified Name Identifier format is the default for a newly created WS Federation service provider, but this name identifier format doesn't work with the ADFS federation server. Additionally, some Group Claims (Adatum ClaimApp Claim and Adatum TokenApp Claim) must be satisfied in order to gain access to the SharePoint server.
-
On the WS Federation page, click the name of the TreyResearch service provider.
-
Click , then fill in the following fields:
Attribute set: Select the WS Federation attribute set you created.
Send with authentication: Move the All Roles attribute to the list.
-
Click , then click .
-
Select for the Name Identifier Format.
-
Select as the value for the e-mail identifier.
-
Click twice, then update the Identity Server.
-
Continue with Setting Up Roles for ClaimApp and TokenApp Claims.
Setting Up Roles for ClaimApp and TokenApp Claims
When users access resources on the ADFS server, they need to have two roles assigned: a ClaimApp role and a TokenApp role. The following steps explain how to create these two roles so that they are assigned to all users that log in to the Identity Server.
-
On the Identity Servers page, click > > .
-
Click , specify a name for the policy, select , then click .
-
On the Rule 1 page, leave Condition Group 1 blank.
With no conditions to match, this rule matches all authenticated users.
-
In the section, click > .
-
In the text box, specify .
-
In the section, click > .
-
In the text box, specify .
-
Click twice, then click .
-
Click .
-
On the Roles page, select the role policy you just created, then click .
-
Click , then update the Identity Server.
-
Continue with Importing the ADFS Signing Certificate into the NIDP-Truststore.
Importing the ADFS Signing Certificate into the NIDP-Truststore
The NetIQ Identity Provider (NIDP) must have the trusted root of the ADFS signing certificate (or the certificate itself) listed in its Trust Store, as well as specified in the relationship. This is because most ADFS signing certificates are part of a certificate chain, and the certificate that goes into the metadata is not the same as the trusted root of that certificate. However, because the Active Directory step-by-step guide uses self-signed certificates for signing, it is the same certificate in both the Trust Store and in the relationship.
To import the ADFS signing certificate’s trusted root (or the certificate itself) into the NIDP-Truststore:
-
On the Identity Servers page, click > > .
-
Click .
-
Next to the field, click the icon.
This adds the trusted root of the ADFS signing certificate to the Trust Store.
-
On the Select Trusted Roots page, select the trusted root or certificate that you want to import, then click .
If there is no trusted root or certificate in the list, click . This enables you to import a trusted root or certificate.
-
Next to the field, click the icon.
-
Select the trust stores where you want to add the trusted root or certificate, then click twice.
-
Update the Identity Server so that the changes can take effect.
This finishes the configuration that must be done on the Identity Server for the Identity Server to trust the ADFS server. The ADFS server must be configured to trust the Identity Server. Continue with Configuring the ADFS Server.
Configuring the ADFS Server
The following tasks must be completed on the Trey Research server (adfsresouce.treyresearch.net) to establish trust with the NetIQ Identity Server.
Enabling E-mail as a Claim Type
There are three types of claims for identity that can be enabled on an ADFS server. They are Common Name, E-mail, and User Principal Name. The ADFS step-by-step guide specifies that you do everything with a User Principal Name, which is an Active Directory convention. Although it could be given an e-mail name that looks the same, it is not. This scenario selects to use E-mail instead of Common Name because E-mail is a more common configuration.
-
From the Administrative Tools, open the Active Directory Federation Services tool.
-
Navigate to the by clicking > > .
-
Verify that E-mail is in this list. If it isn’t, move it to the list.
-
Navigate to your Token-based Application and enable e-mail by right-clicking the application, editing the properties, and clicking the box.
-
Navigate to your Claims-aware Application and repeat the process.
-
Continue with Creating an Account Partners Configuration.
Creating an Account Partners Configuration
WS Federation requires a two-way trust relationship. Both the identity provider and the service provider must be configured to trust the other provider. This task sets up the trust between the ADFS server and the Identity Server.
-
In the Active Directory Federation Services console, navigate to the Account Partners by clicking > > .
-
Right-click , then select > .
-
Supply the following information in the wizard:
-
You do not have an account partner policy file.
-
For the display name, specify the DNS name of the Identity Server.
-
For the specify the following:
https://<DNS_Name>:8443/nidp/wsfed/Replace <DNS_Name> with the DNS name of the Identity Server.
This URI is the base URL of your Identity Server with the addition of /wsfed/ on the end.
-
For the , specify the following:
https://<DNS_Name>:8443/nidp/wsfed/epReplace <DNS_Name> with the DNS name of the Identity Server.
This URL is the base URL of your Identify Server with the addition of /wsfed/ep at the end.
-
For the verification certificate, import the trusted root of the signing certificate on your Identity Server.
If you have not changed it, you need the Organizational CA certificate from your Administration Console. This is the trusted root for the test-signing certificate.
-
Select .
The Identity Server is outside of any forest, so do not select .
-
Select the E-mail claim.
-
Add the suffix that you will be using for your e-mail address.
You need to have the e-mail end in a suffix that the ADFS server is expecting, such as @novell.com, which grants access to any user with that e-mail suffix.
-
-
Enable this account partner.
-
Finish the wizard.
-
Continue with Enabling ClaimApp and TokenApp Claims.
Enabling ClaimApp and TokenApp Claims
The Active Directory step-by-step guide sets up these roles to be used by the resources. You set them up to be sent in the All Roles attribute from the Identity Server. You must map these roles into the Adatum ClaimApp Claim and the Adatum TokenApp Claim.
-
In the Active Directory Federation Services console, click the account partner that you created for the Identity Server (see Creating an Account Partners Configuration).
-
Right click the account partner, then create a new with the following values:
Incoming group claim name: Specify .
Organization group claim: Specify .
-
Right-click the account partner, and create another with the following values:
Incoming group claim name: Specify .
Organization group claim: Specify .
-
Continue with Disabling CRL Checking.
Disabling CRL Checking
If you are using the Access Manager certificate authority as your trusted root for the signing certificate (test-signing certificate), there is no CRL information in that certificate. However, the ADFS has a mandatory requirement to do CRL checking on any certificate that they receive. For instructions on how to disable this checking, see “Turn CRL checking on or off”.
Use the following tips as you follow these instructions.
-
Create a file from the script contained at that link called TpCrlChk.vbs.
-
Exit the Active Directory Federation Services console.
If you do not exit the console, the console overwrites the changes made by the script file and CRL checking is not turned off.
-
Run the command with the following syntax:
Cscript TpCrlChk.vbs <location of ADFS>\TrustPolicy.xml "<service URI>" None
Replace <location of ADFS> with the location of the ADFS TrustPolicy.xml file. The default location is C:\ADFS\TrustPolicy.xml.
Replace <service URI> with the URI you specified in Step 3. If the DNS name of your Identity Server is idp-50.amlab.net, replace it with https://idp-50.amlab.ne:8443/nidp/wsfed/.
Your command should look similar to the following:
Cscript TpCrlChk.vbs C:\ADFS\TrustPolicy.xml "https://idp-50.amlab.net:8443/nidp/wsfed/" None
Logging In
-
In a browser on your client machine, enter the URL of the SharePoint server. For example:
https://adfsweb.treyresearch.net/default.aspx
-
Select the IDP from the drop-down list of , then submit the request.
If you are not prompted for the realm, clear all cookies in the browser and try again.
-
Log in with a user at the NetIQ Identity Provider
-
Verify that you can access the SharePoint server.If you only see a page that says Server Error in '/adfs' Application, see Turning On Logging on the ADFS Server and follow the instructions in Common Errors.
Troubleshooting
Turning On Logging on the ADFS Server
If you see the message Server Error in '/adfs' Application displayed in the client's browser, the best place to look for the cause is in the ADFS log file.
To turn on this log file:
-
In the Active Directory Federation Services console, right-click , then click .
-
Click the tab, then enable everything on the page.
-
Click , then look for the file that is created in the path listed in the .
-
Look in that file for reasons that the federation is failing.
For an explanation of some of the common errors, see Common Errors.
Common Errors
[ERROR] SamlViolatesSaml:
Error parsing AuthenticationMethod: Invalid URI: The format of the URI could not be determined.
Cause: This is because the contract has the wrong format for its URI. The URI must start with urn: or http://. Change the contract and try again.
[ERROR] Saml contains an unknown NameIdentifierFormat:
Issuer=https://idp-51.amlab.net:8443/nidp/wsfed/; Format=urn:oasis:names:tc:SAML:1.1:nameid-format:unspecified
Cause: The name identifier format is set to unspecified, and it needs to be set to E-mail.
[ERROR] Saml contains an unknown Claim name/namespace:
Issuer=https://idp-51.amlab.net:8443/nidp/wsfed/; Namespace=urn:oasis:names:tc:SAML:1.0:assertion; Name=emailaddress
Cause: The emailAddress attribute is not in the correct namespace for WSFed.
CRL Errors
-
2008-08-01T19:56:55 [WARNING] VerifyCertChain: Cert chain did not verify - error code was 0x80092012
-
2008-08-01T19:56:55 [ERROR] KeyInfo processing failed because the trusted certificate does not have a a valid certificate chain. Thumbprint = 09667EB26101A98F44034A3EBAAF9A3A09A0F327
-
2008-08-01T19:56:55 [WARNING] Failing signature verification because the KeyInfo section failed to produce a key.
-
2008-08-01T19:56:55 [WARNING] SAML token signature was not valid: AssertionID = idZ0KQH0kfjVK8kmKfv6YaVPglRNo
Cause: The CRL check isn't turned off. See Disabling CRL Checking.
[ERROR] EmailClaim.set_Email:
Email 'mPmNXOA8Rv+j16L1iNKn/4HVpfeJ3av1L9c0GQ==' has invalid format
Cause: The drop-down list next to E-mail in the identifier format was not changed from <Not Specified> to a value with a valid e-mail address in it.
Using the ADFS Server as an Identity Provider for an Access Manager Protected Resource
The Active Directory Federation Services server can be configured to provide authentication for a resource protected by Access Manager.
Figure 5-27 Using an ADFS Server for Access Manager Authentication
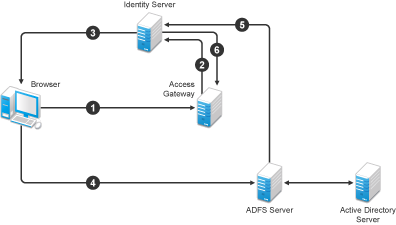
In this scenario, the following exchanges occur:
-
The user requests access to a resource protected by an Access Gateway.
-
The resource sends an authentication request to the NetIQ Identity Server.
-
The Identity Server is configured to trust an Active Directory Federation Services server and gives the user the option of logging in at the Active Directory Federation Services server.
-
The user logs into the Active Directory Federation Services server and is provided a token
-
The token is sent to the Identity Server.
-
The token satisfies the authentication requirements of the resource, so the user is allowed to access the resource.
The following sections describe how to configure this scenario.
Configuring the Identity Server as a Service Provider
Prerequisites
-
You have set up the Active Directory Federation Services, Active Directory, and SharePoint servers and the client as described in the ADFS guide from Microsoft. See the “Step-by-Step Guide for Active Directory Federation Services”.
-
You have set up the NetIQ Access Manager system with a site configuration that is using SSL in the Identity Server's base URL. See Section 14.0, Enabling SSL Communication.
-
Enable the Liberty Personal Profile.
In the Administration Console, click > > > . Select the , then click > . Update the Identity Server.
Enabling the WS Federation Protocol
Access Manager ships with only SAML 1.1, Liberty, and SAML 2.0 enabled by default. To use the WS Federation protocol, it must be enabled on the Identity Server.
-
In the Administration Console, click > > .
-
In the section of the General Configuration page, select .
-
Click .
-
Update the Identity Server.
-
Continue with Creating a WS Federation Identity Provider.
Creating a WS Federation Identity Provider
To have a trust relationship, you need to set up the Adatum site (adfsaccount.adatum.com) as an identity provider for the Identity Server.
Adatum is the default name for the identity provider. If you have used another name, substitute it when following these instructions. To create an identity provider, you need to know the following information about the Adatum site:
Table 5-16 Adatum Values
|
What You Need to Know |
Default Value and Description |
|---|---|
|
Provider ID |
Default Value: urn:federation:adatum The ADFS server provides this value to the service provider in the realm parameter in the assertion. You set this value in the of the Trust Policy on the ADFS server. The label is . |
|
Sign-on URL |
Default Value: https://adfsaccount.adatum.com/adfs/ls/ The service provider uses this value to redirect the user for login. This URL is listed in the of the Trust Policy on the ADFS server. The label is . |
|
Logout URL |
Default Value: https://adfsresource.treyresearch.net/adfs/ls/ The ADFS server makes no distinction between the login and logout URL. Access Manager has separate URLs for login and logout, but from a NetIQ Identity Server to an ADFS server, they are the same. |
|
Signing Certificate |
This is the certificate that the ADFS server uses for signing. You need to export it from the ADFS server. It can be retrieved from the properties of the on the ADFS Server on the tab.This certificate is a self-signed certificate that you generated when following the step-by-step guide. |
To create an identity provider:
-
In the Administration Console, click > > > .
-
On the WS Federation page, click , select , then fill in the following fields:
Name: Specify a name that identifies the identity provider, such as Adatum.
Provider ID: Specify the federation service URI of the identity provider, for example urn:federation:adatum.
Sign-on URL: Specify the URL for logging in, such as https://adfsaccount.adatum.com/adfs/ls/.
Logout URL: Specify the URL for logging out, such as https://adfsresource.treyresearch.net/adfs/ls/
Identity Provider: Specify the path to the signing certificate of the ADFS server.
-
Confirm the certificate, then click .
-
For the authentication card, specify the following values:
ID: Leave this field blank.
Text: Specify a description that is available to the user when the user mouses over the card.
Image: Select an image, such as , or any other image.
Show Card: Enable this option so that the card can be presented to the user as a login option.
-
Click .
-
Continue with Modifying the User Identification Specification.
Modifying the User Identification Specification
The default settings for user identification are set to do nothing. The user can authenticated but the user is not identified as a local user on the system. This is not the scenario we are configuring. We want the user to be identified on the local system. Additionally, we want to specify which contract on the Access Gateway is satisfied with this identification. If a contract is not specified, the Access Gateway resources must be configured to use the option, which is not a typical configuration.
-
On the WS Federation page, click the name of the Adatum identity provider configuration.
-
Click .
-
For , select .
-
Select .
-
For the , select .
-
Click twice.
-
Update the Identity Provider.
-
Continue with Importing the ADFS Signing Certificate into the NIDP-Truststore.
Importing the ADFS Signing Certificate into the NIDP-Truststore
The Identity Server must have the trusted root of the ADFS signing certificate (or the certificate itself) listed in its trust store, as well as specified in the relationship. This is because most ADFS signing certificates have a chain, and the certificate that goes into the metadata is not the same as the trusted root of that certificate. However, because the Active Directory step-by-step guide uses self-signed certificates for signing, it is the same certificate in both the trust store and in the relationship.
To import the ADFS signing certificate’s trusted root (or the certificate itself) into the NIDP-Truststore:
-
On the Identity Servers page, click > > .
-
Click .
-
Next to the field, click the icon.
This adds the trusted root of the ADFS signing certificate to the Trust Store.
-
On the Select Trusted Roots page, select the trusted root or certificate that you want to import, then click .
If there is no trusted root or certificate in the list, click . This enables you to import a trusted root or certificate.
-
Next to the field, click the icon.
-
Select the trust stores where you want to add the trusted root or certificate, then click twice.
-
Update the Identity Server so that changes can take effect.
This ends the basic configuration that must be done to for the Identity Server to trust the ADFS server as an identity provider. However, the ADFS server needs to be configured to act as an identity server and to trust the Identity Server. Continue with Configuring the ADFS Server to Be an Identity Provider.
Configuring the ADFS Server to Be an Identity Provider
The following tasks describe the minimum configuration required for the ADFS server to act as an identity provider for the Access Manager Identity Server.
For additional configuration options, see Additional WS Federation Configuration Options.
Enabling a Claim Type for a Resource Partner
You can enable three types of claims for identity on an ADFS Federation server. They are Common Name, E-mail, and User Principal Name. The ADFS step-by-step guide specifies that you do everything with a User Principal Name, which is an Active Directory convention. Although it could be given an e-mail that looks the same, it is not. This scenario selects to use E-mail instead of Common Name because E-mail is a more common configuration.
-
In the Administrative Tools, open the tool.
-
Navigate to the by clicking > > .
-
Ensure that E-mail is in this list.
-
Navigate to Active Directory by clicking > > .
-
Enable the :
-
Right-click this claim, then select .
-
Click the box.
-
Add the LDAP mail attribute by clicking > and selecting .
This is the LDAP attribute in Active Directory where the user’s e-mail address is stored.
-
Click .
-
-
Verify that the user you are going to use for authentication has an E-mail address in the mail attribute.
-
Continue with Creating a Resource Partner.
Creating a Resource Partner
The WS Federation protocol requires a two-way trust. The identity provider must be configured to trust the service provider, and the service provider must be configured to trust the identity provider. You have already set up the service provider to trust the identity provider (see Creating a WS Federation Identity Provider). This section sets up the trust so that the identity provider (the ADFS server) trusts the service provider (the Identity Server).
-
In the Active Directory Federation Services console, access the Resource Partners page by clicking > > .
-
Right-click the , then click > .
-
Supply the following information in the wizard:
-
You do not have a resource partner policy file to import.
-
For the display name, specify the DNS name of the Identity Server.
-
For the , enter the following:
https://<DNS_Name>:8443/nidp/wsfed/Replace <DNS_Name> with the name of your Identity Server.
This is the base URL of your Identity Server with the addition of /wsfed/ at the end.
-
For the Federation Services endpoint URL, specify the following:
https://<DNS_Name>:8443/nidp/wsfed/spassertion_consumer
Replace <DNS_Name> with the name of your Identity Server.
This is the base URL of your Identity Server with the addition of /wsfed/spassertion_consumer at the end.
-
Select .
The Identity Server is outside of any forest, so do not select .
-
Select the E-mail claim.
-
Select the option.
-
-
Enable this resource partner.
-
Finish the wizard.
-
To test the configuration, continue with Logging In.
Logging In
-
In a client browser, enter the base URL of your Identity Server.
-
From the list of cards, select the Adatum contract.
-
(Conditional) If you are not joined to the Adatum domain, enter a username and password in the browser pop-up. Use a name and a password that are valid in the Adatum domain.
If you are using the client that is joined to the Adatum domain, the card uses a Kerberos ticket to authenticate to the ADFS identity provider (resource partner).
-
When you are directed back to the Identity Server for Federation User Identification, log in to the Identity Server with a username and password that is valid for the Identity Server (the service provider).
-
Verify that you are authenticated.
-
Close the browser.
-
Log in again.
This time you are granted access without entering credentials at the service provider.
Additional WS Federation Configuration Options
You can enable the sharing of attribute information from the Identity Server to the ADFS server. This involves creating an attribute set and enabling the sending of the attributes at authentication. See Configuring the Attributes Obtained at Authentication.
For other options that can be modified after you have created the trusted identity server configuration, see Modifying a WS Federation Identity Provider.
Managing WS Federation Providers
The WS Federation page allows you to create or edit trusted identity providers and trusted service providers. When you create an identity provider configuration, you are configuring the Identity Server to be a WS Federation resource partner. When you create a service provider configuration, you are configuring the Identity Server to be a WS Federation account partner.
-
In the Administration Console, click .
-
Select one of the following actions:
New: Launches the Create Trusted Identity Provider Wizard or the Create Trusted Service Provider Wizard, depending on your selection. For more information, see one of the following:
Delete: Allows you to delete the selected identity or service provider. This action deletes the definition.
Enable: Enables the selected identity or service provider.
Disable: Disables the selected identity or service provider. When the provider is disabled, the server does not load the definition. However, the definition is not deleted.
Modify: Click the name of a provider. For configuration information, see Modifying a WS Federation Identity Provider or Modifying a WS Federation Service Provider.
-
Click , then update the Identity Server.
Creating an Identity Provider for WS Federation
To have a trust relationship, you need to set up the ADFS server as an identity provider for the Identity Server.
-
In the Administration Console, click > > > .
-
On the WS Federation page, click , select , then fill in the following fields:
Name: Specify a name that identifies the identity provider, such as Adatum.
Provider ID: Specify the federation service URI of the identity provider, for example urn:federation:adatum.
Sign-on URL: Specify the URL for logging in, such as https://adfsaccount.adatum.com/adfs/ls/.
Logout URL: Specify the URL for logging out, such as https://adfsresource.treyresearch.net/adfs/ls/
Identity Provider: Specify the path to the signing certificate of the ADFS server.
-
Confirm the certificate, then click .
-
For the authentication card, specify the following values:
ID: Leave this field blank.
Text: Specify a description that is available to the user when the user mouses over the card.
Image: Select an image, such as , or any other image.
Show Card: Enable this option so that the card can be presented to the user as a login option.
-
Click .
For information about additional configuration steps required to use this identity provider, see Using the ADFS Server as an Identity Provider for an Access Manager Protected Resource.
Creating a Service Provider for WS Federation
To establish a trusted relationship with the ADFS server, you need to set up the ADFS server as service provider. The trusted relationship allows the service provider to trust the Identity Server for user authentication credentials.
-
In the Administration Console, click > > > .
-
Click > , then fill in the following fields:
Name: Specify a name that identifies the service provider, such as TreyResearch.
Provider ID: Specify the provider ID of the ADFS server. The default value is urn:federation:treyresearch.
Sign-on URL: Specify the URL that the user is redirected to after login. The default value is https://adfsresource.treyresearch.net/adfs/ls/.
Logout URL: (Optional) Specify the URL that the user can use for logging out. The default value is https://adfsresource.treyresearch.net/adfs/ls.
Service Provider: Specify the path to the signing certificate of the ADFS server.
-
Click , confirm the certificate, then click .
For information about additional configuration steps required to use this service provider, see Using the Identity Server as an Identity Provider for ADFS.
Modifying a WS Federation Identity Provider
This section explains how to modify a WS Federation identity provider after it has been created. Creating an Identity Provider for WS Federation explains the steps required to create an identity provider. You can modify the following configuration details:
Renaming the Trusted Provider
-
In the Administration Console, click > > > >
-
In the field, specify a new name for the trusted provider.
-
Click twice, then update the Identity Server.
Configuring the Attributes Obtained at Authentication
When the Identity Server creates its request to send to the identity provider, it uses the attributes that you have selected. The request asks the identity provider to provide values for these attributes. You can then use these attributes to create policies, to match user accounts, or if you allow provisioning, to create a user account on the service provider.
To select the attributes:
-
In the Administration Console, click > > > >
-
(Conditional) To create an attribute set, select from the drop-down menu.
An attribute set is a group of attributes that can be exchanged with the trusted provider. For example, you can specify that the local attribute of any attribute in the Liberty profile (such as Informal Name) matches the remote attribute specified at the service provider.
-
Select an attribute set.
-
Select attributes from the list, and move them to the left side of the page.
-
(Conditional) If you created a new attribute set, it must be enabled for STS.
For more information, see Enabling the Attribute Set.
-
Click , then update the Identity Server.
Modifying the User Identification Method
The user identification method specifies how to identify the user.
-
In the Administration Console, click > > > >
-
Select the contract that can be used for authentication. Fill in the following field:
Satisfies contract: Specifies the contract that is satisfied by the assertion received from the identity provider. WS Federation expects the URI name of the contract to look like a URL, so it rejects all default Access Manager contracts. You must create a contract with a URI that conforms to WS Federation requirements.
For more information about how to create this contract, see Creating a New Authentication Contract.
-
Specify whether the user can associate (federate) an account at the identity provider (the ADFS server) with an account at Identity Server. Fill in the following field:
Allow federation: Indicates whether account federation is allowed. Enabling this option assumes that a user account exists at the provider or that a method is provided to create an account that can be associated with the user on subsequent logins. If you do not use this feature, authentication is permitted but is not associated with a particular user account.
-
Select one of the following methods for user identification:
-
Do nothing: Allows the user to authenticate without creating an association with a user account. This option cannot be used when federation is enabled.
-
Authenticate: Allows the user to authenticate using a local account.
-
Allow ‘Provisioning’: Provides a button that the user can click to create an account when the authentication credentials do not match an existing account.
-
-
Provision account: Allows a new account to be created for the user when the authenticating credentials do not match an existing user. When federation is enabled, the new account is associated with the user and used with subsequent logins. When federation is not enabled, a new account is created every time the user logs in.
This option requires that you specify a user provisioning method.
-
Attribute matching: Enables account matching. The service provider can uniquely identify a user in its directory by obtaining specific user attributes sent by the trusted identity provider. This option requires that you specify a user matching method.
-
Prompt for password on successful match: Specifies whether to prompt the user for a password when the user’s name is matched to an account, to ensure that the account matches.
-
-
-
(Conditional) If you selected a method that requires provisioning ( or ), click the icon and create a provisioning method.
For configuration information, see Defining the User Provisioning Method.
-
(Conditional) If you selected as the identification method, click the icon and create a matching method.
For configuration information, see Configuring the Attribute Matching Method for Liberty or SAML 2.0.
-
Click twice, then update the Identity Server.
Viewing the WS Identity Provider Metadata
You can view the metadata of the ADFS server, edit it, and view information about the signing certificate.
-
In the Administration Console, click > > > >
The following values need to be configured accurately:
ID: This is provider ID. The ADFS server provides this value to the service provider in the realm parameter in the assertion. You set this value in the of the on the ADFS server. The label is . The default value is urn:federation:adatum.
sloUrl: This is the sign-on URL. This URL is listed in the of the on the ADFS server. The label is .
ssoUrl: This is the logout URL. The default value is https://adfsresource.treyresearch.net/adfs/ls/. The ADFS server makes no distinction between the login URL and the logout URL.
If the values do not match the ADFS values, you need to edit the metadata.
-
To edit the metadata, click . For configuration information, see Editing the WS Identity Provider Metadata.
-
To view information about the signing certificate, click .
-
Click twice.
Editing the WS Identity Provider Metadata
You can view and edit the metadata of the ADFS server.
-
In the Administration Console, click > > > >
-
Configure the following fields:
Provider ID: This is the provider ID. The ADFS server provides this value to the service provider in the realm parameter in the assertion. You set this value in the of the on the ADFS server. The label is . The default value is urn:federation:adatum.
Sign-on URL: This is the sloUrl. This URL is listed in the of the on the ADFS server. The label is .
Logout URL: This is the ssoUrl. The default value is https://adfsresource.treyresearch.net/adfs/ls/. The ADFS server makes no distinction between the login URL and the logout URL.
-
If you need to import a new signing certificate, click the button and follow the prompts.
-
To view information about the signing certificate, click .
-
Click twice, then update the Identity Server.
Modifying the Authentication Card
When you create an identity provider, you must also configure an authentication card. After it is created, you can modify it.
-
In the Administration Console, click > > > >
-
Modify the values in one or more of the following fields:
ID: If you have need to reference this card outside of the Administration Console, specify an alphanumeric value here. If you do not assign a value, the Identity Server creates one for its internal use. The internal value is not persistent. Whenever the Identity Server is rebooted, the value can change. A specified value is persistent.
Text: Specify the text that is displayed on the card. This value, in combination with the image, indicates to the users the provider they are logging into.
Image: Specify the image to be displayed on the card. Select the image from the drop-down list. To add an image to the list, click .
Show Card: Determine whether the card is shown to the user, which allows the user to select and use the card for authentication. If this option is not selected, the card is only used when a service provider makes a request for the card.
Passive Authentication Only: Select this option if you do not want the Identity Server to prompt the user for credentials. If the user has already authenticated and the credentials satisfy the requirements of this contract, the user is passively authenticated. If the user’s credentials do not satisfy the requirements of this contract, the user is denied access.
-
Click twice, then update the Identity Server.
Assertion Validity Window
You can configure the assertion validity time for WS Federation Provider (SP) to accommodate clock skew between the Service Provider and SAML IDP Server.
To set the assertion validity for WSFed configuration, add the following parameters in the IDP web.xml and restart tomcat:
Add the following parameters in the web.xml below the ldapLoadThreshold context param:
  <context-param>
    <param-name>wsfedAssertionValidity</param-name>
    <param-value>600</param-value>
  </context-param>
The value 600 which is configurable denotes seconds.
To restart Tomcat enter the following command:
Linux: /etc/init.d/novell-idp restart
Windows:
net stop Tomcat7
net start Tomcat7
Modifying a WS Federation Service Provider
This section explains how to modify a WS Federation service provider after it has been created. Creating a Service Provider for WS Federation explains the steps required to create the service provider. You can modify the following configuration details:
Renaming the Service Provider
-
In the Administration Console, click > > > >
-
In the field, specify a new name for the service provider.
-
Click twice, then update the Identity Server.
Configuring the Attributes Sent with Authentication
When the Identity Server creates its response for the service provider, it uses the attributes listed on the Attributes page. The response needs to contain the attributes that the service provider requires. If you do not own the service provider, you need to contact the administrator of the service provider and negotiate which attributes you need to send in the response. The service provider can then use these attributes to identify the user, to create policies, to match user accounts, or if it allows provisioning, to create a user account on the service provider.
-
In the Administration Console, click > > > >
-
(Conditional) To create an attribute set, select from the drop-down menu.
An attribute set is a group of attributes that can be exchanged with the trusted provider. For example, you can specify that the local attribute of any attribute in the Liberty profile (such as Informal Name) matches the remote attribute specified at the service provider.
-
Select an attribute set.
-
Select attributes that you want to send from the list, and move them to the left side of the page.
-
(Conditional) If you created a new attribute set, it must be enabled for STS.
For more information, see Enabling the Attribute Set.
-
Click , then update the Identity Server.
Modifying the Authentication Response
When the Identity Server sends its response to the service provider, the response can contain an identifier for the user. If you do not own the service provider, you need to contact the administrator of the service provider and negotiate whether the user needs to be identified and how to do the identification. If the service provider is going to use an attribute for user identification, that attribute needs to be in the attributes sent with authentication. See Configuring the Attributes Sent with Authentication.
To select the user identification method to send in the response:
-
In the Administration Console, click > > > >
-
For the format, select one of the following:
Unspecified: Specifies that the SAML assertion contains an unspecified name identifier.
E-mail: Specifies that the SAML assertion contains the user’s e-mail address for the name identifier.
X509: Specifies that the SAML assertion contains an X.509 certificate for the name identifier.
-
For the value, select an attribute that matches the format. For the Unspecified format, select the attribute that the service provider expects.
The only values available are from the attribute set that you have created for WS Federation.
-
To specify that this Identity Server must authenticate the user, disable the option. When the option is disabled and the Identity Server cannot authenticate the user, the user is denied access.
When this option is enabled, the Identity Server checks to see if other identity providers can satisfy the request. If one or more can, the user is allowed to select which identity provider performs the authentication. If a proxied identity provider performs the authentication, it sends the response to the Identity Server. The Identity Server then sends the response to the service provider.
-
Click twice, then update the Identity Server.
Viewing the WS Service Provider Metadata
You can view the metadata of the ADFS server, edit it, and view information about the signing certificate.
-
In the Administration Console, click > > > >
The following values need to be configured accurately:
ID: This is provider ID. This is the value that the ADFS server provides to the Identity Server in the realm parameter of the query string. This value is specified in the of the page on the ADFS server. The parameter label is . The default value is urn:federation:treyresearch.
sloUrl: This is the sign-on URL. This URL is listed in the of the on the ADFS server. The label is . The default value is https://adfsresource.treyresearch.net/adfs/ls/.
ssoUrl: This is the logout URL. The default value is https://adfsresource.treyresearch.net/adfs/ls/. The ADFS server makes no distinction between the login URL and the logout URL.
If the values do not match the ADFS values, you need to edit the metadata.
-
To edit the metadata, click . For configuration information, see Editing the WS Service Provider Metadata.
-
To view information about the signing certificate, click .
-
Click twice.
Editing the WS Service Provider Metadata
You can view the metadata of the ADFS server and edit metadata.
-
In the Administration Console, click > > > >
-
Configure the following fields:
Provider ID: This is provider ID. This is the value that the ADFS server provides to the Identity Server in the realm parameter of the query string. This value is specified in the of the page on the ADFS server. The parameter label is . The default value is urn:federation:treyresearch.
Sign-on URL: This is the sloUrl. This URL is listed in the of the on the ADFS server. The label is . The default value is https://adfsresource.treyresearch.net/adfs/ls/.
Logout URL: This is the ssoUrl. The default value is https://adfsresource.treyresearch.net/adfs/ls/. The ADFS server makes no distinction between the login URL and the logout URL.
-
If you need to import a new signing certificate, click and follow the prompts.
-
To view information about the signing certificate, click .
-
Click twice, then update the Identity Server.
Configuring STS Attribute Sets
Use the Attribute Set page to select the attribute set or sets that contain attributes the STS can provide to a relying party. An attribute set must be created before you can select it.
When creating an attribute set for the STS, you need to know which protocol you are going to use for the attribute set and select the attributes and namespace appropriate for the protocol.
-
In the Administrations Console, click > > > > .
-
To select a set, move the set from the list to the list.
WS Federation: There is no default attribute set for WS Federation. For information about how to create the set, see Configuring the Attributes Obtained at Authentication and Configuring the Attributes Sent with Authentication.
-
Click , then update the Identity Server if you have changed the configuration.
Configuring STS Authentication Methods
Use the Authentication Methods page to select the methods that can be used for authentication at the STS. The methods determine the credentials the user must supply for authentication and the user store that is used to verify the credentials. The WS Federation protocol does not use methods for authentication.
-
In the Administrations Console, click > > > > .
-
To enable a method, move the method from the list to the list.
All the methods that you have defined for the Identity Server appear in the list, but the only default method that works is the Secure Name/Password-Form method. It has been extended so that it knows how to extract name and password information from a managed card that is not backed by a personal card. You can use the Secure Name/Password-Form class to create additional methods for specific user stores.
You can also create a custom method, if required. For information, see NetIQ Access Manager Developer Tools and Examples.
-
Click , then update the Identity Server if you have changed the configuration.
Configuring STS Authentication Request
Use the Authentication Request page to select the format for the name identifier that is returned in the SAML assertion. The selected attribute sets determine the values that are available for the formats. If you select a format but do not specify a value, a unique value is generated.
-
In the Administration Console, click > > > > .
-
Select one of the following:
None: Indicates that the SAML assertion does not contain a name identifier.
Unspecified: Specifies that the SAML assertion contains an unspecified name identifier. For the value, select the attribute that the relying party and the identity provider have agreed to use.
E-mail: Specifies that the SAML assertion contains the user’s e-mail address for the name identifier. For the value, select an e-mail attribute.
X509: Specifies that the SAML assertion contains an X.509 certificate for the name identifier. For the value, select an X.509 attribute.
-
Click , then update the Identity Server if you have changed the configuration.
5.2.9 Configuring WS-Trust Security Token Service
This section describes WS-Trust Security Token Service (WS-Trust STS) and how to configure it. Topics include:
Overview
Web services are software applications that interact over network by using the Hyper Text Transfer Protocol (HTTP). World Wide Web Consortium (W3C) describes Web services as a standard means of interoperating between software applications running on a variety of platforms and frameworks. A Web service provides a fine-grained service to its client.
Web services use network for communication and data exchange spanning from protected network (intranet) to unprotected network (internet). This demands for security requirements such as client authentication, access control, data integrity, and confidentiality.
You can secure Web services and protect your information against authentication attacks and unauthorized access by using security tokens. A security token contains a set of claims made by a client that includes details such as a user name, password, identity, key, and certificate.
NetIQ Access Manager addresses the need for a secure token mechanism through WS-Trust STS that is based on the WS-Trust protocol. WS-Trust is built on top of the WS-Security specification. It enables Web applications to construct trusted SOAP message exchanges.
WS-Trust STS provides secure communication and integration between services. It issues and validates security tokens to establish trust relationships between a Web service client and a Web service provider. If the requestor (Web service client) does not have the necessary token to provide required claims to a service, it contacts WS-Trust STS and requests the needed tokens with proper claims. WS-Trust STS may in turn require its own set of claims for authenticating and authorizing the request for security tokens.
How WS-Trust STS Works
WS-Trust STS allows secure identity propagation and token exchange between Web services. It provides a standard framework for requesting and returning security tokens by using Request Security Token (RST) and Request Security Token Response (RSTR) messages. RST provides the means for requesting a security token from WS-Trust STS. RSTR contains the requested token, claims, and other related information.
The Web service client provides its credentials to WS-Trust STS and gets a SAML token from WS-Trust STS. A trust is established between the Web service provider and WS-Trust STS. The Web service client presents the token from WS-Trust STS to the Web service provider. The Web service provider validates if the token has been issued from WS-Trust STS and grants access to the required service.
The following diagram illustrates an example of how WS-Trust STS facilitates a secure communication between a Web service client and a Web service provider through security tokens:
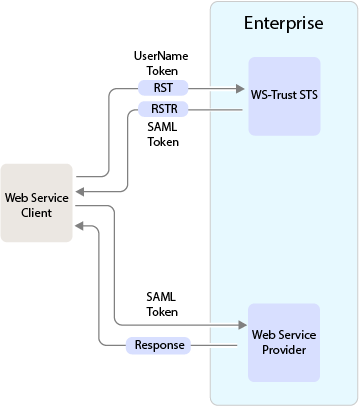
WS-Trust STS is designed to interoperate with many different Web Service environments and supports SOAP and WS-Trust specifications.
Web services must implement the protocol defined in the WS-Trust 1.3 or 1.4 specification by making assertions based on evidence that it trusts, to whoever trusts it, or to specific recipients. For more information about WS-Trust specification, see WS-Trust 1.3 Specification and WS-Trust 1.4 Specification.
The following table lists supported SOAP and WS-Trust versions and corresponding namespaces:
|
Specification |
Version |
Namespace |
|---|---|---|
|
Soap |
1.1 |
http://schemas.xmlsoap.org/soap/envelope/ |
|
1.2 |
http://www.w3.org/2003/05/soap-envelope |
|
WS-Trust |
1.3 |
http://docs.oasis-open.org/ws-sx/ws-trust/200512/ |
|
1.4 |
http://docs.oasis-open.org/ws-sx/ws-trust/200802 |
NOTE:
-
WS-Trust STS supports SAML tokens in addition to usernametokens.
WS-Trust STS can issue both SAML 1.1 and SAML 2.0 based tokens.
-
WS-Trust STS supports issuing, validating and renewing tokens. This release does not support canceling tokens.
-
Web service clients and Web service providers should be in the same domain. This release does not support multiple domains.
-
By default, the SAML tokens are line wrapped for all the protocols. To disable line wrapping, add the following line in the /opt/novell/nam/idp/conf/tomcat7.conf file: JAVA_OPTS="${JAVA_OPTS} -Dorg.apache.xml.security.ignoreLineBreaks= true. Restart Identity Server.
Benefits
WS-Trust STS offers the following benefits:
-
Enables the secure exchange of SOAP messages among Web services.
-
Facilitates identity delegation (through ActAs) and impersonation (through OnBehalfOf) where an authenticated user is granted access to downstream Web services.
-
Reduces complexity for the Web service consumer as the Web service consumer does not need token specific knowledge.
Scenarios
This section describes the basic scenarios supported by WS-Trust STS.
Scenario 1: Web Service Client Communicating with Token Protected Web Service Provider
In this scenario, a Web service client situated outside the enterprise tries to access a Web service provider hosted inside the enterprise.
This process consists of requesting a token by means of the request-response message pairs of a Request Security Token (RST) and a Request Security Token Response (RSTR). The tokens are included in SOAP messages.
The following diagram illustrates this scenario:

-
A Web service client, which is outside the enterprise, sends its credentials to WS-Trust STS and request for the security token through RST.
-
WS-Trust STS verifies the client’s credentials and then issues a security token (SAML token) through RSTR.
The Web service client caches the security token and then uses it in multiple requests to the Web service provider.
-
The Web service client presents the token to the Web service provider.
-
The Web service provider validates the token and sends the response to the Web service client.
Scenario 2: Web Single Sign-On and STS
In this scenario, a Web service client that resides as part of a Web application within an enterprise tries to access services from other Web service providers of the same enterprise. A user named Alice accesses to the Web application through a browser and needs single sign-on access to other applications.
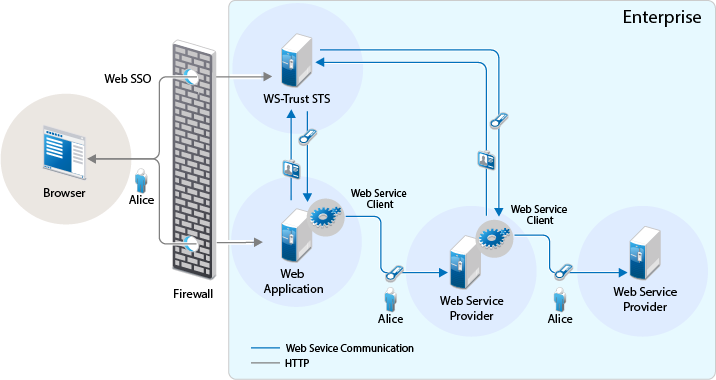
-
A Web application sends a single sign-on authentication request to WS-Trust STS on behalf of Alice.
The Web application is residing within the enterprise.
-
The Web application passes the credentials corresponding to the single sign-on session to the Web service client.
-
The Web service client requests for security token by using the passed on credentials.
-
WS-Trust STS verifies the credentials. After checking the credentials, it verifies if the Web service provider for which the token has been requested for is a trusted service provider. Then it issues a security token consumable by the service provider.
-
The Web service client residing within the Web application presents the token to the Web service provider. The Web service client caches the security token and then uses it in multiple requests to the Web service provider.
-
The Web service provider validates the token and sends the response to the Web service client residing within the Web application.
The tokens are included in SOAP messages.
Scenario 3: Identity Delegation and Impersonation
In this scenario, a Web service provider requests services from other Web service providers.
The following use-case explains this scenario:
There are two Web service providers called Service1 and Service2 providing some fine-grained service. Both Service1 and Service2 require authentication and trust WS-Trust STS. A Web service client tries to access Service1 and requests for the service. To fulfill the request, Service1 needs to access the service of Service2. Service1 can request a token from WS-Trust STS to access Service2. This exchange of information happens through security tokens embedded in SOAP messages.
This chaining of service request can be any number of nodes based on the implementation.
Requests for tokens can be made in two ways:
-
By using the ActAs element (Identity Delegation): The ActAs element is used for delegated requests. Delegated scenarios require composite delegation, where the final recipient of the issued token can see the entire delegation chain. ActAs is commonly used in multi-tiered systems to authenticate and pass information about identities between the tiers without having to pass this information at the application or business logic layer.
-
By using the OnBehalfOf element (Impersonation): The OnBehalfOf element is used for proxy requests. OnBehalfOf is used when the identity of only the original client is important. The final recipient of the issued token can only see claims about the original client. The information about intermediaries is not preserved.
The following diagram illustrates the workflow:
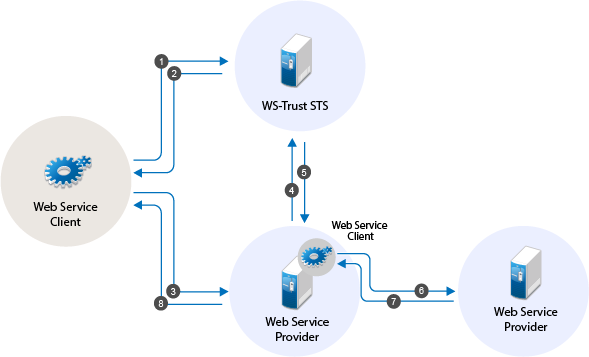
The following workflow explains the ActAs scenario:
-
The Web service client sends a RST to WS-Trust STS for its authentication.
-
WS-Trust STS returns a SAML token to the client in the RSTR. Let us refer to this SAML token as token1. The subject of this SAML token is client.
-
The client forwards the token1 with its SOAP request to Service1.
-
Then Service1 sends a RST to WS-Trust STS again authenticating itself to the STS. This time the RST contains the token1 inside the ActAs element.
-
WS-Trust STS issues a SAML token (referred to as token2). The subject of this token is Service1. It contains an attribute called ActAs with the value of client.
-
Service1 sends token2 to Service2. By processing token2, Service2 understands that the original requester is client and Service1 is acting as the original requester.
-
Service2 sends the response to Service1.
-
Service1 forwards the response to the client.
The following workflow explains the OnBehalfOf scenario:
-
The Web service client sends a RST to WS-Trust STS for its authentication.
-
WS-Trust STS returns a SAML token to the client in the RSTR. Let us refer to this SAML token as token1. The subject of this SAML token is client.
-
The client forwards the token1 with its SOAP request to Service1.
-
Then Service1 sends a RST to WS-Trust STS again authenticating itself to the STS. This time the RST contains the token1 inside the OnBehalfOf element.
-
WS-Trust STS issues a SAML token (referred to as token2). The subject of this token is client.
-
Service1 sends token2 to Service2. Service2 understands that the original requester is client but cannot see the details of Service1.
-
Service2 sends the response to Service1.
-
Service1 forwards the response to the client.
IMPORTANT:Starting from Access Manager 4.0 SP1 release, the default binding supported is SOAP 1.2. If you want to use SOAP 1.1 instead, perform the following steps on all instances of the Identity Server:
-
Traverse to the /opt/novell/nam/idp/webapps/nidp/WEB-INF folder and edit the sun-jaxws.xml file.
-
Remove all instances of bindings from the endpoints in the sun-jaxws.xml file and save the changes. A binding is represented by the following line in this file:
binding="http://java.sun.com/xml/ns/jaxws/2003/05/soap/bindings/HTTP/"
-
Restart the Identity Server using the /etc/init.d/novell-idp restart command.
Renewing a Token
The renew token operation helps in renewing a token issued by WS-Trust Security Token Service(STS). Only a token that is issued by an Identity Server that is part of the same cluster can be renewed. Tokens issued by a different Identity Server in a different cluster or by a third-party STS cannot be renewed.
Each token generated by the STS is valid for the duration specified using the setting. A token can be renewed only before lapse of the expiry period. For example: if the Token Lifetime has been specified as 180 seconds, token renew operation will succeed only till the 179th second.
Workflow:
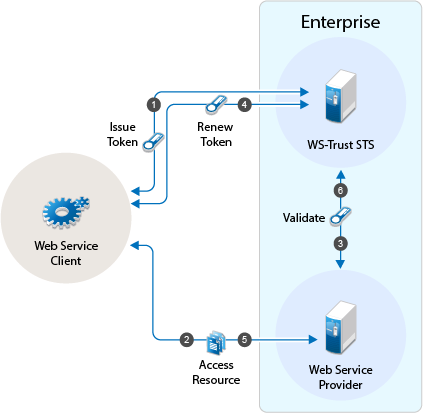
-
The Web service client sends a RST to WS-Trust STS for its authentication and WS-Trust STS returns a SAML token to the client in the RSTR
-
Web Service Provider uses the SAML token from STS and requests access to resources hosted on the Web Service provider.
-
The Web Service Provider validates the SAML token and provides access to the resources.
-
When the token is nearing expiry, the Web service client sends a RST to WS-Trust STS to renew the token previously issued. The STS renews the validity of the token and sends a renewed token to the Web Service client for any further requests.
-
Web Service client uses the renewed SAML token from STS and requests access to resources hosted on the Web Service provider.
Authentication by Using SAML Tokens
WS-Trust STS accepts SAML tokens issued by a third-party STS for authentication. The tokens can be in SAML 1.1 or SAML 2.0.
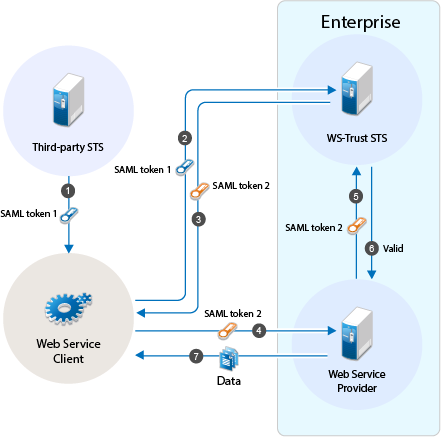
Workflow:
-
The Web service client sends a RST to third-party STS. The third-party STS returns a SAML token to the client in the RSTR.
-
The Web Service client uses SAML token issued by the third-party STS and requests WS-Trust STS to grant access to resources hosted on the Web Service Provider.
-
WS-Trust STS authenticates the client using the third-party SAML token and issues a new SAML token.
-
The Web Service client uses this new SAML token to get access to resources hosted on the Web Service Provider.
-
The Web Service Provider validates the SAML token with WS-Trust STS.
-
The Web Service client can access the resources on the Web Service Provider if the SAML token is valid.
Configuring WS-Trust STS
Before a Web service can invoke operations on STS, you must enable WS-Trust and configure it in Access Manager. This section discusses the following topics:
Enabling WS-Trust
Access Manager ships with only SAML 1.1, Liberty, and SAML 2.0 enabled by default. To use the WS-Trust protocol, you must enable it on the Identity Server.
To enable WS-Trust, perform the following steps:
-
In the Administration Console, click > > .
-
In the section, select .
-
Click .
-
Update the Identity Server.
Configuring Access Manager for WS-Trust STS
To configure WS-Trust STS, perform the following steps:
-
In the Administration Console, click > > .
-
Select > .
-
Specify the following details:
Token Lifetime: Specify the duration in seconds for which the token is valid. The default value is 360 seconds.
Token Issuer: Specify the name of the issuer of the authentication token.
Authentication Methods: Select methods that can be used for authentication at STS for WS-Trust.
Select and move methods from to .
Tokens: Select the type of tokens that can be issued for authentication at STS for WS-Trust. SAML 1.1 and SAML 2.0 tokens are supported. If you select both token types, the token type configured in the service provider is returned.
-
Click .
Viewing STS Service Details
EndPoint URL is the SOAP endpoint of STS. The Web service client and Web service provider must be configured to these endpoints.
In the Administration Console under > > > > , you can view the following STS EndPoint details:
Service Name: The name of the STS service endpoint that is configured in the Web service client.
Port Name: The port that STS implements. This is configured in the Web service client.
MEX EndPoint URI: The MetadataExchange endpoint of STS.
WSDL of STS Username authentication: WSDL location for username authentication. This file is used by applications that use the token service with username authentication.
WSDL of STS SAML authentication: WSDL location for SAML. This file is used by applications that use the token service with SAML authentication.
Configuring Service Providers
You require to configure Web service providers to accept tokens issued by an STS. The Web service provider uses an IssuedToken policy for the same. The IssuedToken policy is wrapped in WSDL. For a sample policy, see A Sample WS-Policy for Web Service Providers.
Configuring a service provider includes adding a service provider domain and then adding a service provider in a configured domain. Access Manager also allows you to modify and delete configured service provider domains and service providers.
Adding a Domain and Assigning WS-Trust Operations
-
In the Administration Console, click > > > > .
-
Click to create a general domain. Selecting creates an Office 365 domain that can be configured for active authentication. For details on creating an Office 365 domain, see Configuring an Office 365 Domain By Using WS-Trust Protocol
-
Specify the following details:
Name: Specify a name for the domain.
WS-Trust Operations: Select operations in that WS-Trust STS performs for tokens and move these to .
The available operations are Issue, Validate, OnBehalfOf, ActAs and Renew.
If you select OnBehalfOf and Act As the Available operations, additional configuration is required. For more information, see Adding Policy for ActAs and OnBehalfOf
-
Click . Continue with creation of a trusted Service Provider. For more information, see Adding Web Service Providers
Adding Web Service Providers
This section discusses how to add service providers for WS-Trust STS. Adding a service provider includes adding service provider EndPoint URL, configuring trust certificates, selecting token types, and customizing attributes.
Perform the following steps:
-
In the Administration Console, click > > > > .
-
Select the domain under which you want to configure a service provider.
-
Click > .
-
Specify the following details:
Name: Specify a name for the service provider.
Endpoint: Specify the SOAP endpoint location at the service provider to which SOAP messages are sent.
Token Type: Select the type of token that the service provider will accept or validate.
Encrypt Proof Token Using: Import a certificate from the file system or paste content of the certificate here. This certificate should be configured in the Web service provider and is used for creating the subject confirmation in the SAML token.
-
Click .
-
Select the Service Provider to define the Attributes and Authentication Response. For more information, see Modifying Service Providers
Enabling Delegation and Impersonation
By default, ActAs and OnBehalfOf requests are disabled in the Access Manager Identity Server. To enable delegation and impersonation, you must enable ActAs and OnBehalfOf by performing the following steps:
-
Go to > .
-
Click the service provider domain name for which you want to enable ActAs and OnBehalfOf operations.
-
Under , select and in and move to .
-
Click .
These operations are restricted to a set of privileged user accounts defined in the policy. You need to configure the allowed user accounts, who can perform ActAs and OnBehalfOf operations, in the nidconfig.properties file of each Identity Server installation. For more information, see Adding Policy for ActAs and OnBehalfOf
Configuring ActAs to Lookup Multiple User Stores
For ActAs, the username on behalf of whom a client requests for a token must be present in the user store (eDirectory). The default implementation checks for this user only in the default user store. If you want to search the user in a different user store, perform the following steps:
-
In the Administration Console, click > > > > .
-
Click and specify the following details:
Display name: Specify Find_By_Username
Java class: Select Other
Java class path: Specify com.novell.nidp.authentication.local.UserNameAuthenticationClass
-
Click > .
-
Go to > .
-
Click and select the Find_By_Username class.
For more information about how to configure an authentication method, see Section 5.1.3, Configuring Authentication Methods.
-
Go to > . Move this authentication method in the from .
Adding Policy for ActAs and OnBehalfOf
You must add an policy to allow ActAs and OnBehalfOf operations. The default policy looks for a configuration of allowed user names from the nidpconfig.properties file. Allowed usernames are the user accounts that the intermediate Web service provider uses to authenticate with STS when sending a request with ActAs or OnBehalfOf elements.For ActAs and OnBehalfOf, you must specify multiple username values separated with comma. If no value is specified, ActAs and OnBehalfOf are denied.
The nidpconfig.properties file is located in the following location:
Linux: /opt/novell/nids/lib/webapp/WEB-INF/classes.
Windows: C:\Program Files (x86)\Novell\Tomcat\webapps\nidp\WEB-INF\classes
Enable the following attribute by removing the pound (#) symbol from it for allowing ActAs:
WSTRUST_AUTHORIZATION_ALLOWED_ACTAS_VALUES=alice,admin
Enable the following name-value pair by removing the pound (#) symbol from it for allowing OnBehalfOf:
WSTRUST_AUTHORIZATION_ALLOWED_ONBEHALF_VALUES=bob,admin
To simplify parameters, you can define only the following parameter:
WSTRUST_AUTHORIZATION_ALLOWED_VALUES=alice,admin
These users can perform both Actas and onBehalfOf operations.
After editing the file, restart the Identity Server by running the following command:
Linux: /etc/init.d/novell-idp restart
Windows: net stop Tomcat7
net start Tomcat7
After upgrading Access manager, the configuration is set to default values. You must reconfigure the details after each upgrade.
Managing Service Provider Domains
The WS-Trust page allows you to create, modify, and delete service provider domains. This page lists all configured service provider domains.
-
In the Administration Console, click > > > > .
The list of all configured service provider domains is displayed.
-
Select one of the following actions:
-
New: Select to create a general domain. Selecting creates a domain that can be configured for single sign-on to Office 365 services. For more on creating Office 365 domain, see Adding a Domain and Assigning WS-Trust Operations.
-
Delete: Deletes the selected service provider domain.
-
-
Click , then update the Identity Server.
-
Select the Service Provider domain to modify the following details:
-
Name: Modify the name of the service provider domain.
-
WS Trust Operations: Modify the list of selected WS-Trust operations.
-
-
Click .
Managing Service Providers
Access Manager allows you to you to create, modify, and delete trusted service providers. The Service Providers page lists all configured service provider.
-
In the Administration Console, click > > > > > [name of the service provider domain] > .
The list of all configured service provider for the selected domain is displayed.
-
Select one of the following actions:
-
New: Launches the Create a Service Provider page. For more information, see Adding Web Service Providers.
-
Delete: Deletes the selected service providers.
-
-
Click .
Modifying Service Providers
-
In the Administration Console, click > > > > > [name of the service provider domain] > .
The list of all configured service provider for the selected domain is displayed.
-
Click the name of the service provider you want to edit.
Configuration > Trust
You can modify the following details:
-
Name
-
Endpoint
-
Token Type
-
Encrypt Proof Token Using
For more information about these fields, see Adding Web Service Providers.
Configuration > Attributes
-
Select the Attribute Set and move attributes from the Available list to the pane. This indicates the attributes that you want sent in an assertion to the service provider.
Configuration > Authentication Response
-
Specify a value for the name identifier.
-
The persistent and transient formats are generated automatically. For the others, you can select an attribute. The available attributes depend upon the attributes that you have selected to send with authentication (see Configuring the Attributes Obtained at Authentication). If you do not select a value for the E-mail, Kerberos, X509, or Unspecified format, a unique value is automatically generated.
IMPORTANT:In Access Manager 4.0 SP1, the SAML tokens with Name Identifier value other than username do not support ActAs, OnBehalfOf and SAML authentication operations.
-
-
-
Click .
A Sample WS-Policy for Web Service Providers
You should modify WSDL of a Web service provider to include IssuedTokenPolicy that points to Access Manager WS-Trust STS. To modify WSDL, you require to add a WS-Policy with IssuedTokenElement. The following is a sample configuration:
<wsp:Policy wsu:Id="<policy_name>">
        <wsp:ExactlyOne>
            <wsp:All>
                <wsaws:UsingAddressing xmlns:wsaws="http://www.w3.org/2006/05/addressing/wsdl" wsp:Optional="false"/>
                <sc:KeyStore wspp:visibility="private" alias="xws-security-server"/>
                <sp:SymmetricBinding>
                    <wsp:Policy>
                        <sp:ProtectionToken>
                            <wsp:Policy>
                                <sp:IssuedToken sp:IncludeToken="http://schemas.xmlsoap.org/ws/2005/07/securitypolicy/IncludeToken/AlwaysToRecipient">
                                    <sp:RequestSecurityTokenTemplate>
                                        <t:TokenType>http://docs.oasis-open.org/wss/oasis-wss-saml-token-profile-1.1#SAMLV1.1</t:TokenType>
                                        <t:KeyType>http://schemas.xmlsoap.org/ws/2005/02/trust/SymmetricKey</t:KeyType>
                                        <t:KeySize>256</t:KeySize>
                                    </sp:RequestSecurityTokenTemplate>
                                    <wsp:Policy>
                                        <sp:RequireInternalReference/>
                                    </wsp:Policy>
                                    <sp:Issuer>
                                        <wsaws:Address>https://namtest.com:8443/nidp/wstrust/sts</wsaws:Address>
                                        <wsaws:Metadata>
                                            <wsx:Metadata>
                                                <wsx:MetadataSection>
                                                    <wsx:MetadataReference>
                                                        <wsaws:Address>https://namtest.com:8443/nidp/wstrust/sts/mex</wsaws:Address>
                                                    </wsx:MetadataReference>
                                                </wsx:MetadataSection>
                                            </wsx:Metadata>
                                        </wsaws:Metadata>
                                    </sp:Issuer>
                                </sp:IssuedToken>
                            </wsp:Policy>
                        </sp:ProtectionToken>
                        <sp:Layout>
                            <wsp:Policy>
                                <sp:Lax/>
                            </wsp:Policy>
                        </sp:Layout>
                        <sp:IncludeTimestamp/>
                        <sp:OnlySignEntireHeadersAndBody/>
                        <sp:AlgorithmSuite>
                            <wsp:Policy>
                                <sp:Basic128/>
                            </wsp:Policy>
                        </sp:AlgorithmSuite>
                    </wsp:Policy>
                </sp:SymmetricBinding>
                <sp:Wss11>
                    <wsp:Policy>
                        <sp:MustSupportRefIssuerSerial/>
                        <sp:MustSupportRefThumbprint/>
                        <sp:MustSupportRefEncryptedKey/>
                    </wsp:Policy>
                </sp:Wss11>
                <sp:Trust10>
                    <wsp:Policy>
                        <sp:MustSupportIssuedTokens/>
                        <sp:RequireClientEntropy/>
                        <sp:RequireServerEntropy/>
                    </wsp:Policy>
                </sp:Trust10>
            </wsp:All>
        </wsp:ExactlyOne>
    </wsp:Policy>
Configuring Web Service Clients
Access Manager WS-Trust STS can be accessed from various Web service clients. The following sections provide example configurations and sample code snippets for CXF-based and Metro-based Web service clients:
Configuring Apache CXF-based Web Service Clients
You can configure CXF-based Web service clients either programmatically or through XML configuration files. Below is a sample XML configuration. Add the following features to cxf.xml under the top-level beans section:
<cxf:bus>
    <cxf:features>
      <cxf:logging />
      <wsa:addressing />
    </cxf:features>
  </cxf:bus>
Define the STS client with its properties as follows:
<jaxws:client name="{<your webservice target namespace>}WebServicePort"
    createdFromAPI="true">
    <jaxws:properties>
<entry key="ws-security.sts.client">
        <bean class="org.apache.cxf.ws.security.trust.STSClient">
          <constructor-arg ref="cxf" />
          <property name="wsdlLocation"
            value="https://<your idp base url>nidp/wstrust/sts?wsdl" />
          <property name="serviceName" value="{http://www.netiq.com/nam-4-0/wstrust}SecurityTokenService" />
          <property name="endpointName" value="{http://www.netiq.com/nam-4-0/wstrust}STS_Port" />

          <property name="wspNamespace" value="http://schemas.xmlsoap.org/ws/2004/09/policy" />
          <property name="properties">
            <map>
              <entry key="ws-security.username" value="<username to connect to idp>" />
              <entry key="ws-security.password" value="<password>" />
              <entry key="ws-security.encryption.properties" value="clientKeystore.properties" />
              <entry key="ws-security.encryption.username" value="mystskey" />
              <entry key="soap.force.doclit.bare" value="true" />
              <entry key="soap.no.validate.parts" value="true" />
            </map>
          </property>
        </bean>
      </entry>
</jaxws:clien>
You can configure ws-security.callback-handler to provide username and password programmatically. You can also configure global sts-client in cxf.xml that can be used across multiple Web services.
For more information about configuring Apache CXF-based Web service clients, see Apache CXF.
Configuring Metro-based Web Service Clients
You can configure Metro-based clients through NetBeans (an integrated development environment).
-
Create a Web service client project in NetBeans.
-
Right click the project and click to create a STS client. Point the WSDL to http://<name of the identity provider server>:<port>/nidp/wstrust/sts?wsdl.
-
Configure the username and password to access WS-Trust STS.
The user configured needs to get authenticated into Access Manager password-based authentication classes. You can also configure the Callback-based configuration in NetBeans to provide username and passwords dynamically.
-
When you create a Web service client for your Web service, which is configured for STS-issued tokens, you need to specify the endpoint URL of WS-Trust STS in the Web service client properties. You can specify this in NetBeans by right clicking > and selecting .
For more information about configuring Metro-based Web service clients, see To Specify an STS on the Service Side and To Specify an STS on the Client Side in Configuring A Secure Token Service (STS).
Renew Token - Sample Request and Response
Renew Token - Sample Request
<soap:Envelope xmlns:soap="http://www.w3.org/2003/05/soap-envelope">
   <soap:Header>
      <Action xmlns="http://www.w3.org/2005/08/addressing">http://docs.oasis-open.org/ws-sx/ws-trust/200512/RST/Renew</Action>
      <MessageID xmlns="http://www.w3.org/2005/08/addressing">urn:uuid:9cfedcee-2ebf-47e0-a24a-45281d785136</MessageID>
      <To xmlns="http://www.w3.org/2005/08/addressing">https://namsb.blr.novell.com:443/nidp/wstrust/sts</To>
      <ReplyTo xmlns="http://www.w3.org/2005/08/addressing">
         <Address>http://www.w3.org/2005/08/addressing/anonymous</Address>
      </ReplyTo>
      <wsse:Security soap:mustUnderstand="1" xmlns:wsse="http://docs.oasis-open.org/wss/2004/01/oasis-200401-wss-wssecurity-secext-1.0.xsd" xmlns:wsu="http://docs.oasis-open.org/wss/2004/01/oasis-200401-wss-wssecurity-utility-1.0.xsd">
         <wsu:Timestamp wsu:Id="TS-1">
            <wsu:Created>2014-02-10T23:36:42Z</wsu:Created>
            <wsu:Expires>2014-02-10T24:36:42Z</wsu:Expires>
         </wsu:Timestamp>
         <wsse:UsernameToken wsu:Id="UsernameToken-2">
            <wsse:Username>admin</wsse:Username>
            <wsse:Password Type="http://docs.oasis-open.org/wss/2004/01/oasis-200401-wss-username-token-profile-1.0#PasswordText">novell</wsse:Password>
         </wsse:UsernameToken>
      </wsse:Security>
   </soap:Header>
   <soap:Body>
      <wst:RequestSecurityToken xmlns:wst="http://docs.oasis-open.org/ws-sx/ws-trust/200512" xmlns:wsse="http://docs.oasis-open.org/wss/2004/01/oasis-200401-wss-wssecurity-secext-1.0.xsd">
         <wst:RequestType>http://docs.oasis-open.org/ws-sx/ws-trust/200512/Renew</wst:RequestType>
         <wst:TokenType>urn:oasis:names:tc:SAML:2.0:assertion</wst:TokenType>
         <wst:KeyType>http://docs.oasis-open.org/ws-sx/ws-trust/200512/SymmetricKey</wst:KeyType>
         <wst:Entropy>
            <wst:BinarySecret Type="http://docs.oasis-open.org/ws-sx/ws-trust/200512/Nonce">2O0dAaqhrBJqbouiQTf7D2pXtXRo36Wi/yswGeoq7iQ=</wst:BinarySecret>
         </wst:Entropy>
         <wst:RenewTarget>
            <saml2:Assertion ID="nstsa657b5f4-9bf0-45b7-9875-07eeb6d65196" IssueInstant="2014-05-26T10:33:50.564Z" Version="2.0" xmlns:ds="http://www.w3.org/2000/09/xmldsig#" xmlns:exc14n="http://www.w3.org/2001/10/xml-exc-c14n#" xmlns:saml2="urn:oasis:names:tc:SAML:2.0:assertion" xmlns:xenc="http://www.w3.org/2001/04/xmlenc#" xmlns:xs="http://www.w3.org/2001/XMLSchema" xmlns:ns10="http://www.w3.org/2000/09/xmldsig#" xmlns:ns13="http://www.w3.org/2001/10/xml-exc-c14n#" xmlns:ns3="http://docs.oasis-open.org/wss/oasis-wss-wssecurity-secext-1.1.xsd" xmlns:ns5="http://docs.oasis-open.org/ws-sx/ws-trust/200512/" xmlns:ns9="http://schemas.xmlsoap.org/ws/2006/02/addressingidentity" xmlns:sc="http://docs.oasis-open.org/ws-sx/ws-secureconversation/200512" xmlns:trust="http://docs.oasis-open.org/ws-sx/ws-trust/200512" xmlns:wsa="http://www.w3.org/2005/08/addressing" xmlns:wsp="http://schemas.xmlsoap.org/ws/2004/09/policy" xmlns:wst="http://schemas.xmlsoap.org/ws/2005/02/trust" xmlns:wsu="http://docs.oasis-open.org/wss/2004/01/oasis-200401-wss-wssecurity-utility-1.0.xsd" xmlns:S="http://www.w3.org/2003/05/soap-envelope" xmlns:wsse11="http://docs.oasis-open.org/wss/oasis-wss-wssecurity-secext-1.1.xsd">
               <saml2:Issuer>https://namsb.blr.novell.com/nidp/wstrust/sts</saml2:Issuer>
               <ds:Signature>
                  <ds:SignedInfo>
                     <ds:CanonicalizationMethod Algorithm="http://www.w3.org/2001/10/xml-exc-c14n#"/>
                     <ds:SignatureMethod Algorithm="http://www.w3.org/2000/09/xmldsig#rsa-sha1"/>
                     <ds:Reference URI="#nstsa657b5f4-9bf0-45b7-9875-07eeb6d65196">
                        <ds:Transforms>
                           <ds:Transform Algorithm="http://www.w3.org/2000/09/xmldsig#enveloped-signature"/>
                           <ds:Transform Algorithm="http://www.w3.org/2001/10/xml-exc-c14n#"/>
                        </ds:Transforms>
                        <ds:DigestMethod Algorithm="http://www.w3.org/2000/09/xmldsig#sha1"/>
                        <ds:DigestValue>Z3S4qxz2wRv0k5np2R6ENkIF9pk=</ds:DigestValue>
                     </ds:Reference>
                  </ds:SignedInfo>
                  <ds:SignatureValue>ZxeqeuD7NXfNRPiaYY3v2Nfo9vTx+ceASiAFBDzOfaWGczHBT0eYU+AQM99vdX1GCBCdWqO9qQR8
2WP71mzREC6ndg+8g/zJ6UH+Jzsf05hIxCAu7d7fg5qP5/BP++x8vUlpUQ32D8daxx+GIwuZjlOs
8KhdbgLReYSWyX6PV0UbjbnAtDFaBTTJ5lpEqHdK7FGUiISXg679o16BTJSs/V2bBOrX7cZGRGte
PMBGz19qX0rzoeNpLJFpJi23+/wAYaqzz0kyRGeyA0De0ugsqw2XRvUPciaYhbqqOraFUfmpyspC
o7ClzwsvnO1h1gVX/lDBwfLokrBeijsG3FN3Hg==</ds:SignatureValue>
                  <ds:KeyInfo>
                     <ds:X509Data>
                        <ds:X509Certificate>MIIFBDCCA+ygAwIBAgIkAhwR/6b9CQnrHMhxuBSYqOCbHugRb+e4U/9jWi9kAgIWCzKcMA0GCSqG
SIb3DQEBBQUAMDExGjAYBgNVBAsTEU9yZ2FuaXphdGlvbmFsIENBMRMwEQYDVQQKFApuYW1zYl90
cmVlMB4XDTE0MDUyMTE4NTQwMVoXDTI0MDUyMTE4NTQwMVowHzEdMBsGA1UEAxMUbmFtc2IuYmxy
Lm5vdmVsbC5jb20wggEiMA0GCSqGSIb3DQEBAQUAA4IBDwAwggEKAoIBAQDRTsdCFBM3ImpIyRAj
OdFFEYbC/ykQUEZFwGp62BAUxoLIOpmDZyxpbqIh+l462GFByuCvkLOhnelOGV6Ii/cTAbaHko7h
T7cfUC3N4kmhnc3IXWgjodRIXMlaUSYDYd79guyVjG0brOWJMxJxvm1eo3p8bFzPLnpkEdJ7c8HM
BRqckecaGT8nbpm1KGZFAStrRRTryu2aG670FP3+MHWZmydqLlvrK1NCfe+7DlpOUwA13sSgMslf
6UCI4E50gn6pQ26rctGKrBsFfrX76t6ESZuaqFlWS+YA11cWS3irtihT0p2GsoxcJzq+IvHosHY+
pvrt4gcJiZJN6P3e6yrrAgMBAAGjggIUMIICEDAdBgNVHQ4EFgQUpSkUiviZFQ7yIDLb9sJT+mZH
kngwHwYDVR0jBBgwFoAUfFLP7EF6tU2u2qquPNTvLDdV7e8wggHMBgtghkgBhvg3AQkEAQSCAbsw
ggG3BAIBAAEB/xMdTm92ZWxsIFNlY3VyaXR5IEF0dHJpYnV0ZSh0bSkWQ2h0dHA6Ly9kZXZlbG9w
ZXIubm92ZWxsLmNvbS9yZXBvc2l0b3J5L2F0dHJpYnV0ZXMvY2VydGF0dHJzX3YxMC5odG0wggFI
oBoBAQAwCDAGAgEBAgFGMAgwBgIBAQIBCgIBaaEaAQEAMAgwBgIBAQIBADAIMAYCAQECAQACAQCi
BgIBFwEB/6OCAQSgWAIBAgICAP8CAQADDQCAAAAAAAAAAAAAAAADCQCAAAAAAAAAADAYMBACAQAC
CH//////////AQEAAgQG8N9IMBgwEAIBAAIIf/////////8BAQACBAbw30ihWAIBAgICAP8CAQAD
DQBAAAAAAAAAAAAAAAADCQBAAAAAAAAAADAYMBACAQACCH//////////AQEAAgQR/6b9MBgwEAIB
AAIIf/////////8BAQACBBH/pv2iTjBMAgECAgEAAgIA/wMNAIAAAAAAAAAAAAAAAAMJAIAAAAAA
AAAAMBIwEAIBAAIIf/////////8BAQAwEjAQAgEAAgh//////////wEBADANBgkqhkiG9w0BAQUF
AAOCAQEAbA0AdHm5pV6cEwSyOoB3aJfaLegMYPlAuTNK9ajhez9PIHPGSQzNxTRbj3eV9P+ueP7j
i8AFVR3Ej4eA7S1i5kPGuSXhwM6VhSIsCn+x+HbpnFdWJdu5EvErjTIbbjRU/4wTRCqKe7loFqKs
rH+BGNuUJw16l2PM+wJ+sajX7ktzP8rk8CF+cTOe8ggFcEuJ4igl1MMkVbul1RTggRmpcILNFk57
QdmySozjVok1OVQOzIGcAggPBSZeCumNNP8mQIAmvnwWG0cTvDIkMkCV1AzCC0WK0dWM53JZD/aa
tHay9w8QWoUU5cJo8B+uSm2vN+53PdtMKWOXhJcXtXpKKg==</ds:X509Certificate>
                     </ds:X509Data>
                  </ds:KeyInfo>
               </ds:Signature>
               <saml2:Subject>
                  <saml2:NameID NameQualifier="">admin</saml2:NameID>
                  <saml2:SubjectConfirmation Method="urn:oasis:names:tc:SAML:2.0:cm:bearer"/>
               </saml2:Subject>
               <saml2:Conditions NotBefore="2014-05-26T10:33:50.564Z" NotOnOrAfter="2014-05-26T10:35:50.564Z">
                  <saml2:AudienceRestriction>
                     <saml2:Audience>http://164.99.184.228:8080/doubleit/services/doubleit</saml2:Audience>
                  </saml2:AudienceRestriction>
               </saml2:Conditions>
               <saml2:Advice/>
               <saml2:AuthnStatement AuthnInstant="2014-05-26T10:33:50.564Z">
                  <saml2:AuthnContext>
                     <saml2:AuthnContextClassRef>urn:oasis:names:tc:SAML:1.0:am:password</saml2:AuthnContextClassRef>
                  </saml2:AuthnContext>
               </saml2:AuthnStatement>
               <saml2:AttributeStatement>
                  <saml2:Attribute AttributeName="emailaddress" AttributeNamespace="http://schemas.xmlsoap.org/ws/2005/05/identity/claims" Name="emailaddress" NameFormat="http://schemas.xmlsoap.org/ws/2005/05/identity/claims">
                     <saml2:AttributeValue>admin@idp.com</saml2:AttributeValue>
                  </saml2:Attribute>
               </saml2:AttributeStatement>
            </saml2:Assertion>
         </wst:RenewTarget>
      </wst:RequestSecurityToken>
      <ns:RequestSecurityToken xmlns:ns="http://docs.oasis-open.org/ws-sx/ws-trust/200512/"/>
   </soap:Body>
</soap:Envelope>
Renew Token - Sample Response
<S:Envelope xmlns:S="http://www.w3.org/2003/05/soap-envelope" xmlns:wsse11="http://docs.oasis-open.org/wss/oasis-wss-wssecurity-secext-1.1.xsd" xmlns:wsse="http://docs.oasis-open.org/wss/2004/01/oasis-200401-wss-wssecurity-secext-1.0.xsd" xmlns:wsu="http://docs.oasis-open.org/wss/2004/01/oasis-200401-wss-wssecurity-utility-1.0.xsd" xmlns:xs="http://www.w3.org/2001/XMLSchema">
   <S:Header>
      <Action S:mustUnderstand="true" xmlns="http://www.w3.org/2005/08/addressing">http://docs.oasis-open.org/ws-sx/ws-trust/200512/RSTR/RenewFinal</Action>
      <MessageID xmlns="http://www.w3.org/2005/08/addressing">uuid:f41d7aeb-6f67-4df3-9fe4-e160889b7efb</MessageID>
      <RelatesTo xmlns="http://www.w3.org/2005/08/addressing">urn:uuid:9cfedcee-2ebf-47e0-a24a-45281d785136</RelatesTo>
      <To xmlns="http://www.w3.org/2005/08/addressing">http://www.w3.org/2005/08/addressing/anonymous</To>
      <wsse:Security S:mustUnderstand="true">
         <wsu:Timestamp wsu:Id="_1" xmlns:ns15="http://docs.oasis-open.org/ws-sx/ws-secureconversation/200512" xmlns:ns14="http://schemas.xmlsoap.org/soap/envelope/">
            <wsu:Created>2014-05-26T10:35:41Z</wsu:Created>
            <wsu:Expires>2014-05-26T10:40:41Z</wsu:Expires>
         </wsu:Timestamp>
      </wsse:Security>
   </S:Header>
   <S:Body>
      <trust:RequestSecurityTokenResponse xmlns:ns10="http://www.w3.org/2000/09/xmldsig#" xmlns:ns13="http://www.w3.org/2001/10/xml-exc-c14n#" xmlns:ns3="http://docs.oasis-open.org/wss/oasis-wss-wssecurity-secext-1.1.xsd" xmlns:ns5="http://docs.oasis-open.org/ws-sx/ws-trust/200512/" xmlns:ns9="http://schemas.xmlsoap.org/ws/2006/02/addressingidentity" xmlns:sc="http://docs.oasis-open.org/ws-sx/ws-secureconversation/200512" xmlns:trust="http://docs.oasis-open.org/ws-sx/ws-trust/200512" xmlns:wsa="http://www.w3.org/2005/08/addressing" xmlns:wsp="http://schemas.xmlsoap.org/ws/2004/09/policy" xmlns:wst="http://schemas.xmlsoap.org/ws/2005/02/trust">
         <trust:TokenType>urn:oasis:names:tc:SAML:2.0:assertion</trust:TokenType>
         <trust:RequestedSecurityToken>
            <saml2:Assertion ID="nstsa657b5f4-9bf0-45b7-9875-07eeb6d65196" IssueInstant="2014-05-26T10:35:41.072Z" Version="2.0" xmlns:ds="http://www.w3.org/2000/09/xmldsig#" xmlns:exc14n="http://www.w3.org/2001/10/xml-exc-c14n#" xmlns:saml2="urn:oasis:names:tc:SAML:2.0:assertion" xmlns:xenc="http://www.w3.org/2001/04/xmlenc#">
               <saml2:Issuer>https://namsb.blr.novell.com/nidp/wstrust/sts</saml2:Issuer>
               <ds:Signature>
                  <ds:SignedInfo>
                     <ds:CanonicalizationMethod Algorithm="http://www.w3.org/2001/10/xml-exc-c14n#"/>
                     <ds:SignatureMethod Algorithm="http://www.w3.org/2000/09/xmldsig#rsa-sha1"/>
                     <ds:Reference URI="#nstsa657b5f4-9bf0-45b7-9875-07eeb6d65196">
                        <ds:Transforms>
                           <ds:Transform Algorithm="http://www.w3.org/2000/09/xmldsig#enveloped-signature"/>
                           <ds:Transform Algorithm="http://www.w3.org/2001/10/xml-exc-c14n#"/>
                        </ds:Transforms>
                        <ds:DigestMethod Algorithm="http://www.w3.org/2000/09/xmldsig#sha1"/>
                        <ds:DigestValue>bX5LSfro0HkupLsMkU/V+x39P+g=</ds:DigestValue>
                     </ds:Reference>
                  </ds:SignedInfo>
                  <ds:SignatureValue>QLRRXQ4TzTgM9mVa5UF1p7YRqRvLP/h3pyP0KVzZXcbCfDmtT4bO14lqfhNoXL+Ym2iu2V1MIC5I
TRSt6D/y6pfs4/nChMrOuk5spMZYLBee+0PdlGYhfLGzyh/AONZGsoVrHf1/LItMeTp4MVmk/hTp
8yTWb0r79Ssz5TEbwJ/NkqFXxa9XffheaTySOfNXQYu3tL1rdp7Zaq5BR7mye00huo6gBTshHTXM
fGPYMu/Sy0kapqTBWHUbwt8FzysBEgELZdquhuvt1NOfHqkWAbyp5vExjjrYxl06Z7Fu3LnDSq+m
hI9S+VLs1bBR2XgNofhw/bFVBboYkzZDT6Ipmg==</ds:SignatureValue>
                  <ds:KeyInfo>
                     <ds:X509Data>
                        <ds:X509Certificate>MIIFBDCCA+ygAwIBAgIkAhwR/6b9CQnrHMhxuBSYqOCbHugRb+e4U/9jWi9kAgIWCzKcMA0GCSqG
SIb3DQEBBQUAMDExGjAYBgNVBAsTEU9yZ2FuaXphdGlvbmFsIENBMRMwEQYDVQQKFApuYW1zYl90
cmVlMB4XDTE0MDUyMTE4NTQwMVoXDTI0MDUyMTE4NTQwMVowHzEdMBsGA1UEAxMUbmFtc2IuYmxy
Lm5vdmVsbC5jb20wggEiMA0GCSqGSIb3DQEBAQUAA4IBDwAwggEKAoIBAQDRTsdCFBM3ImpIyRAj
OdFFEYbC/ykQUEZFwGp62BAUxoLIOpmDZyxpbqIh+l462GFByuCvkLOhnelOGV6Ii/cTAbaHko7h
T7cfUC3N4kmhnc3IXWgjodRIXMlaUSYDYd79guyVjG0brOWJMxJxvm1eo3p8bFzPLnpkEdJ7c8HM
BRqckecaGT8nbpm1KGZFAStrRRTryu2aG670FP3+MHWZmydqLlvrK1NCfe+7DlpOUwA13sSgMslf
6UCI4E50gn6pQ26rctGKrBsFfrX76t6ESZuaqFlWS+YA11cWS3irtihT0p2GsoxcJzq+IvHosHY+
pvrt4gcJiZJN6P3e6yrrAgMBAAGjggIUMIICEDAdBgNVHQ4EFgQUpSkUiviZFQ7yIDLb9sJT+mZH
kngwHwYDVR0jBBgwFoAUfFLP7EF6tU2u2qquPNTvLDdV7e8wggHMBgtghkgBhvg3AQkEAQSCAbsw
ggG3BAIBAAEB/xMdTm92ZWxsIFNlY3VyaXR5IEF0dHJpYnV0ZSh0bSkWQ2h0dHA6Ly9kZXZlbG9w
ZXIubm92ZWxsLmNvbS9yZXBvc2l0b3J5L2F0dHJpYnV0ZXMvY2VydGF0dHJzX3YxMC5odG0wggFI
oBoBAQAwCDAGAgEBAgFGMAgwBgIBAQIBCgIBaaEaAQEAMAgwBgIBAQIBADAIMAYCAQECAQACAQCi
BgIBFwEB/6OCAQSgWAIBAgICAP8CAQADDQCAAAAAAAAAAAAAAAADCQCAAAAAAAAAADAYMBACAQAC
CH//////////AQEAAgQG8N9IMBgwEAIBAAIIf/////////8BAQACBAbw30ihWAIBAgICAP8CAQAD
DQBAAAAAAAAAAAAAAAADCQBAAAAAAAAAADAYMBACAQACCH//////////AQEAAgQR/6b9MBgwEAIB
AAIIf/////////8BAQACBBH/pv2iTjBMAgECAgEAAgIA/wMNAIAAAAAAAAAAAAAAAAMJAIAAAAAA
AAAAMBIwEAIBAAIIf/////////8BAQAwEjAQAgEAAgh//////////wEBADANBgkqhkiG9w0BAQUF
AAOCAQEAbA0AdHm5pV6cEwSyOoB3aJfaLegMYPlAuTNK9ajhez9PIHPGSQzNxTRbj3eV9P+ueP7j
i8AFVR3Ej4eA7S1i5kPGuSXhwM6VhSIsCn+x+HbpnFdWJdu5EvErjTIbbjRU/4wTRCqKe7loFqKs
rH+BGNuUJw16l2PM+wJ+sajX7ktzP8rk8CF+cTOe8ggFcEuJ4igl1MMkVbul1RTggRmpcILNFk57
QdmySozjVok1OVQOzIGcAggPBSZeCumNNP8mQIAmvnwWG0cTvDIkMkCV1AzCC0WK0dWM53JZD/aa
tHay9w8QWoUU5cJo8B+uSm2vN+53PdtMKWOXhJcXtXpKKg==</ds:X509Certificate>
                     </ds:X509Data>
                  </ds:KeyInfo>
               </ds:Signature>
               <saml2:Subject>
                  <saml2:NameID NameQualifier="">admin</saml2:NameID>
                  <saml2:SubjectConfirmation Method="urn:oasis:names:tc:SAML:2.0:cm:bearer"/>
               </saml2:Subject>
               <saml2:Conditions NotBefore="2014-05-26T10:35:41.072Z" NotOnOrAfter="2014-05-26T10:37:41.072Z">
                  <saml2:AudienceRestriction>
                     <saml2:Audience>http://164.99.184.228:8080/doubleit/services/doubleit</saml2:Audience>
                  </saml2:AudienceRestriction>
               </saml2:Conditions>
               <saml2:Advice/>
               <saml2:AuthnStatement AuthnInstant="2014-05-26T10:33:50.564Z">
                  <saml2:AuthnContext>
                     <saml2:AuthnContextClassRef>urn:oasis:names:tc:SAML:1.0:am:password</saml2:AuthnContextClassRef>
                  </saml2:AuthnContext>
               </saml2:AuthnStatement>
               <saml2:AttributeStatement>
                  <saml2:Attribute AttributeName="emailaddress" AttributeNamespace="http://schemas.xmlsoap.org/ws/2005/05/identity/claims" Name="emailaddress" NameFormat="http://schemas.xmlsoap.org/ws/2005/05/identity/claims">
                     <saml2:AttributeValue xmlns:soap="http://www.w3.org/2003/05/soap-envelope">admin@idp.com</saml2:AttributeValue>
                  </saml2:Attribute>
               </saml2:AttributeStatement>
            </saml2:Assertion>
         </trust:RequestedSecurityToken>
         <trust:Lifetime>
            <wsu:Created>2014-05-26T10:35:41.071Z</wsu:Created>
            <wsu:Expires>2014-05-26T10:37:41.071Z</wsu:Expires>
         </trust:Lifetime>
      </trust:RequestSecurityTokenResponse>
   </S:Body>
</S:Envelope>
5.2.10 Configuring OAuth and OpenID Connect
OAuth 2.0 is an open protocol to allow secure authorization. It enables users to allow third-party client to access users’ private resources. Users do not need to share their credentials. The third-party clients can be web applications, mobile phones, handheld devices, and desktop applications. OAuth provides a method to issue Access tokens to third-party client applications with the user's approval. The third-party client application can then use the Access token to access protected resources hosted by the resource server.
OAuth allows users to control the access to web resources by scope, action, and time.
Access Manager uses OpenID Connect along with OAuth. OpenID Connect implements a single sign-on protocol on top of the OAuth authorization process. It allows client applications to verify the identity of a user based on the authentication performed by the Identity Server (authorization server). It also allows client applications to obtain a user’s basic profile information.
See Section D.0, OAuth versus Other Protocols for differences among OAuth and other single sign-on protocols.
How OAuth Helps
OAuth addresses the following security concerns:
-
To provide access to protected resources, users share their credentials in clear-text with third-party applications. Potential security breaches that can result from the ability of third-party applications to store a user's credentials for future use.
-
Security issues associated with password authentication.
-
The inability of resource owners to restrict a client application's access to protected resources for a specified duration or to limit the client application's access to a subset of resources.
-
The inability of resource owners to revoke a client application's access to a specific client application.
OAuth Terminology
The following list includes frequently used terms in an OAuth flow:
How OAuth Works
You can configure OAuth with Access Manager in one of two ways based on the following requirements:
-
If the web applications validate the Access token before allowing a client application accesses to resources.
-
If the Access Gateway validates the Access token on behalf of web applications.
Web applications validate an Access token before allowing a client application to access resources
The Identity Server (authorization server) issues an Access token and web applications validate the token before granting a client application to access resources. This configuration is suitable in the following scenarios:
-
Web server authentication
-
Accessing resources without using owner’s credentials
-
RESTful applications security
-
Mobile authentication
For more information about these scenarios, see OAuth Scenarios.
Figure 5-28 The following diagram illustrates the OAuth flow:
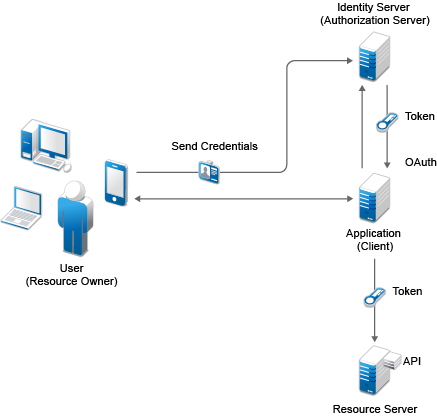
-
The client application requests authorization from the user (resource owner). Client applications can make the authorization request directly to the resource owner or through the authorization server (Identity Server) as an intermediary.
-
The client application receives an authorization grant from the authorization server. An authorization grant represents the resource owner's authorization. The user communicates the authorization by using one of four grants types (see OAuth Authorization Grant) or by using an extension grant.
-
The client application authenticates itself at the authorization server, sends the authorization grant, and requests an Access token.
-
The authorization server authenticates the client application and validates the authorization grant. The authorization server issues an Access token for a valid grant.
-
The client application requests the resource server to provide access to the protected resource and authenticates this by presenting the Access token.
-
The resource server accepts the request for a valid token.
The Access Gateway validates the Access token on behalf of web applications
This configuration is suitable when client applications want to access resources on legacy web applications. See Legacy Web Applications Security for details about when to use this configuration.
Figure 5-29 The following diagram illustrates the workflow:
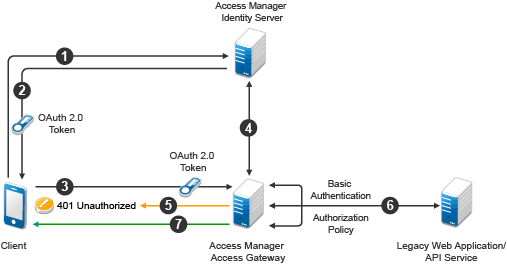
-
A client application requests access to a web resource and provides authentication details to the Identity Server.
-
The Identity Server authenticates the client application, gets the user’s consent, generates an OAuth token, and sends the token to the client application.
-
The client application provides the token to the Access Gateway.
-
The Access Gateway sends the token to the Identity Server for validation.
-
If the token is not valid, AG returns a 401 error.
-
If the token is valid, The Access Gateway performs the following tasks:
-
Executes the authorization policy, if configured, based on OAuth scopes or claims.
-
Sends user attributes and grants details provided to the client application to the web application by using the Identity Injection policy, if configured.
-
-
The resource server returns a response to the Access Gateway and the Access Gateway sends this response to the client application.
Why Use OpenID Connect
OAuth allows users to authorize client applications to access users' protected resources through an Access token. The Access token does not contain any information about a user's identity. Hence, a client application does not know who the user is. A client application also does not know if the authorization server has issued the access token to it or to any other relying party.
OpenID Connect builds on OAuth and provides solutions for OAuth’s limitations. It issues an ID token that contains signed assertions about the user. Client applications can verify the ID token and obtain additional details about the user. The ID token also contains information about the issuing authority, the intended client application, time of the token created, and the token expiration time.
OpenID Connect Claims
A client application can obtain information about a user and authentication events through claims. A claim contains information about a user such as phone number, first name, and last name.
OAuth Scenarios
This section describes the following basic scenarios supported by OAuth:
RESTful Applications Security
OAuth provides a way to secure REST APIs. For example, an enterprise acme.com exposes REST APIs that provide various functions. Using OAuth, acme.com can provide secure authorization control on APIs to ensure that the right people have access to these APIs. In addition, they can also enable applications to call APIs on behalf of a user. acme.com can also revoke access to an API even if an application uses it.
See Section C.0, SOAP versus REST API to learn the differences between SOAP and REST API.
Accessing Resources without Using the Resource Owner’s Credentials
In a typical web authentication model, a client application uses the resource owner’s credentials to access the resource owner’s information that is hosted on a server. OAuth allows a client application to access resources that are controlled by the resource owner and provides a method to obtain permission from the resource owners to access their resources. The resource owners provide this permission in the form of a token and a matching shared-secret. The resource owner does not need to share credentials with the client application. Tokens are issued with a restricted scope and limited life.
For example, a user named Alice has installed a gaming application that runs in her browser and uses OAuth for accessing a social site at www.example.com. The gaming application updates scores in a database at www.example.com. The gaming application is registered with the social site and has an identifier. Alice has registered with the social site for identification and authentication. To upload Alice's scores, the gaming application accesses the score database when Alice authorizes it. When Alice accesses the page from the redirect URI in the game application, the authorization serversends the client ID, password, and authentication code received in the redirect request parameters to www.example.com, which in turn returns an Access token to the game application. The gaming application sends the token to www.example.com to access Alice’s resources. www.example verifies the token and grants the gaming application access to Alice’s account for updating the scores.
NOTE:This example is derived from the OAuth RFC document.
Web Server Authentication
To access the user data of other sites, third-party applications seek user’s credentials (user names and passwords). Sharing passwords may result in a security breach. OAuth enables third-party applications to access a user’s information without using the users’ passwords. OAuth also provides a way to grant limited access. For example, a user (resource owner) can allow a printing service (client application) to access private photos stored at a photo sharing service (server), without sharing credentials with the printing service. Instead, the user authenticates directly with the photo sharing service that issues the printing service delegation-specific credentials.
For example, a user named Alice accesses an application running on a web server at www.printphotos.example and instructs it to print her photographs that are stored on a server at www.storephotos.example. The application at www.printphotos.example receives Alice's authorization consent for accessing her photographs without learning her authentication credentials of www.storephotos.example.
The following diagram illustrates the workflow of the web server authentication:
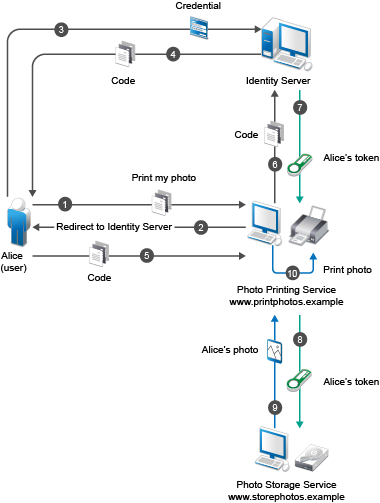
NOTE:This example is derived from the OAuth RFC document.
Mobile Authentication
Applications on a mobile device request for authentication and the web server redirects you to the authorization server (Identity Server) to authenticate and authorize the server to access your data. When you approve, the web server receives an Access token as part of the redirect URL. After the authorization server grants the token, the application can access the protected data with the Access token. Less confidential applications, such as mobile clients or thick clients use this authentication.
Legacy Web Applications Security
OAuth enables client applications including thick clients, mobile, and OAuth enabled browser-based applications to access resources available on legacy web applications. In this scenario, the Access Gateway validates the token on behalf of web applications. You do not need to modify web applications to understand the OAuth flow.
OAuth Implementation Flow
The following diagrams depict the implementation flow of OAuth in Access Manager:
NOTE:Access Manager uses variable length Access tokens and authorization codes. The client applications and web servers should not assume any fixed size of tokens and codes and should allocate necessary memory to handle the token. Token size depends on the size of scope names. Some servers may have size limitations on query string and HTTP headers. Ensure that an application uses only necessary scopes to avoid any issue.
OAuth Implementation without using the Access Gateway

-
Develop a resource server (web application or REST service). (Application Developer)
-
Identify scopes and permissions for this resource server. (Application Developer or Administrator)
-
Add the resource server in Access Manager. See Adding a Resource Server. (Application Developer or Administrator)
-
Define the identified scopes and permissions for the resource server in Access Manager. See Defining Scopes and Claims for a Resource Server. (Application Developer or Administrator)
-
Develop a client application. (Application Developer)
-
Register the client application in Access Manager. You can register a client by using the Administration Console (Administrator), Identity Server (Application Developer or Administrator), or REST API (Application Developer or Administrator). See Registering OAuth Client Applications and Registering a Client Application by Using REST API.
-
Identity Server assigns a unique client ID and client secret to this client application.
-
Configure the client ID and secret in the application. (Application Developer or Administrator)
-
Deploy the resource server. (Application Developer)
-
Deploy the client application. (Application Developer)
For information about basic scenarios in which you can implement this configuration, see OAuth Scenarios.
For more information about how to enable and configure OAuth in Access Manager for this implementation flow, see Managing OAuth and OpenID Connect.
OAuth Implementation using the Access Gateway
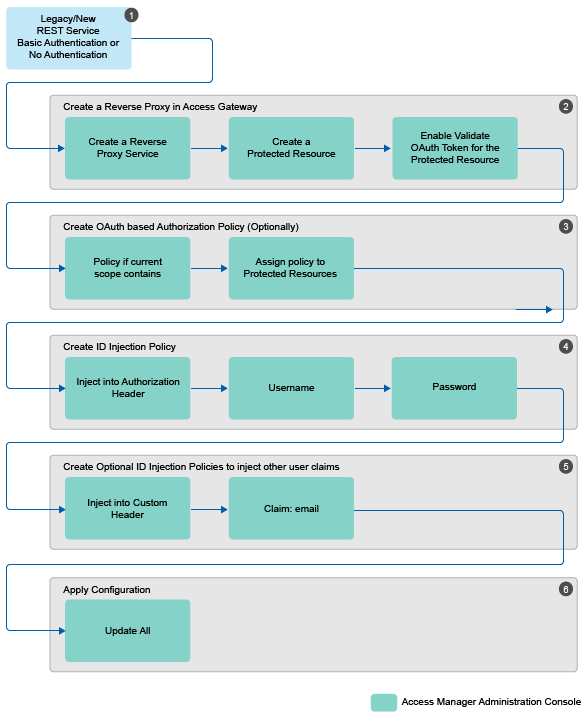
-
Determine the web application or REST service for which you want to implement this configuration.
-
Create a reverse proxy in the Access Gateway and enable OAuth in the Access Gateway for this reverse proxy. See Enabling OAuth in the Access Gateway.
-
Configure an authorization policy based on OAuth Scopes. See Configuring an Authorization Policy based on OAuth Scopes.
-
Configure an Identity Injection policy to inject user name and password. See Configuring an Identity Injection Policy for OAuth Claims.
-
Configure optional Identity Injection policies to inject other user claims, if required. You can define the additional roles in the same policy also that you configured for injecting user name and password. See Configuring an Identity Injection Policy for OAuth Claims.
-
Apply the changes.
For information about the scenario in which you can implement this configuration, see Legacy Web Applications Security.
For information about how to configure OAuth in Access Manager for this implementation flow, see Configuring the Access Gateway for OAuth.
OAuth Authorization Grant
Authorization grant is an intermediate credential that represents the resource owner authorization. To request an Access token, the client application obtains authorization from the resource owner. The resource owner communicates the authorization in the form of an authorization grant that a client application uses to request the Access token. OAuth defines four grant types: authorization code, implicit, resource owner credentials, and client credentials. It also provides an extension mechanism for defining additional grant types. This section discusses the authorization flow for the following grants:
Authorization Code Grant (Web Server)
Client applications hosted on a secure server use Authorization Code Grant. Client applications use this grant to obtain both Access tokens and Refresh tokens. This grant ensures that both types of tokens remain with the client web application (the server side) and the authorization server does not send these to the browser. Only the authorization code is visible to the browser.
The client application redirects the resource owner to the authorization server through the web browser. The resource owner authenticates at the authorization server. The authorization server obtains resource owner’s consent and then redirects the web browser with the authorization code to the client application.
This flow is suitable for client applications who can interact with the resource owner’s user-agent and can receive incoming requests from the authorization server.
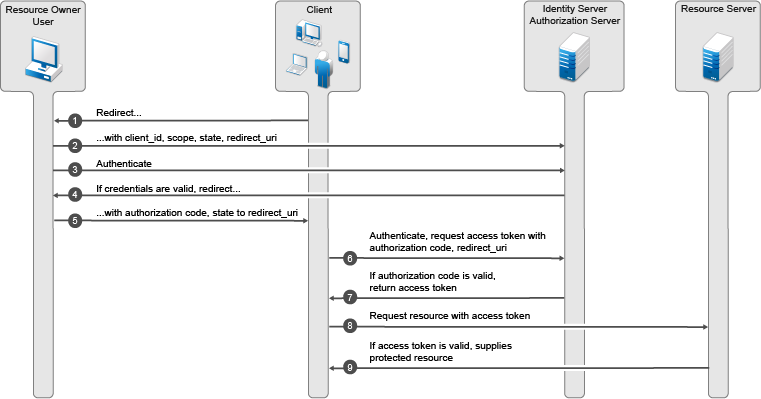
Implicit Grant
This flow is suitable for client applications residing in the user's device. A client application can implement this flow in a browser using a scripting language such as JavaScript or Flash, from a mobile device, or from a desktop application. After a user grants the requested authorization, the authorization server returns an Access token to the application. An intermediate authorization code is not required. As the authorization server sends the Access token to the web browser, this flow offers less security than the authorization code.
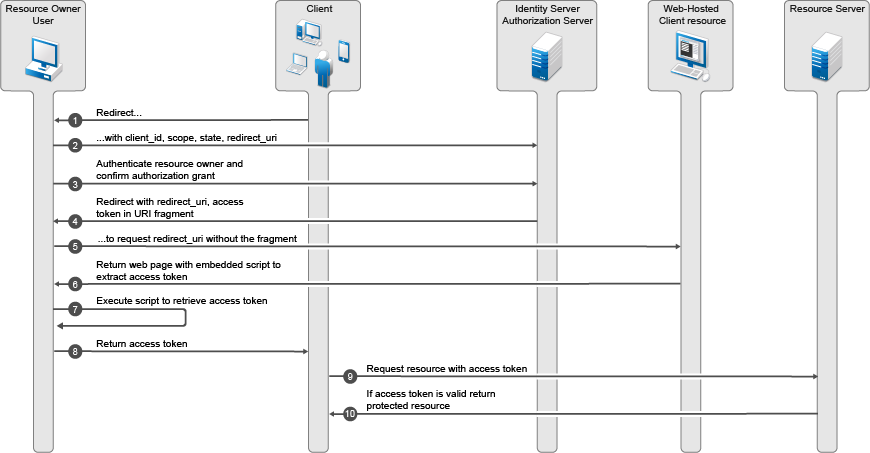
Resource Owner Credential Grant
This flow is suitable for client applications who have a trust relationship with resource owners.In this flow, the client application sends user's credentials along with its own credentials to the authorization server (Identity Server). The Identity Server provides an Access token and an Refresh token to the client application. The user does not need to log in to approve the request.
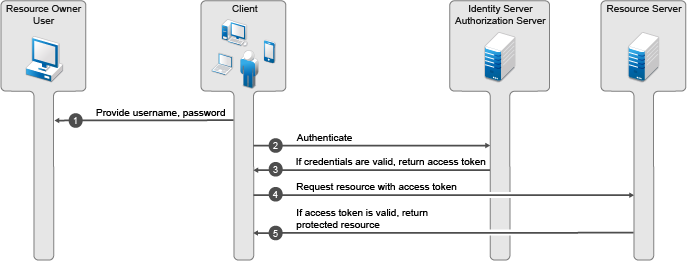
Client Credential Grant
The Client Credential Grant is useful for applications that access their own resources from the resource server. This grant type only requires the client application’s credentials. Resource owner's credentials are not required.
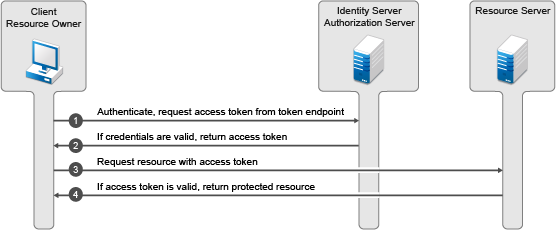
OpenID Connect Authentication Flows
This section describes the flow of OpenID Connect authentication by using the Authorization Code flow and Implicit flow.
Authentication by Using the Authorization Code Flow
In this authentication process, the Token endpoint returns all tokens.The Authorization Code Flow returns an authorization code to the client application. The client application exchanges it for an ID token and an Access token. The authorization server can also authenticate the client application before exchanging the authorization code for an Access token. This process does not expose tokens to the User Agent.
Process Flow:
-
The client application prepares an authentication request containing the desired request parameters and sends the request to the authorization server.
-
The authorization server authenticates the user.
-
The authorization server obtains the user consent for the request.
-
The authorization server sends the user consent to the client application with an authorization code.
-
The client application requests a response by using the authorization code at the Token endpoint.
-
The client application receives a response that contains an ID token and Access token in the response body.
-
The client application validates the ID token and retrieves the user's subject identifier.
Authentication by Using the Implicit Flow
In this authentication process, the authorization endpoint returns all tokens. The endpoint returns the Access token and ID token directly to the client application that may result in revealing the tokens to the user and applications that have access to the User Agent.
Process Flow:
-
The client application generates an authentication request containing the desired request parameters and sends the request to the authorization server.
-
The authorization server authenticates the user.
-
The authorization server obtains the user consent.
-
The authorization server sends the user to the client application with an ID token and, if requested, an Access token.
-
The client application validates the ID token and retrieves the user's Subject Identifier.
Managing OAuth and OpenID Connect
NOTE:NTS will support the Access Manager setup and any app issues where the API request is sent to the right Access Manager endpoint. Any other code changes needed to integrate with Access Manager are outside the scope of traditional NTS support and need to go through the namsdk@netiq.com channel.
The following is the sequence of the OAuth and OpenID Connect configuration:
-
Enable the OAuth protocol in the Administration Console
-
Define the global settings
-
Configure a resource server
-
Configure scopes and claims for a resource server
-
Register client applications
NOTE:Use Internet Explorer 10 or later, Firefox, or Chrome for configuring OAuth 2.0.
This section discusses the following topics:
Extending a User Store for OAuth 2.0 Authorization Grant Information
Access Manager OAuth 2.0 implementation stores the information about a client application, which a user authorizes to access attributes and resources. This information is unique per user. So, you need to store as part of a User Object in the user store. If you already have a free attribute, you can use it in in while defining Global Settings.
If a free attribute is not available, then extend the User Object schema to add a new single-valued stream attribute with a name. Access Manager will store an XML object in this attribute for each user authorization.
The following example describes how to extend the schema of a User Object in eDirectory:
-
Click to > > .
-
Specify as nidsOAuthGrant.
-
Click .
-
Select under .
-
Click .
-
Select .
-
Click > .
-
Go to > > .
-
Select Person under .
-
Click .
-
Move nidsOAuthGrant from to .
-
Click .
Enabling OAuth and OpenID Connect
Access Manager ships with only SAML 1.1, Liberty, and SAML 2.0 enabled by default. To use OAuth, you must enable it in the Identity Server. Otherwise, the configuration will not work.
To enable OAuth and OpenID Connect, perform the following steps:
-
In the Administration Console, click > > .
-
In the section, select .
-
Click .
-
Update the Identity Server.
Defining Global Settings
The Global Settings page enables you to specify the default OAuth and OpenID Connect settings for the authorization server such as issuer URL, token types, grants, and so on.
-
In the Administration Console, click > > > > .
-
You can configure and view the following details on this page:
Field
Description
Issuer
Specify the name of the authorization server. This name is part of the ID token.
Authorization Grant LDAP Attribute
Specify a valid LDAP attribute. The attribute specified must exist in the user store.
A scope uses this attribute to store user consent. Whenever a user grants authorization to an application, this attribute is updated. Ensure that no other application uses this attribute.
For more information, see Extending a User Store for OAuth 2.0 Authorization Grant Information.
Grant Type(s)
Select the types of grants that the authorization server will support. Based on the grant type you select, the system selects corresponding token type by default.
For more information about grant types, see OAuth Authorization Grant.
Token Type(s)
Select the types of tokens that the authorization server will support.
-
ID Token: A security token that contains claims about the authentication of an end user by an authorization server to the relying party.
-
Access Token: Includes the specific scopes and durations of granted access.
-
Refresh Token: Used to obtain a new access token when an Access token becomes invalid or expires.
Authorization Code Timeout
Specify the duration in minute after how long the authorization code becomes invalid.
Access Token and ID Token Timeout
Specify the duration in minute after how long the Access token and ID token become invalid.
Refresh Token Timeout
Specify the duration in minute after how long the Refresh token becomes invalid.
Supports Signing
Select this option if you want the authorization server to sign the ID token
If you selected , select a signing certificate.
Signing Certificate
Select a certificate to sign ID tokens.
-
-
Click .
Configuring a Resource Server
Access Manager allows you to define settings for each resource server. A resource server validates and accepts tokens sent by client applications, and then grants access to resources.
Setting up a resource server includes adding a resource server, defining scopes, and defining claims associated with each scope. Scopes and claims decide what resources client applications can access and what actions they can perform on the resources.
Access Manager also allows you to modify and delete configured resource servers. Configuring a resource server consists of the following actions:
Adding a Resource Server
Perform the following steps:
-
In the Administration Console, click > > > > .
-
Click .
-
Specify a name for the resource server.
-
Click .
Continue with Defining Scopes and Claims for a Resource Server.
Defining Scopes and Claims for a Resource Server
A scope is a set of permissible actions that a client application can perform on the accessed resources. You can define scopes and then set up claims or permissions for each scope. When a user grants client applications access to protected resources, they can perform actions based on permissions defined in the scope.
A scope can be of the following two types:
-
Resource permissions: The resource server can fetch these scopes/permissions specific to requirements. For example, for the edit_photo scope, the resource server recognizes and grants edit rights for the photo.
-
User Claims: Access Manager acts as a special resource server managing access to users' claims. A client application can request these claims.
For example, you can define a scope named email and define permissions associated with this scope such as read only. A client application who will access the email can only read the content.
Perform the following steps to define scopes and permissions:
-
In the Administration Console, click > > > > .
-
Select the resource server name for which you want to define a new scope.
-
Click .
-
Specify the following details:
Field
Description
Name
Specify a name for the scope.
Description
Specify a description for the scope. The consent page shows this description.
Require user permission
Select this option if this scope requires the user’s permission before providing access to the protected resources.
Contains user's claims
Select this option to include user’s claims in this scope.
Allow modification in consent
Select this option to allow modification in consent. When selected, the resource owner can choose not to share this scope with the client application.
-
Click .
-
Based on whether you have selected , you require to perform any one of the following actions:
-
Select an attribute set: If you have selected the option, the Identity Server will fetch the required information from the user endpoint. You must specify the LDAP attributes. You can select an attribute set from the list or create a new attribute set. For more information about how to create an attribute set, see Section 3.5.1, Configuring Attribute Sets.
-
Create Claims/Permissions: If you have not selected , create claims for the scope.
-
Click , specify a name for the claim, and click .
-
-
Click .
Modifying Scopes of a Resource Server
You can modify the scopes of a registered resource server. Access Manager allows you to delete a resource server or delete the scope of a resource server.
To modify scopes of a resource server, perform the following steps:
-
In the Administration Console, click > > > > . This page lists all registered resource servers.
-
Click the resource server > scope you want to modify.
-
On the Edit Scope page, modify the details as required. For more information about the fields on this page, see Defining Scopes and Claims for a Resource Server.
-
Click .
Modifying Claims and Attributes
You can modify or delete a defined claim. You can also update the attributes associated with a scope. If you have selected while creating the scope, the Identity Server fetches the required information from the user endpoint. In this case, you can change the associated LDAP attributes.
If you have not selected , the scope contains claims instead of LDAP attributes. You can change the name of the claim. For more information about the fields on this page, see Defining Scopes and Claims for a Resource Server.
Managing OAuth Client Applications
A client application that sends API requests to the authorization server must be registered with the authorization server. As part of the registration, specify the client name, redirections (URIs), and any other provider-specific data required by the API. You can register a client application in the Administration Console or in the Identity Server.
Prerequisites for managing client applications include:
-
Administration Console: The user must have the NAM_OAUTH2_ADMIN role defined in the OAuth policy.
-
Identity Server: The user must have the NAM_OAUTH2_DEVELOPER role defined in the OAuth policy.
An application developer must log into the Identity Server for registering a client application.
The tab lists all the applications that you added. You can view details, modify, and delete applications.
Registering OAuth Client Applications
Perform the following steps to register a client application:
-
In the Administration Console, click > > > > > .
-
Specify the following details:
Field
Description
Client Name
Specify the name of the client application.
Client Type
Select whether this is a web-based or a desktop client application.
For web-based applications specify the client type in this format: https://client.example.org/callback
For native/desktop applications, specify the client type in any one of the following formats:
https://www.namnetiq.in/
or
x-com.netiq.sample://www.namnetiq.in/
Redirect URIs
Specify the URIs that the Identity Server uses to send the authorization code and implicit requests.
Grants Required
Select the grant types required for this client application. Available grant types include:
-
Authorization Code (default)
-
Implicit
-
Resource Owner Credentials
-
Client Credentials
Token Types
Select the token type that the authorization server will return to this client application. The following are available tokens:
-
Code
-
ID Token
-
Refresh Token
-
Access Token
-
-
Click .
Specify the following details:
Field
Description
Client Logo URL
Specify the URL of the logo that you want to include in the consent page.
Privacy Policy URL
Specify the URL of the privacy policy you want to include in the consent page. You can define your own privacy policy.
Terms of Service URL
Specify the URL of the terms of service.
Contacts
Specify email addresses of people related to this client application.
-
Click . This is an optional step. Specify the following details:
Field
Description
JSON Web Key Set URI
Specify the URI of the JSON file containing the json web keys.
ID Token Signed Response Algorithm
Specify the ID Token Signed Response Algorithm.
ID Token Encrypted Response Algorithm
Specify the algorithm used to encrypt the key.
ID Token Encrypted Response Enc
Specify the algorithm used to encrypt the content.
-
Click .
The Identity Server assigns a client ID and a client secret. To see this ID and secret, go to the list of registered client applications on the Client Application page and click the view icon for this client application.
Modifying Registered Client Applications
To modify a registered client application, perform the following steps:
-
In the Administration Console, click > > > > . The page lists all registered client applications along with the following details:
Field
Description
Client Application
Name of the registered application
Application Type
Type of the application: Web or Native/Desktop
Actions
List of icons associated with actions that you can perform on an application. You can perform the following actions:
-
View details of a registered client application
-
Delete a registered client application
-
Modify details of a registered client application.
-
-
Click the edit icon under . The Client Configuration page opens. Modify the details as required. For more information about fields, see Registering OAuth Client Applications.
-
Click .
Configuring the Access Gateway for OAuth
You can configure the Access Gateway to validate OAuth tokens on behalf of the resource server. If the token is not valid then the Access Gateway returns the unauthorized 401 error to the client application.
Configuring the Access Gateway for OAuth consists of the following three steps:
Enabling OAuth in the Access Gateway
If you want the Access Gateway to validate a token before granting access to a protected resource, you must enable OAuth for that protected resource.
Perform the following steps to enable OAuth in the Access Gateway:
-
In the Administration Console, click > > > [Reverse Proxy name] > [Proxy Service name].
-
Select the tab.
-
Click the protected resource for which you want to enable OAuth.
-
Select .
-
Click .
Configuring an Authorization Policy based on OAuth Scopes
You must configure an authorization policy and then assign it to the protected resource. Access Gateway makes decisions based on the rules defined in the authorization policy after validating the OAuth tokens.
Resources protected by OAuth tokens do not execute any authentication procedure. Hence, evaluation of policies associated with OAuth protected resources cannot fetch any user attributes outside the OAuth scope. All the user attributes needed for the protected resource must be part of the OAuth scope. Ensure that the proxy services protected by OAuth are not associated with any policies that refer to authentication contract, profiles, LDAP attribute, LDAP OU, roles, or RISK score. Any policy, which requests for data other than the scope of OAuth token fails.
Perform the following steps to configure an Authorization policy for scopes:
-
In the Administration Console, click > > > [Reverse Proxy name] > [Proxy Service name].
-
Select the tab.
-
Click the protected resource for which you want to configure an Authorization policy.
-
Select the tab.
-
Click > .
-
Specify a name for the policy and select for the policy type.
-
Click .
-
Specify the following details:
Field
Action
Description
(Optional) Describe the purpose of this rule.
Priority
Specify the order in which a rule is applied in the policy, when the policy has multiple rules. The highest priority is 1 and the lowest priority is 10.
NOTE:If two rules have the same priority, a Deny rule is applied before a Permit rule.
Conditions
Click and then select .
For , select the scope from the list.
Actions
Select one of the following:
-
Permit: Allows the user to access the resource.
-
Deny: Select one of the following deny actions:
-
Display Default Deny Page: Displays a generic message, indicating that the user has insufficient rights to access the resource.
-
Deny Message: Allows you to provide a customized message that you want to display to users after denying their access attempts.
-
Redirect to URL: Allows you to specify a URL to redirect users after denying access. For example: http://www.example.com
-
-
Redirect: Specify the URL to which you want the users to redirect when they meet the conditions of this policy.
-
Re-authenticate with Contract: Allows you to specify an authentication contract used to authenticate the user.
-
-
Click > .
-
Select the policy you created and click > .
The Authorization page of the protected resource opens.
-
Select the Authorization policy and click > .
Configuring an Identity Injection Policy for OAuth Claims
You must configure an Identity Injection policy if you want to send the claims details to the resource server. Claims can include user attributes or permissions.
Perform the following steps to configure an Identity Injection policy for scopes:
-
In the Administration Console, click > > > [Reverse Proxy name] > [Proxy Service name].
-
Select the tab.
-
Click the protected resource for which you want to configure an Identity Injection policy.
-
Select the tab.
-
Click > .
-
Specify a name for the policy, and then select for the type of policy.
-
Click .
-
Specify the following details:
Field
Action
Description
Specify the purpose of this policy.
Priority
Specify the sequence in which you want to apply the rule in the policy, if the policy has multiple rules. The highest priority is 1 and the lowest priority is 10.
Action
Click , then select one of the following:
-
: Inserts the user name and password into the header. Select under and then select a claim.
-
: Inserts custom names into the custom header. Select under and then select a claim.
-
: Inserts custom tags with name/value content into the custom header. Select under and then select a claim.
-
: Inserts a query string into the URL for the page. Select under and then select a claim.
-
: Inserts authentication values from the Kerberos ticket into the custom header. Select under and then select a claim.
-
-
Click > .
-
Select the policy you created and click > .
-
The Identity Injection page of the protected resource opens.
-
Select the Identity Injection policy and click > .
Configuring an Identity Injection Policy for User Passwords
Ensure that you have enabled the option under in the eDirectory user store for all users, so that the policy can retrieve the password from the user store. Without this configuration, the identity injection policy for user password will not work.
For more information about how to enable the password retrieval in eDirectory, see Universal Password Configuration Options in the NetIQ Password Management Administration Guide.
NOTE:The password retrieval works only with eDirectory.
Perform the following steps:
-
In the Administration Console, click > > > [Reverse Proxy name] > [Proxy Service name].
-
Select the tab.
-
Click the protected resource for which you want to configure an Identity Injection policy.
-
Select the tab.
-
Click > .
-
Specify a name for the policy and select for the policy type.
-
Click .
-
Configure the policy with the following details:
-
: Select .
-
: Select >
-
Password: Select >
-
-
Click > .
-
Select the policy you created and click > .
The Identity Injection page of the protected resource opens.
-
Select the Identity Injection policy and click > .
Viewing Endpoint Details
In the Administration Console under > > > > , you can view the following endpoints:
-
Authorization EndPoint: Enables client applications to interact with the resource owner and obtain an authorization grant. It is located on an authorization server.
-
Registration EndPoint: Enables registering client applications on the authorization server. It is located on the authorization server.
-
Token EndPoint: Enables client applications to obtain an Access token by providing its authorization grant or Refresh token. It is located on an authorization server.
-
UserInfo EndPoint: Provides information about the user associated with the Access token in the standard OpenID Connect format.
-
OpenID Metadata EndPoint: Provides information about OpenID provider metadata.
NOTE:As per OAuth specifications, endpoints should not accept any non-HTTPS request. However, Access Manager supports non-HTTPS requests also. This is required to enable OAuth in scenarios when Access Manager is deployed behind a third-party SSL accelerator.
OAuth and OpenID Connect Audit Events
Access Manager provides the following OAuth audit events:
-
OAuth & OpenID Token Issued
-
OAuth & OpenID Token Issue Failed
-
OAuth Consent Provided
-
OAuth Consent Revoked
-
OAuth Client Applications
-
OAuth & OpenID Token Validation Success
-
OAuth & OpenID Token Validation Failed
For details about how to configure Access Manager to send these events to a Novell Auditing Server, see Section 15.2, Enabling Identity Server Audit Events.
Enabling Logging for OAuth and OpenID Connect
To enable logging for OAuth and OpenID Connect events, perform the following steps:
-
In the Administration Console, click > > > .
-
Select under .
-
In the section, specify any one of the following options for OAuth and OpenID Connect:
-
Off: Turns off component file logging
-
Severe: Logs serious failures that can stop system processing
-
Warning: Logs potential failures that have minimal impact on execution.
-
Info: Logs informational events.
-
Verbose: Logs static configuration information
The system logs any configuration errors under one of the primary three levels: Severe, Warning, and Info.
-
Debug: Logs events for all of the preceding levels (Severe, Warning, Info, and Verbose)
-
-
Click .
Managing Clients Applications by Using REST API
You can programmatically register, view, modify, and delete a client application in Access Manager.
Before performing any of these actions, you must have your role defined as NAM_OAUTH2_DEVELOPER or NAM_OAUTH2_ADMIN in the OAuth policy.
You can register a user in any of the following two ways:
-
Using username and password
-
Using Access token: To register a client application by using an Access token, you must have your role defined as NAM_OAUTH2_DEVELOPER in the OAuth policy.
Use the Resource Owner flow to get an Access token. The endpoint for Resource Owner flow is
https://<Identity Server URL: Port Number>/nidp/oauth/nam/token. This endpoint requires the followings parameters to provide an Access token:
Parameter
Value
grant_type
password
username
Application developer’s user name
password
Application developer’s password
scope
-
urn:netiq.com:nam:scope:oauth:registration:full (This scope allows you to register, view, modify, and delete client applications.)
-
urn:netiq.com:nam:scope:oauth:registration:read (This scope provides read-only access)
token endpoint
Identity Server URL: Port Number>/ nidp/oauth/nam/token
-
This section discusses the following topics:
Registering a Client Application by Using REST API
To register a client application, the HTTP method value should be POST.
The Identity Server uses the following endpoint for registering a client application:
https://<Identity Server URL: Port Number>/nidp/oauth/nam/clients
The endpoint requires the following parameters:
Table 5-17 OAuth Parameters for Client Registration
|
Parameter |
Value |
Required/Optional |
|---|---|---|
|
client_id |
Name of the client application. |
Required |
|
application_type |
web or native |
Optional |
|
response_types |
Redirection URI values used by the client application. |
Required |
|
grant_types |
The following are the supported grant types:
If you do not specify a grant type, the default grant type is used. The default value is authorization_code. |
Optional |
|
response_types |
The following are the supported response type:
|
Optional |
|
logo_uri |
Specify the URL of the logo that you want to include in the consent page. Example: https://client.example.org/logo.png |
Optional |
|
policy_uri |
URL of the Relying Party Client’s privacy policy. Example: https://client.example.org/privacypolicy |
Optional |
|
tos_uri |
URL of the Relying Party's terms of service Example: https://client.example.org/terms |
Optional |
|
contacts |
Email addresses of people related to this client application. |
Optional |
|
jwks_uri |
Specify the URI of the JSON file containing the json web keys. This key set contains signing keys that the relying party uses to validate signatures from the OpenID provider. Example: https://client.example.org/my_public_keys.jwks |
Optional |
|
id_token_signed_response_alg |
Specify the ID Token Signed Response Algorithm. This algorithm is required for signing the ID token issued to the client. |
Optional |
|
id_token_encrypted_response_alg |
Specify the algorithm used to encrypt the key. |
Optional |
|
id_token_encrypted_response_enc |
Specify the algorithm used to encrypt the content. |
Optional |
Modifying a Client Application by Using REST API
Perform the following steps:
-
Retrieve the client details from the https://<Identity Server URL: Port Number>/nidp/oauth/nam/clients/<client ID> endpoint. In the request for retrieving client details, use GET as the HTTP method value.
-
Send the update request. In the update request, use POST as the HTTP method value.
The Identity Server uses the following endpoint for modifying a registered client application:
https://<Identity Server URL: Port Number>/nidp/oauth/nam/clients/
For the list of parameters this endpoint requires for a client application modification, see Table 5-17.
NOTE:For updating a client application, you must send the complete xml with all parameters during the update request. If you do not include a parameter in the update xml, the server will not initialize this parameter. For example, if you want to update the response_types parameter, send the updated value for this parameter and existing values for other parameters in the request.
Viewing a Client Application by Using REST API
To view a client application, use GET as the HTTP method value.
You can view a registered client application by using the following two endpoints:
-
https://<Identity Server URL: Port Number>/nidp/oauth/nam/clients/: To view all clients applications registered by a developer
-
https://<Identity Server URL: Port Number>/nidp/oauth/nam/clients/<client ID>: To view a specific client application registered by a developer
Deleting a Client Application by Using REST API
To delete a client application, the HTTP method value should be DELETE.
The Identity Server uses the following endpoint for deleting a registered client application:
https://<Identity Server URL: Port Number>/nidp/oauth/nam/clients/<client ID>
Managing OAuth 2.0 Resource Server and Scope by Using REST API
You can programmatically register, view, modify, and delete a resource server and scopes in Access Manager.
Registering a Resource Server by Using REST API
To register a resource server by using REST API, you must have your role defined as NAM_OAUTH2_ADMIN in the OAuth policy. Send an HTTPS POST request with the appropriate URI parameters to resource server endpoint URI. The request includes the following information:Scope: urn:netiq.com:nam:scope:oauth:registration:full
Resource Server Endpoint: https://<Identity Server URL: Port Number>/nidp/oauth/nam/resourceservers
HTTP Method: POST
URI Parameter: Include the following parameter:
|
Parameter |
Required |
Description |
|---|---|---|
|
name |
yes |
Name of the resource server |
Deleting a Resource Server by Using REST API
To delete a resource server by using REST API, you must have your role defined as NAM_OAUTH2_ADMIN in the OAuth policy. The delete request includes the following details:
Scope: urn:netiq.com:nam:scope:oauth:registration:full
HTTP Method: DELETE
Resource Server Endpoint: https://<Identity Server URL: Port Number>/nidp/oauth/nam/resourceservers/<resourceServerName>
Viewing Registered Resource Servers
To view all registered resource servers by using REST API, you must have your role defined as NAM_OAUTH2_ADMIN or NAM_OAUTH2_DEVELOPER in the OAuth policy. The request includes the following details:
Scope: urn:netiq.com:nam:scope:oauth:registration:full
HTTP Method: GET
Resource Server Endpoint: https://<Identity Server URL: Port Number>/nidp/oauth/nam/resourceservers
Creating a Scope by Using REST API
To create a scope by using REST API, you must have your role defined as NAM_OAUTH2_ADMIN in the OAuth policy. The request includes the following details:
Scope: urn:netiq.com:nam:scope:oauth:registration:full
Resource Server Endpoint: https://<Identity Server URL: Port Number>/nidp/oauth/nam/resourceservers/<resourceServerName>/scopes
HTTP Method: POST
Request URI Parameters:
|
Parameter |
Required |
Description |
|---|---|---|
|
scope |
Yes |
Name of the scope |
|
scope_description |
Yes |
Description of the scope. The consent page displays this description while obtaining authorization from the user. |
|
claims |
Either claims or attribute_set is required. |
List of claims |
|
attribute_set |
Attribute name and attribute dn. Sample: { "name" : "jpeg_photo", "dn" : "cn=jpeg_photo,o=novell"} |
|
|
userPermissionRequired |
No |
Boolean value. Default value is true. |
|
adminApprovalRequired |
Yes |
Boolean value. Default value is true, set it to false always. |
|
isGroupOfUserAttributes |
No |
Boolean value. Default value is false. |
|
allowModifyInConsent |
No |
Boolean value. Default value is false. |
Modifying a Scope by Using REST API
To modify a scope by using REST API, you must have your role defined as NAM_OAUTH2_ADMIN in the OAuth policy. The request includes the following details:
Scope: urn:netiq.com:nam:scope:oauth:registration:full
Resource Server Endpoint: https://<Identity Server URL: Port Number>/nidp/oauth/nam/resourceservers/<resourceServerName>/scopes/<scopename>
HTTP Method: POST
Send only those parameters which you want to modify.
Deleting a Scope by Using REST API
To delete a scope by using REST API, you must have your role defined as NAM_OAUTH2_ADMIN in the OAuth policy. The request includes the following details:
Scope: urn:netiq.com:nam:scope:oauth:registration:full
Resource Server Endpoint: https://<Identity Server URL: Port Number>/nidp/oauth/nam/resourceservers/<resourceServerName>/scopes/<scopename>
HTTP Method: DELETE
Viewing Configured Scopes by Using REST API
You can view details of all scopes together or a specific scope. To view a scope by using REST API, you must have your role defined as NAM_OAUTH2_DEVELOPER or NAM_OAUTH2_ADMIN in the OAuth policy.
Viewing Details of a Specific Scope
The request includes the following details:
Scope: urn:netiq.com:nam:scope:oauth:registration:full
Resource Server Endpoint: https://<Identity Server URL: Port Number>/nidp/oauth/nam/resourceservers/<resourceServerName>/scopes/<scopename>
HTTP Method: GET
Viewing Details of All Configured Scopes
The request includes the following details:
Scope Required: urn:netiq.com:nam:scope:oauth:registration:full
Resource Server Endpoint: https://<Identity Server URL: Port Number>/nidp/oauth/nam/resourceservers/<resourceServerName>/scopes
HTTP Method: GET
End User Operations
End users can perform the following actions:
User Authorization
When end users access a client application, they are required to give consent for the application to access their email, basic profile, and any other information. An administrator configures a list of allowed scopes. The Consent page shows only these scopes. For example, if an administrator configures email and basic profile, a user can see only these two scopes in the consent pageFigure 5-30.
Figure 5-30 Consent Page
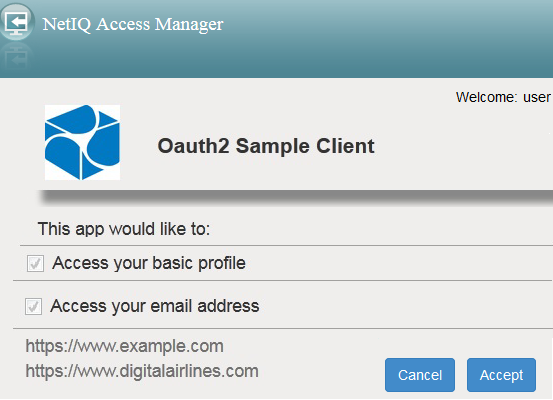
Select the scope that you want the application to access and click .
NOTE:Email is a mandatory scope configured by the administrator and all client applications can access this scope by default. You cannot deselect this scope on the consent page.
The client application should remember the scopes a user has provided earlier in the consent. For the next request, the client application should ask for the scopes that the user did not provide in the earlier request. For example, if a client application asks for five scopes and the user provides only three scopes, the client application should remember user's choice and should not ask for the five scopes again unless it is an absolute requirement.
Revoking Authorizations
You can view all authorized client applications with their scopes and claims under the tab. An end user can revoke the consent given earlier to client applications by using the Revoke Consent page.
Log into the Identity Server and go to > . You can view details of client applications and revoke the client applications’ access if required.
Configuring the Demo OAuth Application
This application demonstrates how to protect an OAuth enabled application by using Access Manager. This application contains a RESTful web service and a client application that uses this RESTful web service.
The RESTful web service allows you to perform TODO tasks for a hypothetical application. This web service exposes an API to add, modify, and delete tasks on behalf of a user. The client application provides a web interface that uses REST APIs to manage these tasks. The REST service protects REST APIs with OAuth Access tokens issued by a trusted Access Manager OAuth provider.
This demo configuration provides a way to test OpenID connect endpoints such as metadata, userinfo, and tokeninfo endpoints.
Configuring the demo OAuth application includes the following steps:
Prerequisite
Ensure that you meet the following prerequisites before running the demo application:
-
Install a Linux operating system such OpenSuSE or SuSE Linux Enterprise System or a Windows operating system.
-
Set up Java SE Runtime Environment 7 8.
-
Install a web browser. The recommended browser is Google Chrome.
-
Install Access Manager 4.1 and configure basic settings. See NetIQ Access Manager 4.1 Installation and Upgrade Guide and Section 3.0, Setting Up a Basic Access Manager Configuration.
-
Ensure that you have performed the activities listed in Access Manager Configuration Checklist.
-
Download the demo application: OAuth 2.0 Demo Application.
-
Edit host entries for Access Manager and the demo application. See Editing Host Entries.
Editing Host Entries
If your client and server machines are not in the DNS system, you need to edit the host entries.
Adding Access Manager’s Host Entries
If the domain name is not configured for Access Manager, you need to add a host entry to your desktop system.
Perform the following steps:
-
In Access Manager Administration Console, go to > > cluster name > .
-
Add this Base URL value to the host files.
On Windows: %WINDOWS%\System32\etc\drivers\hosts
On Linux: /etc/hosts
-
Open the host file and add the host entries.
For example, 10.0.0.0 namtest.mycompany.com
Adding the Demo Application’s Host Entries
If you access the demo application by using a web browser, you must access it through a DNS name. This is the IP address where your application is hosted. For example, if you run the demo application on local host (127.0.0.1.), then the host entry is:
For example, 127.0.0.1 mydemoclient.mycompany.com
Access Manager Configuration Checklist
Ensure that you have performed the following actions before running the demo application:
-
Install the Access Manager Administration Console. See
Installing Access Manager
in the NetIQ Access Manager 4.1 Installation and Upgrade Guide. -
Install the Access Manager Identity Server and import it into the Administration Console. See
Installing Access Manager
in the NetIQ Access Manager 4.1 Installation and Upgrade Guide. -
Create an Identity Server cluster configuration and add the imported Identity Server to that cluster. See Section 3.4, Identity Servers Cluster.
-
Enable OAuth & OpenID Connect in > > > cluster > .
-
Extend the user store to host a new attribute on User Object named nidsOAuthGrant. Scopes use this attribute to store the authorization grants provided by a user. If you use the embedded user store of the Administration Console for authenticating users at the Identity Server, then perform the following steps mentioned in Extending a User Store for OAuth 2.0 Authorization Grant Information.
NOTE:under > cluster name > should have the IP address of the Administration Console.
-
Create a new certificate with key size 2048 and SHA algorithm set to SHA256. In the Administration Console, go to > > and specify the name as oauth2048. You will need this certificate while accessing OpenID Connect endpoints. In Access Manager, OpenID Connect uses certificate configured in > cluster > > . OpenID Connect uses the reverse proxy certificate in Access Manager Appliance.
-
Perform the following actions under > cluster > > :
-
Set to or the name you specified when you extended the user store.
-
Select all and .
-
Click and choose the certificate you have created for this demo configuration.
-
Specify the certificate's algorithm.
-
Registering the Demo RESTful Service in the Administration Console
The demo application contains a simple RESTful web service. This RESTful web service exposes a REST API to add, modify, and delete tasks. A client application can post a request to create, modify, or delete a task by using a REST API. OAuth 2.0 protects this communication. Therefore, each request must contain an OAuth 2.0 Access token with necessary scope list_todo, create_todo, delete_todo to list tasks, add tasks, and delete tasks respectively. Define these scopes in the Administration Console. Later, the client application can request any of these scopes.
To create the scopes, perform the following steps:
-
In the Access Manager Administration Console, click > > > > > .
-
Specify Todo Service and click .
-
Click newly created services (Todo Service) > .
-
Click and specify the following details:
-
: create_todo
-
: Create Task Items
-
: Select this option
-
-
Repeat step 4 and add the following scopes:
-
: list_todo, : Access your task list
-
: delete_todo, : Delete your task list
In this step, you can select .
-
-
Click > > .
Registering the Demo Client Application
The client application needs to communicate with the Identity Server through the OAuth 2.0 protocol. As per this protocol’s specification, the Identity Server must uniquely identify each client application. You must register client application in the Identity Manager.
To register a client application in the Identity Server, the user must have the NAM_OAUTH2_DEVELOPER role defined in the OAuth policy. Hence, an administrator needs to create the role in the Administration Console and assign it to the user.
Creating an OAuth 2.0 Developer Role for Registering a Client Application in the Identity Server
Perform the following steps:
-
In the Administration Console, click > > > > .
-
Click > . Specify the following details:
-
: oauth_developers
-
: Identity Server: Roles
-
-
Click .
-
Specify the following details under :
-
: : :
-
: :
-
: : admin or provide your own condition here.
-
-
Specify the following detail under :
-
: NAM_OAUTH2_DEVELOPER
-
-
Click > > .
-
Select the oauth_developers and click .
-
Select the oauth_developers policy again and click > > .
Registering a Client Application in the Identity Server
Perform the following steps:
-
Determine the Identity Server’s base URL. Go to > > cluster > > .
-
Launch this base URL (https://<base_url>/nidp/) in a web browser.
-
Log into as an administrator.
-
Go to > > > .
-
Specify the following details:
-
: NetIQ Demo Application
-
:
-
: Specify the following URLs with the host name you specified in Editing Host Entries (mydemoclient.mycompany.com) and the last one with host name of Access Manager installation (namtest.mycompany.com).
Add each URL in a separate text box.
https://mydemoclient.mycompany.com:9443/_oauth-callback
https://mydemoclient.mycompany.com:9443/_oauth-callback2
https://mydemoclient.mycompany.com:9443/ag/callback
https://mydemoclient.mycompany.com:9443/callback
https://mydemoclient.mycompany.com:9443/oidc/_oauth-callback
https://mydemoclient.mycompany.com:9443/oidc/_oauth-callback2
https://namtest.mycompany.com/nidp/netiq/nam/oauth/nam-oauth-callback.html
-
-
Select all grants required and token types options.
-
Click .
-
Click NetIQ Demo Application (newly registered client application) and note the values of and .
-
Log out of the Identity Server.
Running REST Services
Now, the demo application is ready to run.
-
Launch the resource server (Task Service).
-
Open a command editor. (Windows: cmd, Linux: any terminal)
-
Verify that the JAVA class path is set correctly:
Windows: set PATH=c:\Program Files\Jdk\bin;%PATH%
Linux: export PATH=/usr/lib64/jvm/jdk1.8/bin:$PATH
Replace the path of JDK wherever it is installed.
-
Locate the downloaded demo application file.
-
Extract todo-service-0.1-SNAPSHOT.zip.
-
Go to todo-service-0.1-SNAPSHOT
-
Open the Identity Server Base URL (https://namtest.mycompany.com/nidp/bin/todo-service -Dhttp.port=9001)
Replace the host name with the Identity Server URL. This will run the todo REST service in the port 9001.
Running the Client Application
Perform the following steps:
-
Launch a command editor. (Windows: cmd, Linux: any terminal)
-
Ensure that the Java path is correct. Verify this by running java. If not, set the path to JAVA_HOME’s bin:
Windows: set PATH=c:\Program Files\Jdk\bin;%PATH%
Linux: export PATH=/usr/lib64/jvm/jdk1.8/bin:$PATH
Replace with the path of JDK wherever it is installed.
-
Locate the downloaded demo application file.
-
Extract todo-webapp-0.1-SNAPSHOT.zip.
-
Go to todo-webapp-0.1-SNAPSHOT.
-
Open this Administration Console URL= https://namtest.mycompany.com:8443/nps IDP_BASE_URL=https://namtest.mycompany.com/nidp OAUTH2_CLIENT_ID=uJaQKe5QIC2RZLx5d53lA6sc1-PMOXI_psOrUABLzVQSktHBGoVLF9bXOJElCJ3yft17CbwJmgMHuaz604i55Q OAUTH2_CLIENT_SECRET=ZcX_SxxwmcTezB9nloCxQzHRFo4Yci-2wmbDmyZNMN0CSkhm6UtraPFPFNzB88iEyA5MqluiDq8vomqGUq8RNQ TODO_SERVICE_PORT=9001 TODO_SERVICE_HOST=localhost ./bin/todo-webapp -Dhttp.port=9000 -Dhttps.port=9443
This will run the client web application in the port 9443.
Accessing the Client Application through a Web Browser
You can access the application in a browser by using this URL: https://mydemoclient.mycompany.com:9443/.
5.2.11 Configuring Authentication Through Federation for Specific Providers
Setting Up Google Applications
Google Applications are pre-configured to establish federation with external service providers.
-
In the Administration Console, click > > > .
For the protocol, click .
-
Click > .
NOTE:By default, the > is selected.
-
Select from the drop-down list.
By default, the source is selected and the field is pre-filled with the metadata XML. You should edit the Location in the metadata text and replace YOURDOMAIN with the domain name configured in Google Applications.
-
In the option, specify a name by which you want to refer to the provider and click .
-
Review the metadata certificates and click . For Google Applications, the certificates page displayed is empty because the metadata does not contain information about the certificates. The system displays the trusted provider on the protocol page. For example, if you have specified the as , the page displays the trusted service provider when you click .
Figure 5-31 Trusted Service Provider for Google Application/Office 365/Sales Force

-
Click , then update the Identity Server.
The wizard allows you to configure the required options and relies upon the default settings for the other federation options. For information about how to configure the default settings and how to configure the other available options, see Section Section 3.9.4, Modifying a Trusted Provider.
You can configure Access Manager to provide the single sign-on services to Google applications by using Security Assertion Markup Language (SAML) 2.0. For more information, see Integrating Google Apps and Novell Access Manager using SAML 2.0.
Setting Up Office 365 Services
Office 365 is pre-configured to establish federation with external service providers. For more information, see Setting Up Google Applications. In Step 3, select . The system displays the trusted provider on the protocol page. For example, if you have specified the as Office365, the screen displays the trusted service provider as in Figure 5-31, when you click .
Access Manager is compatible with Microsoft Office 365 and provides single sign-on access to Office 365 services.
For more information, see Section 5.2.12, Configuring Single Sign-On for Office 365 Services.
Integrating Salesforce With Access Manager By Using SAML 2.0
Salesforce.com is pre-configured to establish federation with external service providers.
Integrating Salesforce With Access Manager By Using SAML 2.0 for Identity Provider Initiated Login
To integrate Salesforce for idpsend, follow the procedure in Setting Up Google Applications. In Step 3, select . The system displays the trusted provider on the protocol page. For example, if you have specified the as SalesForce, the screen displays the trusted service provider as in Figure 5-31, when you click .
Access Manager allows your users to use their existing LDAP credentials for single sign-on access to salesforce.com as well as any Web applications protected by Access Manager.
For information using SAML 2.0 for Identity Provider initiated login, follow the procedure below.
-
Create domain in Salesforce.
To enable IDP-initiated login in Salesforce.com, you must enable and configure the option in Salesforce.com. Defining your own domain provides the basis for an IDP-initiated URL.
-
Login as administrator. Go to > > .
-
Specify the subdomain name and check the availability.
-
Agree to the terms and conditions and click .
-
-
If you have already configured your identity provider for Salesforce.com using the wizard, you must update configuration in the identity provider according to the new domain. Perform the following steps.
-
Download the metadata from Salesforce site for your domain. See Step 3. Send and import this metadata into your Identity Server Salesforce configuration. For reimporting metadata in Access Manager Identity Server, see Viewing and Reimporting a Trusted Provider’s Metadata.
-
Change the Intersite Transfer URL to point to the new domain URL
-
-
Update the Identity Server.
Integrating Salesforce With Access Manager By Using SAML 2.0 for Service Provider Initiated Login
Service provider configuration options offer you more flexibility and control for example, simultaneously federating with more than one Identity Server. Salesforce.com also supports SP-initiated login along with IDP-initiated login. SP-initiated login lets the user use a simple and intuitive URL to access the target application.
Follow the procedure given below to integrate Salesforce with Access Manager by using SAML 2.0 for service provider initiated login. Assume that the user has a Salesforce account.
-
Create domain in Salesforce.
To enable SP-initiated login in Salesforce.com, you must enable and configure the option in Salesforce.com. Defining your own domain provides the basis for an SP-initiated URL.
-
Login as administrator. Go to > > .
-
Specify the subdomain name and check the availability.
-
Agree to the terms and conditions and click Register Domain.
If you have already configured your identity provider for Salesforce.com using wizard, you must update configuration in the identity provider according to the new domain. Perform the following steps.
NOTE:Configure SSO configuration. Follow the procedure below to enable SAML support in Salesforce.
-
Go to your Salesforce account and login.
-
From the left panel, select > > > and fill the form.
-
To enable SAML select > > > > > .
-
-
Change the Intersite Transfer URL to point to the new domain URL.
-
Import Salesforce metadata in Access Manager.
As with any other SAML federation you must configure both your Access Manager Identity Server and Salesforce.com Service Provider (SP) to establish a trust. You now have an option to download your metadata from Salesforce.com. To download your specific metadata go to your Salesforce.com instance.
-
Login as administrator. Go to > > .
-
Select which you have configured above and .
-
Reimport this metadata into your service provider configuration in Access Manager assuming that you have created Salesforce using the wizard.
The metadata file you download will include a certificate. For Access Manager to trust or use this certificate, the trusted root certificate chain that minted the certificate must exist in the Access Manager certificate trust stores.
-
-
Import certificate in Access Manager, for example, Salesforce.com.
-
Open the downloaded metadata .xml file with a file editor and search for the certificate in the X509Certificate element (between <ds:X509Certificate> and </ds:X509Certificate>).
-
Copy the information into its own file and give it a .cer file extension. Windows will recognize this as a certificate.
-
Double click and open the file.
-
Click to see the chain of authority for the certificate.
You will need the trusted root certificate for every CA in the chain that you see listed.
-
In the example above, select the and click .
-
Click .
-
-
You can now export the CA trusted root certificate.
-
Click . This will launch the Windows Certificate Export Wizard.
-
Select encoded when prompted. Give the file a name and save.
-
Repeat this process for every CA in the certificate path chain.
-
Use the Access Manager Administration Console to import the resulting CA trusted root certificates into your Access Manager keystores.
-
After importing, add these certificates into the Identity Server Keystore. For more information, see Section 11.0, Managing Certificates and Keystores.
Ensure to add Root certificate of Salesforce into your OCSP trust store else, OCSP validation fails and the Identity Server displays an error.
Integrating Shibboleth Identity Provider With Access Manager
You can establish a single sign-on exchange between Access Manager SAML 2 service provider and a Shibboleth SAML 2 identity provider.
For more information, see Integrating Access Manager with Shibboleth’s Identity Provider Server.