14.1 Enabling SSL Communication

Because the Identity Server handles authentication, it must be configured for SSL before any of the other Access Manager components. You can then configure the Access Gateway to use SSL in its connections to the Identity Server, to the browsers, and to its Web servers.

SSL impacts the performance of Access Manager components. Instead of enabling Access Manager components for SSL, you can front the components with an SSL terminator or accelerator. The SSL terminator offloads the handling of the SSL traffic, and the Access Manager components can be configured to use HTTP. For some tips on using such a device, see Section 14.1.4, Using an SSL Terminator.

14.1.1 Identifying the SSL Communication Channels

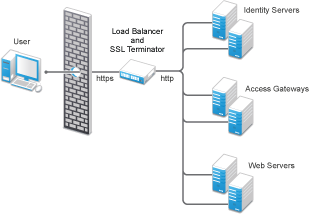
Access Manager has five communication channels that can be configured for SSL. Figure 14-1 illustrates these channels.

Figure 14-1 Potential SSL Communication Channels

You were instructed to set the first channel between the Identity Server and the LDAP servers when you configured the user stores (see Step 4 in Section 3.3, Configuring an Identity Server). The other channels need to be configured according to their numeric values. You need to configure SSL between the Identity Server and the browsers before you configure the channel between the Access Gateway and the Identity Server for SSL.

The eDirectory that resides on the Administration Console is the main certificate store for all of the Access Manager components. You can use this local certificate authority (CA) to create certificates for SSL or you can purchase certificates from a well-known certificate authority. This section describes how to use both types of certificates to enable secure communication.

14.1.2 Using Access Manager Certificates

By default, all Access Manager components (Identity Server and Access Gateway) trust the local CA. However, the browsers are not set up to trust the Access Manager CA. You need to import the public key of the trusted root certificate (configCA) into the browsers to establish the trust.

This section discusses the following procedures:

Configuring Secure Communication on the Identity Server

The Identity Server comes with a the test-connector certificate. This procedure shows you how to replace this certificate by completing the following tasks:

  • Enable SSL on the Identity Server (changing from HTTP to HTTPS)

  • Create a certificate

  • Replace the test-connector certificate with the newly created certificate

To configure SSL on the Identity Server:

  1. In the Administration Console, click Devices > Identity Servers.

  2. In the Configuration column, click Edit.

  3. Change Protocol to HTTPS (the system changes the port to 8443), click Apply, then click OK at the warning.

  4. Copy the domain name of your Identity Server configuration to the clipboard, or take note of the name. It must match the common name of the new certificate.

  5. Click the SSL Certificate icon, then click OK at the warning if you clicked Apply when you changed the protocol to HTTPS.

    If you did not click Apply, then click Cancel and click Apply before returning to this option

    The Keystore configuration page appears.

  6. In the Certificates section, click Replace.

  7. In the Replace dialog box, click the Select Certificate icon next to the Certificate field.

  8. On the Select Certificate page, click New.

  9. Click Use local certificate authority.

    This option creates a certificate signed by the local CA (or Organizational CA), and creates the private key.

  10. Fill in the following fields:

    Certificate name: A name that you can associate with this certificate. For easy reference, you might want to paste the domain name of the Identity Server configuration in this field.

    For information about how to modify the default values before clicking OK, see Section 10.0, Creating Certificates.

    Subject: Click the Edit Subject icon. In the Common Name field, paste the domain name of the base URL of the Identity Server configuration. This value cannot be an IP address or begin with a number, in order to ensure that trust does not fail between providers.

    If you are going to be using Windows CardSpace, fill in values for the other common attributes.

  11. Click OK.

  12. To accept the default values in the other fields, click OK twice.

    The new certificate is displayed on the Select Certificate page.

  13. Verify that the new certificate is selected, then click OK.

  14. Click OK on the Replace dialog box.

  15. Click Restart Now to restart Tomcat, as prompted.

  16. Click Close on the Keystore page.

    • If your Identity Server and Administration Console are on the same machine, you need to log in to the Administration Console again.

    • If your Identity Server is on another machine, click OK.

  17. To verify the health of the Identity Server, click Devices > Identity Servers.

  18. To update the embedded service provider of the Access Gateway to use the new URL, click Devices > Access Gateways > Update.

    If you do not receive the option to update the Access Gateway, select the Access Gateway, then click Actions > Service Provider > Restart Service Provider > OK.

    Restarting the service provider reestablishes the trust between the Access Gateway and the new base URL for the Identity Server.

  19. Verify that the trusted relationship between the Identity Server and the Access Gateway has been reestablished.

    1. Enter the URL to a protected resource on the Access Gateway.

    2. Complete one of the following:

Configuring the Access Gateway for SSL

This section describes how to set up SSL for the Access Gateway communication channels:

Configuring SSL Communication with the Browsers and the Access Gateway

  1. In the Administration Console, click Devices > Access Gateways > Edit > [Name of Reverse Proxy].

  2. To configure the reverse proxy for SSL, fill in the following fields:

    Enable SSL with Embedded Service Provider: Select this option to encrypt the data exchanged for authentication (the communication channel between the Identity Server and the Access Gateway). This option is only available for the reverse proxy that has been assigned to perform authentication.

    If you enable SSL between the browsers and the Access Gateway, this option is automatically selected for you. You can enable SSL with the embedded service provider without enabling SSL between the Access Gateway and the browsers. This allows the authentication and identity information that the Access Gateway and the Identity Server exchange to use a secure channel, but allows the Access Gateways to use non-secure channels with the browsers and the Web servers. This saves processing overhead if the data on the Web servers is not sensitive.

    Enable SSL between Browser and Access Gateway: Select this option to require SSL connections between your clients and the Access Gateway. SSL must be configured between the browsers and the Access Gateway before you can configure SSL between the Access Gateway and the Web servers. For this process, see Enabling SSL between the Reverse Proxy and Its Web Servers.

    Redirect Requests from Non-Secure Port to Secure Port: Determines whether browsers are redirected to the secure port and allowed to establish an SSL connection. If this option is not selected, browsers that connect to the non-secure port are denied service.

  3. Generate a certificate key by using the Access Manager CA:

    1. Click Auto-generate Key, then click OK twice.

    2. On the Select Certificate page, make sure the certificate is selected, then click OK.

      The generated certificate appears in the Server Certificate text box.

  4. Configure the ports for SSL:

    Non-Secure Port: Specifies the port on which to listen for HTTP requests. The default port for HTTP is 80. If you have selected the Redirect Requests from Non-Secure Port to Secure Port option, requests sent to this port are redirected to the secure port. If the browser can establish an SSL connection, the session continues on the secure port. If the browser cannot establish an SSL connection, the session is terminated.

    Secure Port: Specifies the port on which to listen for HTTPS requests (which is usually 443). This port needs to match the configuration for SSL. If SSL is enabled, this port is used for all communication with the browsers. The listening address and port combination must not match any combination you have configured for another reverse proxy or tunnel.

  5. In the Proxy Service List, click [Name of Proxy Service] > Protected Resources.

  6. In the Protected Resource List, change the Authentication Procedure from an HTTP contract to an HTTPS contract.

    For example, if a protected resource is using the Name/Password - Basic contract, click the name and change it to the Name/Password - Form, the Secure Name/Password - Basic or the Secure Name/Password - Form contract. Then click OK.

    The Name/Password - Form contract is capable of using either HTTP or HTTPS.

    To enable single sign-on, select the same contract for all the protected resources.

  7. Click the Configuration Panel link near the bottom of the page, then in the confirmation box, click OK.

  8. On the Server Configuration page, click Reverse Proxy / Authentication.

  9. In the Embedded Service Provider section, click Auto-Import Identity Server Configuration Trusted Root, click OK, specify an alias, click OK twice, then click Close.

    This option imports the public key of the Identity Server into the trust store of the embedded service provider. This sets up a trusted SSL relationship between the embedded service provider and the Identity Server.

    The configCA public key certificate of the Access Manager CA is automatically added to the ESP Trust Store. If you are using Access Manager CA certificates for the Identity Server, you do not need to import the configCA certificate unless someone has deleted it from this trust store.

  10. Click Configuration Panel, then in the confirmation box, click OK.

  11. On the Server Configuration page, click OK.

  12. On the Access Gateways page, click Update > OK.

  13. Update the Identity Server so that it uses the new SSL configuration. Click Devices > Identity Servers, then click Update > OK.

  14. Verify that the trusted relationship between the Identity Server and the Access Gateway has been reestablished:

    1. Enter the URL to a protected resource on the Access Gateway. For example, enter

      https://www.mytest.com
      
    2. Complete one of the following:

Enabling SSL between the Reverse Proxy and Its Web Servers

To enable SSL between the reverse proxy and the Web servers, you must have already performed the following tasks:

  • Enabled SSL between the Access Gateway and the browsers. See Section 3.6.1, Configuring a Reverse Proxy and select the Enable SSL between Browser and Access Gateway field.

  • Enabled SSL on the Web server. See your Web server documentation.

If you have completed these tasks:

  1. In the Administration Console, click Devices > Access Gateways > Edit > [Name of Reverse Proxy] > [Name of Proxy Service] > Web Servers.

    The Web Servers configuration page appears.

  2. To configure SSL, select Connect Using SSL.

    This option is not available if you have not set up SSL between the browsers and the Access Gateway. See Section 3.6.1, Configuring a Reverse Proxy and select the Enable SSL between Browser and Access Gateway field.

  3. In the Connect Port field, specify the port that your Web server uses for SSL communication.

  4. Configure how you want the certificate verified. The Access Gateway supports different options. Select one of the following:

    • Do not verify: Select this option if you do not want to verify the Web Server Trusted Root certificate. Continue with Step 4.

    • To verify the certificate authority of the Web server certificate, select Any in Reverse Proxy Trust Store. When this option is selected, the public certificate of the certificate authority must be added to the proxy trust store.

      IMPORTANT:For an Access Gateway Service, this option is a global option. If you select this option for one proxy service, all proxy services on an Access Gateway Service are flagged to verify the public certificate. This verification is done even when other proxy services are set to Do not verify.

  5. Click the Manage Reverse Proxy Trust Store icon. The auto import screen appears.

  6. Ensure that the IP address of the Web server and the port match your Web server configuration.

    If these values are wrong, you have entered them incorrectly on the Web server page. Click Cancel and reconfigure them before continuing.

  7. Click OK.

    Wait while the Access Gateway retrieves the server certificate, the root CA certificate, and any CA certificates from a chain from the Web server.

  8. Specify an alias, then click OK.

    All the displayed certificates are added to the trust store.

  9. Click Close.

  10. (Optional) For mutual authentication:

    1. Select the certificate. Click the Select Certificate icon, select the certificate you created for the reverse proxy, then click OK.

    2. Import the trusted root certificate of the CA that signed the proxy service’s certificate to the Web servers assigned to this proxy service.

      See your Web server documentation for instructions.

  11. Click Configuration Panel, then click OK.

  12. On the Configuration page, click OK.

  13. On the Access Gateways page, click Update.

  14. (Optional). Test this configuration from a client browser:

    1. Enter the published DNS name as the URL in the browser.

    2. Click the links that require authentication for access.

14.1.3 Using Externally Signed Certificates

When the Identity Server is configured to use an SSL certificate that is signed externally, the trusted store of the embedded service provider for each component must be configured to trust this new CA. The browsers that are used to authenticate to the Identity Server must be configured to trust the CA that created the certificate for the Identity Server. If you obtain a certificate from a well-known external CA, most browsers are already configured to trust certificates from well-known CAs.

The following procedures explain how to use certificates signed by an external Certificate Authority.

Obtaining Externally Signed Certificates

The following sections explain how to create certificate signing requests for the Identity Server and Access Gateway, how to use the requests to obtain signed certificates, then how to import the signed certificates and the root certificate of the Certificate Authority into Access Manager.

Creating the Certificate Signing Request

You need to create two certificate signing requests: one for the Identity Server and one for the Access Gateway. The Certificate name and the Common name need to be different, but the other values can be the same.

What you need to know or create

Example

Your Value

Certificate name

ipda_test or lag_test

________________________ ________________________

Certificate Subject Fields:


Common name

ipda.test.novell.com or lag.test.novell.com

________________________ ________________________


Organizational unit

novell

________________________


Organization

test

_______________________


City or town

Provo

________________________


State or province

UTAH

_______________________


Country

US


To create a signing request for the Identity Server:

  1. In the Administration Console, click Security > Certificates > New.

  2. Select the Use External certificate authority option.

  3. Fill the following fields:

    Certificate name: idpa_test

    Signature algorithm: Accept the default.

    Valid from: Accept the default.

    Months valid: Accept the default.

    Key size: Accept the default.

  4. Click the Edit icon on the Subject line.

  5. Fill in the following fields:

    Common name: idpa.test.novell.com

    Organizational unit: novell

    Organization: test

    City or town: Provo

    State or province: UTAH

    Country: US

  6. Click OK twice, then click the name of the certificate.

  7. Click Export CSR.

    The signing request is saved to a file.

  8. Repeat Step 1 through Step 7 to create a signing request for the Access Gateway.

Getting a Signed Certificate

You can send the certificate signing request to a certificate authority and wait for the CA to return a signed certificate or you can use a trial certificate for testing while you wait for the official certificate. Companies such as VeriSign offer trial signed certificates for testing.

Modify the following instructions for the CA you have selected to sign your certificates:

  1. Set up an account with a certificate authority and select the free trial option.

  2. Open your certificate signing request for the Identity Server in a text editor.

  3. Copy and paste the text of the certificate request into the appropriate box for a trial certificate.

  4. If CA requires that you select a server platform, select eDirectory if available. If eDirectory is not a choice, select unknown or server not listed.

  5. Click Next, then copy the signed certificate and paste it into a new text file or at the bottom of the signing request file.

  6. Click Back, and repeat Step 2 through Step 5 for the Access Gateway.

  7. Follow the instructions of the vendor to download the root certificate of the Certificate Authority and any intermediate CA certificates.

Importing the Signed Certificates and Root Certificate

The following steps explain how to imported the signed certificates and the trust root into the Administration Console so that they are available to be assigned to key stores and trusted root stores.

  1. In the Administration Console, click Access Manager > Certificates > Trusted Roots.

  2. Click Import, then specify a name for the root certificate.

  3. Either click Browse and locate the root certificate file or select Certificate data text and paste the certificate in the text box.

  4. Click OK.

    The trusted root is added and is now available to add to trusted root stores.

  5. (Conditional) Repeat Step 2 through Step 4 for any intermediate CA certificates.

  6. In a text editor, open the signed certificate for the Identity Server.

  7. In the Administration Console, click Access Manager > Certificates, then click the name of certificate signing request for the Identity Server.

  8. Click Import Signed Certificate, then select Certificate data text (PEM/Based64).

  9. Paste the text for the signed certificate into the data text box. Copy everything from

    -----BEGIN CERTIFICATE-----

    through

    -----END CERTIFICATE-----

  10. Click Add trusted root, then either click Browse and locate the root certificate file or select Certificate data text and paste the certificate in the text box.

  11. (Conditional) For any intermediate CA certificates, click Add intermediate certificate, then either click Browse and locate the intermediate certificate file or select Certificate data text and paste the certificate in the text box.

  12. Click OK.

    The certificate is now available to be assigned to the keystore of a device.

    If the certificate fails to import and you receive an error, it is probably missing a trusted root certificate in a chain of trusted roots. To determine whether this is the problem, see Resolving a -1226 PKI Error and Importing an External Certificate Key Pair.

  13. Repeat Step 6 through Step 12 for the Access Gateway certificate.

Configuring the Identity Server to Use an Externally Signed Certificate

This section explains how to enable SSL between the Identity Servers and the browsers.

  1. In the Administration Console, click Devices > Identity Servers.

  2. In the Configuration column, click Edit.

  3. Change Protocol to HTTPS (the system changes the port to 8443), click Apply, then click OK at the warning.

  4. In the SSL Certificate line, click the Browse icon.

  5. In the Certificates section, click Replace, then click the Browse icon.

  6. Select the Identity Server certificate, then click OK twice.

  7. At the prompt to restart Tomcat, select to restart Tomcat now.

  8. Click Close on the Keystore page.

    • If your Identity Server and Administration Console are on the same machine, you need to log in to the Administration Console again.

    • If your Identity Server is on another machine, click OK.

  9. Wait for the Identity Server health to turn green.

  10. Click Access Gateway > Edit > Service Provider Certificates > Trusted Roots.

  11. In the Trusted Roots section, click Add, then click the Browse icon.

  12. Select the trusted root certificate of the certificate authority that signed the Identity Server certificate.

  13. (Conditional) If you imported intermediate certificates for the CA, select them also.

  14. Click OK until you return the Service Provider Certificates page.

    IMPORTANT:If the external certificate authority writes the DN in reverse order (the cn element comes first rather than last), you receive an error message that the certificate names do not match. You can ignore this warning, if the order of the DN elements is the cause.

  15. Click Close, then click Access Gateways.

  16. Update the Access Gateway.

  17. Test the SSL connection between the browser and the Identity Server:

    1. Enter the Base URL of the Identity Server in a browser.

      https://idpa.test.novell.com:8443/nidp
      
    2. If the URL returns a login page, log in using the credentials of a user in the LDAP server.

      The user portal appears.

      If the URL returns an error rather than displaying a login page, verify the following:

      • The browser trusts the CA that created the certificate.

      • The browser can resolve the DNS name of the Identity Server

      • The browser can access port 8443.

  18. Verify that the trusted relationship between the Identity Server and the Access Gateway has been reestablished:

    1. Enter the URL to a protected resource on the Access Gateway.

    2. Complete one of the following:

Configuring the Access Gateway to Use an Externally Signed Certificate

This section explains how to enable SSL communication between the Access Gateway and the Identity Server (channel 3 in Figure 14-1) and between the Access Gateway and the browsers (channel 4 in Figure 14-1).

  1. In the Administration Console, click Devices > Access Gateways > Edit > [Name of Reverse Proxy].

  2. Select Enable SSL with Embedded Service Provider.

  3. Select Enable SSL between Browser and Access Gateway.

  4. In the Server Certificate line, click the Browse icon.

  5. Select the Access Gateway certificate, then click OK.

    IMPORTANT:If the external certificate authority writes the DN in reverse order (the cn element comes first rather than last), you receive an error message that the subject name does not contain the cn of the device. You can ignore this warning, if the order of the DN elements is the cause.

  6. Click Auto-Import Embedded Service Provider Trusted Root, then click OK.

    This adds the trusted root of the Access Gateway certificate to the trusted root store of the Identity Server.

  7. Specify an Alias for the certificate, then click OK > Close.

  8. On the Reverse Proxy page, click OK.

  9. On the Server Configuration page, click Reverse Proxy / Authentication.

  10. In the Embedded Service Provider section, click Auto-Import Identity Server Configuration Trusted Root and follow the prompts.

    This imports the trusted root certificate of the Identity Server into the trusted root store of the embedded service provider.

  11. Click OK twice to return to the Access Gateways page.

  12. On the Access Gateways page, click Update.

  13. Click Identity Servers > Update.

  14. Verify that the trusted relationship between the Identity Server and the Access Gateway has been reestablished:

    1. Enter the URL to a protected resource on the Access Gateway.

    2. Complete one of the following:

14.1.4 Using an SSL Terminator

An SSL terminator is a method of offloading the processor-intensive public key encryption algorithms involved in SSL transactions to a hardware terminator or accelerator. This can be a separate card that plugs into a PCI slot in a computer that contains one or more coprocessors able to handle the SSL processing, or it can be a dedicated (and expensive) hardware device.

The most processing-intensive part of an SSL session is the stage where the SSL server (the Identity Server or Access Gateway) is required to decrypt the SSL session key (an asymmetric key) that has been sent to it from the SSL client (usually a Web browser). This is known as the SSL handshake. Typically a hardware SSL terminator offloads the processing of the SSL handshake while leaving the server software to process the less intense symmetric cryptography of the actual SSL data exchange. The terminator can also act as a proxy and handle all SSL operations, which allows the server that is behind the terminator use unencrypted connections.

The performance benefits to the Access Manager servers are very high, often resulting in faster performance and higher throughput.

Although the Access Manager configuration settings are the same for any SSL terminator, the process for configuring the terminator for rewriting varies with the hardware. The following explanations use the Citrix Netscaler SSL terminator to explain the required rewriter configuration. For more information about this SSL terminator, see the following documents:

The following sections describe the required network configuration, the required Access Manager components, and the terminator and Access Gateway configuration process.

Required Setup

The following diagram illustrates the sample setup that was used for the configuration steps.

This setup has the following features:

  • The Citrix Netscaler SSL terminator is configured to load balance (it provides the L4 switch functionality) and to offload the SSL traffic.

  • The Identity Servers and the Access Gateways are accessible only through the SSL terminator via HTTP.

  • The Identity Servers and the Access Gateways communicate to each other through the SSL terminator.

  • The Identity Server cluster is configured to use HTTP on port 80. For information about translating the default 8080 port to 80, see Translating the Identity Server Configuration Port in the NetIQ Access Manager 4.1 Installation and Upgrade Guide.

Configuring the SSL Terminator

The configuration instructions assume that the SSL virtual servers have been created for the Access Gateways and Identity Servers on the SSL terminator. This sample configuration uses the logical name of “Access Manager Access Gateway” for the Access Gateway virtual server, and “Access Manager Identity Server” for the Identity Sever virtual server. The virtual server setup details are available in the documentation links referenced in Section 14.1.4, Using an SSL Terminator.

To enable the rewrite functionality:

  1. Configure the SSL terminator to rewrite information in the HTTP header to be HTTPS:

    The string used within the quotes is the virtual server name of the SSL virtual server. Each Access Manager component set has a different name for the virtual server.

    1. At the command line, enter the following command for the Access Gateway:

      set ssl vserver "Access Manager Access Gateway" -sslRedirect ENABLED -redirectPortRewrite ENABLED 
      

      The "Access Manager Access Gateway" string needs to be replaced with the name you have specified for the Access Gateway virtual server.

      Enabling SSL Redirect (-sslRedirect) causes the SSL terminator to convert any HTTP 302 redirect responses from back-end servers to HTTPS redirects.

    2. At the command line, enter the following command for the Identity Server.

      set ssl vserver "Access Manager Identity Server" -sslRedirect ENABLED -redirectPortRewrite ENABLED 
      

      The "Access Manager Identity Server" string needs to be replaced with the name you have specified for the Identity Server virtual server.

  2. Create a policy to scan the HTTP data (as opposed to headers) as it passes through the SSL terminator and replace references to http:// with references to https://.

    At the command line, enter the following commands:

    add rewrite action httpRewriteAction replace_all "http.res.body(50000)" "\"https://\"" -pattern "http://" 
    
    add rewrite policy HttpToHttpsRewrite "http.res.body(50000).contains(\"http://\")" httpRewriteAction 
    

    The (50000) value references the number of bytes to scan. This number can be tweaked for the size of the page; 50000 was from the Citrix support examples.

  3. Bind the policy to the Identity Server virtual server.

    At the command line, enter the following command:

    bind lb vserver "Access Manager Identity Server" -policyName HttpToHttpsRewrite -priority 100 -gotoPriorityExpression END -type RESPONSE
    

    This command rewrites all Identity Server generated references of http to the https scheme. For example, the following entry in the default login (login.jsp) page includes an HTML form with an action tag that indicates where the credentials are to be posted. The page includes the following line:

    <form name="IDPLogin" enctype="application/x-www-form-urlencoded" method="POST" action="<%= (String) request.getAttribute("url") %>" AUTOCOMPLETE="off">
    

    When the JSP is executed, the following is sent back to the browser by the Identity Server:

    <form name="IDPLogin" enctype="application/x-www-form-urlencoded" method="POST" action="http://idp126.lab.novell.com/nidp/idff/sso?sid=4" AUTOCOMPLETE="off">
    

    With the policy defined above, the action tag is rewritten to the following:

    <form name="IDPLogin" enctype="application/x-www-form-urlencoded" method="POST" action="https://idp126.lab.novell.com/nidp/idff/sso?sid=4" AUTOCOMPLETE="off">
    

Configuring the Access Gateway

With the SSL terminator rewriting HTTP to HTTPS for the Identity Server, the only changes required on the Access Manager side are for the Access Gateway. There are three particular cases where the Access Gateway must have its scheme rewritten:

  • All Web pages rendered through the Access Gateway must have their schemes rewritten from HTTP to HTTPS.

    Because of the complexity of Web pages, many SSL terminators have issues rewriting all references in a Web page from HTTP to HTTPS. The Access Gateway must take responsibility for this work.

    By default, the Access Gateway rewriter does not rewrite the scheme if the proxy service and back-end Web servers use the same protocol. In this case, all traffic into the proxy is HTTP and all traffic to the back-end Web servers is also HTTP, which implies that no scheme rewriting takes place. Because the browser expects all links to reference HTTPS schemes, the Access Gateway must be configured to automatically rewrite all HTTP references on Web pages to HTTPS.

  • The Liberty Authentication request generated by the Access Gateway must have the target URL rewritten to HTTPS.

    When a user accesses an Access Gateway protected resource, a corresponding Liberty authentication request is generated by the Embedded Service Provider and is sent to the Identity Server via the browser. This authentication request includes multiple attributes, including information about the trusted Liberty service provider generating the request, a target URL where the user must be redirected to post authentication, and the contract to be executed at the Identity Server. The target URL is embedded in this authentication request and references an HTTP resource. The Access Gateway must be able to rewrite this HTTP request to HTTPS. The following example was sent by the Access Gateway to the Identity Server via the browser.

    HTTP/1.1 302 Moved Temporarily
    Server: Apache-Coyote/1.1
    Set-Cookie: JSESSIONID=AF5484F1CD4D218C5404A17A0DA86E5A; Path=/nesp; secure
    Location: http://idp126.lab.novell.com/nidp/idff/sso?RequestID=idQgvQqocG6fgFrkeiUG6jlRD.LMk&MajorVersion=1&MinorVersion=2&IssueInstant=2010-05-18T13%3A53%3A26Z&ProviderID=https%3A%2F%2Flag129.lab.novell.com%3A443%2Fnesp%2Fidff%2Fmetadata&RelayState=MA%3D%3D&consent=urn%3Aliberty%3Aconsent%3Aunavailable&ForceAuthn=false&IsPassive=false&NameIDPolicy=onetime&ProtocolProfile=http%3A%2F%2Fprojectliberty.org%2Fprofiles%2Fbrws-art&target=http%3A%2F%2Flag129.lab.novell.com%3A443%2Fformfill%2Fphpinfo.phpentRef=u&AuthnContextStatemscell%2Fsecure%2Fname%2Fpassword%2Furi
    Date: Tue, 18 May 2010 13:53:26 GMT
    Content-Length: 0
    Via: 1.1 lag129.lab.novell.com (Access Gateway 3.1.1-265_eng_600589-7AA324FFCBA4D4ED)
    

    The target parameter embedded within the authentication request references HTTP in the following line:

    http%3A%2F%2Flag129.lab.novell.com%3A443%2Fformfill%2Fphpinfo.php
    

    This needs to be rewritten to use the HTTPS scheme, for example:

    https%3A%2F%2Flag129.lab.novell.com%3A443%2Fformfill%2Fphpinfo.php
    
  • The Location HTTP header in the 302 redirects must have its scheme rewritten from HTTP to HTTPS. There are two cases where the Access Gateway sends 302 redirects back to the browser:

    • When a non-authenticated user tries to access a protected resource, a series of HTTP redirects are generated by the Access Gateway that redirect the user to the Embedded Service Provider or to the Identity Server server requesting the user’s credentials. Browsers execute on these 302 redirect status codes and generate corresponding requests to the URL defined in the Location HTTP header. The scheme on the Location header must be HTTPS and not the default HTTP.

    • When the back-end Web server sends a 302 redirect to the browser, the Access Gateway must interpret the URL and make any rewrites it deems necessary (such as scheme and path-based multi-homing path injection). Because the proxy and back-end Web server schemes are both HTTP in the setup, the Location header is not rewritten by default.

The Location header rewriting is handled by the SSL terminator. You have already enabled this rewriting in Step 1.a.

To configure the Access Gateway to rewrite Web page references and the target URL:

  1. In the Administration Console, click Devices > Access Gateways > Edit > Reverse Proxy / Authentication.

  2. In the Proxy Settings section, select Behind Third Party SSL Terminator, then click OK.

  3. Click OK, then update the Access Gateway.

14.1.5 SSL Renegotiation

SSL renegotiation is the process of establishing a new SSL handshake over an existing SSL connection. SSL renegotiation can be initiated either by the SSL client or the SSL server. Initiating an SSL renegotiation on the client or the server requires different set of APIs. The renegotiation messages (ciphers and encryption keys) are encrypted and then sent over the existing SSL connection to establish another session securely and is useful in the following scenarios:

  • When you require a client authentication.

  • When you require a different set of encryption and decryption keys.

  • When you require a different set of encryption and hashing algorithms.

SSL renegotiation is enabled or disabled by the following parameter: "sun.security.ssl.allowUnsafeRenegotiation.

NOTE:By default this parameter is disabled.

This is defined in a registry on Windows and a configuration file on SLES.

You can verify whether the Identity Server, Access Gateway and Administration Console support secure renegotiation by using the following command:

openssl s_client -connect <IP address of the Access Manager component:port>

Port can either be 8443 or 443 based on the Access Gateway configuration.

Enabling a Windows SSL Renegotiation

Perform the following steps to enable the SSL renegotiation on Windows 64-bit platform:

  1. Launch Registry Editor by executing the Start > Run regedit command.

  2. In the left pane of Registry Editor, navigate to My Computer > HKEY_LOCAL_MACHINE\SOFTWARE\Wow6432Node\Apache Software Foundation\Procrun 2.0\Tomcat7\Parameters\Java\.

  3. Double-click Options in the right pane of the Registry Editor.

  4. Search for the -Dsun.security.ssl.allowUnsafeRenegotiation string.

    • If -Dsun.security.ssl.allowUnsafeRenegotiation is available, set the value to true. For example, -Dsun.security.ssl.allowUnsafeRenegotiation=true

    • If -Dsun.security.ssl.allowUnsafeRenegotiation is not available, add -Dsun.security.ssl.allowUnsafeRenegotiation=true

  5. Go to C:\Program Files(x86)\Novell\Tomcat\conf\server.xml > Server > Service > Connector, then search for the connector 8443 and check if the connector has the port 8443.

  6. Add the allowUnsafeLegacyRenegotiation=true string.

  7. Restart Tomcat to enable the SSL renegotiation.

Perform the following steps to enable the SSL renegotiation on Windows 32-bit platform:

  1. Launch Registry Editor by executing the command regedit in Start > Run.

  2. In the left pane of Registry Editor, navigate to My Computer > HKEY_LOCAL_MACHINE\SOFTWARE\Apache Software Foundation\Procrun 2.0\Tomcat7\Parameters\Java\.

  3. Double-click Options in the right pane of registry editor.

  4. Search for the -Dsun.security.ssl.allowUnsafeRenegotiation string.

    • If -Dsun.security.ssl.allowUnsafeRenegotiation is available, set the value to true. For example, -Dsun.security.ssl.allowUnsafeRenegotiation=true.

    • If -Dsun.security.ssl.allowUnsafeRenegotiation is not available, add

      -Dsun.security.ssl.allowUnsafeRenegotiation=true.

  5. Go to C:\Program Files(x86)\Novell\Tomcat\conf\server.xml > Server > Service > Connector., then search for the connector 8443 and check if the connector has the port 8443.

  6. Add the allowUnsafeLegacyRenegotiation=true string.

  7. Restart Tomcat to enable the SSL renegotiation.

The following instructions explain how to disable the SSL renegotiation in Windows 32- bit and Windows 64-bit platform:

  1. Launch Registry Editor by executing the command regedit in Start > Run.

  2. In the left pane of Registry Editor, navigate to My Computer > HKEY_LOCAL_MACHINE\SOFTWARE\Apache Software Foundation\Procrun 2.0\Tomcat7\Parameters\Java\.

  3. Double-click Options in the right pane of registry editor.

  4. Search for the -Dsun.security.ssl.allowUnsafeRenegotiation string.

  5. In -Dsun.security.ssl.allowUnsafeRenegotiation, set the value to false. For example, -Dsun.security.ssl.allowUnsafeRenegotiation=false

  6. Restart Tomcat to disable the SSL renegotiation.

Enabling a Linux SSL Renegotiation

To enable the SSL renegotiation on SLES 11 SP2 and SP3, add the parameter JAVA_OPTS="${JAVA_OPTS} -Dsun.security.ssl.allowUnsafeRenegotiation=true in the configuration file /var/opt/novell/tomcat7/conf/tomcat7.conf if the parameter does not exist.

Restart Tomcat to enable SSL renegotiation.

To disable the SSL renegotiation on SLES 11 SP2 and SP3, add the parameter JAVA_OPTS="${JAVA_OPTS} -Dsun.security.ssl.allowUnsafeRenegotiation=false in the configuration file /var/opt/novell/tomcat7/conf/tomcat7.conf if the parameter does not exist.

Restart Tomcat to disable SSL renegotiation.