3.6 Configuring the Access Gateway
The basic Access Gateway configuration procedures consists of the following tasks:
3.6.4 Setting Up Policies
The Access Gateway lets you retrieve information from your LDAP directory and inject the information into HTML headers, query strings, or basic authentication headers. The Access Gateway can then send this information to the back-end Web servers. Access Manager calls this technology Identity Injection.
This is one of the features within Access Manager that enables single sign-on. Users are prompted for the login credentials for one time, and Access Manager then supplies them for the resources you have configured for Identity Injection.
This section explains how to set up an Identity Injection policy for basic authentication. This policy is assigned to the third directory on your Web server, which is the basic directory that your Web server has been configured to require basic authentication before allowing access.
-
In the Administration Console, click > > > > > > .
-
Configure the resource for the basic directory as described in Section 3.2, Prerequisites for Setup:
-
For the contract, select or .
-
For the URL path, specify the path to the basic directory (/basic/*).
-
Click .
-
-
Click > .
On a new installation, the list is empty because no policies have been created.
-
In the section, click .
-
In the section, click then specify values for the following fields:
Name: Specify a name for the Identity Injection policy.
Type: Select .
-
Click .
-
(Optional) Specify a description for the policy.
-
In the section, click > .
-
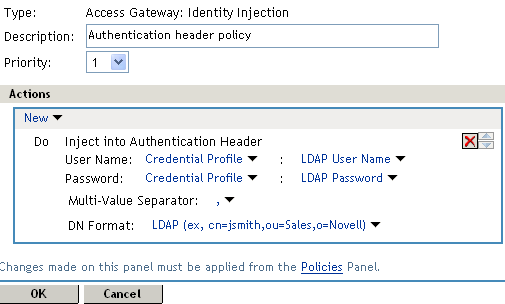
Set up the policy for and :
-
For , select and .
This injects the value of the cn attribute into the header.
-
For , select and .
The policy should look similar to the following:
-
-
Click > > > .
-
Select the new Identity Injection policy, then click > .
-
Click > > > .
-
To test this configuration from a client browser, specify the published DNS name as the URL in the browser. Click the link to the page that uses basic authentication.
You are prompted to log in. If you have set up Web applications on your Web server that require login, any additional login prompts are hidden from the user and are handled by the identity injection system.
For an example of how Identity Injection policies can be used for single sign-on to the Identity Manager User Application, see “Configuring Access Manager for UserApp and SAML”.