3.12 Sample Configuration for Protecting an Application Through Access Manager
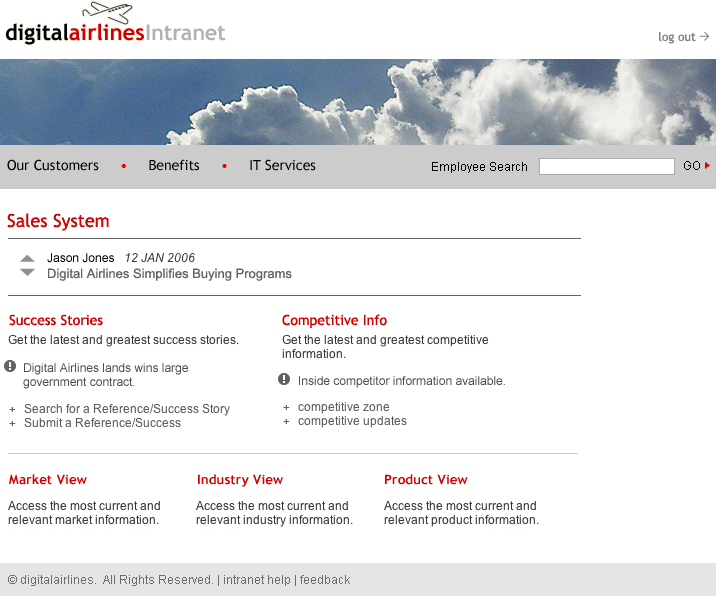
This section explains how to use Access Manager to protect the Web site illustrated in the following figure. The sample application that comes by default with the Access Manager Appliance showcases the various Access Manager features. Ensure that you remove the landing portal in the production environment. Instructions for removing this portal are given on the landing page.
Figure 3-24 Digital Airlines Web Services
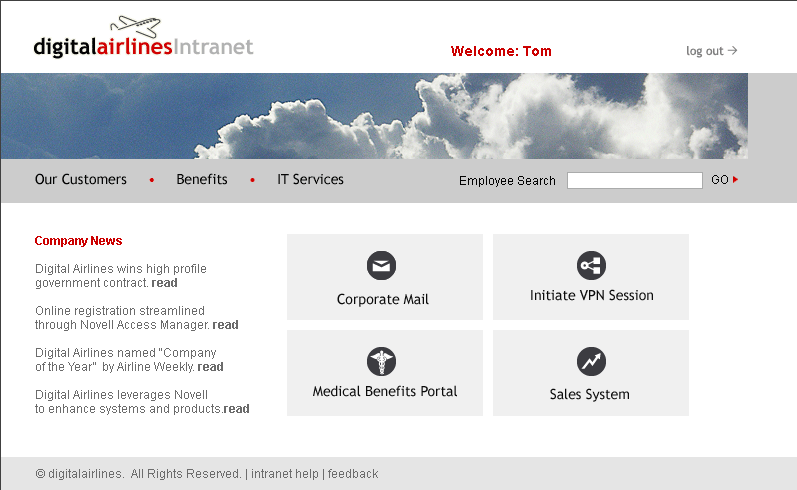
This section explains how to configure the Access Manager components to allow access to this first page and how to create and assign policies that protect the other pages.
The example Web pages are designed to help network administrators understand the basic concepts of Access Manager by installing and configuring a relatively simple implementation of the software. The example serves as a primer for a more comprehensive production installation of Access Manager.
3.12.1 Installation Overview and Prerequisites
This section discusses the concepts involved in installing Access Manager to protect the example Digital Airlines Web site:
After you deploy this example, you should understand the basic features of Access Manager and know how to configure the software to protect your own Web servers and applications.
Installation Architecture
The diagram below illustrates how the Digital Airlines example is integrated with Access Manager.
Figure 3-25 Digital Airlines Architecture
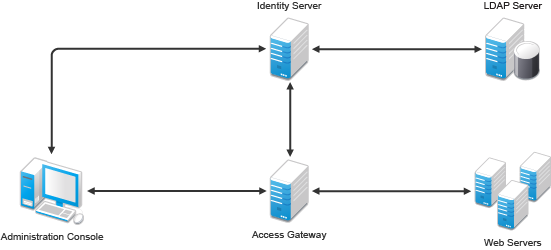
This document explains how to use a browser machine and two other machines for this configuration.
Table 3-1 NetIQ Access Manager Components
|
Administration Console |
Identity Server |
Access Gateway |
Application Web Server |
LDAP User Store |
Browser |
|---|---|---|---|---|---|---|
|
Machine 1 |
X |
X |
|
X |
X |
|
|
Machine 2 |
|
|
X |
|
|
|
|
Machine 3 |
|
|
|
|
|
X |
The simplified configuration described in this document is for a test environment only. It is not a recommended or supported configuration for a production environment. For example, the configuration database installed with the Administration Console should not be used as an LDAP user store in a production environment. In a production environment, you would not want to install Administration Console, Identity Server, and Web server on the same machine. This simplified configuration is designed to minimize the number of machines required for a tutorial.
After deploying the Digital Airlines example, you should understand the concepts required to deploy Access Manager in a number of other configurations. In a production environment, you need to install the necessary Access Manager components according to your specific requirements. For more information about other possible installation configurations, see the Installing Access Manager in the NetIQ Access Manager 4.1 Installation and Upgrade Guide.
Deployment Overview
Prerequisite Tasks
Before starting with the Digital Airlines example, you must perform the following tasks:
-
Enable pop-ups on a Firefox browser (3.x or above) or Internet Explorer browser (7.x or above) for managing and configuring the Access Manager components.
-
Install NetIQ Access Manager Administration Console, Identity Server, and Access Gatewayas described in the Installing Access Manager in the NetIQ Access Manager 4.1 Installation and Upgrade Guide.
-
Configure the NetIQ Access Manager Identity Server. For configuration details, see Section 3.3, Configuring an Identity Server.
IMPORTANT:The Digital Airlines procedures explain how to add a user to the configuration store of the Administration Console. These instructions assume that you have configured the Identity Server to use this configuration store as the LDAP user store. This is not a recommended configuration for a production environment. To enable this configuration for a test environment, specify the IP address of the Administration Console for the address of the server replica.
Do not configure the Access Gateway at this time. Other tasks explain how to configure the Access Gateway to allow access to the Digital Airlines site on the Web server.
Deployment Tasks
To configure access to the Digital Airlines site, you need to complete the following tasks:
-
Set up the Apache Web server on your Identity Server, then install the Digital Airline pages.
For more information, see Section 3.12.2, Setting Up the Web Server.
-
Configure the Access Gateway to protect the Web server, but allow public access to the site. See Section 3.12.3, Configuring Public Access to Digital Airlines.
-
Configure the Access Gateway to allow access to the protected pages. See Section 3.12.4, Implementing Access Restrictions.
3.12.3 Configuring Public Access to Digital Airlines
This section describes the procedures for configuring the Access Gateway so that a client can access the Digital Airlines site. Before continuing, make sure you have completed the prerequisite tasks described in Prerequisite Tasks and Section 3.12.2, Setting Up the Web Server.
-
On the client machine, open a browser and log in to the Administration Console.
-
In the Administration Console, click > .
The IP address or name of the Access Gateway you installed should be listed in the display window.
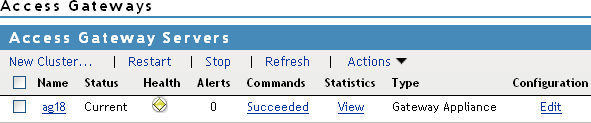
An Access Gateway that has not been configured displays a yellow health status.
-
Click > .
-
In the option, select the configuration you have assigned to the Identity Server.
This sets up the trust relationship between the Access Gateway and the Identity Server that is used for authentication.
-
In the , click , specify DAL as the new , then click .
-
Enable a listening address.
If the server has only one IP address, only one is displayed and it is automatically selected as the . If the server has multiple addresses, you can select one or more IP addresses to enable. You must enable at least one address by selecting its check box.
-
Configure a listening port.
Non-Secure Port: Select 80, which is the default port for HTTP.
Secure Port: This is the HTTPS listening port. This port is unused and cannot be configured until you enable SSL. This configuration scenario does not contain SSL configuration instructions.
-
In the , click and specify the following information:
Proxy Service Name: Specify any name that intuitively identifies this service on your Access Gateway server. For this example, specify Dallistener.
Public DNS Name: The DNS name you want the public to use to access your Digital Airlines site. This DNS name must resolve to the IP address you set up as the listening address. This example uses am3bc.provo.novell.com.
Web Server IP Address: The IP address of the Web server where your Digital Airlines files are installed.
Host Header: Select from the drop-down menu. The Web server and the Digital Airlines pages have not been set up to require the DNS name of the Web server in the Host Header, so it does not matter what name is placed in the Host Header.
Your form should look similar to the following:

-
Click .
-
In the , click .
-
Click , then in the , click .
-
Type everything in , then click .
-
In the field, select from the drop-down menu.
Under , you should see /*, which includes everything on that server.
Later on, you will be instructed to change the field to a , but for now, we want you to learn how the example works without any authentication.
-
Click .
-
In , verify that the protected resource you created is enabled, then click .
-
Click the > .
-
To apply the changes, click > .
Until this step, nothing has been saved. The status pushes the configuration to the server. When the configuration update has completed successfully, the server returns the status of .
-
To update the Identity Server for the trusted relationship, click > , then click > .
-
To test the results, complete the following.
-
Open a browser on the client machine.
-
Enter the URL for the proxy service. For this example, it is
am3bc.provo.novell.com
Your network needs to be configured so that this published DNS name of the proxy service resolves to the IP address of the Access Gateway. The reverse proxy hides the internal address of the Web server.
You should see the Digital Airlines page.
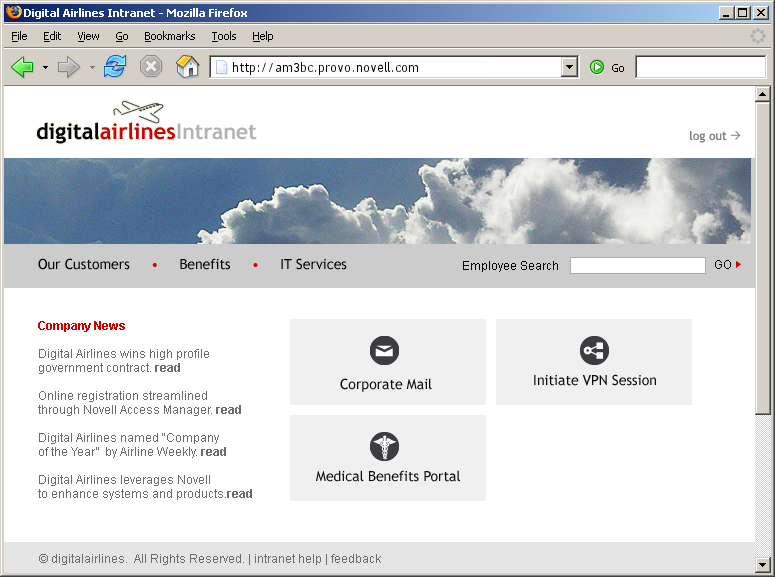
If you get an error, check the time on the Access Gateway and Identity Server. Their time should be synchronized and must be within 5 minutes of each other.
-
-
Close the browser.
-
To require authentication for access to the site and to configure access to the protected pages (the VPN application and the hidden Sales System site), continue with Section 3.12.4, Implementing Access Restrictions.
Currently, the and buttons do not link to available pages. They exist to illustrate what you could do when you require your users to authenticate before accessing the site.
For example, the button could be configured so that the redirected request initiates a mail session to the user’s default e-mail application and injects the login credentials to provide access to the user’s protected, Web-based e-mail account.
The button could be configured to set up a federated account with the company that provides medical benefits for your company.
3.12.4 Implementing Access Restrictions
After you access the Digital Airlines site as a public resource (see Section 3.12.3, Configuring Public Access to Digital Airlines), you can configure the site for authentication and authorization requirements. This section describes the following tasks:
Enabling an Authentication Procedure
After hiding the internal Web server behind the Access Gateway, you can add an authentication method to the Web site by using the following procedure:
-
In the Administration Console, click > > .
-
Click > > > .
-
In the field, select .
IMPORTANT:Make sure to select the from the drop-down menu. does not work correctly if the base URL for the Identity Server is HTTP.
-
Click to return to the Protected Resources page.
-
Click > , then click > .
This pushes the new configuration to the server. When the configuration process is complete, the status returns to .
-
To test the results, open a browser and enter the URL of your Web site.
The Web site should now be protected and require you to log in by using a name and password.
-
Enter the credentials of the admin user of your Administration Console.
The Digital Airlines site appears. If you receive an error, see Common Authentication Problems.
-
Close all sessions of the browser.
The Digital Airlines page has a logout graphic, but it isn’t an action. The current session is active until you log out (which isn’t possible), until the session times out (the default value is 20 minutes), or you close all sessions of the browser.
-
Continue with Configuring a Role-Based Policy.
Common Authentication Problems
In this basic configuration there are two common configuration errors that can cause login to fail:
Error 300101015: If your Access Gateway and Identity Server do not have the same time, the assertion is invalid. Check the time of each machine.
Errors 100101043 and 100101044: The Identity Server and the Access Gateway need to be able to resolve each other’s DNS names. If you are in a lab and not using a DNS server, make sure the host files of each machine have been configured to resolve the DNS name to the IP address of the device.
The other cause for these errors, when SSL has not been enabled, is the failure to update either the Identity Server or the Access Gateway after making a change to the base URL of the Identity Server or modifying the Identity Server the Access Gateway is trusting for authentication.
For information about how to force the Access Gateway to update the metadata for the Identity Server, see Embedded Service Provider Metadata.
Configuring a Role-Based Policy
You learned how to set up and configure Access Manager to protect a basic Web service. Access Manager also uses role-based access control (RBAC) to conveniently assign a user to a particular job function or set of permissions within an enterprise, in order to control access.
Access Manager enables you to assign roles to users, based on attributes of their identity, and then associate policies with the roles. In designing your own actual production environment, you need to decide which roles you need (such as, sales, administrative, and accounting). You create Role policies that assign the roles to your users, and then you create Authorization and Identity Injection policies that use the roles to control access.
This section explains how to set up an Identity Injection policy that customizes the main page of the Digital Airlines site. When the index.php page has access to the user’s name, the main page displays the name. If the user belongs to the sales_role role, the button is displayed on the page.
To configure an Identity Injection policy that uses a role, complete the following tasks:
Adding an LDAP Attribute to Your Configuration
The LDAP attribute that is added in this section is an LDAP attribute assigned to the User class in eDirectory. This attribute is used to assign users to the sales role.
-
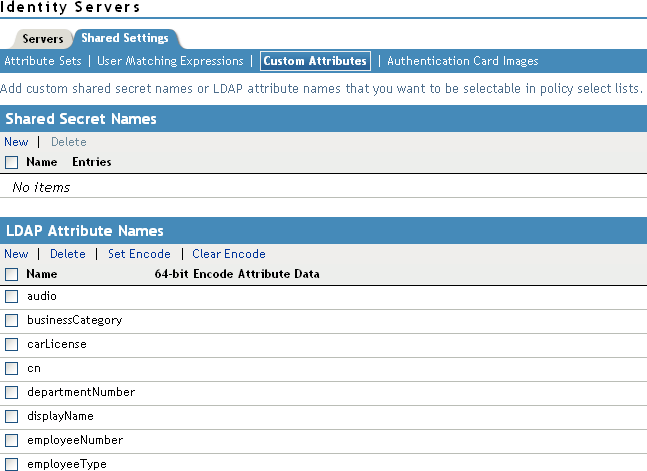
In the Administration Console, click > , then click > .
-
In the section, click , type description in the field, then click .
This adds the description attribute to the policy list of available LDAP attributes, and you can use this attribute to assign a role to your users.
-
Click .
-
Continue with Creating a Sales Role.
Creating a Sales Role
Use the following procedure to create a sales role for the Digital Airlines example. (For more information about Role policies, see Section 6.2, Role Policies.)
-
In the Administration Console, click > then click > .
-
In the section, click
-
In the section, click then fill in the following fields:
Name: Specify .
Type: Select .
-
Click to open the policy editor.
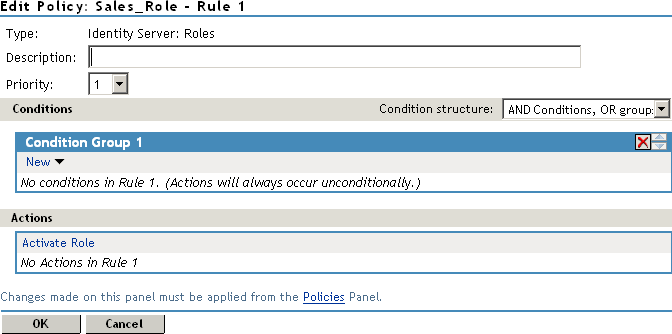
-
In , click > , and assign the following values:
LDAP Attribute: Select . (If is not included in the list, you can add it from this page. For instructions, see Step 5.a through Step 5.c.)
Comparison: Select .
Mode: Select .
Value: Select (from the drop-down box); specify Sales as the value.
Result on Condition Error: Select
If the attribute is not listed in the drop-down menu, create it by following this procedure:
-
In , click > , scroll to the bottom of the list, then click .
-
In the field, specify , then click .
-
In the field, select from the drop-down menu.
-
-
In the section, click , then specify sales_role in the field. Your rule should look similar to the following:
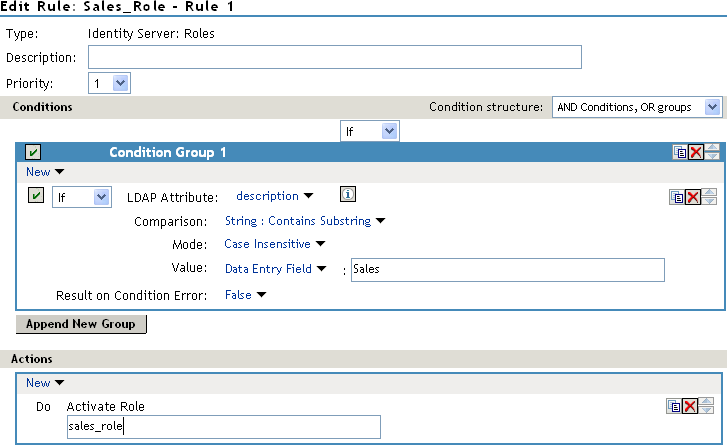
The value for might be case sensitive. If you are going to inject this role into a policy for a Web server, and the page on the Web server is configured so that it evaluates case, make sure the value entered here matches what is expected on the Web server. The button on the Digital Airlines site requires that this value be lowercase: sales_role.
-
Click to close the Rule editor, then click to close the .
-
To save the Role policy, click , then click to return to the .
-
In the , select then click .
-
Click .
-
Update the Identity Server.
Wait for the to return to .
-
Continue with Creating a New User with a Sales Role.
Creating a New User with a Sales Role
After you have created a user policy, only users provisioned with that policy can access the protected Web resource. This section describes how to create a user that meets the conditions to be assigned the Sales role. These instructions assume that you are using the configuration store of the Administration Console as the LDAP user store. If you are using a different server than the LDAP user store, you need to modify these instructions:
-
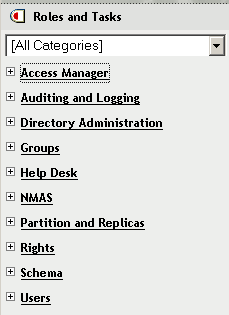
In the Administration Console, click the
 icon in the top menu bar.
-
Click .
-
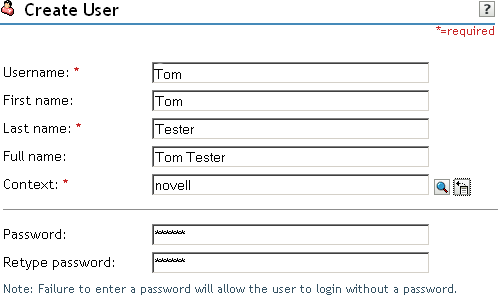
Click then fill in the following fields:
Username: Specify Tom.
First name: Specify Tom.
Last name: Specify Tester.
Context: Click the icon, then click . The user is automatically assigned the context of .
Password: Assign a password to the user.
Retype password: Retype the assigned password.
Your user entry should look similar to the following:
-
Scroll to the field, then click the icon.
-
In the text box, type Sales (initial uppercase), then click to return to the Create User page.
-
On the Create User page, click , then click to close the task.
Tom meets the requirements to be assigned the Sales role when he logs in.
-
Continue with Creating the Identity Injection Policy for a Custom Header.
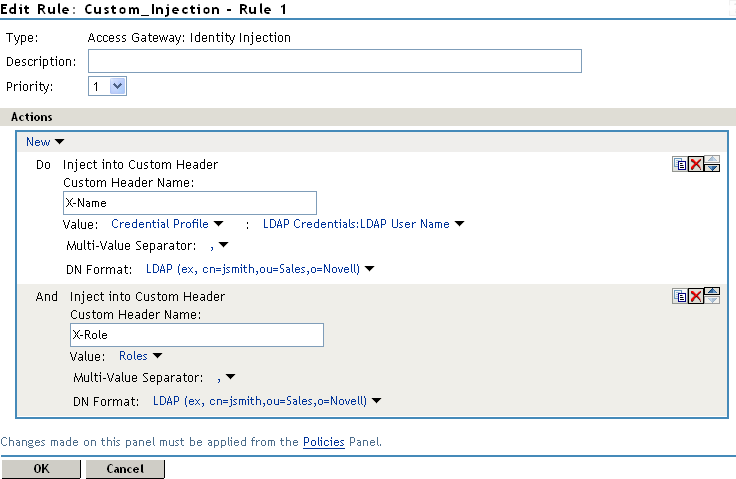
Creating the Identity Injection Policy for a Custom Header
The following policy injects the user’s roles and DN into a custom header. The index.php page reads this information and uses it to display the user’s name. If the user is assigned the sales_role, the button is displayed on the main page.
-
In the Administration Console, click the
 icon in the top menu bar.
-
Click > , then click > > > > .
-
Click > .
-
In the section, click , then fill in the following:
Name: Specify .
Type: Select .
-
In the section, click > .
-
To inject the user’s name, fill in the following values:
Custom Header Name: Specify .
Value: Select . The is selected automatically for you.
-
To inject the user’s roles, click > , then fill in the following values for the second custom header:
Custom Header Name: Specify .
Value: Select .
Your policy should look similar to the following:
-
Click twice, then click .
-
Click .
-
In the section, select , then click.
-
Click .
-
Click > , then click > .
-
To test Tom’s access rights, complete the following steps:
-
Open a new browser, then enter the URL of the Digital Airlines Web site you created.
In this example, it is am3bc.provo.novell.com.
-
When prompted for user ID and password from Access Manager, log in with Tom’s credentials.
The page appears with a message at the top, and the button appears in the lower right corner of the page.
-
Click the button, and the Sales page appears.
If the Sales System button does not appear, Tom was not assigned the sales_role:
-
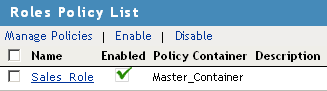
Verify that the role policy is enabled for the Identity Server by clicking > , and confirm that the Identity Server is listed in the column for the policy.
-
On the Policies page, confirm that the Access Gateway is listed in the column for the Identity Injection policy.
-
Discover whether there was an error in the Role policy evaluation. Click > , then download the catalina.out (Linux) or the stdout.log (Windows) file for the Identity Server. Search for the name of the role policy and determine whether the role was successfully assigned.
-
Determine whether there was an error in Identity Injection policy evaluation. Click > , then download the catalina.out (Linux) or the stdout.log (Windows) file for the Access Gateway. Search for the name of the Identity Injection policy and determine whether its values were successfully injected.
For more information about troubleshooting policies, see Section 26.7, Troubleshooting Access Manager Policies.
-
-
Close all sessions of the browser.
-
-
To test that the sales_role is required for the button to appear, complete the following steps:
-
Open a new browser, then enter the URL of the Digital Airlines Web site you created.
In this example, it is am3bc.provo.novell.com.
-
Log in as the admin user. The page should have a at the top of the page, but the button should not appear.
-
To the URL, add /sales, and the Sales page appears.
This illustrates that although the link is hidden, the Sales page is not protected.
-
Close all sessions of the browser.
-
-
Continue with Assigning an Authorization Policy to Protect a Resource.
Assigning an Authorization Policy to Protect a Resource
Use the following procedure to limit access to the Sales page based on the sales role:
-
In the Administration Console, click > then click > > > .
-
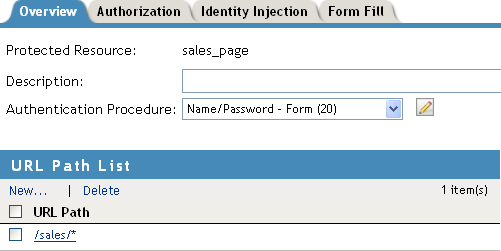
In the , click , specify sales_page for the name, then click .
-
For the , select .
-
In the , click /*, modify it to specify /sales/*, then click .
Your protected resource should look similar to the following:
-
Click > .
-
Click then fill in the following fields:
Name: Specify
Type: Select .
-
Click .
The Edit Policy page appears.
-
In , click > , then specify the following values:
Comparison: Select .
Mode: Select .
Value: Select
Return on Condition Error: Select
-
In the section, ensure that is selected.
Your rule should look similar to the following:
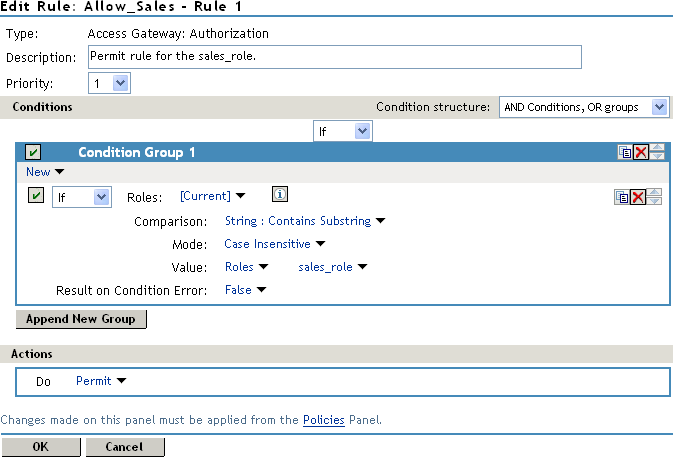
This rule allows everyone assigned to the sales_role to have access.
-
Click .
-
In the , select .
This second rule is a general deny rule for everyone who has not been assigned the sales_role.
-
Make sure the field is set to 10 and that the has no conditions.
-
In the section, click , select , then select .
-
Click , then in the text box, type the deny message: Sorry, you must work in sales today.
Your rule should look similar to the following.
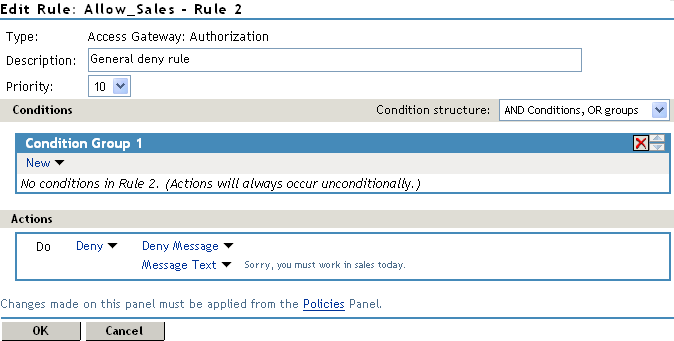
With no conditions in the condition group, this creates a general deny rule that matches everyone. The users who have been assigned the sales role match the first rule that is processed. Everyone else matches this general deny rule.
-
Click to close the rule editor, then click to close the .
-
In the Policy List window, click , then click .
-
In the , select the policy, then click .
-
Click .
-
Click the link, then click > .
-
Test the results:
-
Open a new browser, then enter the URL of the Digital Airlines Web site you created.
In this example, it is am3bc.provo.novell.com.
-
Log in as the admin user.
-
Add /sales to the URL.
You should receive the following response window with the message derived from the Access Gateway you just configured:
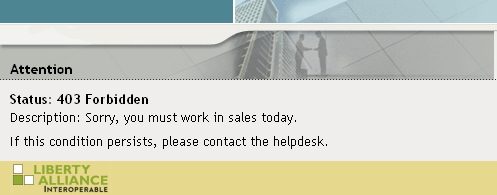
Now, only users with an assigned sales role can access the Sales page.
-
-
Test the results with a user who has the sales role:
-
Open a new browser, then enter the URL of the Digital Airlines Web site you created.
In this example, it is am3bc.provo.novell.com.
-
Log in as Tom.
-
Click the button or add /sales to the URL.
The Sales page is displayed.
-
Close all sessions of the browser.
-
-
Continue with Configuring an Identity Injection Policy for Basic Authentication.
Configuring an Identity Injection Policy for Basic Authentication
A common way to protect Web resources is to configure the Web server to require basic authentication for accessing a resource. The Web is configured to check for the user’s name and password in the HTTP authentication header. If you have Web resources with this type of configuration, you can enable single sign-on to these resources by creating a policy that injects the username and password into the HTTP authentication header.
This section explains how to set up the /sales directory to require basic authentication, and then how to create the Identity Injection policy.
Configuring the Web Server for Basic Authentication
It is difficult to create a configuration on the Apache Web server that provides consistent results by using LDAP SSL for basic authentication. Because this is a tutorial and is expected to be implemented in a testing environment, the following steps explain how to configure Apache to allow for a clear-text password over LDAP and how to configure basic authentication in this environment. The purpose of this section is not to explain how to configure Apache, but to explain how you can enable single sign-on for Web resources that require basic authentication.
Enabling LDAP Clear-Text Passwords
To turn off the SSL requirement on the internal LDAP user store:
-
Log in to the Administration Console.
-
Click the
 icon in the top menu bar.
-
Click , then configure the following fields.
Context: Accept the default [root] value and leave the option enabled.
Name: Accept the default wildcard value.
Type: Select from the list.
-
In the section, click the LDAP Group - <your server name> object, then select .
-
Select the attribute, then click .
-
Select the check box, then click .
-
Click or at the bottom of the page.
If you do not click one of these buttons, your modifications are not saved.
-
To return the Administration Console machine to its default view, click the icon in the top menu bar.
-
From a terminal window on the Administration Console machine, log in as root.
-
Restart eDirectory with the following command:
/etc/init.d/ndsd restart
Enabling Basic Authentication
You need to enable the Apache server to require basic authentication for the /sales directory. On SLES 11 SP1 and SP2, you need to enable two authentication modules and modify an Apache configuration file.
-
At the Apache server machine, log in to YaST.
-
Click > > .
-
Scroll down, then enable the and modules.
-
Click .
-
In a text editor, open the /etc/apache2/httpd.conf file.
-
Add the following section to the end of the file:
<Directory "/srv/www/htdocs/sales">
   Options Indexes FollowSymLinks
   AllowOverride None
   order allow,deny
   allow from all
   AuthType Basic
   AuthName Internal
   AuthBasicAuthoritative off
   AuthBasicProvider ldap
   AuthzLDAPAuthoritative off
   AuthLDAPURL ldap://127.0.0.1/o=novell?uid??(objectclass=*)
   require valid-user
   AuthLDAPBindDN cn=admin,o=novell
   AuthLDAPBindPassword novell
</Directory>
Replace the information in the AuthLDAPURL line with the information the IP address of your LDAP user store. Modify the query string to match your user store. This sample line assumes that the Web server and your LDAP user store are installed on the Administration Console, and 127.0.0.1 is its internal address.
The AuthLDAPBindDN and AuthLDAPBindPassword contain the distinguished name of a user and that user’s password. This user needs sufficient rights to log in to the LDAP user store and to search for the users in the tree.
-
Restart the Apache server with the following command:
/etc/init.d/apache2 restart
-
To test that the /sales directory now requires basic authentication:
-
Open a new browser, then enter the URL of the Digital Airlines Web site you created.
In this example, it is am3bc.provo.novell.com.
-
Log in using the credentials for Tom.
Even though Tom has logged in and been assigned the correct role, he is prompted to log in again to access the /sales directory. To enable single-sign on, you must create an Identity Injection policy that injects Tom’s credentials into the authentication header.
-
-
Continue with Configuring the Web Server for Basic Authentication.
Creating an Identity Injection Policy for Basic Authentication
This section explains how to enable single sign-on by creating an Identity Injection policy that injects the user’s authentication credentials into a header. The Web server uses the credentials in the authentication header to satisfy its login requirements.
-
In the Administration Console, click > , then click > > > .
-
In the , click .
-
Click > > .
-
For the new policy, fill in the following fields:
Name: Specify for the name.
Type: Select for the type.
-
Click .
-
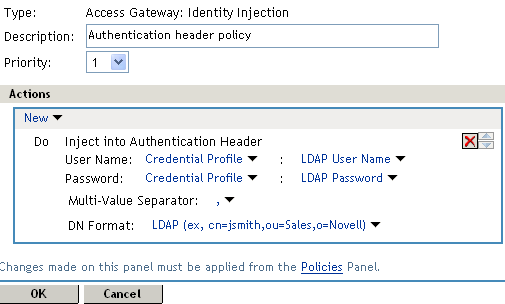
In the section, click , select , then select the following values:
User Name: Select . The value is automatically selected for you. This credential is the cn attribute of the user.
Password: Select . Click , then select .
Your policy should look similar to the following:
-
Click to close the policy editing page, then click to close the Rule List page.
-
In the Policy List page, click , then click .
-
Select the check box, click , then click .
-
Click to return to the . Your list should look similar to the following:
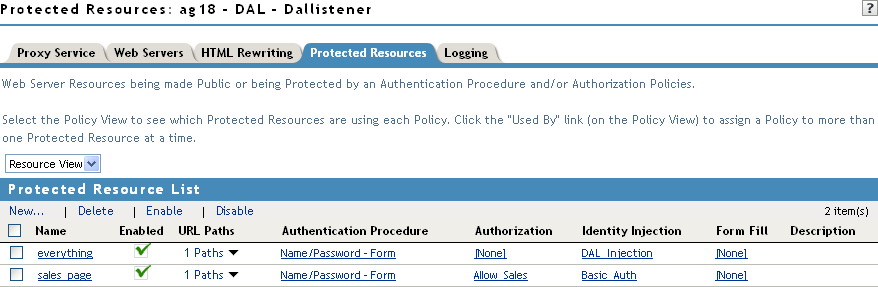
-
To save your configuration changes, click the link, then click > .
-
To test the configuration:
-
Open a new browser, then enter the URL of the Digital Airlines Web site you created.
In this example, it is am3bc.provo.novell.com.
-
Log in as Tom.
The Digital Airlines site should appear with the button.
-
Click the button. You should have access to the Sales System site, as shown below:
For more information about Identity Injection policies, see Section 6.4, Identity Injection Policies.
-
Close all sessions of the browser.
-