3.2 Discovering and Inventorying Data Center Resources
PlateSpin Recon gets information about data center assets in two stages.
-
Discover: Discovering machines in the network retrieves information such as hostnames, IP addresses, MAC addresses, and port information.
-
Inventory: Inventorying the previously discovered machines retrieves deeper data for each server, such as operating system, installed applications, services, processor speed, memory, network, and disk resources.
After machines are inventoried, they can be monitored and included in all report types, regardless of which method is used for inventory.
PlateSpin identifies a machine through unique attributes such as the IP address. If you change the IP address of the machine after inventorying a machine, you must reinventory the machine.
For information about ports used by PlateSpin Recon to inventory servers, see Knowledge Base article Q7920571.
3.2.1 Inventory and Discovery Methods
A common way to use discovery and inventory is to discover a large number of servers on the network. These servers appear under the node in the Data Center Explorer. Next, select the discovered servers and inventory them. Finally, select which inventoried servers you want to monitor. It is also possible to discover, inventory, and start monitoring servers in a single step.
You can add servers to the Data Center Explorer by using the button  .
.
There are seven inventory methods available. Each inventory method is unique and has different requirements.
Table 3-2 Inventory Methods
|
Discover and Inventory |
Discover and Optionally Inventory |
|---|---|
Machines
To discover and inventory physical and virtual servers:
-
Click the button
 > or click the menu > > .
The Inventory Machines dialog box is displayed.
-
In , specify the hostname or the IP address of the machines you want to inventory.
You can specify multiple hostnames or IP addresses separated with a comma; however, they need to all use the same credentials.
-
Specify credentials for the machines you add in Step 2. For more information on how to specify a new credential, see Section 3.2.2, Inventory Credentials.
This enables the button.
-
(Optional) Start monitoring the servers when they are inventoried and/or add them to existing groups. For more information, see Section 3.2.3, Inventory Options.
-
Configure the schedule when you want to perform the inventory.
-
To immediately start the inventory, do one of the following:
-
Click in the drop-down list.
-
Click in the drop-down list, then click >.
-
-
To perform inventory at a later time, set up a schedule:
-
In the drop-down list, click Schedule.
The Scheduling Options dialog box is displayed.
-
Select one of the following schedules
-
Fill in the fields.
For details about the fields, click the appropriate schedule listed above.
-
-
-
Click .
Virtual Center
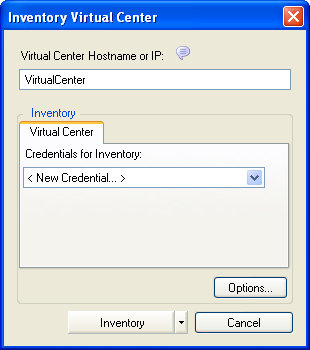
Inventorying a Virtual Center involves collecting information about all the servers and virtual machines in the Virtual Center. This is much more efficient than discovering and inventorying all the servers and virtual machines individually.
To discover and inventory Virtual Center servers:
-
Click the button
 > or click the menu > > .
The Inventory Virtual Center dialog box is displayed.
-
Specify the hostname or the IP address of the Virtual Center you want to inventory.
-
Specify credentials for the machines that you added in Step 2. For more information on how to specify a new credential, see Section 3.2.2, Inventory Credentials.
This enables the button.
-
(Optional) Start monitoring the servers when they are inventoried and/or add them to existing groups. For more information, see Section 3.2.3, Inventory Options.
-
Configure the schedule when you want to perform the inventory.
-
To immediately start the inventory, do one of the following:
-
Click in the drop-down list.
-
Click in the drop-down list, then click >.
-
-
To perform inventory at a later time, set up a schedule:
-
In the drop-down list, click Schedule.
The Scheduling Options dialog box is displayed.
-
Select one of the following schedules
-
Fill in the fields.
For details about the fields, click the appropriate schedule listed above.
-
-
-
Click .
Virtual Center contents appear in the Data Center Explorer the same way they are organized in the Virtual Center, with all nodes, clusters, resource pools, and virtual machine nodes. The machines do not appear under in the Data Center Explorer until they are inventoried.
When using per core licensing, you must first inventory a Virtual Center before inventorying ESX Servers that belong to it, or the virtual machines on those ESX Servers. For more information, see Per Core in the Novell PlateSpin Recon 3.7.4 Getting Started Guide.
From a CSV File
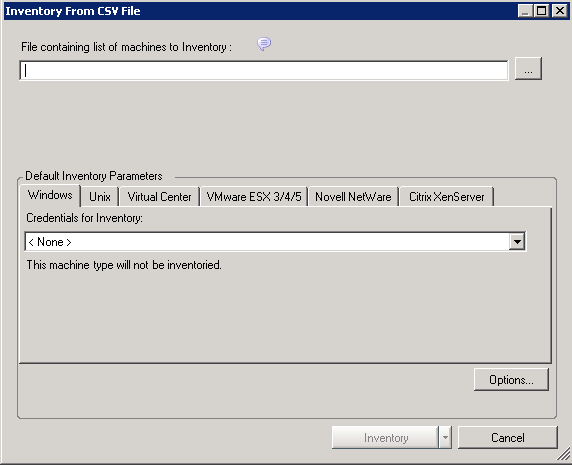
Inventorying machines from a CSV file allows you to add servers whose information resides in a comma-separated value file. Use the following format to list the machines in the file:
Address, [Username], [Password], [Description], [Inventory Type]
Table 3-3 CSV File Requirements
|
Field |
Required |
Description |
|---|---|---|
|
Address |
Yes |
IP address or hostname of the machine. |
|
Username |
Optional |
Username for the credential. If this is left blank, the default credentials are used. |
|
Password |
Optional |
Password for the credential. This is required only when creating a credential. |
|
Description |
Optional |
Description for the credential. If the entry for a machine in the CSV file contains username and password, the credential description must be unique. |
|
Inventory type |
Optional |
Can be any of the following values. Values must match case and spacing as shown below:
If the value is unspecified, Windows and UNIX are the defaults and these are determined by the formats of the credentials that you specify in the CSV file:
This field is also expected to be at the end of the CSV file. |
To discover and inventory machines from a CSV file:
-
Click the button
 > or click the menu > > .
The Inventory from CSV dialog box is displayed.
-
Type the path (or use the adjacent browse button) to locate a CSV file containing servers to inventory.
-
(Conditional) If the CSV file does not contain the credentials for all the machines, specify the credentials for the machines in the Default Inventory Parameter panel.
NOTE:The area is disabled if the CSV file contains credentials for all its machines.
For more information on how to specify a new credential, see Section 3.2.2, Inventory Credentials.
This enables the button.
-
(Optional) Start monitoring the machine when they are inventoried and/or add them to existing groups. For more information, see Section 3.2.3, Inventory Options.
-
Configure the schedule when you want to perform the inventory.
-
To immediately start the inventory, do one of the following:
-
Click in the drop-down list.
-
Click in the drop-down list, then click >.
-
-
To perform inventory at a later time, set up a schedule:
-
In the drop-down list, click Schedule.
The Scheduling Options dialog box is displayed.
-
Select one of the following schedules
-
Fill in the fields.
For details about the fields, click the appropriate schedule listed above.
-
-
-
Click .
Windows Domain
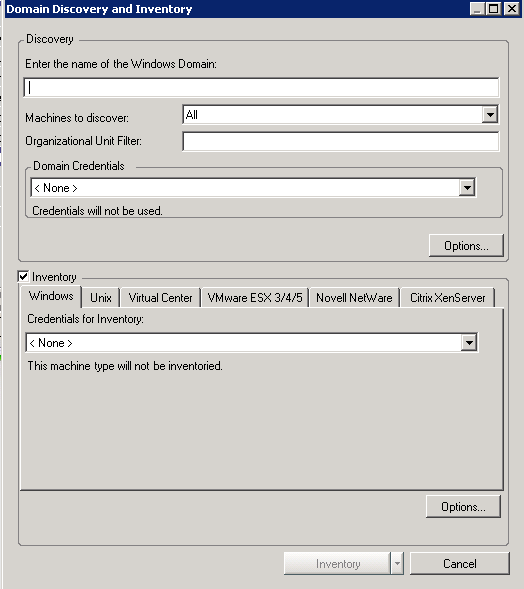
Inventorying machines by using the Windows Domain option allows you to add all the servers discovered in the specified Windows Domain.
To discover and optionally inventory servers in a specified Windows Domain:
-
Click the button
 > or click the menu > > .
The Domain Discovery and Inventory dialog box is displayed.
-
Type a Windows Domain name.
-
In the drop-down list, select which machines to discover. The available options are , , or (NT4 Workstation, Windows XP).
-
(Conditional) If you want to discover a specific part of a domain, configure the Organizational Unit (OU) filter. For more information, see Domain Discovery:.
-
Click the button to configure discovery options. For more information, see Section 3.2.4, Discovery Options.
If you want to discover machines only, continue with Step 6. If you want to discover and inventory machines, skip to Step 7.
-
(Conditional) If you want to only discover machines without inventorying machine details:
-
Deselect the option.
The option is selected by default.
-
Click
-
-
(Conditional) If you want to discover and inventory machines, additionally configure the following settings:
-
Specify credentials for the machines you added in Step 3.
For more information on how to specify a new credential, see Section 3.2.2, Inventory Credentials.
This enables the button.
-
(Optional) Start monitoring the machines when they are inventoried and/or add them to existing groups. For more information, see Section 3.2.3, Inventory Options.
-
Configure the schedule when you want to perform the inventory.
-
To immediately start the inventory, do one of the following:
-
Click in the drop-down list.
-
Click in the drop-down list, then click >.
-
-
To perform inventory at a later time, set up a schedule:
-
In the drop-down list, click Schedule.
The Scheduling Options dialog box is displayed.
-
Select one of the following schedules
-
Fill in the fields.
For details about the fields, click the appropriate schedule listed above.
-
-
-
Click .
-
IP Range
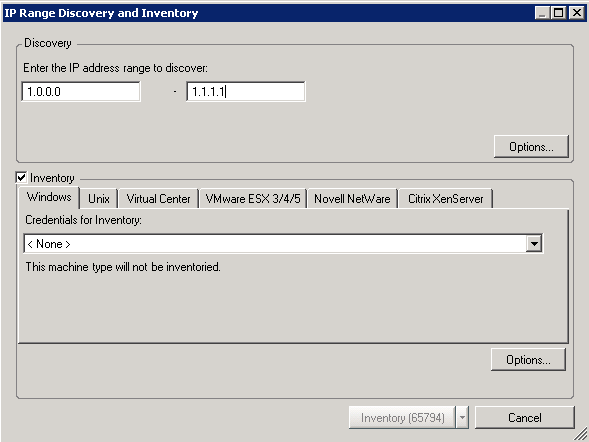
To discover and optionally inventory servers within a specified IP address range:
-
Click the button
 > or click the menu > > .
The IP Range Discovery and Inventory dialog box is displayed.
-
Configure the following settings in the Discovery pane:
-
Specify the IP address range of the servers to discover.
-
Click the button to configure discovery options. For more information, see Section 3.2.4, Discovery Options.
If you want to discover machines only, continue with Step 3. If you want to discover and inventory machines, skip to Step 4.
-
-
(Conditional) If you want to only discover machines without inventorying machine details:
-
Deselect the option.
The option is selected by default.
-
Click
The numbers that are displayed in the button indicate how many individual IP addresses are contained within the range you entered
-
-
(Conditional) If you want to discover and inventory machines, additionally configure the following settings:
-
Specify credentials for the machines you added in Step 2.
For more information on how to specify a new credential, see Section 3.2.2, Inventory Credentials.
This enables the button.
-
(Optional) Start monitoring the machines when they are inventoried and/or add them to existing groups. For more information, see Section 3.2.3, Inventory Options.
-
Configure the schedule when you want to perform the inventory.
-
To immediately start the inventory, do one of the following:
-
Click in the drop-down list.
-
Click in the drop-down list, then click >.
-
-
To perform inventory at a later time, set up a schedule:
-
In the drop-down list, click Schedule.
The Scheduling Options dialog box is displayed.
-
Select one of the following schedules
-
Fill in the fields.
For details about the fields, click the appropriate schedule listed above.
-
-
-
Click .
The numbers that are displayed on the button indicate how many individual IP addresses are contained within the range you entered.
-
Subnet
To discover and optionally inventory servers in a specified subnet:
-
Click the button
 > or click the menu > > .
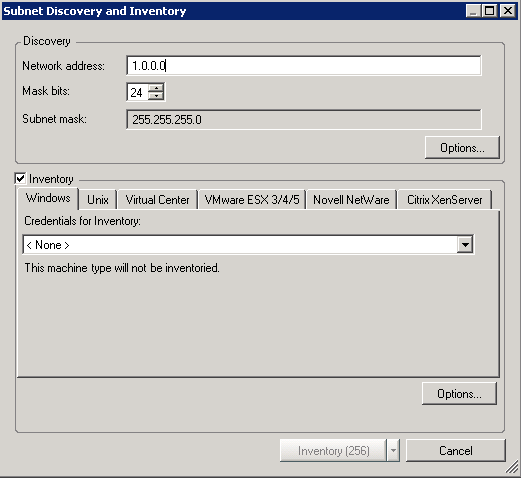
The Subnet Discovery and Inventory dialog box is displayed.
-
Configure the following settings in the Discovery pane:
-
Specify the network address and the mask bits of the subnet to be discovered.
-
Click the button to configure discovery options. For more information, see Section 3.2.4, Discovery Options.
If you want to discover machines only, continue with Step 3. If you want to discover and inventory machines, skip to Step 4.
-
-
(Conditional) If you want to only discover machines without inventorying machine details:
-
Deselect the option.
The option is selected by default.
-
Click
The numbers that are displayed in the button indicate how many individual IP addresses are contained in the subnet you specified.
-
-
(Conditional) If you want to discover and inventory machines, additionally configure the following settings in the Inventory pane:
-
Specify credentials for the machines you added in Step 2.
For more information on how to specify a new credential, see Section 3.2.2, Inventory Credentials.
This enables the button.
-
(Optional) Start monitoring the machines when they are inventoried and/or add them to existing groups. For more information, see Section 3.2.3, Inventory Options.
-
Configure the schedule when you want to perform the inventory.
-
To immediately start the inventory, do one of the following:
-
Click in the drop-down list.
-
Click in the drop-down list, then click >.
-
-
To perform inventory at a later time, set up a schedule:
-
In the drop-down list, click Schedule.
The Scheduling Options dialog box is displayed.
-
Select one of the following schedules
-
Fill in the fields.
For details about the fields, click the appropriate schedule listed above.
-
-
-
Click .
The numbers that are displayed on the button indicate how many individual IP addresses are contained in the subnet you specified.
-
SNMP
To discover and optionally inventory machines by using Simple Network Management Protocol:
-
Click the button
 > or click the menu > > .
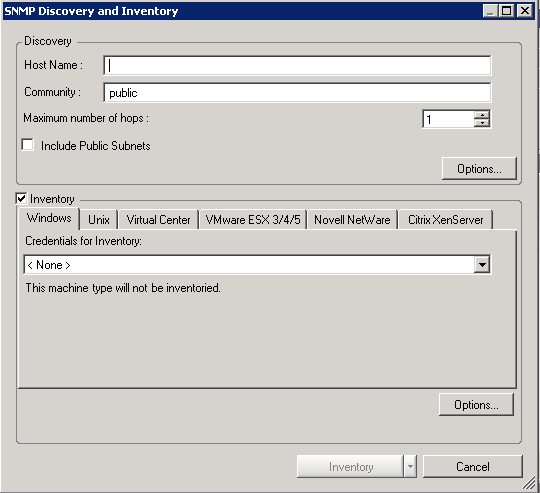
The SNMP Discovery and Inventory dialog box is displayed.
-
Configure the following settings in the Discovery pane:
-
Specify the hostname.
-
Specify the SNMP community name. By default, it is public.
-
In , specify how many hops to make beyond the server from which the discovery is launched. Select whether to include .
-
Click the button to configure discovery options. For more information, see Section 3.2.4, Discovery Options.
If you want to discover machines only, continue with Step 3. If you want to discover and inventory machines, skip to Step 4.
-
-
(Conditional) If you want to only discover machines without inventorying machine details:
-
Deselect the option.
The option is selected by default.
-
Click
-
-
(Conditional) If you want to discover and inventory machines, additionally configure the following settings in the Inventory pane:
-
Specify credentials for the machines you added in Step 2.
For more information on how to specify a new credential, see Section 3.2.2, Inventory Credentials.
This enables the button.
-
(Optional) Start monitoring the machines when they are inventoried and/or add them to existing groups. For more information, see Section 3.2.3, Inventory Options.
-
Configure the schedule when you want to perform the inventory.
-
To immediately start the inventory, do one of the following:
-
Click in the drop-down list.
-
Click in the drop-down list, then click >.
-
-
To perform inventory at a later time, set up a schedule:
-
In the drop-down list, click Schedule.
The Scheduling Options dialog box is displayed.
-
Select one of the following schedules
-
Fill in the fields.
For details about the fields, click the appropriate schedule listed above.
-
-
-
Click .
-
3.2.2 Inventory Credentials
To inventory discovered machines, select the check box in the Discovery and Inventory dialog boxes and then provide login credentials for Windows, UNIX, Virtual Center, VMware ESX, Novell NetWare, or Citrix XenServer machines, depending on the type of machines in use.
For every machine in the list or range, PlateSpin Recon tries each type of credential provided until it finds one that matches. If the credentials are not valid, the machine is not inventoried.
Specifying Credentials for Windows or VMware ESX 3/4/5
Do the following in the Discovery and Inventory dialog box:
-
In the panel, click the or tab depending on the type of machines in use.
-
In the drop‑down list, select credentials.
To add a new credential, click , and configure the Create Stored Credentials dialog box. For detailed information about adding credentials, see Section 4.2, Credentials Manager.
Specifying Credentials for UNIX or Citrix XenServer
Do the following in the Discovery and Inventory dialog box:
-
In the panel, click the or tab depending on the type of machines in use.
-
In the drop‑down list, select credentials.
To add a new credential, click , and configure the Create Stored Credentials dialog box. For detailed information about adding credentials, see Section 4.2, Credentials Manager.
-
Select the check box to use super user privileges for connections.
PlateSpin Recon allows inventorying of Linux (RHEL, SLES, Ubuntu, CentOs, SLES with Xen) and Citrix XenServer machines by using sudo user credentials. However, inventorying of the AIX and Solaris machines by using sudo user credentials is not supported. PlateSpin Recon users can inventory machines by using sudo user credentials only if certain prerequisites are met. For more information on the prerequisites, see Section B.9, Sudo Configuration to Inventory and Monitor Linux Machines.
Local policies can sometimes prevent you from establishing an SSH session as a root user. A user with sudo privileges can get around this restriction by establishing an SSH session as a non-root user and then using sudo to temporarily “switch” to root user privileges.To do this, create the credentials using that user’s username and password. PlateSpin Recon uses the sudo command to perform any operations that require root privileges.
Specifying Credentials for Virtual Center
Do the following in the Discovery and Inventory dialog box:
-
In the panel, click the tab.
-
In the drop‑down list, select credentials.
To add a new credential, click , and configure the Create Stored Credentials dialog box. For detailed information about adding credentials, see Section 4.2, Credentials Manager.
For inventorying a Virtual Center, credentials must have a minimum Browse datastore privilege for the Virtual Center.
On the machine that has Virtual Center installed, Virtual Center automatically includes any user that has Administrator privileges.
Specifying Credentials for Novell NetWare
Do the following:
-
In Novell eDirectory on the NetWare server you want to inventory, create a user with the same login credentials as the PlateSpin Recon server administrator.
-
Associate the local security policies to the PlateSpin Recon server administrator:
-
On the PlateSpin Recon server, click the desktop menu > > .
-
Double click > .
The Local Security Settings window is displayed.
-
Click , then double-click .
-
Associate the administrator with following policies:
-
Act as part of the operating system
-
Create a token object
-
Log on as a batch job
-
Log on as a service
-
Replace a process level token
-
-
-
Ensure that the recommended Novell Client is installed on the PlateSpin Recon server.
For more information on the recommended Novell Clients, see Supported Novell NetWare Platforms.
-
Through the Novell Client, log in to the PlateSpin Recon server as the administrator user created in Step 1.
-
Launch the PlateSpin Recon Client.
-
In the drop-down list (located at the top left corner), click .
The Inventory Machines dialog box is displayed.
-
Click the tab.
-
In the drop-down list, select .
The Create Stored Machines dialog box is displayed.
-
Specify the login credentials of the NetWare administrator, and select as the validation type.
Ensure that you specify the username in the Username.Context format.
Ensure that the administrator has permission to write to the Novell SYS: volume. Also, ensure that TCP port 524 is open on the firewall. For more information, see Section 1.3, Supported Platforms.
-
In the L drop-down list, select .
The Create Stored Machines dialog box is displayed.
-
Fill in the fields:
Username: Specify the administrator username created in Step 1. You must specify the username either in the hostname\username or the domain\username format. If you choose to specify the username in the hostname\username format, ensure that the hostname is the local hostname.
Password: Specify the password of the administrator.
Validation Type: Select .
Hostname or IP of machine to validate against: Specify it as localhost.
-
Click .
3.2.3 Inventory Options
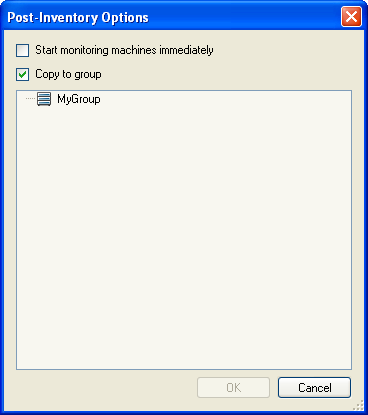
If you want to start monitoring immediately after inventory or if you want to copy machines to a user-defined group, you must configure the Post-Inventory options. The options are available only if you selected the check box in the Discovery and Inventory dialog boxes.
To configure the Post-Inventory options:
-
Click the button in the area.
The Post-Inventory Options dialog box is displayed.
-
Select to begin monitoring each machine discovered when the inventory is complete.
To start monitoring later, do not select the option.
-
Select , then select a target Group from those displayed in the list box to copy all the inventoried machines to that group.
-
Click .
3.2.4 Discovery Options
You can configure additional discovery options when you choose to discover and inventory in any of the following Inventory methods:
-
Windows Domain
-
IP Range
-
Subnet
-
SNMP
To configure discovery options:
-
In the pane, click the button.
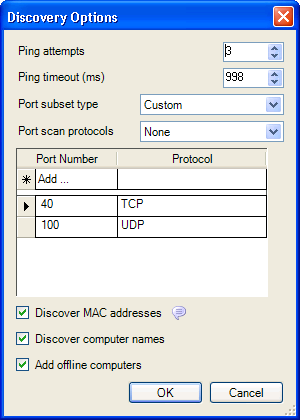
The Discovery Options dialog box is displayed.
-
Configure the and options as desired.
-
In the drop-down list, select one of the following subset types:
-
Most Common: Includes ports for common Windows network services.
-
All Standard: Includes ports below 1025 used by standard protocols.
-
Custom: Includes customized ports that you specify.
To assign individual scan protocols to specific ports:
-
-
To find MAC addresses of machines in the same ethernet segment as the PlateSpin Recon Server, select . The option is selected by default.
-
To include the computer names in the discovery poll, select The option is selected by default
-
To discover computers even if they are currently offline, select .
-
Click .
3.2.5 Viewing Inventory Data and Monitoring Servers
On completion of an inventory operation, you can view inventory data on servers that are listed in the Data Center Explorer tree. To view dynamic data, servers must be monitored for a period of time.
IMPORTANT:When you monitor Windows Server 2003, the memory utilization on the monitored server might increase because the memory usage of the Svchost.exe process increases when other users remotely collect performance data about the monitored server. This is a known issue of Windows Server 2003. To troubleshoot the issue, see the Microsoft Knowledge Base article ID 969701.
Viewing Properties
Properties can assist with viewing static data for inventoried servers. To view inventory information, right-click a server and click .
Figure 3-1 Sample View of the Properties Dialog Box
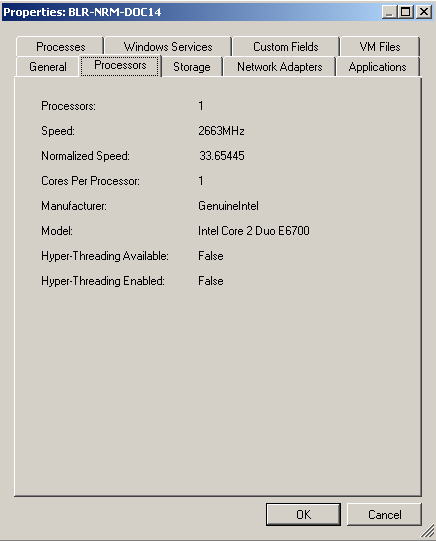
The tabs available in the Properties dialog box change based on the type of server being viewed.
Refreshing the Inventory
To refresh server inventory information in the Data Center Explorer, right-click a server or multiple servers and click on the menu.
Inventory Refresh jobs are scheduled and run in the Job Explorer.
Collecting Dynamic Data by Monitoring Servers
-
To monitor a single server, right-click the inventoried server, then click .
To monitor multiple servers, select them or their parent group, filter, or site, then click .
A job is created in the Job Explorer. For more details, see Section 2.6, Job Explorer.
-
After data is collected, click the server to view the corresponding chart in the Chart Viewer. With at least five minutes of data collected, the Chart Viewer can display workloads and utilization data.
Although PlateSpin Recon might not be currently monitoring a server, it is still possible to view charts and reports showing the previously collected server data.
You can monitor multiple servers by selecting them individually or by using groups, filters, or sites.
To stop monitoring, right-click the monitored server and select . In the confirmation dialog box, click to confirm or to exit the dialog box and continue monitoring.
Viewing Dynamic Data
You can view workloads and utilization data in a chart after collecting at least five minutes worth of data. Analysis Reports require a minimum of one hour’s worth of data. If there is insufficient data, the report is displayed without dynamic data. You can view collected data in a chart by selecting a monitored server.
For more information, see Section 5.1, Chart Viewer and Section 5.2, Report Explorer.
Viewing Logs
Log files reflect the status of data collection for monitored servers.
To inspect a log, right-click a server, click then click .
Acknowledging Logs
If there are some errors associated with a server, an error icon is displayed on that server. If the errors are acceptable, you can acknowledge logs to remove the error icon from the display of the machine.
To acknowledge a log, right-click a server, click then click .
Custom Fields
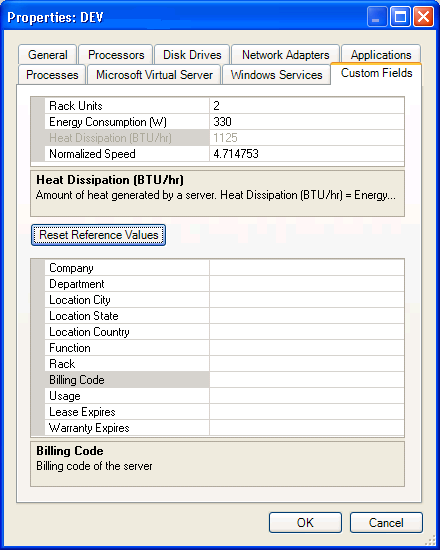
Custom fields are available for entering server information that cannot be inventoried by PlateSpin Recon. These non-inventory fields can assist with identifying candidates for planning and consolidation. The information is stored in the visible table name.
You can specify the custom fields in one of the following ways:
Manually Specifying the Custom Fields
To specify custom fields for multiple servers:
-
Select a server or multiple servers in the Data Center Explorer.
-
Right-click the selection and click for a single server, or click for multiple servers.
The Properties dialog box is displayed.
-
Click the tab.
-
Select a field to view its definition and parameters.
-
Type or select information in any of the fields, including those already filled with data.
-
Click .
If necessary, click to return all fields to their default values.
The database is updated for the selected servers. Report templates can filter for particular custom fields.
IMPORTANT:The new value that you specify is automatically changed to the default value when you import a snapshot containing a selected server having a server template that already exists in Recon. You must manually reset the values after you have imported the server snapshot.
Importing the Custom Fields
PlateSpin Recon allows you to import the custom fields for all the servers in the local site.
-
In the Data Center Explorer, click > .
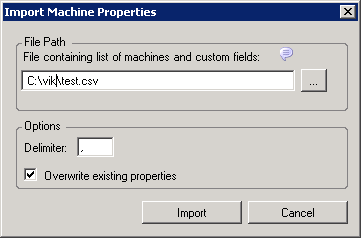
The Import Machine Properties dialog box is displayed.
-
Type the path (or use the adjacent browse button) to locate a CSV file containing custom fields.
Follow these guidelines as you work with the CSV file:
-
The first line must contain the label of the custom fields separated by a delimiter such as a comma (,).
-
The first custom field label on the first line must be Machine. You can list the remaining custom fields in any order.
-
Use the following custom field labels only:
- Rack Units
- Normalized Speed
- Company
- Department
- Location City
- Location State
- Location Country
- Function
- Rack
- Billing Code
- Usage
- Lease Expires
- Warranty Expires
-
The custom field label names are case sensitive.
-
The values for the custom fields must be specified subsequent to the first line, and must be corresponding to the custom fields.
-
Each line must contain the custom fields for a machine.
-
The value for the Machine custom field can be IP address or the machine name. The specified machine name must be unique.
-
The values on each line must be separated by a delimiter such as a comma (,).
A sample CSV file is as follows:
Machine,Rack Units,Company,Lease Expires,Warranty Expires 1.x.x.x,130,Novell,11/25/2009,1/1/2010 -
-
Specify the delimiter used in the CSV file. By default, it is a comma (,).
-
(Conditional) If you want to replace the existing custom fields with the values contained in the CSV file, select the option. By default, the option is selected.
-
Type or select information in any of the fields, including those already filled with data.
-
Click .
Monitoring By Using Sudo User Credentials
PlateSpin Recon allows monitoring of Linux (RHEL, SLES, Ubuntu, CentOs, SLES with Xen) and Citrix XenServer machines by using sudo user credentials. However, monitoring of the AIX and Solaris machines by using sudo user credentials is not supported. PlateSpin Recon users can monitor the machines by using sudo user credentials only if they have the permission to run the commands on the target machine. For more information on how to grant permission to perform monitoring by using sudo user credentials, see Section B.9, Sudo Configuration to Inventory and Monitor Linux Machines.