8.2 Configuring Migration Parameters Using the Migrate Client
8.2.6 Managing a Workload’s Network Identity
PlateSpin Migrate enables you to manage the network identity and domain registration of your migration target workload and specify related preferences as part of a migration job. By default, a job is configured to preserve a source workload’s network identity and domain registration. You can modify the default configuration to suit the objectives of your migration job.
Proper configuration of migration target’s network identity is especially important when you are migrating a workload to a different domain, planning to take it off a domain, or if you intend to change the hostname of a workload while it is in the domain.
To configure a target workload’s network identity options:
-
Start the migration job. For information about starting a migration job, see Using the Migrate Client.
-
In the Network Configuration section of the Migration Job window, click
-
Specify the options and then click .
Configuration options vary depending on whether the target machine is Windows or Linux. For information about the configuration options, see the following sections:
Managing the Identity of Windows Workloads
Use these settings to configure the network identity of your target Windows workload.

|
|
: Specify the desired hostname for the target machine. : When this option is selected, the target workload is assigned a new System Identifier (SID). Credentials are required only for Windows 2008 and Vista systems, and must be the credentials for the local (embedded) Administrator account. If this account has been locally renamed on the source, provide the new name. If this account is disabled on Vista (default), enable it first. Select the required option and type the name of the domain or workgroup that you want the target machine to join. Preserves domain registration and ensures that the source server domain registration remains intact during migration. If you disable this option, the source machine’s domain account is transferred to the target machine. The source server still appears to be on the domain, but does not have a valid connection. : If the target machine is to be part of a domain, specify valid credentials for a user account with permission to add servers to the domain, such as a member of the Domain Admins group or Enterprise Admins group. |
Managing the Network Identity of Linux Workloads
Use these settings to configure the network identity of your target Linux workload and DNS server addresses as required.
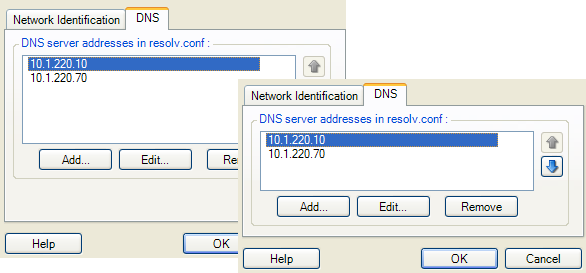
|
|
tab: Specify the desired hostname for the target server. tab: Use the , , and buttons to manage DNS server entries for the new virtual machine. |
8.2.8 Setting Up Migration Networking
For each workload migration job, you must properly configure workload networking so that source workloads and targets can communicate with each other and the PlateSpin Server during the migration process, and that the network configuration of a target workload is in line with its end state.
Temporary Networking: Also called Take Control Network Settings; they apply to source and target workloads booted into a temporary pre-execution environment. See Offline Transfer with Temporary Boot Environment.
Temporary (Take Control) Network Settings
Temporary (Take Control) Network Settings control how source workloads, targets, and the PlateSpin Server communicate among each other during the migration. If required, you can manually specify a temporary network address to your source and target, or configure them to use a DHCP-assigned IP address during the migration.
During Windows and Linux workload migrations, the Temporary Network Settings control the PlateSpin Server’s communication with the source and target workloads that are booted into a temporary pre-execution environment. See Offline Transfer with Temporary Boot Environment.
To configure Temporary (Take Control) network settings:
-
Start the migration job. For information about starting a migration job, see Using the Migrate Client.
-
In the Job Configuration section of the Migration Job window, click .
-
To access network interface mapping and TCP/IP settings, click in the source and target areas as applicable.
-
Click .
Configuration options for the Temporary networking vary and depend on whether the network interface is virtual or physical, and whether it is connecting a Windows or a Linux workload.
Target Take Control network settings are only used during an Offline migration process. On completion, target network settings are read from settings you specify for Target Post-Migration Networking. See Target Post-Migration Networking.
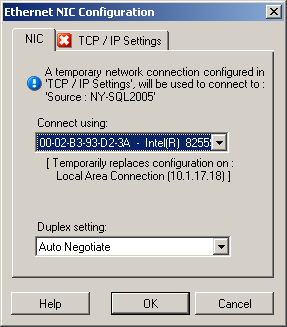
Temporary (Take Control) Network Settings: Physical Network Interfaces
These settings apply only to source physical machines. For target physical machines, Temporary (Take Control) network settings are configured during the boot process that uses the boot ISO image. See Discovering Target Physical Machines.
|
|
If multiple network adapters are present, select the adapter that can communicate with both the PlateSpin Server and the target. Use the drop-down list to select network card duplexing. It must match the duplex setting for the switch to which the network interface is connected. When the source is connected to switch ports that are set to 100 Mbit full duplex and cannot be changed to auto negotiation, select . tab: Click the tab to access TCP/IP and advanced network settings. See TCP/IP and Advanced Network Settings. |
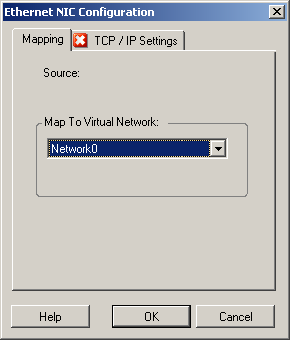
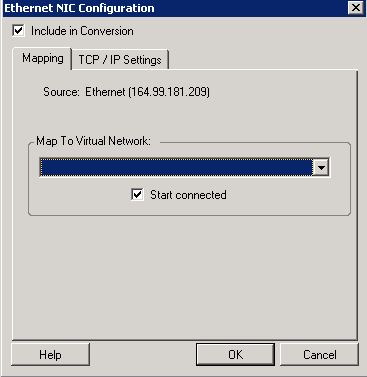
Temporary (Take Control) Network Settings: Virtual Network Interfaces
These settings apply to both source and target Take Control network settings.
|
|
From the drop-down list, select the virtual switch or network to use for communication during an Offline migration. If multiple virtual network adapters are present, select the adapter that can communicate with both the PlateSpin Server and the source machine. This network can differ from the network on which the target virtual machine will run after the migration. tab: Click the tab to access TCP/IP and advanced network settings. See TCP/IP and Advanced Network Settings. |
Target Post-Migration Networking
Target post-migration network settings defined in a migration job control the network configuration of a target after the migration is complete. This applies to both physical and virtual network interfaces.
During workload migration, the target workload’s post-migration network settings are configured while the workload is booted into a pre-execution environment.
To configure target post-migration network settings:
-
Start the migration job. For information about starting a migration job, see Using the Migrate Client.
-
In the Network Configuration section of the Migration Job window, do one of the following:.
-
For target virtual machines: click .
-
For target physical machines: click .
-
-
Configure the options as required and click .
The Configuration options for the target post-migration network settings vary and depend on whether the network interface is virtual or physical, and whether it is connecting a Windows or a Linux workload. For more information about the options, review the following sections:
Post-Migration Networking for Physical Network Interfaces (Windows and Linux)
Use these settings to configure the post-migration network settings of a workload being migrated to physical hardware.
|
|
If multiple network adapters are present, select the adapter that can communicate with the PlateSpin Server. tab: Click the tab to access TCP/IP and advanced network settings. See TCP/IP and Advanced Network Settings. |
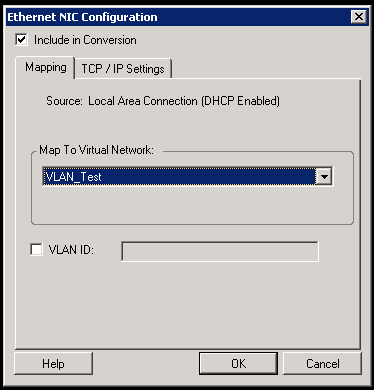
Post-Migration Networking for Virtual Network Interfaces (Windows and Linux)
By default, PlateSpin Migrate configures a migration job to create a virtual NIC for each NIC found on the source. For post-migration connectivity, ensure that the target virtual NIC is mapped to the appropriate virtual network on the target virtualization platform.
|
|
When this option is selected, PlateSpin Migrate creates a virtual NIC for a source NIC. Select the virtual network that will be used on the target VM. Choose a virtual network that allows the target VM to communicate with the server. Enable this option to connect the virtual network interface when starting the ESX target machine. (Applicable for target machine on a Hyper-V server only) Enable this option to specify the virtual network ID to be used on the target machine. If you do not specify this ID, then the virtual network ID of the source machine is used by default. tab: Click the tab to access TCP/IP and advanced network settings. See TCP/IP and Advanced Network Settings. |
TCP/IP and Advanced Network Settings
PlateSpin Migrate provides a standard network configuration interface to both source and target network settings, and for both Temporary and target post-migration networking. Configuration settings vary slightly, depending on the operating system.
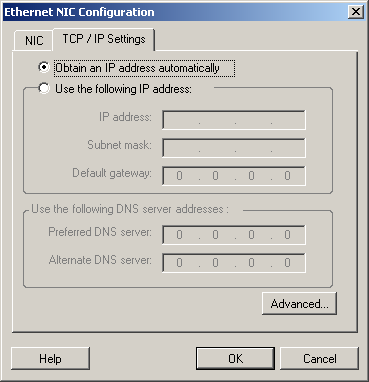
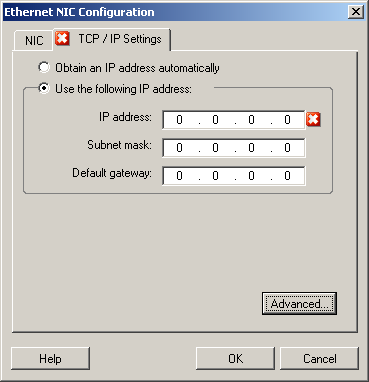
TCP/IP and Advanced Network Settings (Windows)
The following are standard TCP/IP and advanced network settings for Windows workloads:
|
|
When this option is selected, the workload uses an IP address automatically assigned by a DHCP server during the migration process. Select this option to specify a static IP address. If required, specify preferred and alternative DNS server addresses. Click this button to access advanced TCP/IP configuration settings, then specify or edit default gateway, DNS server, and WINS server information as required. |
TCP/IP and Advanced Network Settings (Linux)
The following are standard TCP/IP and advanced network settings for Linux workloads:
|
|
When this option is selected, the workload uses an IP address automatically assigned by a DHCP server during the migration process. Select this option to specify a static IP address. Click this button to access DNS configuration settings, then specify preferred and alternate DNS server addresses as required. You can also indicate whether you want DNS addresses copied to the resolv.conf file located in your target’s /etc directory. |
8.2.9 Configuring Target Virtual Machines
For jobs that involve workload virtualization, PlateSpin Migrate provides a mechanism for specifying target VM configuration options, such as providing a target VM name and a configuration file path, selecting a datastore to use, and allocating virtual memory, in accordance with the features and capabilities of the selected virtualization platform.
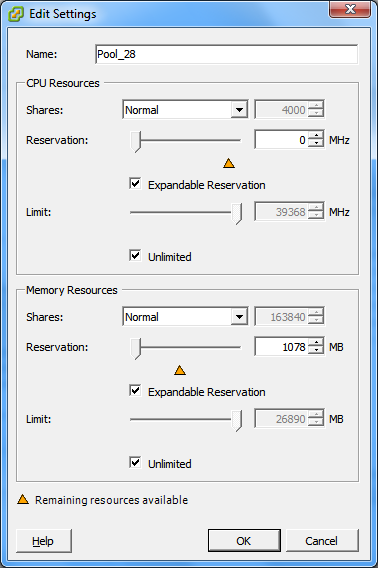
If you have resource pools configured on your target virtualization platform, you can select a resource pool for your VM to be assigned to.
NOTE:If your target VMware ESX server is part of a fully automated Distributed Resource Scheduler (DRS) cluster (a cluster with its VM migration automation level set to , the newly created target VM’s automation level is changed to for the duration of the migration. This means that your target VM might power up on a different ESX server from the one initially selected, but migration is prevented from automatic execution.
To specify target VM configuration options:
-
Start the migration job. For information about starting a migration job, see Using the Migrate Client.
-
In the Virtual Machine Configuration section of the Migration Job window, click .
-
Specify the values for the configuration options and click .
For more information about the virtual machine configuration options, see Virtualization Platform-Specific Virtual Machine Configuration Options.
Virtualization Platform-Specific Virtual Machine Configuration Options
PlateSpin Migrate displays target virtual machine configuration options specific to the selected target and also provides access to advanced configuration options.
Virtual Machine Configuration: VMware ESXi 5
The following are configuration options specific to VMware vSphere 5 (applicable to all VMs under the containing resource pool).
|
|
Specify the display name for the new virtual machine.
(these are similar to CPU resource settings, but apply to memory resources) |
Virtual Machine Configuration: VMware ESX 4.1
The following are configuration options specific to VMware ESX systems prior to vSphere 5. To access settings that control resource pools, the number of CPUs, and CPU scheduling affinity, click
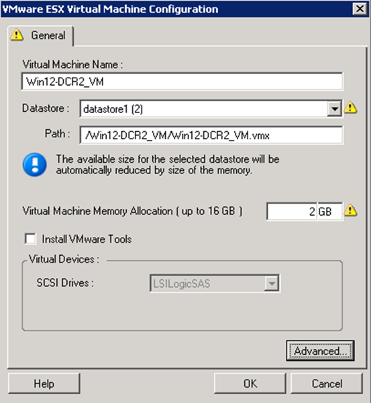
Specify the display name for the new virtual machine. Select the datastore where you want to create the *.vmx file. Specify a name and the directory path for the virtual machine’s *.vmx configuration file. Specify a value for the amount of virtual RAM to be assigned to the virtual machine. Enable this option to install VMware tools during the migration process (recommended). Select either or (the recommended option). : Click this button to view or modify advanced VM configuration settings. |
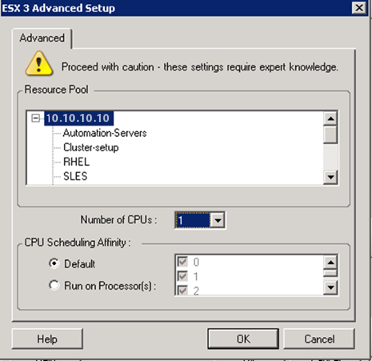
If required, assign your target VM to a resource pool. When no resource pool is specified, the VM is assigned to the root resource pool. Select the required number of CPUs to assign to the target VM. For example, you can convert a single-processor workload to a multi-processor VM, or a multi-processor workload to a single-processor VM. Represents which ESX Server processors the virtual machine can run on (if your ESX Server is a multiprocessor system). Specify the required processor or select (recommended). For details, see your VMware documentation. |
Virtual Machine Configuration: Microsoft Hyper-V
The following are configuration options specific to Hyper-V 2012 systems.
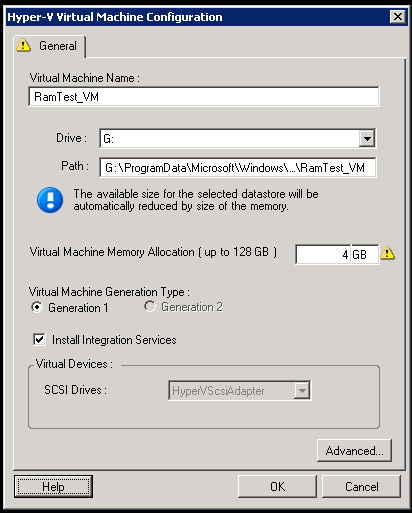
Specify the display name for the new virtual machine. Select the datastore where you want to create the *.vmx file. Specify a name and the directory path for the virtual machine’s *.vmx configuration file. Specify a value for the amount of virtual RAM to be assigned to the virtual machine. Select one of the following generations type for the new virtual machine:
This option is displayed only for Hyper-V machines. Enable this option to install integration services during the migration process (recommended). Select either or (the recommended option). : Click this button to view or modify advanced VM configuration settings. |
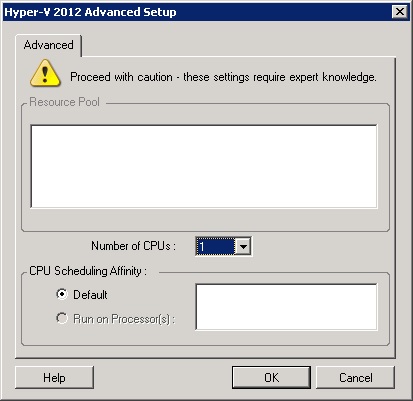
Select the required number of CPUs to assign to the target VM. For example, you can convert a single-processor workload to a multi-processor VM, or a multi-processor workload to a single-processor VM. NOTE:For Generation 1, you can create four legacy network cards and eight synthetic network cards (if integration service is enabled). For Generation 2, you can create eight 8 synthetic network cards. Represents which Hyper-V Server processors the virtual machine can run on (if your Hyper-V Server is a multiprocessor system). Specify the required processor or select (recommended). For details, see your Hyper-V documentation. |
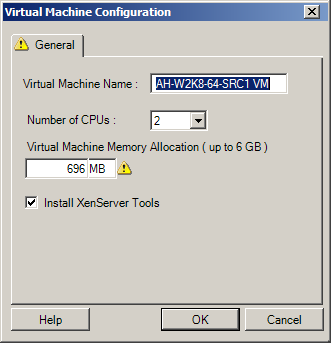
Virtual Machine Configuration: Citrix XenServer
The following are configuration options specific to Citrix XenServer.
|
|
Specify the display name for the new virtual machine. Select the number of CPUs to assign to the target VM. For example, you can convert a single-processor workload to a multi-processor VM, or a multi-processor workload to a single-processor VM. Specify a value for the amount of virtual RAM to be assigned to the virtual machine. Enable this option to install XenServer Tools during the migration process (recommended). |
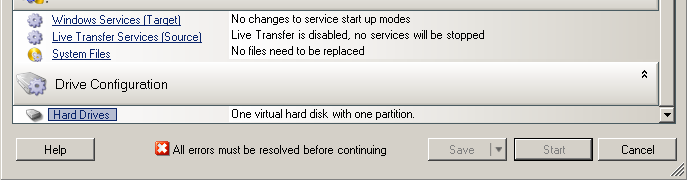
8.2.10 Handling Operating System Services and Applications
PlateSpin Migrate provides a mechanism for migration jobs to handle Windows services (including special features for those services related to Microsoft SQL Server and Microsoft Exchange Server software), Linux daemons, and virtualization enhancements (such as VMware Tools). In addition, when Windows HAL or kernel file replacements are required, you can view which ones were selected for update during a migration job.
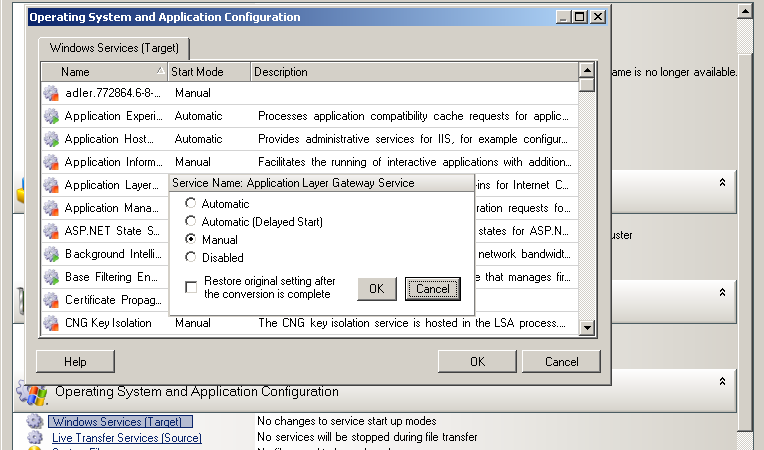
Handling the Startup Mode of Services (Windows Targets)
You can configure a job to modify the startup mode of selected Windows services after the migration is complete. For example, if you don’t need a certain Windows service to continue running on a virtualized workload, you can configure your job to set that service’s target startup type to Disabled.
If you require a service to start upon another service’s request, set the startup type of the required service to Manual.
You can also configure the job to restore a service’s original startup type after the migration is complete. For example, you might require a virus scanner to be disabled during the migration, but its startup type to be restored after the migration completes.
HINT:You can globally configure your startup mode preferences for selected Windows services in PlateSpin Server default options. See Configuring Target Service Defaults.
To configure post-migration startup mode of Windows services:
-
Start the migration job. For information about starting a migration job, see Using the Migrate Client.
-
In the Operating System and Application Configuration section of the Migration Job window, click and then click an item in the column.
-
Select the desired startup mode.
-
To restore the original setting after conversion is complete, select the checkbox.
-
Click .
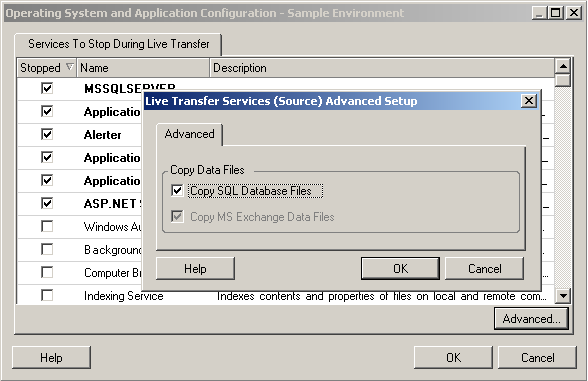
Handling Source Workload Services or Daemons During Live Transfer (Windows and Linux)
For Live Transfer jobs, PlateSpin Migrate provides a mechanism to stop selected services or daemons during the migration. This ensures that data on your source is captured in a consistent state.
If your source workload is running Microsoft SQL Server or Microsoft Exchange Server software, you can configure your migration job to automatically copy the database files of these servers. If you do not require the migration to include the volume containing the databases, consider not stopping these services.
If your source workload includes I/O-intensive application services that might inhibit the ability of the file transfer process to keep up with the changes, consider stopping them during a Live Transfer migration.
After the completion of the migration, services that you select to stop during a Live Transfer migration are automatically restarted on the source, unless you explicitly configure your migration job to power off the source on completion.
For Linux systems, consider using the custom freeze and thaw scripting capability. See Freeze and Thaw Scripting Capabilities (Linux Block-Level Migrations).
HINT:You can globally configure your preferences for stopping selected Windows services during VSS File-based or VSS Block-based Live Transfer. See Configuring Source Service Defaults.
To specify which services or daemons you want the system to stop during Live Transfer:
-
Start the migration job. For information about starting a migration job, see Using the Migrate Client.
-
In the Operating System and Application Configuration section of the Migration Job window, click .
-
To indicate that you want SQL Server and Exchange Server database files copied during the migration, click (applicable to Windows systems only)
-
Click .
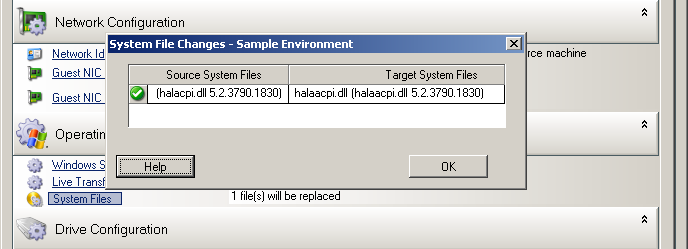
Viewing Windows System Files Selected for Replacement During a Migration
When converting Windows workloads with system files (such as a HAL or kernel files) that are incompatible with the target infrastructure, PlateSpin Migrate uses an appropriate file from its library and saves a backup copy of the source file (*.bak) on the target, in the same system directory.
You can view the HAL or kernel files that PlateSpin Migrate identifies as those requiring replacement:
To view the files selected for replacement during migration:
-
Start the migration job. For information about starting a migration job, see Using the Migrate Client.
-
In the Operating System and Application Configuration section of the Migration Job window, click .
Files selected for replacement during migration are listed.
-
Click .
The following warnings might display at the bottom of the dialog box:
|
|
Indicates that you might need to place the necessary files into the local driver cache on the source Windows server (..\Windows\Driver Cache). |
|
|
PlateSpin Migrate has a partial match with its matrix but the driver cache contains a later version of one or more system files than the one that PlateSpin Migrate will use. |
|
|
PlateSpin Migrate has not found a match for the system files in its matrix. It will replace the system files with a version that is earlier than the ones that were discovered as the source machine's original system files. |
|
|
PlateSpin Migrate has not found a match for the system files in its matrix. It will replace the system files with a version that is later than the ones that were discovered as the source machine's original system files. |
If warnings appear on the screen, click (only available if warnings exist) to learn more.
See also the following KB Article 7920815 (FAQ: Understanding the System Files Information screen).
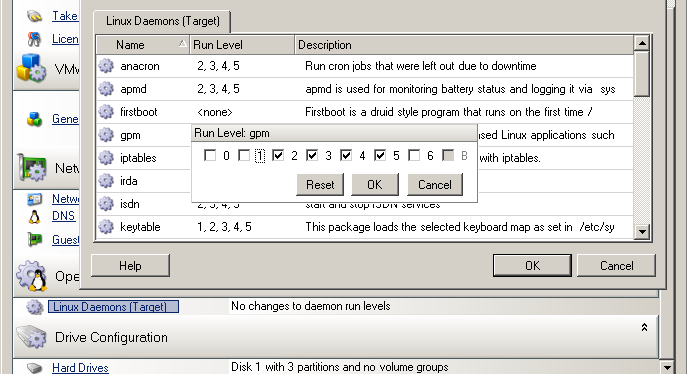
Handling the Run Level of Daemons (Linux Targets)
You can configure a job to modify the run level of selected Linux daemons after the migration is complete. Use the following numeric values:
|
0 |
Shutdown |
|
1 |
Single-user mode |
|
2 |
Unused (user-defined) |
|
3 |
Full multi user-mode (no GUI) |
|
4 |
Unused (user-defined) |
|
5 |
Full multi-user mode with display manager (GUI) |
|
6 |
Reboot |
To configure the post-migration run level of Linux daemons:
-
Start the migration job. For information about starting a migration job, see Using the Migrate Client.
-
In the Operating System and Application Configuration section of the Migration Job window, click and then click an item in the column
-
Select the desired run level. Click .
Handling Virtualization Enhancement Software
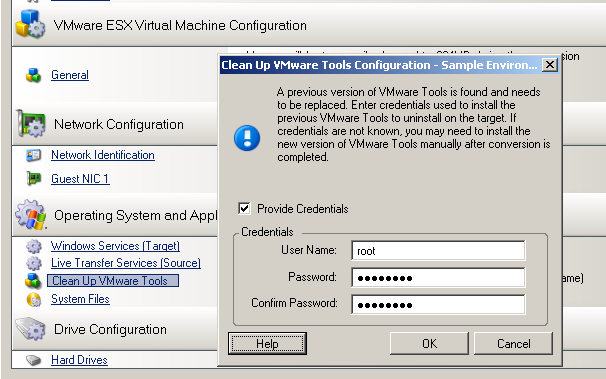
For V2X migrations, PlateSpin Migrate provides a mechanism to automatically uninstall virtualization enhancement software, such as VMware Tools.
When converting a workload on a VMware platform that has an earlier version of VMware Tools installed, PlateSpin Migrate identifies the presence of obsolete software and adds a VMware Tools Cleanup step in the migration job.
You must provide administrator credentials to uninstall VMware Tools. The credentials provided must match the admin-level user account that was logged in during the installation of VMware Tools.
When the earlier version is uninstalled, PlateSpin Migrate proceeds with the installation of the new version of VMware Tools.
NOTE:If you are downgrading a virtual machine that has VMware Tools installed, or if you are converting a virtual machine to another VMware target that has an older version of VMware Tools, the installation of VMware Tools during the configuration of the target will fail.
To configure a job to remove or replace VMware Tools during the migration:
-
Start the migration job. For information about starting a migration job, see Using the Migrate Client.
-
In the Operating System and Application Configuration section of the Migration Job window, click .
-
Depending on the target, PlateSpin Migrate identifies existing instances of VMware Tools and prompts to either replace or remove them, as applicable:
-
For non-VMware targets: The job configuration interface prompts you to uninstall VMware Tools. Provide the same admin-level credentials used to install the software. If the credentials are unknown, VMware Tools remains on the target machine after migration.
-
For VMware targets: The job configuration interface prompts you to replace VMware Tools. Provide the same admin-level credentials used to install the obsolete version of VMware Tools. If the credentials are unknown, install the new version of VMware Tools manually after the migration completes.
-
-
Click .
8.2.11 Handling a Workload’s Storage Media and Volumes
PlateSpin Migrate provides mechanisms for configuring your migration job to handle your workload volumes and their physical or virtual layout in the target infrastructure. For information about the supported storage, see Supported Storage.
Storage layout and volume configuration settings depend on the job configuration mode (Advanced or Wizard), migration type, target virtualization platform, and source operating system.
The following topics provide additional information:
Storage Layout and Volume Configuration
To access drive configuration options:
-
In the of the Migration Job windows, click .
Settings vary depending on the target system.
Windows X2P Drive Configuration
Use these settings to select the volumes to copy during the migration:
|
|
Select the volumes to be copied during the migration. To resize the volume during the migration, specify the desired amount of free space. PlateSpin Migrate automatically adjusts . To resize the volume during the migration, specify the desired size. PlateSpin Migrate automatically adjusts . Select which hard drive the volume will be copied to on the physical target machine. Click this column to determine if an existing vendor partition should remain intact during the migration. If the partitions are not selected, PlateSpin Migrate permanently removes the partitions from the server. |
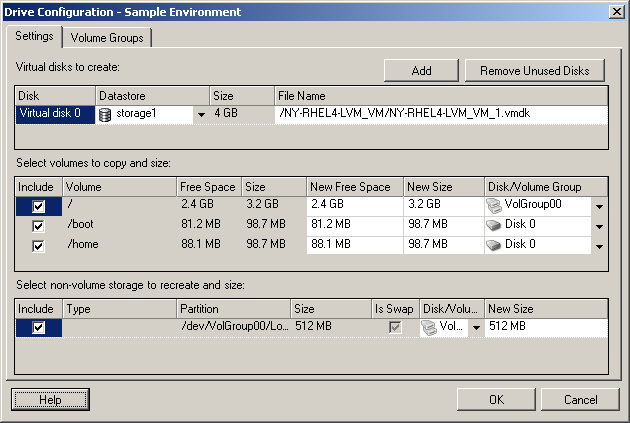
Linux Drive and LVM Volume Configuration
Use these settings to select the volumes and non-volume source spaces to copy and size during the migration. If LVM is installed on the source, a tab provides you with corresponding options.
Handling Linux Disks and Volume Groups
The PlateSpin Migrate Client provides you with Linux-specific user interface elements that provide you with options to properly handle your Linux storage.
Note the following sequence of steps that you must take for properly configuring and mapping newly-added disks and volume groups.
-
After adding a new disk, go to the tab and map the required volume group name by selecting the option.
See Linux Drive and LVM Volume Configuration (Volume Groups Tab).
-
Specify Size in Allocation for Volume Group Box
-
For each added disk, specify the required size in the corresponding field.
After the system focus shifts away from the field, the size of the newly-added disk is updated dynamically.
Linux Drive and LVM Volume Configuration (Settings Tab)
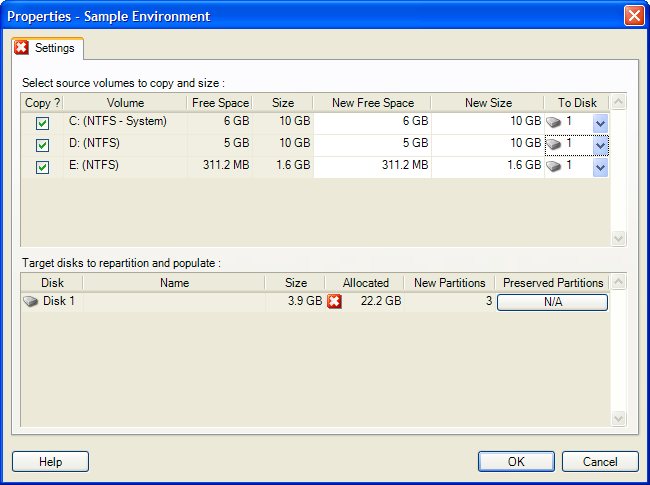
Use these settings to select source volumes to copy, non-volume source spaces to re-create and size, and target disks to repartition and populate.
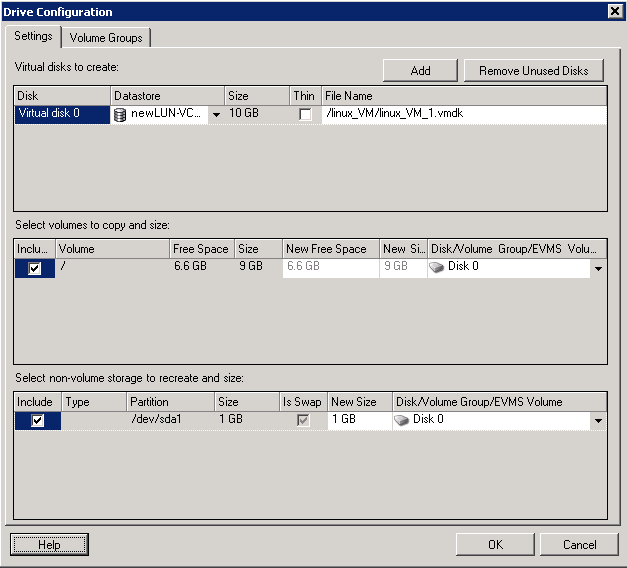
|
|
Select the volumes or non-volume source spaces to be copied or re-created and sized during the migration. To resize the volume during the migration, enter the desired amount of free space. PlateSpin Migrate automatically adjusts . To resize the volume during the migration, enter the desired size. PlateSpin Migrate automatically adjusts . Select which hard drive or volume group the volume will be copied to on the physical target machine. For each disk, click the corresponding cell in this column to select existing vendor partitions to preserve during the migration. If the partitions are not selected, PlateSpin Migrate permanently removes them from the server. |
Linux Drive and LVM Volume Configuration (Volume Groups Tab)
Use these settings to manage volume groups.

|
|
Creates a volume group on the target machine that is not present on the source machine. Renames a volume group that is being copied from the source to the target. Deletes a volume group so that it is not created on the target machine. The volumes assigned to the volume group can be reassigned to other locations by using the tab (by default, they are assigned to disk). To allocate space on disks to a volume group, select the volume group, then select the disks to include in it. Specify the amount of space to be allocated to it on each included disk. |
Target VM-Specific P2V/V2V Drive Configuration
When you configure a peer-to-peer virtualization job, the job configuration window provides access to settings specific to the target virtualization platform.
This section includes the following information:
Drive Configuration: VMware ESX
The following are drive configuration settings specific to VMware ESX:
|
|
|
: Select the datastore volume on the ESX server where you want to place the vmdk files. : Select the volumes to be copied during the migration. : To resize the volume during the migration, specify the desired amount of free space. PlateSpin Migrate automatically adjusts New Size. : To resize the volume during the migration, specify the desired size. PlateSpin Migrate automatically adjusts New Free Space. : Assign the volume to a disk or, if LVM is enabled, to a volume group. The volume will be copied to this disk or volume group on the target machine. : Select any non-volume disk partitions that should be created on the target machine (for example, a Linux swap partition). : To resize the non-volume partition during the migration, specify the desired size. |
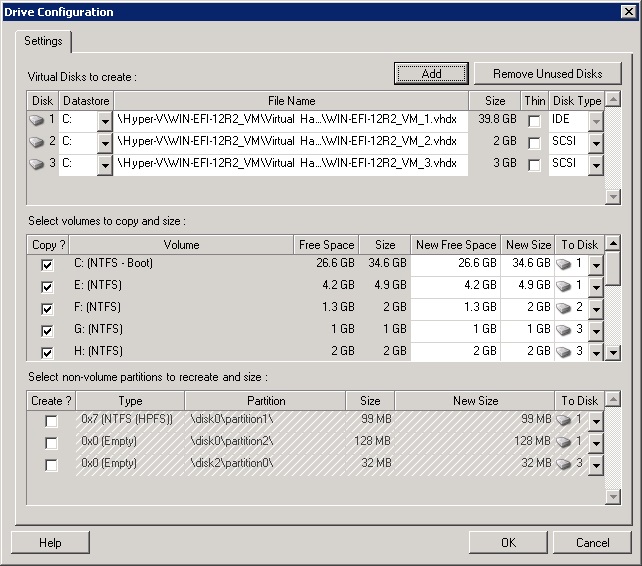
Drive Configuration: Hyper-V
The following are drive configuration settings specific to Hyper-V:
|
|
|
Select the datastore volume on the Hyper-V server where you want to place the .vhd and .vhdx files. : A Generation 1 disk containing the System/Boot volume should be on an IDE disk. (You can create a maximum of three IDE disks.) NOTE:For a Generation 1 disk, the values of second and third disk are chained. For example, if you select the third disk (from the top of the list) as , the second disk autoselects as . If you select the second disk as a then the third disk autoselects to . : Select the volumes to be copied during the migration. : To resize the volume during the migration, specify the desired amount of free space. PlateSpin Migrate automatically adjusts New Size. : To resize the volume during the migration, specify the desired size. PlateSpin Migrate automatically adjusts New Free Space. : Assign the volume to a disk or, if LVM is enabled, to a volume group. The volume is copied to this disk or volume group on the target machine. : Select any non-volume disk partitions that should be created on the target machine (for example, a Linux swap partition). : To resize the non-volume partition during the migration, specify the desired size. |
Volume Configuration in Server Sync
When you are using Server Sync to synchronize two Windows or Linux workloads, PlateSpin Migrate provides you with the capability to specify the required mapping between source volumes and existing volumes on the target. See Synchronizing Workloads with Server Sync.
To access volume configuration options in a Server Sync job:
-
Start the migration job. For information about starting a migration job, see Using the Migrate Client.
-
In the section of the Migration Job window, do one of the following:
-
On Windows: Click .
-
On Linux: Click .
-
-
Configure the Server Sync volume configuration options.
The following topics provide information about Server Sync volume configuration options specific to Windows and Linux workloads.
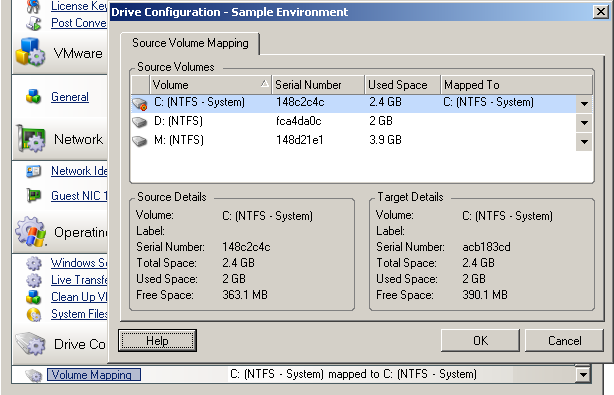
Server Sync Volume Configuration (Windows)
A Server Sync job for Windows workloads provides detailed drive and volume information for both the source and the target, and enables you to specify the required mapping.
|
|
Map each volume on the source to an existing volume on the target. |
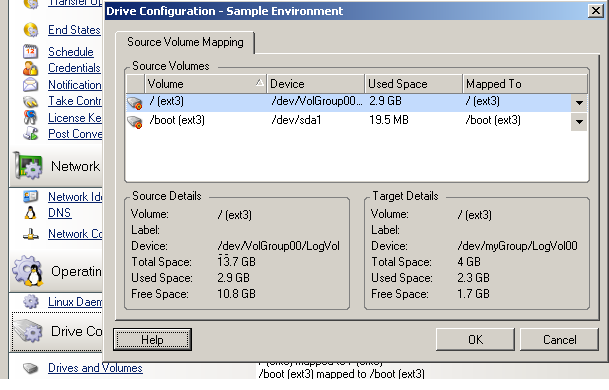
Server Sync Volume Configuration (Linux)
A Server Sync job for Linux workloads provides detailed mount point and volume information for both the source and the target, and enables you to specify the required mapping.
|
|
Map each volume on the source to an existing volume on the target. |
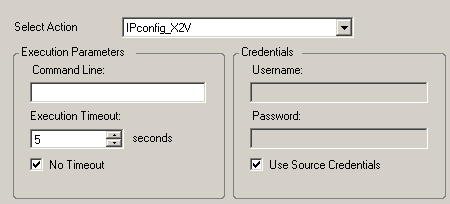
8.2.12 Including a Custom Post-migration Action in a Migration Job
You can set up your migration job to execute a custom action on your target. You must define and save your custom actions and their dependencies in advance. See Managing Custom Actions.
NOTE:Post-migration actions are supported for peer-to-peer and one-time Server Sync migrations only.
When you are setting up a migration job, select the required action, any required command line parameters, and a timeout as required. You must also provide valid credentials for the target workload. If the target workload credentials are unknown, you can use the credentials of the source workload.
To specify a custom post-migration action for your migration job:
-
Start the migration job. For information about starting a migration job, see Using the Migrate Client.
-
In the Virtual Machine Configuration section of the Migration Job window, click
-
Specify the following options:
-
Select Action: From the drop-down list, select a custom action previously saved in your library of post-migration actions.
-
Execution Parameters: Specify any required command line parameters for the action. If required, specify a timeout.
-
Credentials: Provide administrator credentials for the target. If they are the same as those for the source, and if they have been saved, select U.
-