7.5 Creating Custom Right-Click Menus or Dashboard JavaScript Operations
A right-click context menu can be created, edited and used in the Navigation, Search, Show Impacted, Status, and Root Cause portlets. Using context menus, you can:
-
Open additional components, such as the Alarms view, Layout view, Root Cause view, Performance view, and so on
-
Open any URL and send context-sensitive information to the URL
Figure 7-1 Root Cause Portlet with Right-Click Context Menu
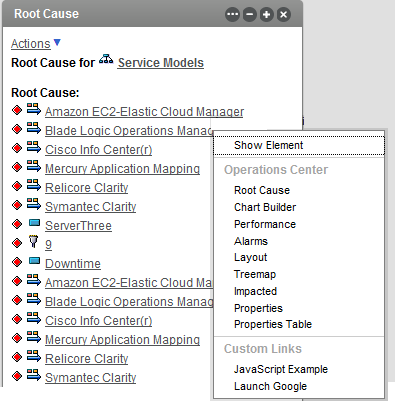
The following sections cover the creation of right-click menus in any portlet that supports right-click menu functionality. Menus can be used to access URLs, issue JavaScript commands, view other portlet, or perform Operations Center server-side operations.
In addition, you can use Dashboard JavaScript operations to create operations with custom user interfaces. Dashboard Javascript operations can submit data into server script operations, providing a mechanism for invoking operations on elements or alarms and creating custom user interfaces, as necessary, using the elements or alarms to prepopulate some data in the user interface and subsequently invoke server script operations to perform additional actions, such as submitting requests into third-party systems, starting new custom workflows, or updating element properties within Operations Center. For more information, see Section 7.5.6, Creating Dashboard JavaScript Operations.
7.5.1 Adding Right-Click Context Menus
While it is possible to create multiple menus for a portlet, only one menu can be active at a time. Multiple menu options can be grouped together on the right-click context menu under a submenu if a grouping title is specified.
To create a right-click menu:
-
Click
 Options and select
  Preferences.
-
If creating a context menu to drive page content, verify the portlet is enabled for “drive” or Navigation Mode functionality.
For specific information about this configuration option, see the portlet’s configuration section in Section 8.0, Configuring Operations Center Portlets.
-
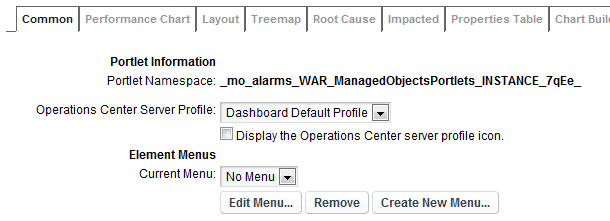
Click the Advanced tab, then select the Common tab.
-
Click Create New Menu.

-
Specify a unique name for the menu, then click Create.
If the name already exists, a message indicates the menu failed to save. After a name has been entered, it cannot be changed.
-
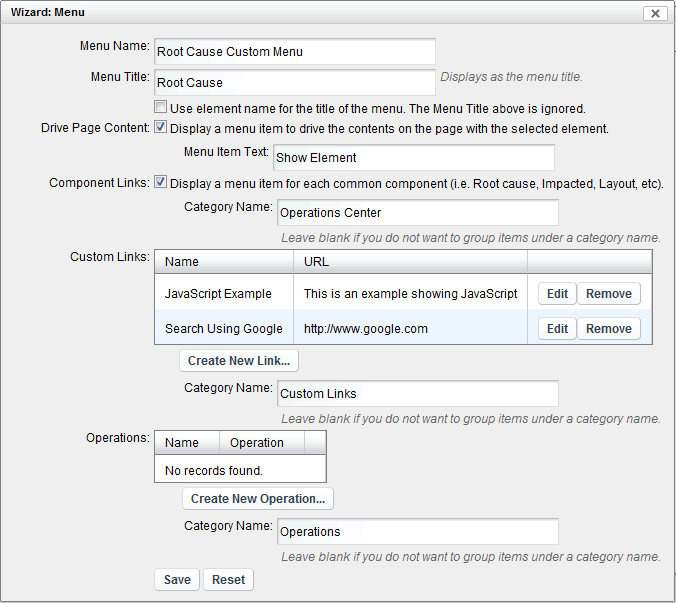
Do one of the following to determine the menu item text that displays in the right-click menu:
-
Enter text in the Menu Title.
-
Select the Use element name for the title of the menu check box to show the element’s name as the menu name.
If neither option is specified, no title is displayed.
-
-
To provide a menu option to update other portlets on the page:
-
Under Drive Page Content, select the Display a menu item to drive the contents on the page with the selected element check box.
-
Specify a name for the menu option in the Menu Item Text box.
For information about driving other portlets, see Section 7.3.2, Configuring Starting Elements for Portlets, and be sure the portlet is enabled for “drive” or Navigation mode as mentioned in Step 2.
-
-
To provide menu options that open common portlet components; such as Charting , Performance, Layout, Treemap, Root Cause, Impacted, and Properties Table:
-
Under Component Links, select the Display a menu item for each common component check box.
-
Specify a name under which to group these menu options in the Category Name box.
For information about portlet component links, see Section 7.2, Configuring Portlet View Links.
-
-
Enter options to open URLs, execute JavaScript commands, or execute operations by adding custom links and operations.
-
To group the menu items, enter a title for the group in the associated Category Name option.
-
Click Save.
After you have created a menu, it is available for use and editing in all portlets that support the right-click menu functionality. If you make changes to the menu in one portlet, those changes are applicable for all instances of the menu in all portlets.
To later edit or remove operations, return to the Common tab under Advanced. Under Current Menu, select the operation name and then click Edit Menu. To remove a link, click Remove.
7.5.2 Accessing URLs from Right-Click Menus
URLs can be included as menu options in portlet right-click context menus. These links can open any URL and send context sensitive information to it. This is a powerful way of launching third-party applications and allowing for context-sensitive display (such as display a remedy ticket associated with a particular element).
Parameters can be passed from the Dashboard to the new URL to customize what appears in the Web page that the URL opens. Parameters can be based on the element from which the user accessed the right-click content menu and can include the DName, element name, and a specified element property, which are all stored in the Operations Center server. For more information on elements including DName and properties, see Viewing Element Properties in the Operations Center 5.6 User Guide.
To create a menu option to a URL and optionally pass parameters:
-
Click
 Options and select
  Preferences.
-
Click the Advanced tab, then select the Common tab.
-
Do one of the following:
-
Select the desired existing menu from the Current Menu list, and click Edit Menu.
-
Click Create New Menu to create a new menu.
For basic steps about defining a new menu, see Adding Right-Click Context Menus.
Specific steps for defining a custom link are detailed in the remaining steps.
-
-
Under Custom Links, click Create New Link.
-
To specify basic link information to create the menu link and to set properties for the browser window that the URL will load in, do the following:

-
Specify the name of the option in the Menu Option Name field.
-
Specify a fully qualified URL for the link in the Link URL field.
-
Leave the Enable JavaScript for the URL above check box deselected.
-
Specify the name of the browser window to open the URL in the Target field.
Enter _blank if it is to always open in a new window.
-
Specify a comma delimited list of parameters to control the size and location of the window in the Parameters field.
For example, toolbar=no,location=no.
-
-
(Optional) To hide the URL link when a specific property value exists, select the Show this link only when the name-value below is matched check box.

Specify the property name and property value expression in the fields provided.
-
(Optional) To set up parameters that are passed by the URL, do the following as necessary:

-
To pass the element DName to the URL, select the Send the element dname as a parameter to the URL check box.
Specify the parameter expression that is appended to the URL in the field provided (such as dname=dname_value).
-
To pass the element name to the URL, select the Send the element name as a parameter to the URL check box.
Specify the parameter expression that is appended to the URL in the field provided (such as name=name_value).
-
To pass an element property name/value pair to the URL, select the Send an element property as a parameter to the URL check box and/or to append the URL with an element property, select the Append element property to the url check box.
Then specify:
-
The parameter name to be used for the passed or appended property in the Parameter field.
-
The property name to match for in the element’s properties in Operations Center in the Operations Center Property field.
-
-
-
Click Create.
The new link definition displays under Custom Links:

7.5.3 Issuing JavaScript Commands from Right-Click Menus
JavaScript commands can be executed by menu options in portlet right-click context menu. Links for JavaScript commands are created and edited the same way as URL links.
To create a right-click menu that issues a JavaScript command:
-
Click
 Options and select
  Preferences.
-
Click the Advanced tab, then select the Common tab.
-
Do one of the following:
-
Select the desired existing menu from the Current Menu list, and click Edit Menu.
-
Click Create New Menu to create a new menu.
For basic steps about defining a new menu, see Adding Right-Click Context Menus.
-
-
Under Custom Links, click Create New Link.
-
To specify basic link information to create the menu link and to set properties for the browser window that the URL will load in, do the following:
-
Specify the name of the option in the Menu Option Name field.
-
Specify the JavaScript command, including any parameters in the Link URL field.
-
Select the Enable JavaScript for the URL above check box.
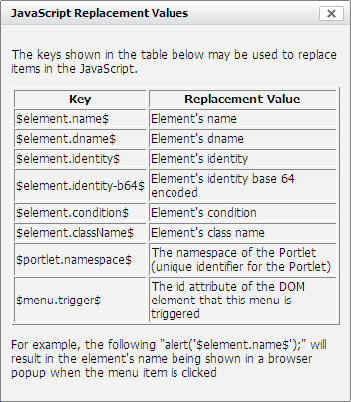
For help in determining the parameters for the JavaScript to use elements and properties of an element from Operations Center, click Replacement Keys.
-
Specify the name of the browser window to open the URL in the Target field.
Enter _blank if it is to always open in a new window.
-
Specify a comma delimited list of parameters to control the size and location of the window in the Parameters field.
For example, toolbar=no,location=no.
-
-
Click Create to save the menu.
The new JavaScript command definition displays under Custom Links.
7.5.4 Adding Portlet View Links to Right-Click Menus
Links that open other components (different portlets) can be included in portlet right-click context menus. When selected, the new portlet uses the element from which the right-click menu was accessed as the starting element.
The options for configuring the components links on the right-click context menu are available when creating a new menu or editing an existing menu. For basic steps about defining a new menu, see Adding Right-Click Context Menus.
To add component links, select the Display a menu item for each common component check box under Component Links. Each component name then appears on the right-click context menu.
7.5.5 Performing Operations Center Server-Side Operations from Right-Click Menus
Server-side operations defined in Operations Center can be added to portlet right-click context menus. For more information on operations, including how to define operations on the Operations Center console, see Modifying Element and Alarm Menus in the Operations Center 5.6 Server Configuration Guide.
Custom operations can be added as the Dashboard right-click menu options. However, they require custom development to interface with the Dashboard. Contact Support for more information.
To create a menu option that runs a server-side operation:
-
In Operations Center console, create or note the operation you wish to access from the Dashboard.
Take note of the Menu Text specified for the operation definition.
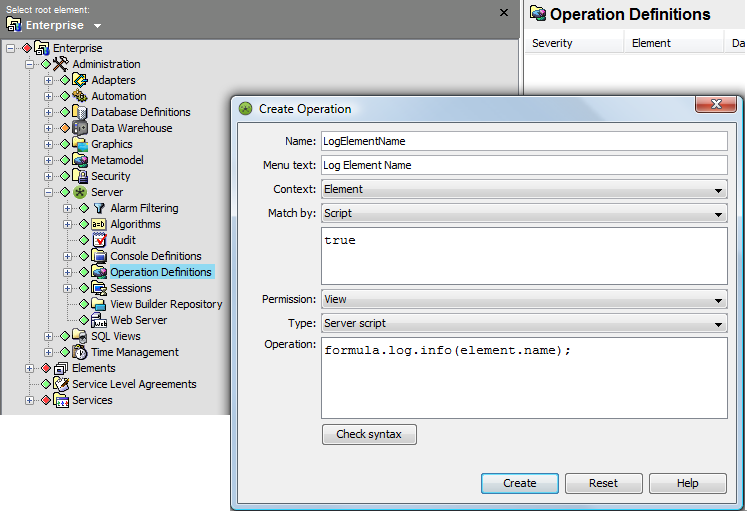
For details on creating operations, see Modifying Element and Alarm Menus in the Operations Center 5.6 Server Configuration Guide.
-
On the Dashboard portlet, on the portlet title bar, click
 (Options) and select click
  (Preferences).
Click the Advanced tab, then click the Common tab.
For basic steps about defining a new menu, see Adding Right-Click Context Menus.
Specific steps for defining the operations menu option are detailed in the remaining steps.
-
Click Create New Menu.

To edit the menu later, use Edit Menu.
-
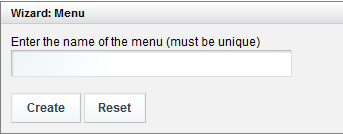
In the Menu dialog box, enter the menu name, then click Create.
-
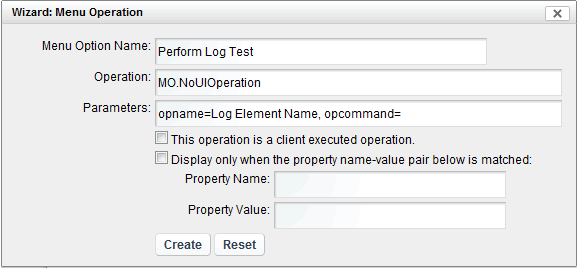
In the Wizard dialog box, under Operations, click Create New Operation. The Menu Operation dialog box displays.
-
Specify the name of the menu option in the Menu Option Name field.
This is the name that will show in the menu.
-
Enter MO.NoUIOperation in the Operation field.
-
Specify any parameters in the Parameters field using the following syntax:
opname=OperationMenuText,opcommand=where OperationMenuText is the menu text for the operation created in Operations Center.
-
Because this is a server-side operation, leave the This Operation is a client executed operation check box deselected.
The type of operation (client side or server side) is defined when the operation is created on the Operations Center console. By default, the Dashboard assumes that the operation is server side and runs on the Operations Center server.
-
Select the Display only when the property name-value pair below is matched check box if the operation is to be unavailable if the Property Name and Value specified cannot be validated with the current element.
(Optional) Specify a Property Name and Property Value to be matched.
-
Click Create. The new operation displays in the Menu’s Operations listing.

-
Click Save on subsequent dialogs to finish creating the new menu.
-
Verify the newly created menu is selected under Currently selected menu in Preferences for the Advanced > Common tab.
Click Save and exit Preferences.
The new menus are available in the right-click context menus for the portlet.

7.5.6 Creating Dashboard JavaScript Operations
Use Dashboard JavaScript operations to create operations with custom user interfaces. Dashboard Javascript operations can submit data into server script operations, providing a mechanism for invoking operations on elements or alarms and creating custom user interfaces, as necessary, using the elements or alarms to prepopulate some data in the user interface and subsequently invoke server-side script operations to perform additional actions, such as submitting requests into third-party systems, starting new custom workflows, or updating element properties within Operations Center.
To create a Dashboard JavaScript operation:
-
Use the Operations Center Console to create a custom operation, and paste the contents of the PrintScopeVariables.js script (available in the OperationsCenter_install_path/database/scripts/dashjs directory) in the text area of the operation definition.
For more information about creating a custom operation, see Customizing Monitored Elements and Alarms in the Operations Center 5.6 Server Configuration Guide.
-
To invoke a server operation from the Dashboard JavaScript operation, use the following JavaScript:
NOCOperations.perform({identity:identity, alarmId:alarmID, name:'<server-side_operation_name>', opParam:'<string_parameter_for_the_server_script_operation.>'});
NOCOperations.perform takes an object as a parameter that must have the following fields:
identity - identity of the element on which to invoke the server operation
alarmId - alarm ID or a comma-delimited list of IDs on which to execute the operation
name - name of the server-side script operation to invoke
opParam - string that contains data that you want to pass as a parameter to the server-side script operation. This parameter will be available to the server-side script operation as args[0].
The OperationsCenter_install_path/database/scripts/dashjs directory includes two scripts that provide examples of the functionality.
The contents of CreateAlarmsClient.js provide an example of defining the custom operation using Dashboard JavaScript, and the contents of CreateAlarmsOperation.fs provide an example of defining the server-side script operation. The Universal Adapter is a good choice to use as an example.
To prevent the server-side script operation from displaying as an option on the element or alarm, select the option to mark it as hidden. The operation will still be available, but will not appear on an element's operation menu.