4.1 Configuring the VMware vSphere Provisioning Adapter
This section includes the following information:
4.1.1 Initial Configuration
Before you can provision and manage VMs with the vsphere provisioning adapter, you must perform some initial steps to configure it in order to get it running.
-
Make sure that the Orchestrate Agent is installed and started on a supported host (that is, a Windows resource or a Linux resource).
For more information, see
Installing the Orchestrate Agent Only
in the PlateSpin Orchestrate 2.5 Installation and Configuration Guide.We recommend that you do not install the Orchestrate Agent on a machine running the vCenter Server. This will allow the server to function without additional Orchestrate load.
-
In the PlateSpin Orchestrate Development Client, log in to the grid that manages vSphere VMs, then in the Explorer tree, select .
-
In the Policy Editor admin view, modify vsphere.policy.
-
Search for the vcenters fact name.
        <fact name="vcenters">
            <dictionary>
                <dictelement key="DEFAULT">
                    <dictionary>
                        <dictelement key="webservice_url" value="https://samp1-vserver.zenworks.lab.novell.com/sdk"/>
                        <!--This fact is used to determine which stored credential will be used for access-->
                        <!--to the vsphere webservice.  By default, this value is 'vsphere_<name of the vcenter key>'-->
                        <!--A credential with this name must be added to the credential manager before any provisioning-->
                        <!--actions will be able to complete successfully.-->
                        <!--<dictelement key="webservice_credential_name" value="vsphere_DEFAULT"/>
                        <dictelement key="auto_portgroup_creation" type="Boolean" value="False"/>
                        <dictelement key="auto_portgroup_disconnection" type="Boolean" value="False"/>
                        <dictelement key="auto_portgroup_deletion" type="Boolean" value="False"/>
                    </dictionary>
                </dictelement>
            </dictionary>
        </fact>
The job.vcenters fact defines the configuration for connecting multiple vCenter Servers to PlateSpin Orchestrate. If you have only one vCenter Server, the DEFAULT dictionary element is all that is necessary to connect to the server.
-
Set the webservice_url fact to either the IP address or DNS name of the VCenter Server.
-
(Conditional) If you plan to manage the VMs of more than one vCenter Server, copy the DEFAULT section of the policy to represent each additional server, then rename the keys. For example:
<fact name="vcenters"> <dictionary> <dictelement key="SAMP1-VSERVER"> <dictionary> <dictelement key="webservice_url" value="https://samp1-vserver.zenworks.lab.novell.com/sdk"/> <!--This fact is used to determine which stored credential will be used for access--> <!--to the vsphere webservice. By default, this value is 'vsphere_<name of the vcenter key>'--> <!--A credential with this name must be added to the credential manager before any provisioning--> <!--actions will be able to complete successfully.--> <dictelement key="webservice_credential_name" value="vsphere_SAMP1-VSERVER"/> <dictelement key="auto_portgroup_creation" type="Boolean" value="False"/> <dictelement key="auto_portgroup_disconnection" type="Boolean" value="False"/> <dictelement key="auto_portgroup_deletion" type="Boolean" value="False"/> </dictionary> </dictelement> <dictelement key="SAMP2-VSERVER"> <dictionary> <dictelement key="webservice_url" value="https://some-other-dns/sdk"/> <!--This fact is used to determine which stored credential will be used for access--> <!--to the vsphere webservice. By default, this value is 'vsphere_<name of the vcenter key>'--> <!--A credential with this name must be added to the credential manager before any provisioning--> <!--actions will be able to complete successfully.--> <dictelement key="webservice_credential_name" value="vsphere_SAMP2-VSERVER"/> <dictelement key="auto_portgroup_creation" type="Boolean" value="False"/> <dictelement key="auto_portgroup_disconnection" type="Boolean" value="False"/> <dictelement key="auto_portgroup_deletion" type="Boolean" value="False"/> </dictionary> </dictelement> </dictionary> </fact>IMPORTANT:The key value must be the actual name of the VCenter server. The value is case-sensitive.
-
-
In the Explorer tree, select the Orchestrate Server or “grid” object, then select the tab in the admin view to open the Authentication page.
-
On the Authentication page, scroll to the Credential Manager (consisting of the panel and the panel), then click to display the Edit Credential dialog box.
-
Fill in the fields of the dialog box:
-
Name: Enter a value in format vsphere_<vCenterId>. If you used the DEFAULT vCenter in the vsphere.policy (see Step 3), you can set this value to vsphere_DEFAULT.
-
User: Enter the username used to connect to the vCenter Web service.
-
Secret: Enter the the password of the vCenter Web service user.
-
Type: (Optional) Enter any string that lets you categorize similar credentials into a category or group. For example, for the vsphere provisioning adapter you might enter a “type” called vsphere.
For more information, see
The Credential Manager
in the PlateSpin Orchestrate 2.5 Development Client Reference. -
-
-
In the Explorer tree, select the PlateSpin Orchestrate resource (or Resource group) that can see the vCenter Server, then select the tab to open the Policies page in the admin view.
-
On the Policies page, click to open the Policy Selection dialog box, then in the list, select the policy, click , then click to associate this policy with this resource (or Resource group). For more information, see
The Resource Policies Page
in the PlateSpin Orchestrate 2.5 Development Client Reference.When the vsphere provisioning adapter job starts, this policy constrains one of these resources for the job to run the Web service commands.
NOTE:If you want to connect multiple vCenter Servers, make sure you modify the vsphere.vcenters fact of the as described in the policy comments.
4.1.2 Configuring Other Policies for vSphere
The following table provides detailed information about other policies associated with the vSphere provisioning adapter that are used to manage the vSphere hosts and the VMs in the grid. The policy settings are applied to all the VMware VMs in the grid.
Table 4-1 Virtual Machine Management Policies for vSphere
|
Policy Name |
Description |
Additional Details |
|---|---|---|
|
vsphere |
Contains the constraints used to select the vCenter Server resources. |
Modify this policy with authentication information for the vCenter server and follow instructions in the policy for creating the credential store. |
|
vsphere_assignPool |
If you need to assign the VMs to a certain cluster (for example, a cluster root pool), or if you want to assign VMs to pools “owned” by your customers, use this policy. |
When applied this policy allows the VM to reside only on VM hosts that have access to the assigned resource pool (resource.vm.pool). |
|
vsphere_client |
Contains the settings used to run the vsphere job on the associated vSphere resource. |
You need to associate the vsphere_client policy to a vSphere resource before the discovery works. For more information, see Step 7. |
|
vsphere_ignoreNetwork |
Includes special facts that allow VMs to consider a VM host despite a missing required Network. |
If ignoreNetworkCheck is set, a vbridge (portgroup) can be dynamically created on a VM power-on event. This works in conjunction with the auto_portgroups_creation fact found in the vpshere.policy. Make sure that you set the auto_portgroups_creation fact to true or else the portgroup will not be created during the VM power-on event. |
|
vspheredaemon |
Includes settings applicable to daemon job. For tuning the daemon, idle timeout period, or debug on or off. |
We recommend that the values for the facts within the policy stay unchanged. For advanced users tuning a server, you can change the maxConcurrentOperations fact default value higher if you consistently run more than 30 actions concurrently. |
|
vsphereJobDefault |
Negates the default constraint on provisioning adapters to run only on physical resources. |
This policy is used for PlateSpin Orchestrate 2.0.2 compatibility. |
|
vspherePA |
Includes the basic constraints for the vsphere provisioning adapter. |
Do not modify this policy. |
|
vSphereUpdate |
Includes settings for the vsphereUpdateDaemon job. The policy can be modified directly or the user can edit job args in the schedule that is created by default installation of Orchestrate. |
For more information, see Configuring the vSphere Update Client. |
|
vsphereVnc |
Includes a setting to alllow remote desktop connections to vSphere VMs. |
For more information, see Section 4.1.4, Setting Up VNC for a VM Managed by vSphere. |
4.1.3 Assigning a vSphere VM to a Resource Pool
All VMs managed by vSphere are assigned to a resource pool. When vSphere VM images are discovered by PlateSpin Orchestrate, the resource.vm.pool fact for each VM is set with what is known by vSphere as a “pool assignment.”
Figure 4-1 A vSphere Resource Pool Discovered in the PlateSpin Orchestrate Development Client

In this example, the VM sles11 is contained within the esx4_pool2 pool, which is a sub-pool of the esx4_pool1 pool, which is also a sub-pool of the esx4_cluster cluster root resource pool. The resource pool hierarchy is in this example is roughly:
esx4_cluster > esx4_pool1 > esx4_pool2
By default, every VMware cluster contains a resource pool know as the “root” resource pool. The root resource pool is usually in a vCenter inventory path similar to this:
/zos91_datacenter/host/esx4_cluster/Resources
If you do not need to restrict VMs based on resource pool assignment, then no policy configuration is necessary and you can provision the VMs as usual, but if you need to assign the VMs to a certain cluster (for example, the cluster root pool), or if you want to assign VMs to a pools “owned” by your customers, you can configure the vsphere_assignPool policy to accomplish this.
Use the following steps to assign a VM to a resource pool, for example to disallow PlateSpin Orchestrate from provisioning the VM to another resource pool:
-
Assign the vsphere_assignPool policy to the VM or a group of VMs. No changes to the actual policy file are necessary.
During provisioning of the VM, Orchestrate verifies and relocates the VM (as necessary) to maintain the validity of the pool assignment.
-
(Conditional) If the VM does not reside in the correct resource pool, modify the resource.vm.pool fact to reflect the correct pool assignment. Orchestrate relocates the VM to the specified resource pool at the next provision.
4.1.4 Setting Up VNC for a VM Managed by vSphere
When you right-click a VM resource, you have the option of launching a remote virtual network computing (VNC) session console of that VM’s desktop. This section provides information about setting up PlateSpin Orchestrate to accommodate a VNC session for a VM.
ESX servers managed by vSphere might have a firewall in place to protect some ports from being open or closed. The vsphere provisioning adapter opens the appropriate ports to accommodate VNC connections from a remote console. These ports are opened when PlateSpin Orchestrate discovers the servers.
Use these steps to set up VNC session connectivity for the VM managed by the vsphere provisioning adapter.
NOTE:Although you can change these settings at any time, they take effect in vSphere only when the VM is not running, such as at provision time.
-
In the Explorer tree of the PlateSpin Orchestrate Development Client, select the Grid Server object where you are logged in, then select the tab to open the server’s authentication page.
-
In the panel (also known as the “Credential Manager”) of the Authentication page, click to open the Add Credential dialog box.
-
In the Add Credential dialog box, specify a credential that includes the VNC password you want to use, then click .
In the next steps, the VNC consoles for one or more of the vsphere VMs in this grid are configured to use the password from this credential. For more information about adding a credential, see
The Users Panel
inThe Orchestrate Server and the Server Admin Objects
in the PlateSpin Orchestrate 2.5 Development Client Reference. -
In the Explorer tree, expand the Policies folder to display the list of policies, then select policy to open the Policy Editor.
-
In the Policy Editor, modify the vnc.credential fact value to be the name of the credential you created in Step 3, then click the icon.
-
In the Explorer tree, select the VM Resource Group (or an individual VM) managed by the vsphere provisioning adapter, then in the admin view, select the tab to open the Policies page for this group.
-
On the Policies page, select to open the Policy Selection dialog box.
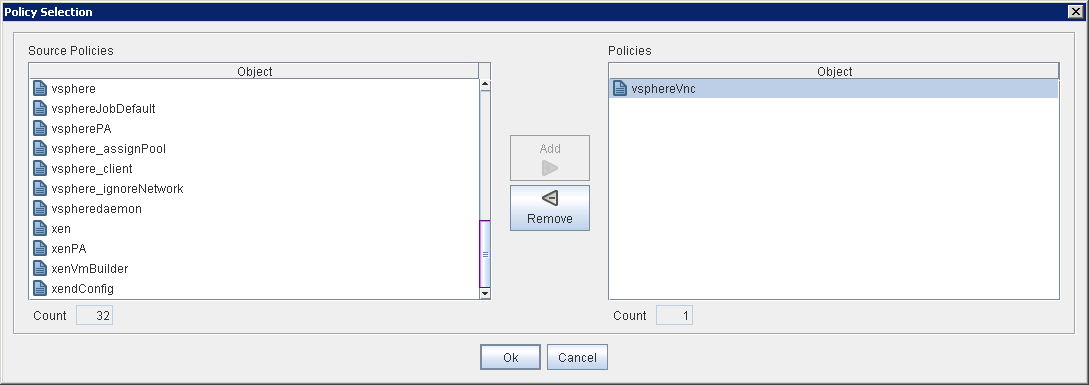
-
In the list of the Policy Selection dialog box, select the policy, click to move it to the associated list, then Click .
-
On the Development Client Menu Bar, click > .
This action opens or closes the firewall on the VM hosts to allow VNC access. This access is based on the vsphere.openVncFirewallPort fact in the vsphere policy.
-
(Conditional: VM must be shut down) From the Explorer tree, right-click a vSphere-managed VM, then select .
If the VM for which you want to open a VNC session is running, you need to shut it down, then reprovision it.
-
(Conditional) If the vSphereUpdate Client is running for your vCenter server, refresh the Orchestrate Client.
or
(Conditional) If the vSphereUpdate Client is not running for your vCenter server, right-click the VM object and select .
If you don’t want to resync before using the VNC console, make sure you configure the vSphere Update Client beforehand. For more information, see Configuring the vSphere Update Client.
-
Right-click the VM object and select to open the login dialog box for the VNC session.
-
In the login dialog box, enter the VNC password that you created in the Credential Manager in Step 3.
NOTE:If you migrate a VM you previously configured and provisioned for VNC availability from one ESX host to another ESX host, it is possible that the port you assigned to the VM for firewall access might be in use by the new ESX host.
If the vnc.mode fact in the vsphereVnc policy is set to automatic and the VM is restarted (or if the process currently occupying the port is restarted), PlateSpin Orchestrate chooses another port for the VM. Because the number of ports available for VNC console use is limited if you are migrating multiple vSphere VMs, you might have to reprovision the VMs with new port numbers if you discover a conflict.
vSphere VNC Facts
The following table lists the VNC-related facts in the vsphere provisioning adapter and provides a description of each of those facts.
Table 4-2 vSphere VMC Facts
4.1.5 Setting Up Orchestrate to Accommodate VMware DRS Clustering and Updates
PlateSpin Orchestrate supports the discovery of VMware vSphere clusters used for high availability in a VMware environment or managed by the VMware Distributed Resource Scheduler (DRS) after an Orchestrate Agent has been deployed into such an environment. In this scenario, Orchestrate also allows you to verify when actions have taken place outside of Orchestrate, such as when DRS moves a VM to an alternate host in the cluster or when an administrator moves a VM into a different resource pool.
Any vSphere clusters discovered by PlateSpin Orchestrate and managed by DRS are listed in the Development Client as members of a convenience group (for example, a group named clusters_vsphere).
You can learn about the read-only cluster-related facts for these discovered clusters in the following PlateSpin Orchestrate documentation references:
-
Orchestrate Facts in the VM Host Cluster Object
in the PlateSpin Orchestrate 2.5 Development Client Reference -
Orchestrate Facts in a VM Host Residing in a Cluster
in the PlateSpin Orchestrate 2.5 Development Client Reference -
Orchestrate Facts in VMs Hosted in Clusters
in the PlateSpin Orchestrate 2.5 Development Client Reference
The Orchestrate update infrastructure consists of two main components:
-
A vSphere Update Client component, which is contained in the PlateSpin Orchestrate Agent
-
The vSphereUpdate monitor job, which starts the client component and ensures that it runs when necessary
Other information in this section that you con use to update the Orchestrate vsphere provisioning adapter for clustering includes the following:
Configuring the vSphere Update Client
To configure the vSphere Update Client:
-
Create a proxy user:
-
In the Orchestrate Development Client, click > to open the Create a New User dialog box.
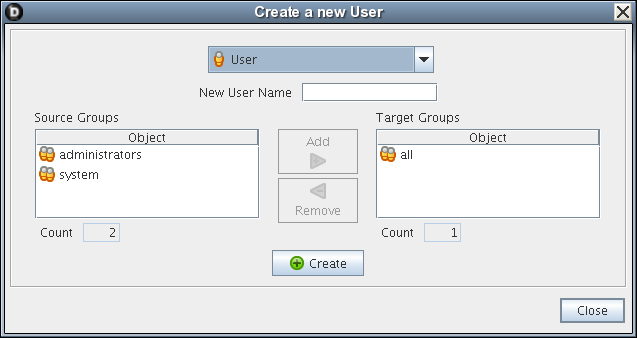
-
In the list, select administrators, then click to move the administrators user group to the list.
-
In the field, specify a user name, click , then click .
This is the proxy user. The username must contain the word “proxy,” for example, my_proxy, or proxy1.
-
-
Modify the vSphereUpdate.policy (or modify the jobargs in the scheduler) so that zos.proxy.user contains the name of the user created in Step 1:
-
In the Explorer Tree, select the group to expand the list of policies included on this grid.
-
Select the policy to open the Policy Editor view.
-
Find the zos.proxy.user fact in the policy, then specify the name of the proxy user you created in Step 1.c as the value for this fact.
-
-
Run the vSphereUpdate schedule and job:
-
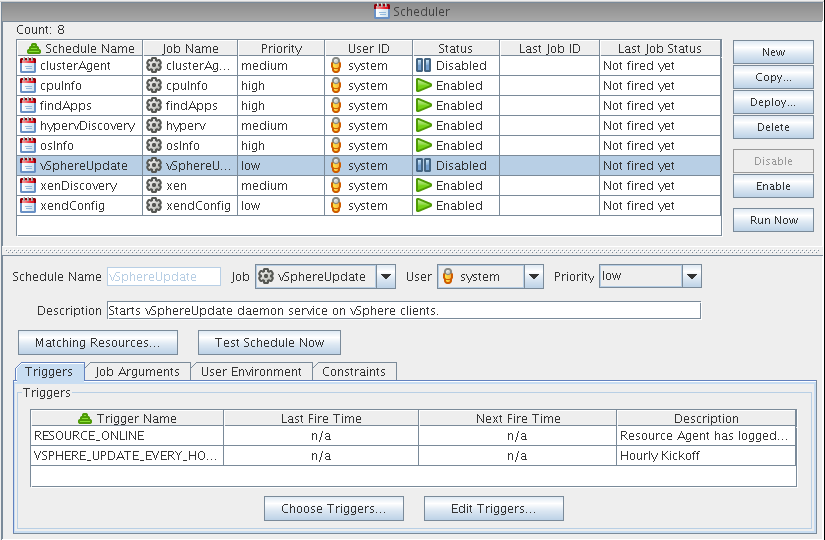
In the toolbar of the Development Client, select to open the Orchestrate Job Scheduler.
-
Select the schedule, click , then click .
-
The vSphereUpdate Monitor Job
The vSphereUpdate monitor job is located in the “all” jobs group. It is associated with both the vsphere policy (for VCenter configuration information) and the vSphereUpdate policy. The vSphereUpdate policy specifies the following cluster-related facts. You can modify these facts to accommodate your environment.
Table 4-3 Cluster-Related Facts in the vSphereUpdate Policy
|
Fact Name |
Type |
Description |
|---|---|---|
|
jobargs.zos.proxy.user |
String |
An administrative user used by the Orchestrate Development Client to log in to the Orchestrate Server in order to perform update operations there. You must create an administrative user for this purpose, if you have not already done so. The name of this user must contain the word “proxy,” for example, my_proxy, or proxy1. When you change the value of this fact, you must restart the Orchestrate Server. For information about configuring the vSphere Update Client, see Configuring the vSphere Update Client. |
|
jobargs.zos.proxy.passwd_validity |
Integer |
The amount of time (measured in seconds) that the zos.proxy.user password is valid. Example: 86400 (1 day)Although the default value (-1) implies that the password is valid forever, the actual validity time is limited to the uptime of the Orchestrate Server. When the password expires, the Development Client is automatically restarted with a new password the next time that the monitor job runs. |
|
jobargs.debug |
Boolean |
Specifies whether you want extra verbose debug logging sent to a job log. NOTE:The client logs its output to the log.txt and err.txt files located in <agent_install_dir>/node.default/.vSphereUpdate/<hostname>/<vcenterId>. |
|
jobargs.verbose |
Boolean |
Specifies whether you want verbose logging sent to a job log. This fact is implicitly set when jobargs.debug is set. |
|
jobargs.mode |
String |
The value for this fact can be optionally set to “clear.” This resets the passwd_validity and forces a restart on the next invocation where the mode is not set. The value can also be set to “stop” to stop all running update clients. |
Configuring Orchestrate to Limit Datastore Visibility in vSphere Clusters
If you want to limit the number of datastores (that is, Orchestrate Repositories) that are available to a vSphere cluster, you can assign a policy similar the policy below to to the undesired repository or repositories:
<policy>
  <repository>
    <fact name="enabled" type="Boolean" value="False" />
    <fact name="provisioner.jobs">
      <array type="String">
      </array>
    </fact>
  </repository>
</policy>
This disables the repository for use with the cluster.
4.1.6 Discovering Enterprise Resources in Multiple vSphere Environments
A data center administrator running VMware products might organize the virtual resources in his or her enterprise into several different vSphere environments. PlateSpin Orchestrate lets you discover and manage all of these enterprise VMs, discovering each relevant VM host, network, repository, and VM within the several vSphere environments and modeling them as objects in the Orchestrate Development Client.
The discovery is facilitated through a PlateSpin Orchestrate Agent that acts as a proxy for the VMware enterprise to provide information about the resources of each vSphere environment. Polices defined and configured on the proxy agent enable communication between each vSphere environment and the established PlateSpin Orchestrate environment.
After the resources of all the vSphere environments are discovered, the provisioning actions available for the discovered objects behave correctly without the need to create new vSphere jobs, policies, or constraints.
This section includes the following information:
Setting Up an Orchestrate Proxy Agent in the vSphere Environment
For PlateSpin Orchestrate to support virtual resource management in multiple vSphere environments, you need to deploy a PlateSpin Orchestrate Agent to a server in one of those environments. The server is then referred to as the “agent host.” For more information, see Installing the Orchestrate Agent Only
in the PlateSpin Orchestrate 2.5 Installation and Configuration Guide.
This section includes the following information:
Installing the Proxy Agent on the vCenter Server
It is not necessary to install the agent on the machine where the vCenter Server is running. In fact, we recommend that you do not install the Orchestrate Agent on this server because the agent’s potential processing needs might put an unsatisfactory load on the vCenter Server. If your circumstances require you to install the agent on the vCenter Server, however, there are some things you need to consider:
-
If you want the agent on the server to forego processing of vSphere provisioning adapter (PA) joblets, do not associate the vsphere_client policy from the object in the Development Client. Verify that the value of the resource.vsphere.client fact is false.
-
If your vCenter Server is running behind a Windows firewall, you need to configure the firewall to allow connections from remote machines to port 443 on the server.
-
If you are using Windows Server 2008 as your vCenter Server platform, remember that VMware adds a firewall rule to allow connections, but only on “public” network types. If you are connecting from a “private” network type, you need to change the firewall rule.
Configuring a Proxy Agent outside of the vSphere Environment
Use the following steps to configure a PlateSpin Orchestrate resource to act as a proxy for the Orchestrate Agent running in the VMware enterprise.
-
(In the vSphere environment) Find the vSphere public certificate on the machine running the vCenter Server. The location of the certificate depends on the server platform:
-
Windows Server 2008: The path to the public key is C:\ProgramData\VMware\VMware VirtualCenter\SSL\rui.crt.
-
Windows Server 2003: The path to the public key is C:\Documents and Settings\All Users\Application Data\VMware\VMware VirtualCenter\SSL\rui.crt.
-
-
(In the vSphere environment) Copy the public certificate to an accessible directory on the agent host (see Setting Up an Orchestrate Proxy Agent in the vSphere Environment). You can use FTP, copy and paste, or access from a shared directory.
-
(In the vSphere environment) Install the public certificate on the agent host, outside of the agent JVM.
The agent JVM has a built-in keystore that includes a default setup to accept certain SSL certificates. Because the vSphere SSL certificate is usually self-signed, it is not accepted by the JVM by default.
-
On the agent host, change to the C: drive.
cd c:\
-
Create the \sslCert directory.
mkdir c:\sslCert
-
Import the certificate to the new directory.
c:\Program Files\Novell\ZOS\Agent\jre\bin\keytool.exe -importcert -file \<path_to_rui.crt> -keystore C:\sslCert\client.keystore
-
When prompted, enter a password for the new keystore.
-
When prompted, enter yes to indicate that you trust the certificate.
HINT:When the client.keystore file has been created on the agent host of one vSphere environment, you can copy it to the agent host in every other vSphere environment of the enterprise.
-
-
(In the Orchestrate environment) In the Orchestrate Development Client, select a resource in the Explorer tree that you want to act as the proxy agent for the VMware enterprise.
-
(In the Orchestrate environment) Modify the vsphere policy associated to the proxy agent:
-
In the Explorer view, expand the group, then select the vsphere policy to open the page.
-
In the page, find the vcenters fact name and the <dictionary></dictelement> section of that fact, then modify it to identify the Web service credential store location of a discrete vSphere environment:
-
Change the first dictelement key from DEFAULT to the exact name of the vCenter Server.
-
Change the value of the webservice_url dictelement key from http to https and localhost to the appropriate DNS name or IP address of the vCenter server.
For example, change http://localhost/sdk
to
https://10.10.10.10/sdk
-
-
(Optional) Copy the text of the entire <dictionary> component of the vcenters fact, then paste it directly following the text of the prior <dictionary> element. Repeat this for each vSphere environment you want to connect to and whose resources you want to discover, then execute Step 5.b on each new <dictionary> component you created for the fact.
-
-
(In the Orchestrate environment) Add a new fact to the vsphere_client policy to facilitate SSL communication between PlateSpin Orchestrate and the vSphere environment:
-
In the Explorer tree, expand the group, then select the vsphere_client policy to open the Policy Editor page.
-
On the Policy Editor page, locate and then uncomment the following section of code:
<!--
<fact name="vsphere.trustStore"
       type="String"
       value="c:\sslCert\client.keystore"
       description="Location on this resource of the trust store (required for SSL)" />
-->
Make sure that the value string in the code matches the path to the keystore on your selected proxy agent (see Step 3.c).
-
Save your changes in the vsphere_client policy.
-
-
(In the Orchestrate environment) Associate the vsphere_client policy to the proxy agen:
-
In the Explorer tree, select the Resource object for the machine that has the agent you are working with, select the tab for this object in the admin view, then click to open the Policy Selection dialog box.
-
In the Policy Selection dialog box, select the vsphere_client policy, click , then click .
-
-
(In the Orchestrate environment) Add vSphere credentials to the proxy agent:
-
On the agent host, change to the C:\Program Files\Novell\ZOS\Agent directory, then create a \credentials subdirectory under it.
-
Open a text editor, paste or type in the password of the vCenter Server, then save the file as vspherecredentials.txt to the new subdirectory you created in Step 8.a.
After a discovery is executed, the credentials are securely stored for future use on the agent, but the plain text vspherecredentials.txt file is removed.
You can also use the webservice_password value found in the vsphere policy for the contents of this text file, but we do not recommend doing this for production use.
-
Running Discovery
When a proxy agent has been deployed and properly configured in the vSphere environment and the policies of the proxy agent have been properly edited, you can go to the Orchestrate Development Client menu toolbar and select >.
When you perform this discovery action, PlateSpin Orchestrate runs jobs that discover the VM hosts, repositories, and networks in each of the vSphere environments. On each discovered object, Orchestrate also generates a *.vsphere.vcenter fact that contains a vCenter ID from the hosting vSphere environment.
NOTE:When a VM has the same name in two different vSphere environments, the second VM discovered is given a name in the following form:
VMNAME_VCENTERID
You can rename these objects if you want to. For more information about renaming Grid objects, see Resource Object Naming and Renaming,
VM Host Object Naming and Renaming,
VM Host Object Naming and Renaming,
Virtual Disk Object Naming and Renaming,
Virtual NIC Object Naming and Renaming,
Virtual Bridge Object Naming and Renaming,
or Repository Object Naming and Renaming
in the PlateSpin Orchestrate 2.5 Development Client Reference.
After the objects are discovered in the vSphere environments, you can use PlateSpin Orchestrate to discover existing VMs in those environments. From the Orchestrate Development Client menu toolbar, select > . PlateSpin Orchestrate discovers all of the VMs managed in the vSphere environments and places them in the Orchestrate model for you to manage.
When a VM with a given name is discovered in two different vSphere environments, the second VM discovered is named in the form of VMNAME_VCENTERID, rather than named by appending an incrementing number, as explained above. As with other such object names that are automatically generated, these VM names can be changed.
If the discovery fails, use the following steps to restart the vspheredaemon job:
-
In the Jobs view of the Orchestrate Client, locate the running vspheredaemon job, then click the stop button to cancel the job.
-
Re-run the provisioning action you attempted before. This restarts the vSphereDaemon.
4.1.7 Known Configuration Limitations for Virtual Center VMs
When a vSphere VM is deleted by the vSphere client, it can leave behind a VM template in a “defined” state that can be subsequently discovered and registered as a resource in PlateSpin Orchestrate.
If you atttempt to remove this VM template in the Orchestrate Client, PlateSpin Orchestrate attempts to remove the VM’s files from the file system, but because the VM has no files to delete, the provioning job fails with the following error:
Error: Delete : Failed delete of Managed Entity :
For other identified Virtual Center VM issues, see the vSphere VM Issues in the Development Client section of the PlateSpin Orchestrate 2.5 Readme.