2.4 Configuring PlateSpin Protect Default Options
This section includes the following information:
-
Section 2.4.1, Setting Up Automatic E-Mail Notifications of Events and Reports
-
Section 2.4.2, Language Setup for International Versions of PlateSpin Protect
-
Section 2.4.3, Language Setup for International Versions of PlateSpin Protect
-
Section 2.4.4, Configuring PlateSpin Server Behavior through XML Configuration Parameters
-
Section 2.4.5, Configuring Support for VMware vCenter Site Recovery Manager
2.4.1 Setting Up Automatic E-Mail Notifications of Events and Reports
You can configure PlateSpin Protect to automatically send notifications of events and replication reports to specified e-mail addresses. This functionality requires that you first specify a valid SMTP server for PlateSpin Protect to use.
SMTP Configuration
Use the PlateSpin Protect Web Interface to configure SMTP (Simple Mail Transfer Protocol) settings for the server used to deliver e-mail notifications of events and replication reports.
Figure 2-1 Simple Mail Transfer Protocol Settings

To configure SMTP settings:
-
In your PlateSpin Protect Web Interface, click > .
-
Specify an SMTP server , a (the default is 25), and a for receiving e-mail event and progress notifications.
-
Type a and , then confirm the password.
-
Click .
Setting Up Automatic Event Notifications by E-Mail
-
Set up an SMTP server for PlateSpin Protect to use. See SMTP Configuration.
-
In your PlateSpin Protect Web Interface, click .
-
Select the option.
-
Click , type the required e-mail addresses separated by commas, then click .
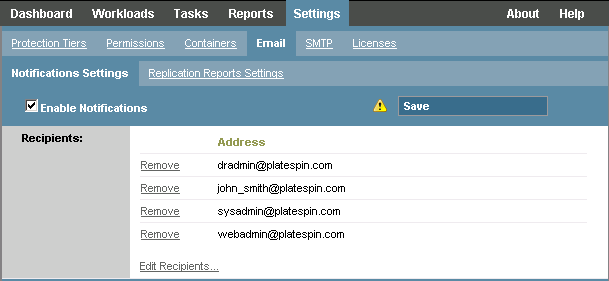
-
Click .
To delete listed e-mail addresses, click next to the address that you want to remove.
The following events trigger e-mail notifications:
|
Event |
Remarks |
|---|---|
|
Workload Online Detected |
Generated when the system detects that a previously offline workload is now online. Applies to workloads whose protection contract’s state is not . |
|
Workload Offline Detected |
Generated when the system detects that a previously online workload is now offline. Applies to workloads whose protection contract’s state is not . |
|
Full Replication Successfully Completed |
|
|
Full Replication Failed |
|
|
Full Replication Missed |
Similar to the Incremental Replication Missed event. |
|
Incremental Replication Successfully Completed |
|
|
Incremental Replication Failed |
|
|
Incremental Replication Missed |
Generated when any of the following applies:
|
|
Test Failover Completed |
Generated upon manually marking a Test Failover operation a success or a failure. |
|
Prepare Failover Completed |
|
|
Prepare Failover Failed |
|
|
Failover Completed |
|
|
Failover Failed |
|
Setting Up Automatic Replication Reports by E-Mail
To set up PlateSpin Protect to automatically send out replication reports by e-mail, follow these steps:
-
Set up an SMTP server for PlateSpin Protect to use. See SMTP Configuration.
-
In your PlateSpin Protect Web Interface, click .
-
Select the option.
-
In the section, click and specify the required recurrence pattern for the reports.
-
In the section, click , type the required e-mail addresses separated by commas, then click .
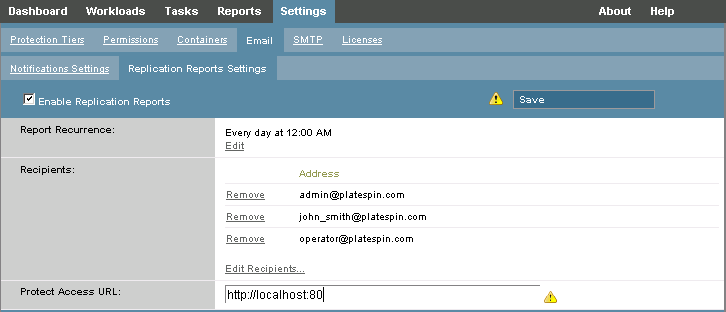
-
(Optional) In the section, specify a non-default URL for your PlateSpin Server (for example, when your PlateSpin Server host has more than one NIC or if it is located behind a NAT server). This URL affects the title of the report and the functionality of accessing relevant content on the server through hyperlinks within e-mailed reports.
-
Click .
For information on other types of reports that you can generate and view on demand, see Generating Workload and Workload Protection Reports.