15.6 Failback
A failback operation restores the business function of a failed production workload in its original environment when the business function of a temporary failover workload is no longer required. Failback is the next logical step after a failover; it transfers the failover workload to its original infrastructure or, if necessary, a new one.
Supported failback methods depends on the target infrastructure type and the degree of automation of the failback process:
-
Automated Failback to a Virtual Machine: Supported for VMware ESX platforms and VMware DRS Clusters.
-
Semi-Automated Failback to a Physical Machine: Supported for all physical machines.
-
Semi-Automated Failback to a Virtual Machine: Supported for Microsoft Hyper-V platforms.
The following topics provide more information:
15.6.1 Automated Failback to a VM Platform
PlateSpin Protect supports automated failback for Failback containers on a supported VMware ESXi Server or a VMware DRS Cluster. See Supported VM Containers.
To execute an automated failback of a failover workload to a target VMware container:
-
Following a failover, select the workload on the Workloads page and click .
The system prompts you to make the following selections
-
Specify the following sets of parameters:
-
Workload Settings: Specify the failover workload’s host name or IP address and provide administrator-level credentials. Use the required credential format. See Guidelines for Workload and Container Credentials.
-
Failback Target Settings: Specify the following parameters:
-
Replication Method: Select the scope of data replication. If you select , you must a target. See Initial Replication Method (Full and Incremental).
-
Target Type: Select . If you don’t yet have a failback container, click and inventory a supported container.
-
-
-
Click and monitor the progress on the Command Details screen.
Upon successful completion, PlateSpin Protect loads the Ready for Failback screen, prompting you to specify the details of the failback operation.
-
Configure the failback details. See Failback Details (Workload to VM).
-
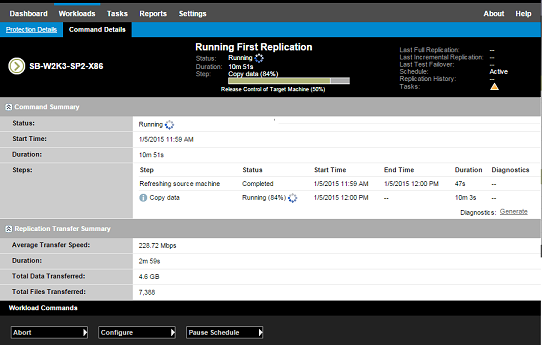
Click and monitor the progress on the Command Details page. See Figure 15-2.
PlateSpin Protect executes the command. If you selected in the Post-Failback parameter set, a command is shown in the Web Interface.
Figure 15-2 Failback Command Details
Failback Details (Workload to VM)
Failback details are represented by three sets of parameters that you configure when you are performing a workload failback operation to a virtual machine. See Table 15-2 for information about parameter settings.
Table 15-2 Failback Details (Workload to VM)
|
Parameter Settings |
Details |
|---|---|
|
Failback Settings |
|
|
Transfer Method |
Select a data transfer mechanism and security through encryption. See Encryption of Data in Transmission. |
|
Failback Network |
Specify the network to use for failback traffic. This is a dedicated network based on virtual networks defined on your VM container. See Networking. |
|
VM Datastore |
Select a datastore associated with your failback container for the target workload. |
|
Volume Mapping |
If the initial replication method is specified as “incremental”, select source volumes and map to volumes on the failback target for synchronization. |
|
Services/Daemons to stop |
Specify the application services (Windows) or daemons (Linux) that are automatically stopped during the failback. See Service and Daemon Control. |
|
Alternative Address for Source |
Specify an additional IP address for the failed-over VM if applicable. See Requirements for Protection across Public and Private Networks through NAT. |
|
Workload Settings |
|
|
CPU |
(VM containers using VMware 5.1, 5.5, and 6.0 with a minimum VM hardware Level 8) Specify the number of sockets and the number of cores per socket for the failback to virtual workload. It automatically calculates the total cores. This parameter applies on the initial setup of a workload with an initial replication setting of . NOTE:The maximum number of cores the workload can use is subject to external factors such as the guest operating system, the VM hardware version, VMware licensing for the ESXi host, and ESXi host compute maximums for vSphere (see vSphere 5.1 Configuration Maximums). Some distributions of a guest OS might not honor the cores and cores per socket configuration. For example, guest OSes using SLES 10 SP4 and OES 2 SP3 retain their original cores and sockets settings as installed, whereas other SLES, RHEL, and OES distributions honor the configuration. |
|
Number of CPUs |
(VM containers using VMware 4.1) Specify the required number of vCPUs (virtual CPUs) to assign to the failback to virtual workload. This parameter applies on the initial setup of a workload with an initial replication setting of . Each vCPU is presented to the guest OS on the VM container as a single core, single socket. |
|
VM Memory |
Assign the required RAM to the target workload. |
|
Hostname, Domain/Workgroup |
Specify the identity and domain/workgroup affiliation of the target workload. For domain affiliation, domain administrator credentials are required. |
|
Network Connections |
Specify the network mapping of the target workload based on the virtual networks of the underlying VM container. |
|
Service States to Change |
Specify the startup state of specific application services (Windows) or daemons (Linux). See Service and Daemon Control. |
|
Post-Failback Settings |
|
|
Reprotect Workload |
Select this option if you plan to re-create the protection contract for the target workload after deployment. This option maintains a continuous event history for the workload and auto-assigns/designates a workload license. |
|
Reprotect after Failback |
Select this option if you intend to re-create a protection contract for the target workload. When the failback is complete, a command will be available in the Web Interface for the failed-back workload. |
|
No reprotect |
Select this option if you do not intend to re-create a protection contract for the target workload. To protect the failed-back workload upon completion, you will have to re-inventory that workload and reconfigure its protection details. |