2.3 Creating Service Models
The process of creating a service model involves the following general steps:
-
To include geographic sites in service models, first define them in the > hierarchy.
-
Use the option to define the major components of a element.
-
Use a variety of sources to populate the elements.
These source elements determine the service model state and can be used for root cause and impact analysis.
This is documented in Section 3.0, Populating Service Models.
-
Service model elements can have custom property pages. Fill in the custom property values if applicable.
This is also documented in Section 3.0, Populating Service Models.
To create a service model, do the following:
2.3.1 Creating a Service Model
-
In the Explorer pane, expand > .
-
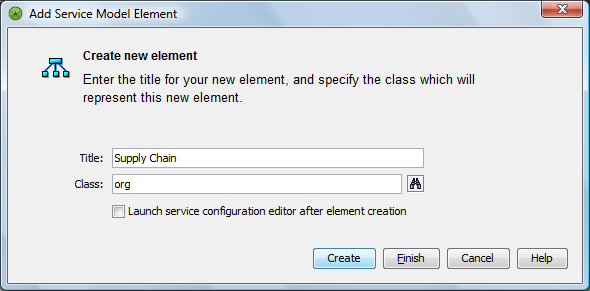
Right-click , , or any subfolder, then click to open the Add Service Model Element dialog box.
-
Specify the name of the new service model in the field.
Element names in Operations Center are case-sensitive. For example, the elements and are not the same. If is imported into a system that already has , it does not replace , but is added as a new element. Element names are unique, based on case sensitivity, whether they are created using or are imported.
-
To select a class other than org for the service model, click Browse
 .
.
The Browse for Class dialog box opens, displaying available classes:

-
Navigate to the class to be assigned to the service model, then click .
The icon associated with the selected class is assigned to the new element.
Class names are not required to be unique in the hierarchy. Multiple instances of a class name can exist. Use the fully qualified class name to select the correct class.
To learn more about creating custom classes, see Section 4.0, Defining Classes, Behavior Models, and Property Pages.
-
Do one of the following:
-
To view and edit the new element’s property pages, click .
The element is created and the element’s property pages open.
-
Click to create the element and close the dialog box.
-
-
Do the following:
-
Continue defining service model components by right-clicking the top-level element you just created, then selecting the option, as described in Adding Child Elements to an Existing Service Model.
-
Populate these components using the methods described in Section 3.0, Populating Service Models.
-
2.3.2 Adding Child Elements to an Existing Service Model
After defining the major components of a service model, define the subcomponents by using the option to add child elements.
To add a child element to a service model element:
-
In the Explorer pane, expand .
-
Right-click an element, then select to open its dialog box:
-
Specify a name for the element in the field.
-
To assign the element to a class, do one of the following:
-
Click
Browse and navigate to the class for the element.
-
Specify a fully qualified class name in the field.
-
Specify a new class name in the field.
The new class displays in the folder under .
-
-
Click .
The new element is added as a child of the selected service model element.