3.10 Using Containers to Control Objects
Container can help you group objects with more options and control over objects than the standard grouping feature.
There are three types of containers that can be used with the Layout view:
-
Simple Container: groups one or more objects in an outer container.
-
Stack Layout Container: layers multiple objects. Stack Layout Container are useful to create node styles that show a different graphic based on the element state.
For information about using stack containers to create a node style, see Section C.4, Looking at the Source Code with a Toggling Graphic Node Style Example.
-
Children Container: shows one or more levels of child elements.
For more information about using children containers, see Section 5.4, Displaying an Element’s Children using Child Containers.
This section covers how to group multiple objects with a simple container:
3.10.1 Grouping Components with a Container
To group drawing components with a container:
-
Use the selection tool to select the desired components.
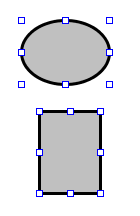
For example, this might include elements, shapes, and associated text labels.
Elements generated by an Automatic layout cannot be grouped with other items.
-
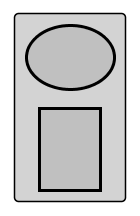
Right-click anywhere on a selected component and select > > .
The selected components are wrapped in an outer container.
3.10.2 Adjusting the Wrap Settings
While outer containers can be modified just like any other rectangle or drawing shape, there are some options that are unique to containers.
To adjust the outer container and wrapping attributes:
-
To adjust the wrap settings, right-click the container and select > > > . The Adjust Wrap Settings dialog box opens.
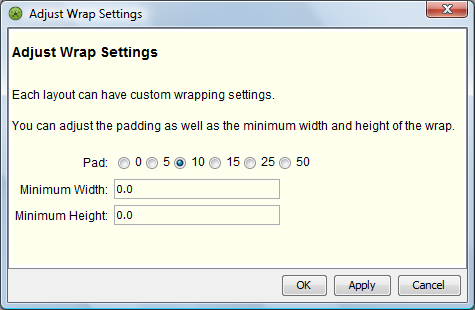
Do any of the following:
-
Select any of the radio buttons to adjust the spacing between the components.
-
Specify the minimum width of the outer container in the field.
-
Specify the minimum height of the outer container in the field.
-
-
To hide or show the outer container do one of the following:
-
To hide the outer container, right-click the container and select > > .
The outer rectangle is invisible to the view.
-
To restore the outer container, right-click the container and select > > .
-
3.10.3 Adjusting Container Layout
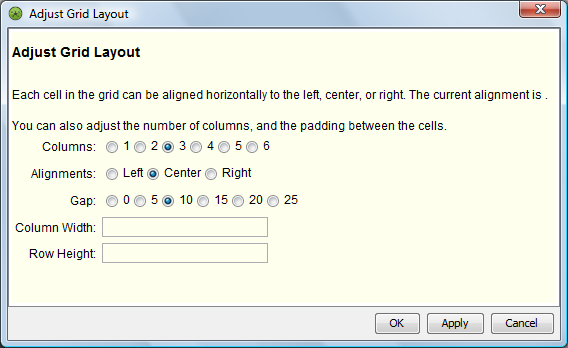
There are many types of layouts available for a container that set how components are displayed in the container. Grid and Flow layouts have additional settings for configuration.
Table 3-2 Container Layout Types
|
Layout Type |
Use to display objects and elements... |
|---|---|
|
Cluster |
In a circular grouping of the objects, packing them together, with the largest ones in the center. |
|
Cluster Box |
In a rectangular grouping of the objects, packing them together, with the largest ones in the center. |
|
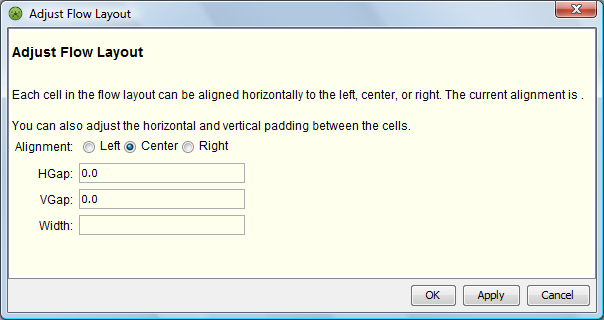
Flow |
In a single column, based on the front to back arrangement of the objects and elements. Items in the front display at the top. |
|
Grid |
Organized in rows and columns. Configure up to 6 columns. Elements automatically wrap to form as many rows as needed. |
|
Horizontal |
In a single horizontal row, based on the front to back arrangement of objects and elements. Items in the back display (left), followed by items further to the front. |
|
HTML |
Similar to how you would use html to format text content. The components flow, usually from left to right, as they are added to a container, but control strings like "br", "tab" and "p" can be used to better adjust the location. |
|
Stack |
One at a time based on conditional settings that determine how they are toggled in and out. For an example, see Section 6.7, Stacked Container Example: Toggling Graphics Based on Condition State. |
|
Wrap |
in a rectangular shape. Generally used to surround a group of child objects with a rectangle after the child objects have been laid out. |
To adjust the outer container and wrapping attributes:
-
In the drawing, right-click the container, then select > > > . The dialog box opens.
-
Select the layout type in the drop-down list, and click .
The view updates to the new layout type.
-
To adjust settings, right-click the container and do one of the following:
-
Flow Layout: select > > > .
-
Grid Layout: select > > > .
-