3.3 Configuring Auto-Login for Single Sign On (SSO)
The Dashboard supports Single Sign On (SSO) capability through its auto‐login function. SSO allows users to gain access to multiple systems (that support SSO) with a single login. For more information on user access to the Dashboard, see Section 4.0, User Accounts.
In situations where it is necessary to disable direct access to the Dashboard server or operations client, authentication can be verified against the SSO implementation before users are allowed to access the Dashboard or the operations client. For more information, see Section 3.3.2, Disabling Direct Client Login.
3.3.1 Implementing Auto-Login with Your Web Server
The Dashboard’s auto-login can be used with any mechanism that can include in HTTP requests an HTTP header containing the user name to be auto-logged in. It is most commonly used with the Apache Web server set up as a reverse proxy.
When using a Web server reverse proxy, the security plug‑in can authenticate incoming HTTP requests based on a certificate for a user name. The Web server can then be configured to pass an HTTP header to the Dashboard containing the user name of the authenticated user. If the Dashboard server has been configured to allow auto-login, the user is automatically logged in bypassing the need for the user to provide user name and password.
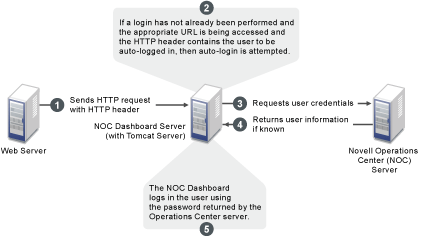
In the above illustration, a Web Server is configured as a reverse proxy. The appropriate auto-login header (such as remote-user) is embedded into HTTP requests and the Dashboard server is configured to allow auto-login. Valid Operations Center users (a user that has already been created and exists in Operations Center) are authenticated if the specified HTTP header exists and the Dashboard is configured for auto-login, and the users are automatically logged into the Operations Center server.
To configure auto-login using the Web server reverse proxy:
-
Configure the Dashboard for auto-login by updating the Dashboard configuration file.
-
Open the /OperationsCenter_Dashboard_install_path/server/webapps/ROOT/WEB-INF/classes/portal-ext.custom.properties file in a text editor.
For more information about the portal-ext.custom.properties file, refer to Section 3.9, Understanding Portal Properties Files.
-
Add the following line, but do not change the value of the property:
auto.login.hooks=com.mosol.liferay.authenticator.MOAuth
-
Add the following line to specify the Web Server Request URIs that allow auto-login:
mo.autologin.request.uris=.*
The value defaults to .* for all pages as shown in the code sample above.
This property can be configured to a specific page such as /c/portal/login and if a user has not yet established a portal login and accesses the http://dashboard_host:dashboard_port/c/portal/login page, the auto-login is attempted. However, if any other page is accessed without a previous a portal login established, then auto-login isn’t attempted because the page is not a match for the property’s regular expression.
To specify more than one specific page, use a pipe character (vertical line) to separate the values. For example, /c/portal/login|/c/portal/layout sets the auto-login to the login page and general layout page. If the general layout page is specified (/c/portal/layout, .*, and so on), then logging out of the portal triggers an immediate attempt to auto-login. If successful, the user is automatically logged in and does not see a login portlet.
-
Add the following line to request the header containing the principal to auto-login:
mo.autologin.header=remote-user
The value of remote-user is an http header only. In this configuration file you don’t usually change the line itself nor declare specific users.
-
After saving the file, restart the Dashboard Web server for the changes to take effect.
For more information, see Section 2.3.1, Starting the Dashboard.
-
-
Configure the Web Server to set up the reverse proxy to forward requests from “/” to the Dashboard server URL.
For more information on configuring the Apache Server reverse proxy, contact Support as a Technical Information Document (TID) has been written on this subject.
-
Configure a custom HTTP header by adding a remote-user, or the header specified above in Step 1.d, to contain the value of an existing Operations Center user.
-
We recommend using client certificates between the Web server and the Dashboard.
For more information about setting up a keystore and truststore, see
Communications Security
in the Operations Center 5.6 Security Management Guide.For more information about configuring Apache for client certificates, contact Support as a Technical Information Document (TID) has been written on this subject.