2.2 Installing Operations Center Server and Dashboard
The AppManager Operations Portal requires the installation of the NetIQ Operations Center Server and Dashboard.
WARNING:The configuration processes required for the AppManager Operations Portal overwrites any pre-existing NetIQ AppManager adapter definitions saved with the name NetIQ(r)AppManager(r), and custom configurations to that adapter are lost.
Before you start the following procedure, have the following guides available for reference:
To install Operations Center software:
-
Install Operations Center.
For instructions, see the following sections in the Operations Center 5.6 Server Installation Guide:
Do not start the Operations Center server as part of this installation process.
-
Install Operations Center Dashboard.
For instructions, see the following sections in the Operations Center 5.6 Dashboard Guide:
Do not start the Dashboard as part of this installation process.
-
Install the latest Operations Center Server and Dashboard Patch Releases.
For instructions on patching the server, see
Patching Operations Center Server Software
in the Operations Center 5.6 Server Installation Guide.For instructions on patching the dashboard, see
Upgrading the Dashboard
in the Operations Center 5.6 Dashboard Guide. -
Do one of the following to start the Operations Center server.
-
Windows: Select Start NetIQ Operations Center under Start > Programs > NetIQ Operations Center.
Starting Operations Center via the Windows Start menu, starts the Operations Center server locally, but not as a service. Therefore, when you log out, the Operations Center server stops.
-
UNIX Log in as the user formula (or another user with root privileges) and from the /OperationsCenter_install_path/bin directory, type mosdaemon at a command prompt.
For additional instructions including configurations to automatically start the server, see
Starting and Stopping the Server
in the Operations Center 5.6 Server Installation Guide. -
-
Import NetIQ Control Center configurations.
-
Perform the following steps to launch the Operations Center console.
-
Start a Java-enabled Web browser.
-
In the Location/Address field, enter the following Uniform Resource Locator (URL) address:
http://server_name:80
where server_name is the Transmission Control Protocol/Internet Protocol (TCP/IP) hostname of the server that is running Operations Center and 80 is the default port setting on Windows. On UNIX, the default server port is 8080.
The Operations Center server login page displays
-
Enter your login credentials and click Login.
-
-
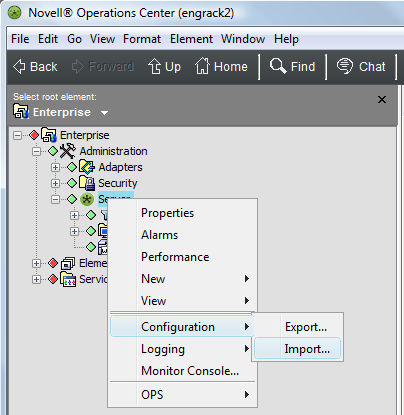
From the Explorer pane, expand Administration.
-
Perform the following steps to import the XML file necessary to create the Control Center adapter and perform other configurations necessary to integrate with NetIQ AppManager Control Center:
-
Right-click Server and select Configuration, then Import.

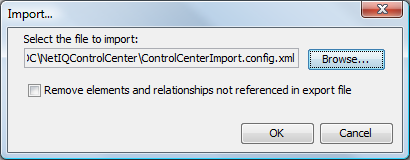
The Import dialog opens.
-
Click Browse to navigate to and select the /OperationsCenter_install_path/NetIQControlCenter/ControlCenterImport.config.xml file:

-
Click OK.
New NetIQ AppManager Control Center and NetIQ AppManager adapters are created under Administration > Adapters.
-
-
-
Continue to Section 2.3, Creating and Configuring AppManager Adapters.