2.20 NetIQ AppManager
Operations Center integrates directly with NetIQ AppManager without an ORB. However, the JDBC driver does not support connections using Windows authentication.
If you are using the AppManager Operations Portal, see the NetIQ AppManager Operations 5.0 Portal Getting Started Guide.
Refer to the following topics to configure the integration with NetIQ AppManager:
2.20.1 Configuring the Integration
To integrate the NetIQ AppManager:
-
Create an adapter for each instance of a NetIQ object server on the network.
From the drop-down list, select NetIQ AppManager.
For instructions, see Section 5.1, Creating an Adapter.
-
Define the adapter properties.
For instructions, see Section A.25, NetIQ AppManager.
2.20.2 Configuring the NetIQ AppManager Integration for Windows Authentication
To configure the NetIQ AppManager adapter to use Windows authentication:
-
Update the adapter property to databaseName;domain=domainName.
For example, where the DbName value was previously QDB, with this change it is now: QDB;domain=MOS.
-
Do one of the following to configure the server:
-
On Unix: No native libraries required, but you must provide user, password.
-
On Windows: Native libraries are optional. If you don't use the native library, you must provide user, password.
-
On Windows for MSSQL Configuration: The following requirements must be met:
-
Must be configured to use Windows Authentication.
-
The machine must be on the domain.
-
Users must be a member of the OS's administrator group.
For example, if you are logging in as MOS\jsmith, the user jsmith must be in the adminitrators group on the MSSQL machine on the MOS domain.
-
If MSSQL is setup to use an instance name, you must turn on the SQLServer Browser Service. Then add the user to the instance's security group.
-
-
-
To configure for Windows Single Sign-On (SSO), do the following:
-
If running Operations Center as a service, the service must use the same domain user account as the database.
If you are receiving an NT AUTHORITY\ANONYMOUS LOGON exception, verify that the account used by the service and the database are the same.
-
Leave the and adapter properties blank (empty).
-
Copy the /OperationsCenter_install_path/classes/win32/ntlmauth32.jar or /OperationsCenter_install_path/classes/win64/ntlmauth64.jar file into the /OperationsCenter_install_path/classes/ext directory.
-
Restart the Operations Center server.
For instructions, see
Manually Starting the Operations Center Server
andStarting the Operations Center Server in UNIX
in the Operations Center 5.0 Server Installation Guide.
-
2.20.3 Viewing NetIQ Custom Properties
When custom properties have been created for objects in NetIQ AppManager, the same properties are surfaced in the page in Operations Center properties.
To view object properties:
-
Right-click the NetIQ element in the Operations Center Explorer pane, then select . The Properties dialog opens.
-
Click , , or to view object attributes, details or custom properties.
The pages available for a NetIQ element depend on object type and if any custom properties exist for the object in NetIQ AppManager.
2.20.4 Adding NetIQ Alarm Comments
While Operations Center includes the NetIQ comment feature, there is also an Operations Center-based commenting option:
Adding a NetIQ Comment
To add a NetIQ comment:
-
Right-click a NetIQ alarm in the Operations Center view, then click comment to open the AppManager Comments dialog box.
-
Enter comments, then click .
You can view previous comments in the section.
Adding a Operations Center-Based Comment
To add an Operations Center comment:
-
Right-click a NetIQ alarm in the Operations Center view, then click to open the Comments dialog box.
-
Enter comments, then click .
You can view previous comments in the section.
2.20.5 Using XSL Templates to Transform Event Messages
NetIQ can contain detailed event messages which are XML documents. Enhancements to the NetIQ integration support XSL templates for transforming these XML documents to HTML. Store the required XSL templates in the /OperationsCenter_install_path/database/netiq directory.
Integrating the NetIQ XSL Template
To create the NetIQ XSL Template:
-
Verify that the NetIQ XML documents have the following format:
<?xml version="1.0">
<APPMANAGER>
<DATADETAIL>
...
</DATADETAIL>
</APPMANAGER>
The key to the XML document is the first node following the APPMANAGER node, which in this example is DATADETAIL.
-
Place the appropriate XSL template in the /OperationsCenter_install_path/database/netiq directory.
Use the convention of matching the XSL template file name with the XML document key node. Using the previous example, name the XSL template file DATADETAIL.xsl. The adapter uses the XSL template to transform the XML document to HTML.
All XSL template files must have the file name extension .xsl. The adapter dynamically discovers, loads, and reloads modified XSL template files, so it is not necessary to stop and restart the adapter or the Operations Center server.
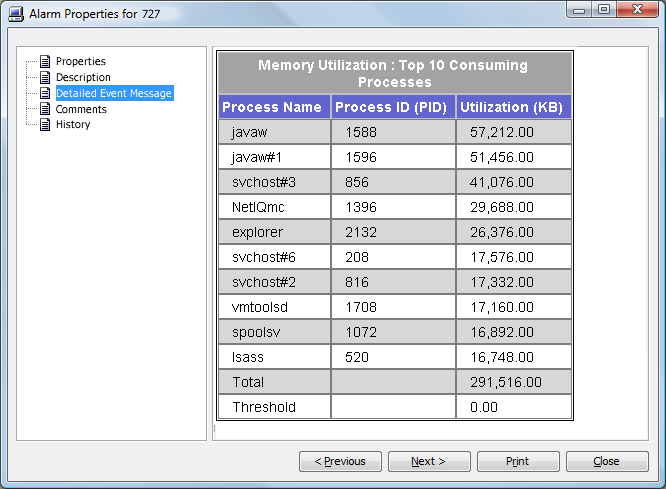
Viewing the NetIQ Event Messages
To view NetIQ event messages:
-
In the pane, right-click a NetIQ alarm, then click to open the Status property page.
-
In the left pane, click to open the Detailed Event Message property page: