2.3 Post Installation Tasks
Perform the following tasks in the order listed:
2.3.1 Setting the Environment Path Variable
After installation, if you want to run Operations Center startup and shutdown commands from any location, set the proper environment path variable.For UNIX, add the Operations Center /bin directory to the path variable so that the system can locate the command line utilities. For Windows, the patch can be set as a system variable or a user variable.
To set the environment path variable, do the following as necessary:
Setting the Path Variable in UNIX
To set the PATH variable:
-
Log in as the user named formula, or other root user that you created earlier.
-
To edit the profile or cshrc file (depending on which command shell you are using), perform one of the following steps:
-
If there is already a line containing PATH= or setenv PATH, append :/OperationsCenter_install_path/bin to that line.
-
If there is no line containing PATH= or setenv PATH, add the following lines and save to the file:
bsh or ksh:
export PATH=$PATH:/OperationsCenter_install_path/bin
csh:
setenv PATH 'echo $PATH':/OperationsCenter_install_path/bin
-
-
Log out as the user named formula, then log back in so that the path changes can take effect.
Locating the Path Environment Variable for Microsoft Windows
To locate the path environment variable:
-
From the desktop, click , , . The Control Panel page is displayed.
-
For Windows XP, in Category View, double-click the link.
-
Double-click
 .
.
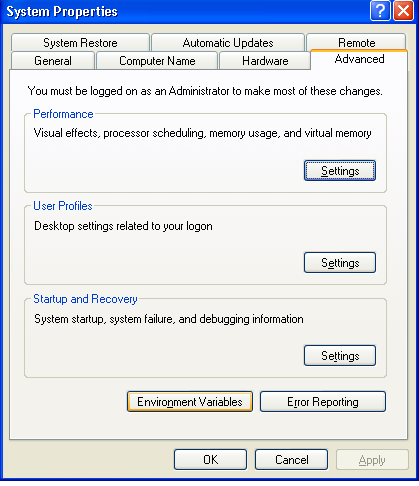
The dialog box is displayed:
Windows 2000:

Windows XP:
-
Click the tab.
-
Click the button.
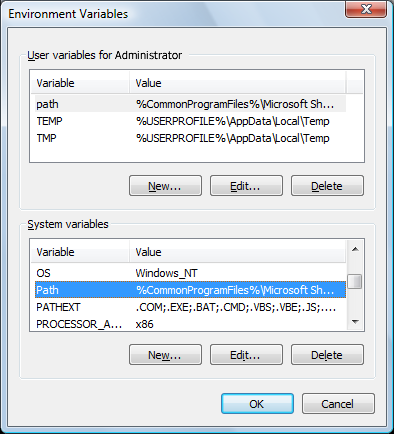
The Environment Variables dialog box is displayed:
Setting the Path As a System Variable in Windows
To set the path as a system variable:
-
From the Environment Variables window, select the line in the System variables list as shown in the previous figure.
-
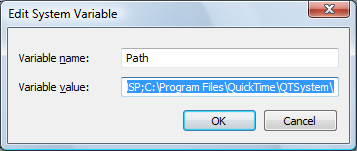
Click . The Edit System Variable dialog box is displayed:
-
Append the declaration with C:\OperationsCenter_install_path\bin or the name of the drive and installation directory you specified on installation.
-
Click to save the changes and close the Edit System Variable window.
-
Click to close the Environment Variables window.
Setting the Path As a User Variable If the Path Variable Does Not Exist in Windows
To set the path as a user variable when the path variable doesn’t exist:
-
From the Environment Variables window, click in the User variables section. The New User Variable dialog box is displayed.
-
Type Path in the Variable Name box.
-
Type %Path%;drive:\OperationsCenter_install_path\bin in the Variable Value box.
-
Click to save the changes and close the New User Variable window.
-
Click to close the Environment Variables window.
Setting the Path As a User Variable If the Path Variable Exists in Windows
To append the path user variable:
-
From the Environment Variables window, select the path line in the User variables section in the Environment Variables window.
-
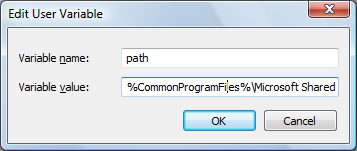
Click . The dialog box is displayed:
-
Append the existing the Variable Value declaration with ;C:\OperationsCenter_install_path\bin or the name of the drive and installation directory you specified on installation.
-
Click to save the changes and close the Edit User Variable window.
-
Click and close the Environment Variables window.
2.3.2 Configuring Display for Images on UNIX
If you plan to use an HP OpenView adapter, NetView adapter or the Dashboard; and Operations Center is installed on a UNIX system, it is necessary that images be sent through Java over X11 protocol so they can be rendered in the Operations Center console or dashboard. This requires the installation of a virtual framebuffer from your operating system vendor.
To configure the display:
-
Download and install a virtual framebuffer from your operating system vendor:
-
Linux: Install an X11 package containing Xsun or Xvfb.
-
Solaris: Install an X11 package containing Xvfb.
-
-
Perform the following system configurations:
-
Edit the user profile for the formula user to set the DISPLAY environment variable to reference the display configured for virtual framebuffer.
-
Configure the virtual framebuffer to start automatically at system start or is part of the Operations Center startup process.
-
-
Start the virtual framebuffer.
-
Issue the following command to verify that the virtual framebuffer is running:
ps -ef |grep vfb
The output will vary depending on your system but shows you the location of the virtual framebuffer, as well as the display and screen name. For example:
-
On Solaris: /application_install_path/Xsun :display_name +nkeyboard +nmouse -dev vfb screen screen_name screen_resolution
-
On Linux: /application_install_path/Xvfb :display_name -screen screen_name screen_resolution
-
-
Do the following to specify the property in the Configuration Managers to where the server listens for connection with the virtual framebuffer:
-
Do the following for the Operations Center server:
-
Open the Operations Center server’s Configuration Manager.
-
Open the pane.
For more information see Host Pane in the Operations Center 5.0 Server Configuration Guide.
-
Specify the .
For example, if the output in Step 4 is /usr/X11/bin/Xvfb :1 -screen 0 1024x768x8, set the x11 Display Name to :1 or :1.0.
-
-
Do the following for the Operations Center Dashboard:
-
Open the Operations Center Dashboard’s Configuration Manager.
For more information see Verifying Configuration Settings in the Operations Center 5.0 Dashboard Guide.
-
Open the pane.
-
Specify the .
For example, if the output in Step 4 is /usr/X11/bin/Xvfb :1 -screen 0 1024x768x8, set the x11 Display Name to :1 or :1.0.
-
-
2.3.3 Starting and Stopping the Server
You can start the Operations Center server either manually or automatically during start up. The server can take a few minutes to start. Check the daemon.trc file for an … Address is in use… message, which indicates that the Operations Center server is running. Or, check the status using the mosstatus command. Do not start the Operations Center console until the Operations Center server starts.
If there are any problems with starting the server, review the trace log files in the /OperationsCenter_install_path/logs directory. The daemon creates a trace log, as does the server. The trace logs store various error messages, such as The license key could not be found. Use any text editor to view the trace logs.
You can also stop the Operations Center server. If a message displays a message when shutting down Operations Center from Windows, adjust the Windows service timeout parameter, which is stored in the Windows registry. The timeout parameter is specified in milliseconds. The registry key is:
HKEY_LOCAL_MACHINE/SYSTEM/CurrentControlSet/Control/WaitToKillServiceTimeout
To start or stop Operations Center services:
Manually Starting the Operations Center Server
To manually start the Operations Center Server, do one of the following:
-
Windows: Select under > > .
Starting Operations Center via the Windows Start menu, starts the Operations Center server locally, but not as a service. Therefore, when you log out, the Operations Center server stops.
-
UNIX: Log in as the user formula (or any user with root privileges) and from the /OperationsCenter_install_path/bin directory, type mosdaemon at a command prompt.
Automatically Starting the Operations Center Server in Windows
By default, the Operations Center daemon is configured to automatically start. If this is disabled, you can re-enable automatic startup by editing the property for the service.
To enable automatic start up for Operations Center:
-
From the desktop, click , , . For Windows 2003, in Category View, double-click the link.
-
Double-click the icon.
-
Double-click the icon. The Services dialog box is displayed:
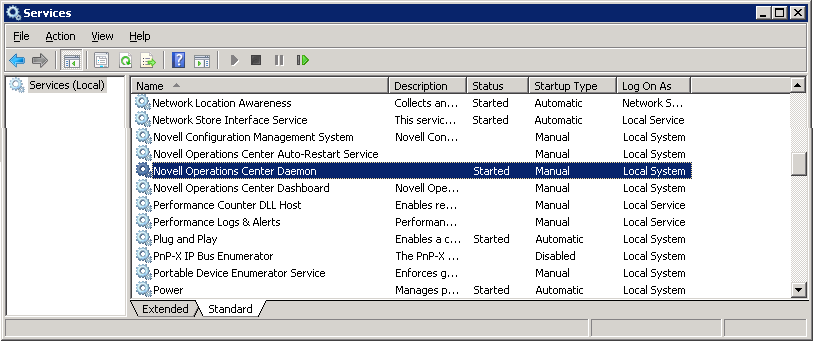
-
Right-click and select to display the Novell Operations Center Daemon Properties dialog box:
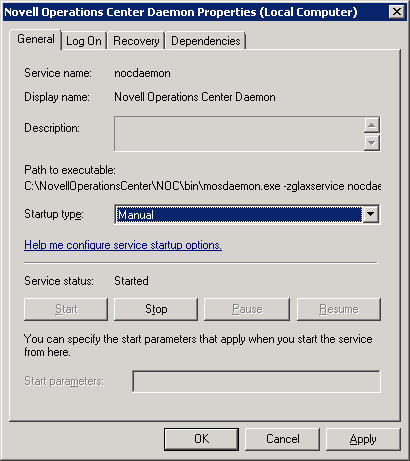
-
Select from the list.
-
Click to close the Novell Operations Center Daemon Properties dialog box.
Starting the Operations Center Server in UNIX
During installation, if you configured the server to automatically start, it starts shortly after the Operations Center daemon starts by default. If not, you will need to start it manually.
For more information on daemon configurations, see Configuring Daemon Control
in the Operations Center 5.0 Server Configuration Guide.
To start the Operations Center server:
-
If the Operations Center daemon is not running, from the /OperationsCenter_install_path/bin directory enter mosdaemon at the command prompt.
-
Enter mosstart Formula.
The following messages display:
Starting the server "Formula" ...
The server "Formula" has been started.
Stopping the Operations Center server in Windows
From the desktop, click the button and then select > > .
Shutting Down the Operations Center server and mosdaemon service from Windows
-
From the desktop, click > > .
For Windows XP, click > > .
-
Double-click the icon to display the Administrative Tools dialog box.
-
Double-click the icon to display the Services dialog box.
-
Right-click the line and select Stop.
Stopping the daemon also shuts down the server.
Stopping the Server and the mosdaemon from the Command Prompt in Windows
From the drive:\OperationsCenter_install_path\bin directory enter mosstop –shutdown at the command prompt where drive is the installation drive.
The server and mosdaemon stop.
Stopping the Server and the mosdaemon manually in UNIX
From the /OperationsCenter_install_path/bin directory enter mosstop –shutdown at the command prompt.
The Operations Center server stops.
2.3.4 Verifying the Installation
After Operations Center software is installed, verify that the installation was successful before proceeding to install any other Operations Center software on the Operations Center server. To do this, start Operations Center and perform a status check.
The mosstatus command verifies that the Operations Center software started correctly. This command also lists the name and status of any adapters that are running, and the number of active sessions. At this point, there are no adapters running and no active sessions. Refer to the Operations Center 5.0 Adapter and Integration Guide for information on defining adapters.
To check the Operations Center server status:
Windows
To verify the installation on Windows:
-
From the drive:\OperationsCenter_install_path\bin directory, type mosstatus –all at the command prompt where drive is the installation drive.
A message displays stating that the Operations Center software was successfully installed and is running.
-
Proceed to Section 2.3.5, Configure the Installation.
UNIX
To verify the installation on Unix:
-
From the /OperationsCenter_install_path/bin directory, type mosstatus –all at the command prompt.
A message similar to the following displays:
Server Formula
Status: 0 adapter(s), 0 active session(s)
This message indicates that the Operations Center software is successfully installed and running. The message indicates that no adapters are running, as none has been defined.
-
Proceed to Section 2.3.5, Configure the Installation.
2.3.5 Configure the Installation
After installing and verifying the installation, configure the installation and/or access the Operations Center console. Some configurations might require restarting the Operations Center server.
-
Launch the Operations Center console or deploy the console to management machines.
NOTE:The default user account is admin with a password of formula.
For instructions, see Section 3.0, Operations Center Console Deployment.
-
Do one of the following to protect the security of your installation:
-
Change the default password on the admin user account.
-
Delete the default admin account and create a new administrator account.
For information about user and group accounts, see the Operations Center 5.0 Security Management Guide.
-
-
After installing and verifying the installation, configure the installation.
Refer to
Overview of Post-Installation Configurations
in the Operations Center 5.0 Server Configuration Guide for more information and links to the following configurations and more:-
Run the Configuration Manager: Configure settings for the Operations Center server as well as Configuration Storage. If you are installing on a cluster, run it after completing all the installations.
-
Create databases: If you plan to use any external databases with Operations Center, you should create them. Be sure to see the sample scripts and Readme files in the /OperationsCenter_install_path/databases/samples directory.
-
Define databases: Many Operations Center data stores require database definitions that are created and managed in the Operations Center console.
-
Determine server security and networking settings, such as IP addresses: For additional information about security in Operations Center, refer to the Operations Center 5.0 Security Management Guide.
-
Determine port usage: Operations Center is installed using default ports, but do consider the ports currently used and how they fit within your environment.
-
Determine memory usage: The Java Virtual Machine is configured with parameters for memory allocation and installs with these default values. Before adjusting the memory, it is important to understand how memory is allocated.
-