17.1 Browsing the Resource Catalog
The action on the tab of the Identity Manager user interface allows you to view resources that have been previously defined in the catalog. It also lets you create new resources and modify, delete, and assign existing resources.
17.1.1 Viewing Resources
-
Click in the list of actions.
The User Application displays a list of resources currently defined in the catalog.

Filtering the Resource List
-
Click the button in the upper right corner of the display.

-
In the dialog, specify a filter string for the resource name or description, or select one or more categories for which you want to see resources. Click :

-
To remove the current filter, click .
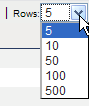
Setting the Maximum Number of Resources on a Page
-
Click on the dropdown list and select the number of rows you want to be displayed on each page:
Scrolling within the Resource List
-
To scroll to another page in the resource list, click on the Next, Previous, First or Last button at the bottom of the list.
Sorting the Resource List
To sort the resource list:
-
Click the header for the column you want to sort on.
The pyramid-shaped sort indicator shows you which column is the new sort column. When the sort is ascending, the sort indicator is shown in its normal, upright position.
When the sort is descending, the sort indicator is upside down.
The initial sort column is determined by the administrator.
If you override the initial sort column, your sort column is added to the list of required columns. Required columns are indicated with an asterisk (*).
When you modify the sort order for the task list, your preference is saved in the Identity Vault along with your other user preferences.
17.1.2 Creating New Resources
-
Click the button at the top of the display:

The User Application displays the New Resource dialog:

-
Provide details for the resource definition, as described below:
Field
Description
The text used when the resource name displays in the User Application. You cannot include the following characters in the when you create a resource:
< > , ; \ " + # = / | & *
You can translate this name in any of the User Application’s supported languages. For more information, see Table 1-1, Common Buttons.
The text used when the role description displays in the User Application. Like the Display Name, you can translate it to any of the User Application’s supported languages. For more information, see Table 1-1, Common Buttons.
Allow you to categorize resources for resource organization. Categories are used for filtering lists of resources. Categories are multi-select.
Users who are designated as the owners of the resource definition. The resource owner does not automatically have the authorization to administer changes to a resource definition.
-
Click to save the role definition.
The User Application displays several additional tabs at the bottom of the window to allow you to complete the resource definition.
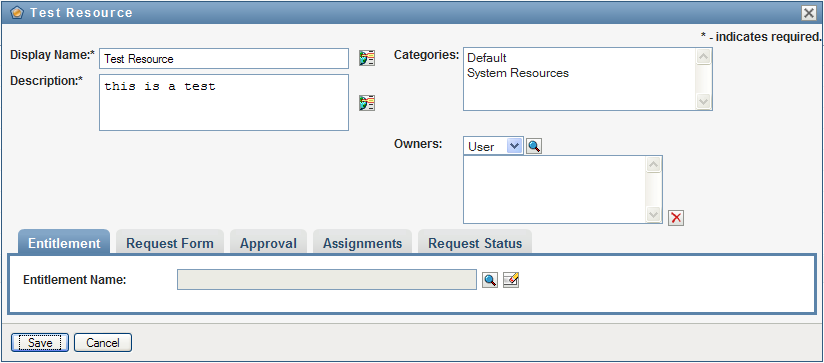
Defining the Entitlement for a Resource Assignment
-
Click the tab.
-
Click to select the entitlement:

The User Application displays a tree-view list of available entitlements:
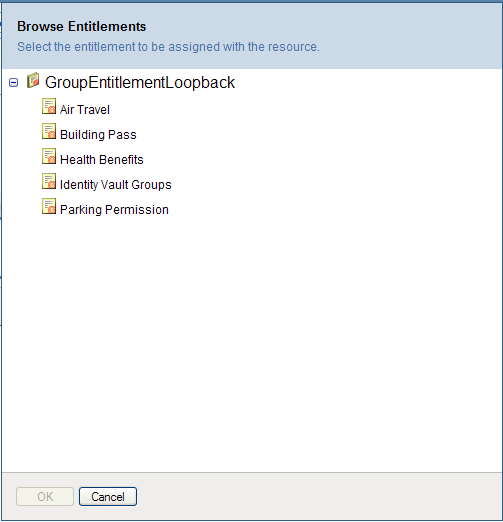
The list shows all drivers and entitlements found in the User Application driver set.
NOTE:If you have not configured the resource correctly, when you access the page to select an Entitlement, you will see a message indicating that you have not configured your entitlements for resource mapping.
For information about configuring your drivers and entitlements for resource mapping, see
Enabling Drivers for Resource Mappings,
in the NetIQ Identity Manager User Application: Administration Guide. -
Select the entitlement you want to use and click .
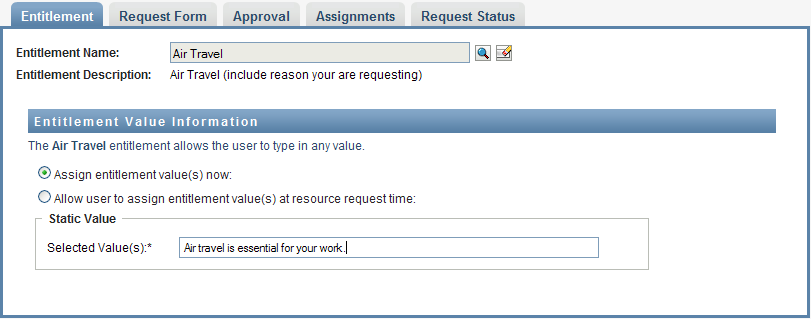
The tab shows information about any values that might be required for the entitlement:

-
Specify the details of the entitlement binding. The details vary depending on the type of entitlement you are associating with the resource:
Type of Entitlement
Description
Valueless entitlement
The entitlement accepts no parameter values. For example, a resource might be bound to an entitlement called Health Benefits that simply makes the recipient eligible for health care benefits. This type of entitlement has a fixed behavior and thereby requires no further information from the requester.
When you bind to a valueless entitlement, no further configuration is required.
Free-form valued entitlement
The entitlement that requires a parameter value specified as a free-form string at request time. For example, a resource might be bound to an entitlement called Clothing that allows the requester to specify a value that represents their favorite color.
You can assign a value at design time when you’re defining the resource, or allow the user to assign a value at request time.
For more information, see Binding to a Free-Form Valued Entitlement.
Single-valued entitlement
The entitlement that requires a single parameter value. For example, a resource might be bound to an entitlement called Parking Permission that allows the requester to select a parking location. The allowable values are provided by an entitlement list, which can include a static list of values defined by an administrator or a dynamic list of values generated from an LDAP query.
You can assign a value at design time when you’re defining the resource, or allow the user to assign a value at request time.
For more information, see Binding to a Single-Valued Entitlement.
Multi-valued entitlement
The entitlement that accepts one or more parameter values. For example, a resource might be bound to an entitlement called Building Pass that allows the requester to select one or more buildings. The allowable values are provided by an entitlement list, which can include a static list of values defined by an administrator or a dynamic list of values generated from an LDAP query.
You can assign a value at design time when you’re defining the resource, or allow the user to assign a value at request time.
For more information, see Binding to a Multi-Valued Entitlement.
Binding to a Free-Form Valued Entitlement
-
To assign a static value at design time, select .
Type a free-form value for the resource:
-
To assign a dynamic value at request time, select .
-
Specify a label that the user will see when requesting the resource:

-
To localize the label, click the button and specify the foreign language text for the label:

-
Binding to a Single-Valued Entitlement
-
To assign a static value at design time, select .
Select a single value from the default entitlement list:
-
To assign a dynamic value at request time, select .
-
Specify a label that the user will see when requesting the resource.
-
To localize the label, click the button and specify the foreign language text for the label.
-
In the dropdown, select the list you want to use to display the allowable values.
-
For an administrator-defined or query entitlement, the allowable values are provided by a list defined in the entitlement. The values are first loaded into code map database tables to allow you to provide user-friendly labels and localized strings. Once loaded, these tables can be used as a source for creating additional entitlement lists.
By default, the User Application creates an entitlement list that includes all rows in the list. You can create more entitlement lists if you want to show selected rows only.
Binding to a Multi-Valued Entitlement
-
To assign a static value at design time, select .
Use the Object Selector to pick the entitlement values:

-
Select one or more values from the default entitlement list:

-
To assign a dynamic value at request time, select .
-
Specify a label that the user will see when requesting the resource:
-
To localize the label, click the button and specify the foreign language text for the label:
-
In the dropdown, select the list you want to use to display the allowable values.
-
Specify whether the user can select multiple values by selecting the checkbox.

Since the entitlement definition allows multiple assignments, you can specify whether you want the resource to also allow multiple assignments.
-
Defining the Request Form
The request form for a resource displays two different types of fields:
-
Entitlement parameter fields, which map to entitlement parameters for which the user can provide values at request time.
-
Decision support fields, which allow the requester to provide additional information that may help the approver make a decision about whether to approve or deny the request.
The tab shows both types of fields, and provides a user interface for creating and editing decision support fields.
In addition to the fields shown on the tab, the request form always includes the following required fields:
All of the fields on the request form are shown on the approval form as read-only values.
To define the request form:
-
Click the tab.

The tab shows a list of fields that correspond to entitlement parameters for which values will be specified at request time. The properties for entitlement parameter fields are configured on the Action tab. You cannot change the behavior of fields that map to entitlement parameters.
-
To add a decision support data field:
-
Click the plus sign (+) to add a new field:

-
The tab adds a new field (with the default label ) to the list of fields, and displays the Properties panel to allow you to define the characteristics of the field:

-
To assign the decision support value right away, click .

Provide a display label for the field, as well as the data type and value. The following data types are supported:
Data type
Description
Boolean
A logical data type having one of two possible values: true or false.
Integer
A sequence of natural numbers.
List
A set of predetermined values from which a value is selected.
String
A sequence of values representing text.
To hide the value on the request form, click . A field that is hidden on the request form is still visible on the approval form.
-
To allow the user to assign the value at request time, click .

Provide a display label for the field, and specify whether the value must be of a particular data type or come from a list.
-
Defining the Approval Flow Settings
To define the approval process:
-
Click the tab.

-
Specify whether the approval process for the resource can be overridden by the approval process for a role by selecting or deselecting the checkbox.
If the checkbox is selected, the role approval process will always override the resource approval process whenever the resource is associated with a role. Once the associated role has been approved, the resource is automatically provisioned, without any need for approval.
-
Define the approval process for a grant operation, as follows:
-
Open the section of the tab.
-
Specify the approval details, as described below:
Field
Description
Select this box if the resource requires approval when requested.
Deselect this box if the resource does not require approval when requested.
When you select , you need to select a custom Resource Assignment Approval Definition. This is the name of the provisioning request definition executed when the resource is requested.
When you select , the resource uses the standard resource assignment approval definition specified in the Resource Subsystem configuration settings.
Select if you want the role to be approved by all of the users in the list. The approvers are processed sequentially in the order they appear in the list.
Select if you want the role to be approved by a percentage of the users in the list. The approval is complete when the percentage of users specified is reached.
For example, if you want one of four users in the list to approve the condition, you would specify Quorum and a percentage of 25. Alternatively, you can specify 100% if all four approvers must approve in parallel. The value must be an integer between 1 and 100.
HINT:The Info button displays text that explains the approval types.
Select if the role approval task should be assigned to one or more users. Select if the role approval task should be assigned to a group. Select if the role approval task should be assigned to a role.
To locate a specific user, group, or role, use the or buttons.To change the order of the approvers in the list, or to remove an approver, see Section 1.4.4, Common User Actions.
-
-
Define the approval details for a revoke operation, as follows:
-
Open the section of the Approval tab.
-
Specify the approval details, as described below:
Field
Description
Select this box if the resource requires approval when requested.
Deselect this box if the resource does not require approval when requested.
Select this box to copy the settings you used for the grant operation to the settings for the revoke operation.
For all other approval details, see the field descriptions for the grant operation, which are presented in Step 3.b.
-
Assigning a Resource
For details, see Assigning a Resource From the Edit Resource Dialog.
Checking the Status of Requests
The action allows you to see the status of your resource assignment requests, including requests you’ve made directly as well as resources assigned through roles. It lets you see the current state of each request. In addition, it gives you the option to retract a request that has not been completed or terminated if you have changed your mind and do not need to have the request fulfilled.
The action shows all resource assignment requests, including those that are running, pending approval, approved, completed, denied, or terminated.
-
Click the tab.

For each field on the request form, the Request Status display shows a separate column in the list. For example, the Parking Garage column is added to the request list to show entitlement values specified for the resource assignment:

-
To see the detailed status information for a request, click the status:

The Assignment Details window is displayed:

For details on what the status values mean, see Section 10.4, Viewing Your Request Status.
-
To retract a request, select the request and click .
If the request has been completed or terminated, you will see an error message if you try to retract the request.
17.1.3 Editing an Existing Resource
-
Select a previously defined resource and click .

-
Make your changes to the resource settings and click .
17.1.4 Deleting Resources
-
Select a previously defined resource and click .
What happens to existing resource assignments When you a delete a resource that already has one or more identities assigned to it, the system removes the resource from those identities. If the resource has been associated with a role, the system also removes all role associations that pertain to the deleted resource.
17.1.5 Assigning Resources
You can assign a resource in either of two ways:
-
From the
-
From the dialog
Both of these methods are described below.
Assigning a Resource From the Catalog
-
Select a previously defined resource in the and click .

The User Application displays the resource request form:

The and fields are required fields that are present in all resource request forms. You can use the Object Selector to select the users for the resource assignment.
Assigning a resource to multiple users You can select one or more users for the resource assignment. If you select multiple users, all of the users receive the same resource assignment parameter values.

The request form may include additional fields to accept values for dynamic parameter values or decision-support values, as shown below:

In the example shown above, the field is used to accept an entitlement parameter value, whereas the and fields are decision-support fields. These fields are not part of the entitlement definition. Instead, these have been added to the resource definition.
-
Fill in the fields on the request form.
-
Click .
Assigning a Resource From the Edit Resource Dialog
-
In the , select a resource and click to open the dialog.
-
Click the tab.
The tab displays a list of assignments that have been granted for the selected resource.
-
To add a new assignment, click .
The User Application displays the resource request form:
For details on working with the request form, see Assigning a Resource From the Catalog.
17.1.6 Refreshing the Resource List
-
Click .
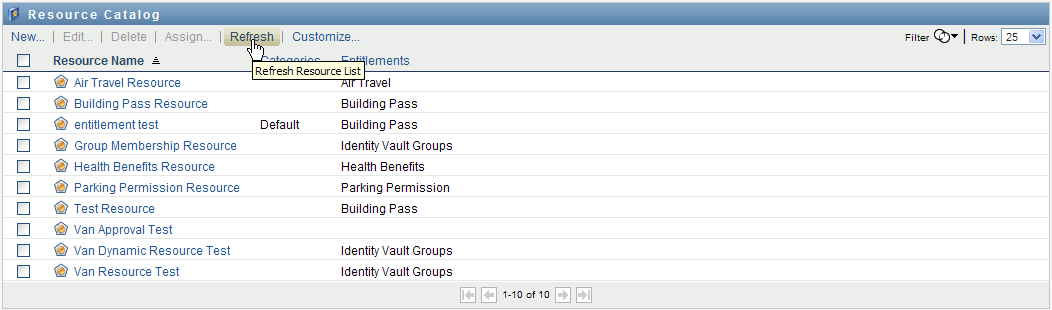
NOTE:If you create a resource assignment, and then remove it, you see a message indicating that the assignment has been removed, but the assignment may still be listed. If you refresh the page, you should see that the assignment has been removed.
17.1.7 Customizing the Resource List Display
The allows you to select and deselect columns, and also reorder columns within the task list display. The column selection and order are controlled by settings within the dialog. When you modify the column list or reorder the columns, your customizations are saved in the Identity Vault along with your other user preferences.
To customize the display of columns:
-
Click in the :

The User Application displays the list of columns currently selected for the display, and a list of additional columns that are available for selection.

-
To include an additional column in the display, select the column in the list box, and drag it to the list box.
To select multiple columns in the list, hold down the Ctrl key and select the columns. To select a range of columns that appear together in the list, hold down the Shift key and select the columns.
You can reorder the columns in the display by moving them up or down in the list box.
-
To remove a column from the display, select the column in the list box, and drag it to the list box.
The column is a mandatory column and cannot be removed from the task list display.
-
To save your changes, click .