10.4 Viewing Your Request Status
The action allows you to see the status of the requests you’ve made. It lets you see the current state of each request. In addition, it gives you the option to retract a request that is still in process if you have changed your mind and do not need to have the request fulfilled.
The action includes process (provisioning) requests, role requests, and resource requests in a single consolidated list. The list provides a column that allows you to see the type for each request. The requests appear in a single list, but the list can be sorted or filtered by request type. You can retract requests that are still in a retractable state from the list.
The Domain Administrator and Domain Manager have the ability to view requests for other users, as described below:
-
When nothing is selected in the control, the request list shows the current user’s requests. These requests include those for which he is either recipient or addressee, as well as requests for which the recipient or addressee is a group, container, or role to which the current user belongs.
-
When a user is selected in the control, the list shows requests that have the selected user as recipient.
-
When a group is selected, the list shows requests that have the selected group as recipient.
-
When a role is selected, the list shows requests that have the selected role as recipient.
-
When a container is chosen, the list shows requests that have the selected container as recipient.
When a Domain Administrator or Domain Manager is in manage mode, the list includes only requests associated with the domain specified for the administrator or manager assignment.
A Team Manager has the ability view requests for team members. Before selecting a team member, the Team Manager must select a team.
When a Team Manager is in manage mode, the list includes only requests associated with the domain specified for the selected team configuration.
Proxy Mode The action is not available in proxy mode.
10.4.1 Viewing the Request List
To see the requests you have made:
-
Click in the group of actions on the Work Dashboard.
The list of requests is displayed. If you are not in managed mode, the requests shown are those for which you are the recipient or the requester. If you are in managed mode, the requests shown are those for which the selected user, group, or container is the recipient or the requester.
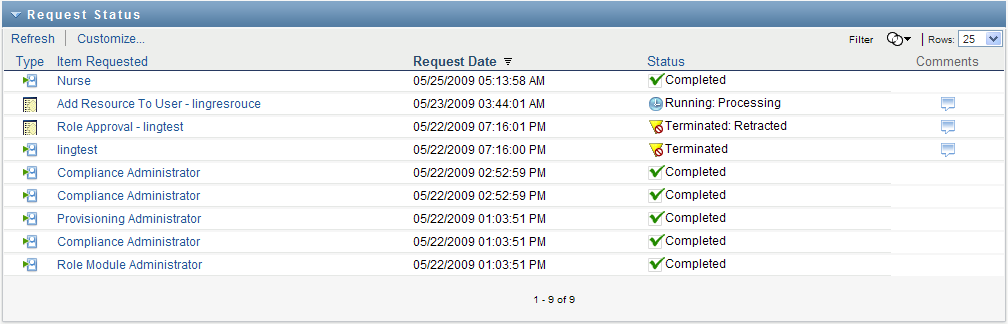
The list includes active requests, as well as requests that have already been approved or denied. The administrator can control how long workflow results are retained for. By default, the Workflow system retains workflow results for 120 days.
NOTE:If you assign a resource to a user that has multiple values from an entitlement, on the tab only one entry will be listed. The first value selected will be the one displayed. On the tab, multiple entries will be listed, and the user will be appear as many times as there were values selected.
To see the type of the request, you need to include the column in the list of columns for the display. When the column is included, the User Application shows an icon indicating whether the request was a process (provisioning) request, role request, or resource request.
The columns in the Request Status list are described below:
-
The column provides the name of the role, resource, or process specified for the request.
-
The column identifies the user who made the request.
-
The column identifies the user, group, or container that will receive the item requested, if the request is approved. In the case of role relationships, the column shows the name of the role related to the role named in the column.
-
The column shows a detailed status for the request as well as an icon that indicates the status summary. The status summary shows the general status of the request and can be selected from the Filter menu to narrow the results when searching for requests with a particular status:
Status summary icon
Detailed Status
Description

New Request
Indicates that this is a new request that is currently being processed.
A request with this status can be retracted.
SoD Approval Start - Pending
Indicates that the Role Service driver is attempting to restart a separation of duties approval process for the request following an SoD Approval Start - Suspended condition.
A request with this status can be retracted.
SoD Approval Start - Suspended
Indicates that the Role Service driver is unable to start a separation of duties approval process and the process has been suspended temporarily.
When the Role Service driver tries to start a workflow and cannot (for example, when the User Application is down or unreachable), the request transitions to a pending retry state to wait for up to a minute before transitioning to a retry state (SoD Approval Start - Pending state) that triggers the driver to try and start the workflow again. These states prevent requests that don't depend on workflows from being backed up behind requests that are blocked by a workflow that can't be started.
If a request shows this status for an extended period of time, make sure the User Application is running. If it is running, check the connection parameters given to the Role Service driver to be sure they are correct.
A request with this status can be retracted.
Approval Start - Pending
Indicates that the Role Service driver is attempting to restart an approval process for the request following an Approval Start - Suspended condition.
A request with this status can be retracted.
Approval Start - Suspended
Indicates that an approval process has been initiated for the request, but the process has been suspended temporarily.
When the Role Service driver tries to start a workflow and cannot (for example, when the User Application is down or unreachable), the request transitions to a pending retry state to wait for up to a minute before transitioning to a retry state (Approval Start - Pending state) that triggers the driver to try and start the workflow again. These states prevent requests that don't depend on workflows from being backed up behind requests that are blocked by a workflow that can't be started.
If a request shows this status for an extended period of time, make sure the User Application is running. If it is running, check the connection parameters given to the Role Service driver to be sure they are correct.
A request with this status can be retracted.

SoD Exception - Approval Pending
Indicates that a separation of duties approval process has been started and is waiting for one or more approvals.
A request with this status can be retracted.
Approval Pending
Indicates that an approval process has been started for the request and is waiting for one or more approvals.
A request with this status can be retracted.

SoD Exception - Approved
Indicates that a separation of duties exception has been approved for this request.
A request with this status can be retracted.
Approved
Indicates that the request has been approved.
A request with this status can be retracted.
Provisioning
Indicates that the request has been approved (if approvals were required), and the activation time for the assignment has been reached. The Role Service driver is in the process of granting the assignment.
You are not permitted to retract a request with this status.

Pending Activation
Indicates that the request has been approved, but the activation time for the assignment has not yet been reached. The Pending Activation does not have a roll-up category, or summary status icon. This means that you cannot filter the list of requests by the Pending Activation status.
A request with this status can be retracted.

SoD Exception - Denied
Indicates that a separation of duties exception has been denied for this request.
You are not permitted to retract a request with this status.
Denied
Indicates that the request has been denied.
You are not permitted to retract a request with this status.

Provisioned
Indicates the request has been approved (if approvals were required), and the assignment has been granted.
You are not permitted to retract a request with this status.
Cleanup
Indicates that the request has been processed and the Role Service driver is in the process removing the internal objects created for the request.
You are not permitted to retract a request with this status.

Canceling
Indicates that the Role Service driver is canceling the request because of a user action.
You are not permitted to retract a request with this status.
Canceled
Indicates that the request has been canceled by a user action.
You are not permitted to retract a request with this status.
Provisioning Error
Indicates that an error occurred during the course of provisioning (granting) or deprovisioning (revoking) the assignment.
The precise error message for a provisioning error is written to the trace or audit log, if either is active. If a provisioning error occurs, check your trace or audit log to see if the error message indicates a serious problem that must be fixed.
You are not permitted to retract a request with this status.
NOTE:If the system clock on the server where the Role Service driver resides is not synchronized with the system clock on the server where the User Application is running, the request status might appear to be different on the Request Status and Role Assignments lists. For example, if you request a role assignment that does not require approval, you might see the status as Provisioned in the Request Status section, but the status on the Role Assignments section shows Pending Activation. If you wait for a minute or so, you might then see the status on the Role Assignments section change to Provisioned. To ensure that the status is shown correctly throughout the User Application, check your system clocks to be sure they are synchronized appropriately.
-
The column shows the date when the request was made.
-
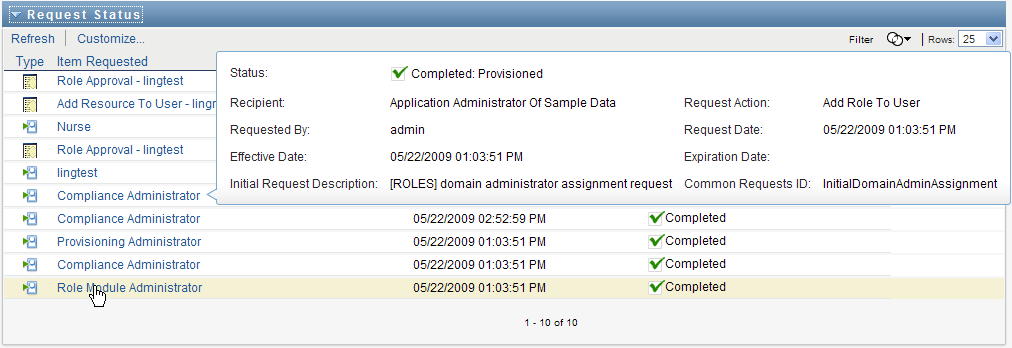
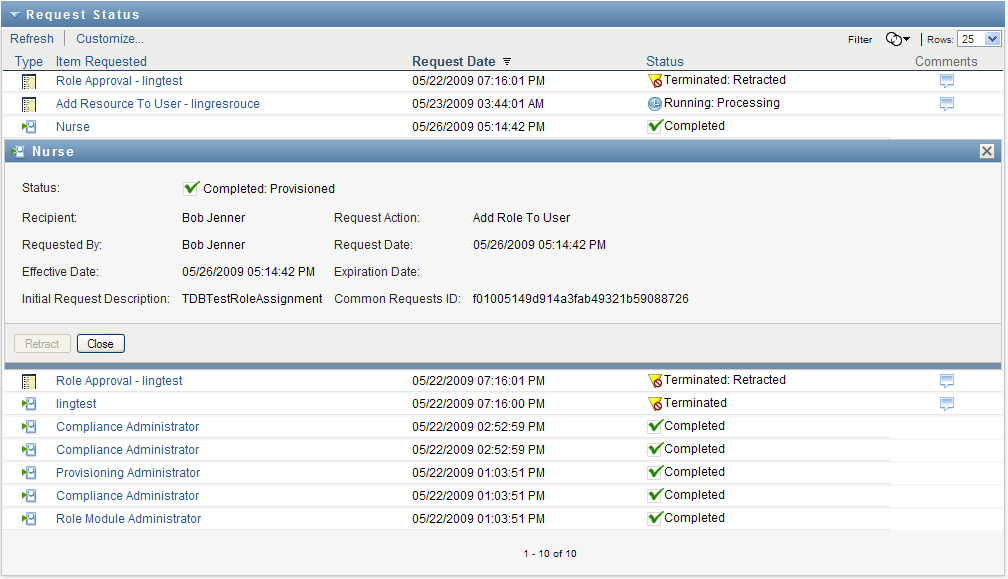
10.4.2 Viewing the Summary for a Request
To see the summary information for a request:
-
Hover over the request name in the column.
10.4.3 Filtering the Request List
You can apply a filter to the request list to limit the number of rows returned. By filtering the request list, you can find what you’re looking for more easily, and also improve performance.
To define a filter for the request list:
-
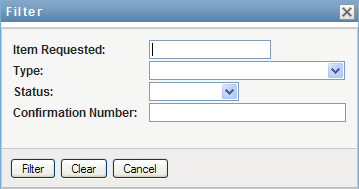
Click the button.

The Filter dialog displays, showing several fields you can use to specify how you want to filter the data:
-
To narrow the search to requests that have a request name that matches a particular string, type the first characters of the string in the field.
-
To narrow the search to requests of a particular type, select the type in the dropdown.
-
To narrow the search to requests that have a particular status, select the status in the dropdown.
The status categories available for selection vary depending on which type you’ve selected in the dropdown.
-
To narrow the search to requests that have a particular confirmation number, type the ID in the field.
The confirmation number is an internal identifier that correlates a set of role assignments that were requested at the same time. Here are some situations in which a set of role assignments will share a confirmation number:
-
A single request assigns multiple roles to a single user.
-
A single request assigns a single role to multiple users. This might occur when a requester assigns a role to a group or container.
When a set of role assignments share a confirmation number, a user can retract each assignment individually. In addition, each role assignment can be approved or denied separately.
-
-
Click to perform a new query for requests, using the selection criteria you’ve specified in the Filter dialog.
When you define a filter for the request list, your filter definition is saved in the Identity Vault along with your other user preferences.
NOTE:The preferences saved always apply to the user currently logged on to the User Application, regardless of whether a different user has been selected in the control.
To see what filter points have been defined previously:
-
Look at the boxes to the left of the Define Filter icon.
When no filters are defined, the Define Filter icon shows two empty rings, as shown below:

When one or more filter points have been defined, each filter point appears in a separate box, as shown below:

To remove a filter point previously specified in the Filter dialog:
-
Click the icon (which looks like an ) next to the filter point you want to remove:

To remove all previously defined filters and update the search results to include all requests.
-
Click the button to open the Filter dialog.
-
Click the button.
The Filter dialog closes and the request list is updated to include all requests.
10.4.4 Customizing the Request Status Columns
The Request Status section of the Work Dashboard page allows you to select and deselect columns, and also reorder columns within the request list display. Any customizations you make to the display are saved for future use.
To customize the display of columns in the request status list:
-
Click the button in the section of the Work Dashboard page.
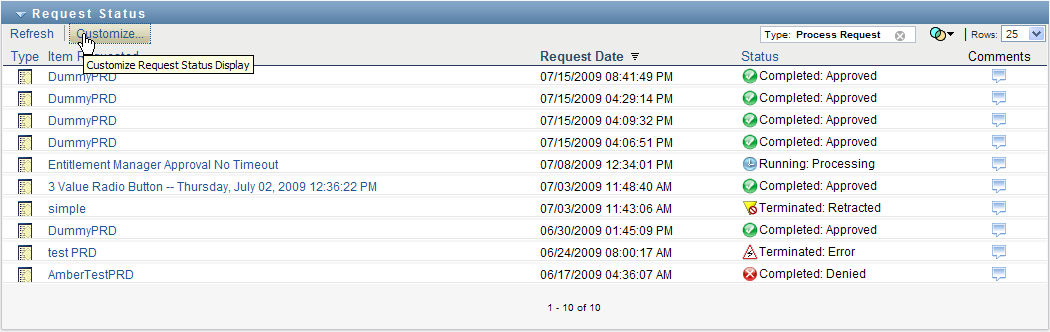
The User Application displays the list of columns currently selected for the display, and a list of additional columns that are available for selection.
-
To include an additional column in the display, select the column in the list box, and drag it to the list box.
To select multiple columns in the list, hold down the Ctrl key and select the columns. To select a range of columns that appear together in the list, hold down the Shift key and select the columns.
You can reorder the columns in the display by moving them up or down in the list box.
-
To remove a column from the display, select the column in the list box, and drag it to the list box.
The and columns are mandatory columns and cannot be removed from the request list display.
-
To save your changes, click .
10.4.5 Controlling the Number of Items Displayed on a Page
To specify the number of items you want displayed on each page:
-
Select a number in the dropdown list.
When you modify the setting, your preference is saved in the Identity Vault along with your other user preferences.
10.4.6 Controlling the Display of Request Status Details
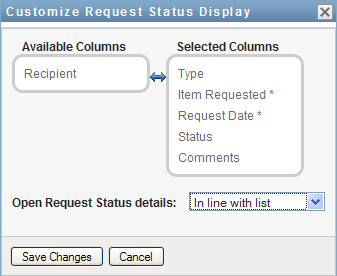
The Work Dashboard page allows you to specify how you want to display the details for a request you click on in the Request Status section of the page. You can display the task details within the list or in a separate modal dialog. This behavior is controlled by a setting within the Customize Request Status Display dialog.
When you modify this setting, your preference is saved in the Identity Vault along with your other user preferences.
To control the display of task details:
-
Click the button in the section of the Work Dashboard page.
The User Application displays the dialog, which allows you to customize the request list display. The set of controls shown may vary depending on which settings the administrator has designated as available for user override.
-
To display the details within the task list display, select in the dropdown. To display the details in a separate modal dialog, select .
-
To save your changes, click .
10.4.7 Sorting the Request List
To sort the request list:
-
Click the header for the column you want to sort on.
The pyramid-shaped sort indicator shows you which column is the new primary sort column. When the sort is ascending, the sort indicator is shown in its normal, upright position. When the sort is descending, the sort indicator is upside down.
You can sort the list on multiple columns by clicking the header for each sort column. The default sort is descending order by Request Date, which causes the most recent requests to display first. If you sort the list on any column other than the Request Date column, the Request Date column is used as the secondary sort column.
When you modify the sort order for the request list, your preference is saved in the Identity Vault along with your other user preferences.
10.4.8 Refreshing the Request List
To refresh the request list:
-
Click the button.
The request list is updated to reflect the current state of the request list for the current user. The button does not remove any filters you have applied to the request list. When you refresh the request list, any filters you have defined are used to update the list, and the filters remain in effect until you reset them.
10.4.9 Viewing the Comments for a Request
-
To display the comment text for a request, click the Comments icon in the request list.

NOTE:To see the comments for a request, you must include the Comments column in the list of selected columns. For details on adding columns to the task list, see Section 10.4.4, Customizing the Request Status Columns.
10.4.10 Viewing the Details for a Request
To view the details for a request:
-
Click the request name in the column.
The User Application displays the details for the request.
10.4.11 Retracting a Request
The Request Status section of the Work Dashboard page gives you the option to retract a request that is still in process if you have changed your mind and do not need to have the request fulfilled.
An end user can retract any request that for which this user is the initiator, as long as the request is still in a retractable state. A Domain Administrator can retract any request within the domain for which the administrator has authority. A Domain Manager must have the proper security permission to retract requests. Specifically, you must have permission to revoke assignments, which implicitly gives you the ability to retract a request as well.
To retract a request:
-
Click on the Request Detail window.
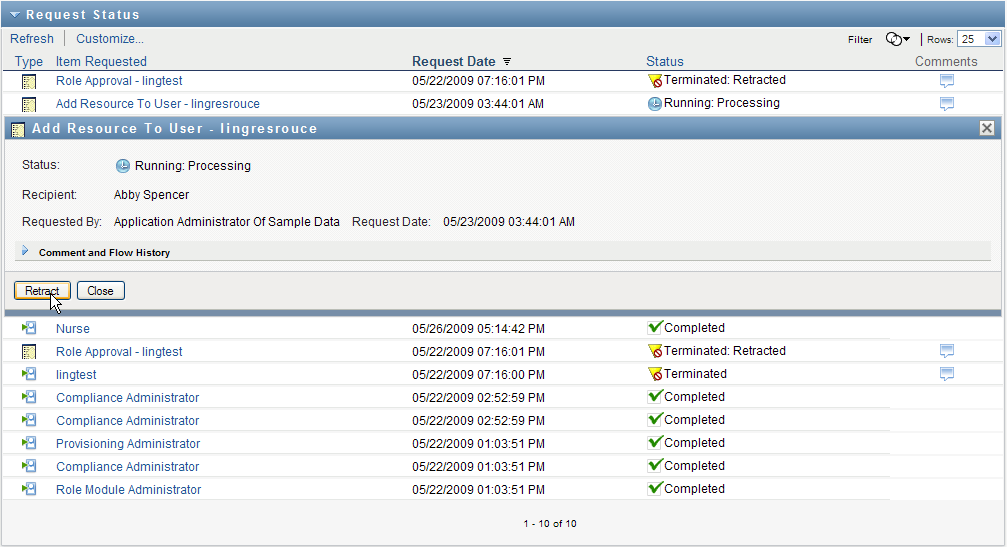
The button is enabled only when the process associated with the request is still running.