2.10 Configuring the Roles and Resources Tab
This section provides details on configuring the underlying subsystem for the Roles and Resources tab. Topics include:
2.10.1 Role Service Driver Configuration
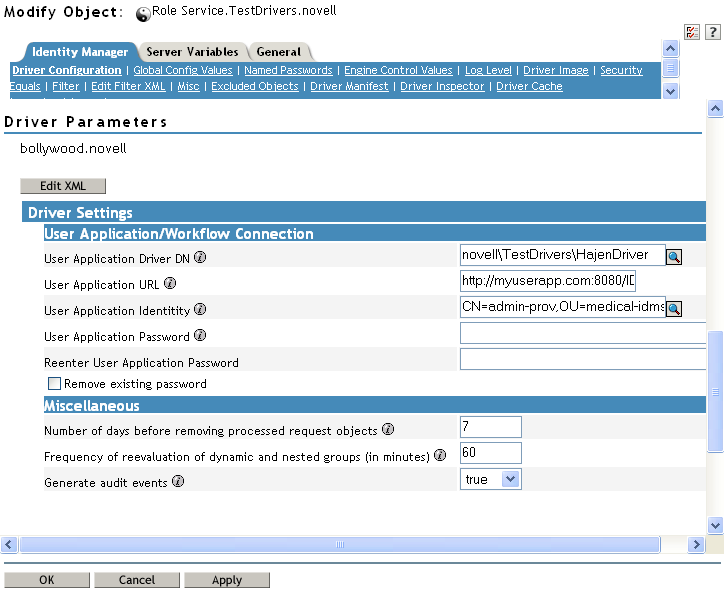
After creating the Role Service driver at installation time, you can optionally modify some of the driver configuration settings in iManager. To configure the Role Service driver:
-
In iManager, click .
-
Browse to the driver set where the driver exists, then click .
-
Click the upper-right corner of the Role Service driver icon, then click .
-
Click on the tab.
-
Scroll down to the section of the page.
-
Make any changes you would like to the settings, and click to commit your changes.
You can modify the following standard driver settings (listed under on the Driver Configuration page), which get their initial values at installation time:
Table 2-5 Standard Driver Settings
|
Option |
Description |
|---|---|
|
|
The distinguished name of the User Application driver object that is hosting the role system. Use the eDirectory format, such as UserApplication.driverset.org, or browse to find the driver object. This is a required field. |
|
|
The URL used to connect to the User Application in order to start Approval Workflows. This is a required field. |
|
|
The distinguished name of the object used to authenticate to the User Application in order to start Approval Workflows. This needs to a user who has been assigned as a Provisioning Administrator for the User Application. Use the eDirectory format, such as admin.department.org, or browse to find the user. The identity needs to be entered in LDAP format (for example, cn=admin,ou=department,o=org), rather than dot format. Note that this is different from the format required at driver install time, where dot notation is expected. This is a required field. |
|
|
Password of the account specified in the User Application Identity field. The password is used to authenticate to the User Application in order to start approval workflows. This is a required field. |
|
|
Re-enter the password of the account specified in the User Application Identity field. |
In addition, you can modify the following additional settings (listed under on the Driver Configuration page) to customize the behavior of the Role Service driver:
Table 2-6 Additional Settings for Customizing the Role Service Driver
|
Option |
Description |
|---|---|
|
|
Specifies the number of days the driver should wait before cleaning up request objects that have finished processing. This value determines how long you are able to track the status of requests that have been fulfilled. |
|
|
Specifies the number of minutes the driver should wait before reevaluating dynamic and nested groups. This value determines the timeliness of updates to dynamic and nested groups used by the User Application. In addition, this value can have an impact on performance. Therefore, before specifying a value for this option, you need to weigh the performance cost against the benefit of having up-to-date information in the User Application. |
|
|
Determines whether audit events are generated by the driver. For details on audit configuration, see Section 3.0, Setting Up Logging. |
Indexing for the Role Service Driver
The Role Service driver creates relevant indexes in eDirectory for roles definitions. If you upload a large number of roles, the indexing of these values may take some time. You can monitor these indexes under Index Management in iManager.
Here is the list of Index Names for the indexes created for the Role Service driver:
nrf(Object Class)
nrf(nrfMemberOf)
nrf(nrfStatus)
nrf(nrfStartDate)
nrf(nrfNextExpiration)
nrf(nrfParentRoles)
nrf(nrfChildRoles)
nrf(nrfCategory)
nrf(nrfRoleCategoryKey)
nrf(nrfLocalizedNames)
nrf(nrfLocalizedDescrs)
nrf(nrfRoles)
2.10.2 User Application Configuration
The action on the tab of the User Application allows you to specify administrative settings for the Role Subsystem. For details on using the action, see the section on configuring the role subsystem in the Identity Manager User Application: User Guide.
2.10.3 Security Roles
The Role Subsystem uses a set of system roles to secure access to functions within the tab. Each menu action in the tab is mapped to one or more of the system roles. If a user is not a member of one of the roles associated with an action, the corresponding menu item is not displayed on the tab.
The system roles are administrative roles automatically defined by the system at install time for the purpose of delegated administration. These include the following:
-
Role Administrator
-
Role Manager
To assign users to the system roles, you need to use the action on the tab. For details on assigning users to roles, see Section 8.3, Administrator Assignments.
The initial assignment of the Role Administrator is specified at installation time and processed when the Role Subsystem is first initialized at startup time.
2.10.4 View Request Status Search Limit
By default, the View Request Status action retrieves up to 10,000 request objects. If a user attempts to retrieve a larger result set, the user will see a message indicating that the limit has been reached. In this case, the user should narrow the search (by specifying a particular user or status, for example) to limit the number of objects returned in the result set. Note that when a user applies a filter to a role name, the filter limits what the user sees and its order, not the number of objects returned.
The administrator can change the maximum number of request objects retrieved by modifying the entity definition for the nrfRequest object in iManager. To do this, the administrator needs to modify the <search-max>10000</search-max> setting by editing the XmlData attribute of the sys-nrf-request object. The sys-nrf-request object can be found under EntityDefs.DirectoryModel.AppConfig within the User Application driver for the Roles Based Provisioning Module.
2.10.5 Provisioning Display Settings
The Administration tab in the User Application provides several settings that control various aspects of the user interface, including general display settings, task settings, and request status settings.
For details on the specifying the provisioning display settings for the user interface, see Section 8.2.3, Configuring the Provisioning UI Display Settings.
2.10.6 E-Mail Notification
The Role Subsystem uses two templates that are specific to roles-based provisioning:
-
(Role Request Notification)
-
(Role Request Approval Completed Notification)
-
(Resource Request Notification)
-
(Resource Request Approval Completed Notification)
You can edit the templates to change the content and format of e-mail messages. For more information on these templates, see Section 17.4, Working with E-Mail Templates.
2.10.7 Enabling Drivers for Resource Mappings
The Roles Based Provisioning Module ships with updated configuration files for the following drivers:
-
Active Directory
-
GroupWise
-
LDAP
-
Notes
-
eDirectory
-
SAP User Management
-
SAP Portal
-
SAP GRC Access Control
All of these updated driver configuration files contain a new section on the driver's Global Configuration Values (GCV) page labeled .
To display the configuration options available in the new section, select for the GCV.
To enable resource mapping for the driver, select for the GCV.
Depending on the driver's capabilities, one or more lower-level options are displayed once resource mapping is turned on. The Active Directory driver, for example, has three lower-level options:
Each option can be turned on or off individually by selecting or .
After saving the changes and restarting the driver, RBPM will detect the driver as enabled for resource mapping.
NOTE:Before RBPM can detect the driver, RBPM must query the entitlement system. RBPM sends the query to the entitlement system every 1440 minutes by default, but you can force the application to send the query immediately using the User Application.
To force the query to run immediately, log into the User Application using a User Application administrator account. Click , then click the button under .
2.10.8 Creating a List in the RBPM Database
You can use lists in request forms to display various options for specifying a resource assignment. This section provides instructions for adding lists to the database by executing a few SQL statements. Once these lists have been created, they can be displayed on a request form on the Roles and Resources tab.
The following example shows how you would create a simple set of values for a list. This example uses SQL statements that work with MySQL:
INSERT INTO PROVISIONING_CODE_MAP SET VIEWID='Factory-Locations', VERSIONNO=1,
DESCRIPTION='Factory Locations', NAME='Factory
Locations',ENTITYKEY='Factory-Locations', ENTITYTYPE=1,
LASTREFRESHED=UNIX_TIMESTAMP();

INSERT INTO PROVISIONING_VIEW_VALUE SET VALUEID='Factory-Locations-1',
VERSIONNO=1, VIEWID='Factory-Locations', PARAMVALUE='Cambridge, MA 02440';

INSERT INTO PROVISIONING_VIEW_VALUE SET VALUEID='Factory-Locations-2',
VERSIONNO=1, VIEWID='Factory-Locations', PARAMVALUE='Provo, UT 97288';
The following example uses SQL statements that work with PostgreSQL:
INSERT INTO PROVISIONING_CODE_MAP (VIEWID,VERSIONNO,DESCRIPTION,NAME,ENTITYKEY,ENTITYTYPE,LASTREFRESHED)
VALUES ('Factory-Locations',1,'Factory Locations','Factory-Locations','Factory-Locations',1,extract(epoch FROM now()));

INSERT INTO PROVISIONING_VIEW_VALUE (VALUEID,VERSIONNO,VIEWID,PARAMVALUE)
VALUES ('Factory-Locations-1','1','Factory-Locations','Cambridge, MA 02440');

INSERT INTO PROVISIONING_VIEW_VALUE (VALUEID,VERSIONNO,VIEWID,PARAMVALUE)
VALUES ('Factory-Locations-2','1','Factory-Locations','Waltham, MA 02451');

INSERT INTO PROVISIONING_VIEW_VALUE (VALUEID,VERSIONNO,VIEWID,PARAMVALUE)
VALUES ('Factory-Locations-3','1','Factory-Locations','Provo, UT 97288');
The VIEWID is the primary key for the PROVISIONING_CODE_MAP. The ENTITYTYPE value 1 identifies the map type as a list. The VIEWID is the foreign key for the PROVISIONING_VIEW_VALUE relationship to the PROVISIONING_CODE_MAP table. The VALUEID is the primary key for the PROVISIONING_VIEW_VALUE table.
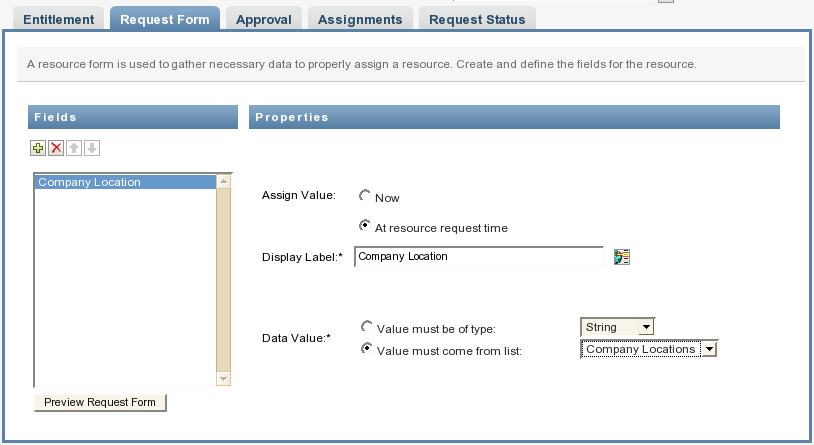
After the Company Location field has been added to the form, you can specify that the company location value should come from the Company Locations list at request time:
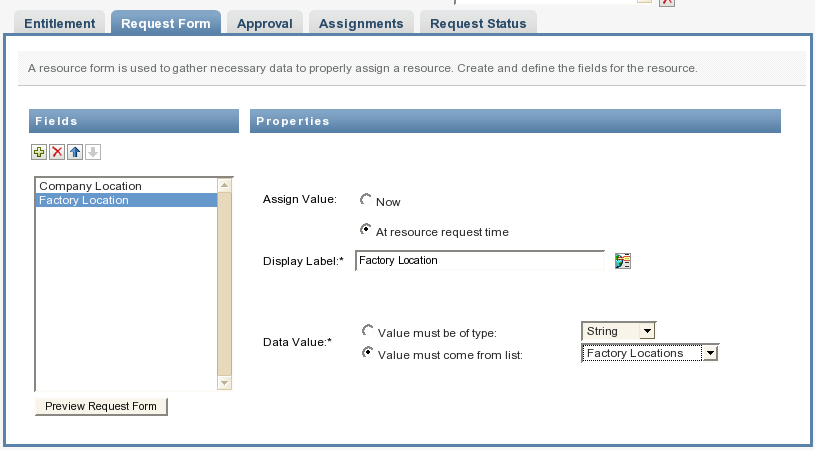
After the Factory Location field has been added, you can specify that the factory location value must come from the Factory Locations list at request time:
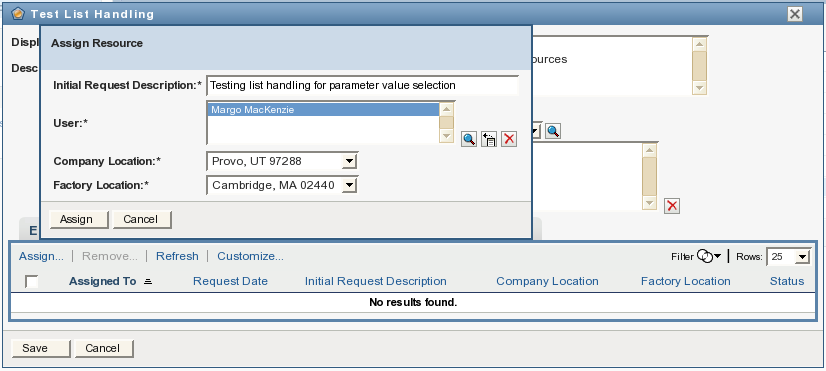
At request time, the user can then select the company location and factory location values when assigning the resource:
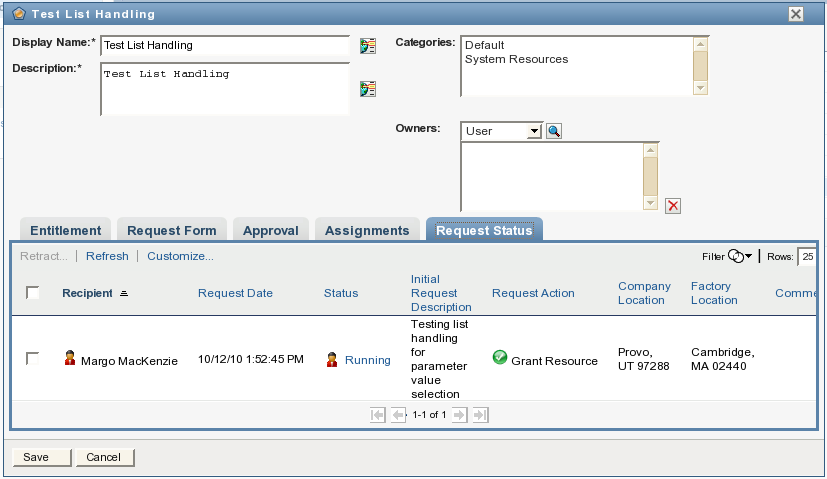
After the resource has been assigned, the Request Status tab for the resource displays the parameter values chosen from the lists for the request form fields: