7.3 Managing Block Devices as VM Virtual Disks
Cloud Manager Orchestration Server can use a block device (an addressable, physical location) for storage on Xen, KVM, VMware vSphere, or Microsoft Hyper-V managed hosts, but it manages such devices as physical disks (pDisks) attached to VM virtual disks (vDisks) to provide better performance compared to a file-backed virtual disk.
A vDisk represents a VM’s view of its storage devices, but a pDisk represents a VM Host’s view of its physical storage devices allocated for VM usage.
Managing block devices as pDisks also saves the additional setup and management that normal block devices require.
IMPORTANT:Block devices defined in the Amazon EC2 environment are not discovered or supported by the Orchestration Server in NetIQ Cloud Manager.
This section includes information to help you set up this kind of block device support for the xen and kvm provisioniong adapters in the Cloud Manager Orchestration Server.
7.3.1 Prerequisites to Configure on Xen and KVM Hosts Before Setting Up Block Device Support
Before you can set up block device support in the Orchestration Server, you need to create the block device on a host that is visible to the supported hypervisor. The block device you set up on that host must be configured with Logical Volume Management (LVM), creating Logical Volumes and Volume Groups. LVM allows flexibility in administering the underlying device, such as making it easeir to move objects, create snapshots, and back up data.
Before you create Volume Groups, you should plan with the Cloud Manager model in mind: an LVM Logical Volume maps to an Orchestration pDisk and an LVM Volume Group maps to an Orchestration Server Repository object of type “block.” The Orchestration Server leverages the Volume Group Name to identify a shared repository, which could map to a shared iSCSI target. The Volume Group Name must be the same on each VM host that accesses this repository (a shared iSCSI target).
Additional Prerequisite for KVM Hosts
In addition to the LVM prerequisite mentioned above, if you are managing VMs with the KVM hypervisor, you must also use the Virtual Machine Manager to create a Logical Volume type on each VM host.
7.3.2 How Block Device Support Works
The following information is included in this section:
Creating New Block Type Repositories
When you run the action by using the appropriate the Orchestration Server provisioning adapter job, the Orchestration Server discovers the block device on the VM host and creates a “block” type Repository Grid object for it in the Explorer tree  . The repository is to be used only as a container for physical disks.
NOTE:For Xen hosts, you need to configure a setting on the xen provisioning adapter job that facilitates the discovery of multiple Volume Groups previously created for the Xen environment. You can find this setting, called , in the panel of the xen job. The default expression is . You can add regular expression patterns (for example, *XenPAVolGrp*) for Volume Group names that are used in the creation of new Repository objects.
You do not need a naming pattern for the storage pools managed by the KVM hypervisor because they are explicitly created.
For more information about repository Grid objects, see Section 10.0, The Repository Object.
Discovering pDisks
After the initial VM host and Repository discovery action, some block devices (considered to be a “physical disk” or “pDisk” in the the Orchestration Server model) might be discovered already attached to a VM, while some are not yet discovered and added under the block repository container. Further discovery requires a action on the new block Repository Grid object. The action launches a provisioning adapter job that discovers the physical disks available for the repository. When this job finishes, new pDisk objects  are created in the Explorer tree under the block Repository object.
You can also create a pDisk in a block Repository by right-clicking the block Repository object and selecting the action. If you create a pDisk without using the discovery, you need to provide information (that is, facts) about it for the Orchestration Server. For more information, see Section 7.3.3, Viewing the Physical Disk Configuration in the Orchestration Console. If you create this object without having a corresponding Logical Volume on the host system, you must create it there so that block device support for this pDisk works in the Orchestration Server.
Attaching an Available pDisk to a VM
After you discover a pDisk (that is, a Logical Volume) using on the block type Repository, that pDisk is not associated with any VM (workload) that Cloud Manager can access. You need to create this association by attaching the pDisk to a vDisk on an available VM.
-
In the Explorer tree of the Cloud Manager Orchestration Console, select a VM to which you want to attach a pDisk.
-
Right-click the VM object and select to create a new vDisk object to be associated with the VM.
-
Attach the pDisk to the vDisk:
-
In the admin view of the vDisk object, select the tab to open the page for the object.
-
Select the drop-down menu to display the list of available repositories, then select the appropriate block type repository from the list.
-
Select the drop-down menu to display the list of available pDisks, then select the appropriate pDisk form the list. The default value, , does not select any physical disk.
-
Click the icon
 on the toolbar to save the fact changes you have made.
When you perform this action, the vDisk facts are automatically populated with the corresponding values from the pDisk object. These values become read-only, because they are retrieved from the pDisk.
-
In the Explorer tree, right-click the VM object associated with the new vDisk you created, then select the action to reconfigure this VM.
NOTE:Remember that when you save the configuration, you only update the object model in the Orchestration Server; you have not affected the VM in the hypervisor. To do so, you must perform the action.
-
Sharing Block Devices Between KVM or Xen VMs
You can use the Orchestration Server to share block devices between VMs residing on either a Xen host or on a KVM host. If you configure this sharing, however, you must be careful to avoid data corruption.
You can safeguard the data on the underlying block device being shared by using the hypervisor or operating system tools to configure it (for example, during logical volume creation) as “read-only.” Another alternative is to install a cluster aware file system like OCFS2 on the block device if that device must be writeable.
To protect data on the block device using the server, you have two alternatives:
-
Modify the vdisk.mode fact to a value, select on the console toolbar to save this change, then right-click the VM object in the Explorer Tree and select to modify the configuration file.
-
Set a maximum number of pDisks that can be associated to a vDisk by using the pdisk.vdisks.max fact. This counter is respected by the provisioning action; the VM does not start if the maximum value is reached.
Limitations of Block Device Support in This Release
Block device support for this release has the following limitations:
-
Orchestration Services does not allow the creation or deletion of pDisks. In other words, no LUN or volume management is possible from the Orchestration Console.
-
Although a VM move is supported (block device disks are marked as unmoveable), cloning a VM that includes the pDisk is not supported if the pdisk.vdisks.max fact is set to 1. Cloning works if the fact is set to a value greater than 1.
-
Not all variations of possible block-based data disks can be discovered on a VM host.
7.3.3 Viewing the Physical Disk Configuration in the Orchestration Console
You can visually expose a pDisk Grid object in the Explorer Tree of the Orchestration Console by selecting the expand/collapse icon of a block Repository object, identifying the pDisk icon, then selecting the icon to display the four tabs in the Virtual Disk admin view.
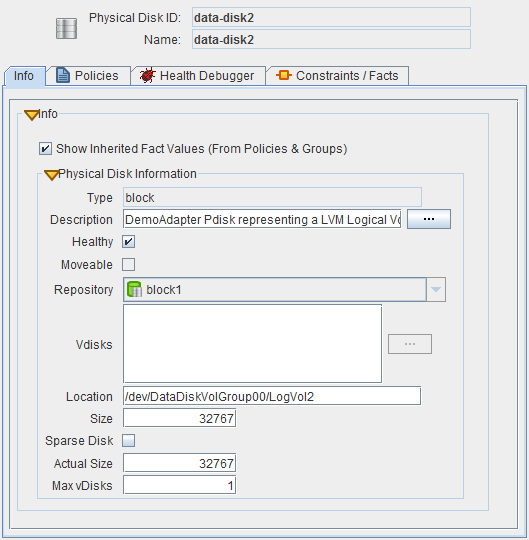
Figure 7-3 The Physical Disk Info/Groups Page
The page that opens under the tab includes fields where you can configure the general information and attributes (facts) of the pDisk.
NOTE:Whenever you make changes to pDisk object facts, the write icon is superimposed on the object’s icon  , signifying that the object has been changed. If you want to save the changes you have made, click the icon
 ![]() on the Orchestration Console toolbar.
on the Orchestration Console toolbar.
This section includes the following additional information:
The Physical Disk Info Panel
The Physical Disk Info panel on the Info page includes the following fields:
NOTE:Tool tip text is displayed when you mouse over any of these fields.
Show Inherited Fact Values: Select this check box to show facts with overridden values supplied through attached and/or inherited policies. Such fact values are read only (non-editable).
Type: This field is read-only. It specifies this pDisk as a block device, which is the pDisk type as the VM host sees it:
In the Fact Editor, this fact is listed as pDisk.type:
<fact name="pDisk.type" value="block" type="String" />
Description: Describes the pDisk with any text that you choose.
In the Fact Editor, this fact is listed as pDisk.description:
<fact name="pdisk.description" value="" type="String" />
For a pDisk discovered and managed by the xen provisioning adapter, this field is usually blank. Because this is a free form field, you can enter any text you want here. For a pDisk discovered and managed by the vSphere provisioning adapter, this field is populated with a display name label obtained by vSphere and mapped to this pDisk by the Orchestration Server..
Healthy: For a pDisk managed on a Xen host, this check box is selected by default, which designates the pDisk as being in good health.
NOTE:We recommend that you do not change the value from its default.
In the Fact Editor, this is fact is listed as pDisk.health:
<fact name="pdisk.health" value="true" type="Boolean" />
Moveable: This fact is marked false by default. Do not change this fact.
In the Fact Editor, this fact is listed as pDisk.moveable:
<fact name="pdisk.moveable" value="false" type="Boolean" />
Repository: The storage location (a Volume Group) containing the pDisk image on the VM host. The field is pre-populated with a block type repository name. It cannot be edited.
In the Fact Editor, this fact is listed as pDisk.repository:
<fact name="pdisk.repository" value="xen3vg" type="String" />
Vdisks: The list of virtual disks that are associated with this physical disk.
In the Fact Editor, this fact is listed as an array:
<fact name="pdisk.vdisks">
  <array type="String">
  </array>
</fact>
This list box is populated when you attach the pDisk to a VM.
Location: For block type disks, this fact contains the URI to the block device, for example /mnt/shared/iscsi/, which could represent an iSCSI share on a VM host.
In the Fact Editor, this fact is listed as pdisk.location:
<fact name="pdisk.location" value="/dev/xen3vg/xen3lv2" type="String" />
Size: The size (measured in MB) of this pDisk image.
In the Fact Editor, this fact is listed as pdisk.size:
<fact name="pdisk.size" value="32767" type="Integer" />
Sparse Disk: This check box is marked true if the image is a sparse (thin) backed vDisk.
In the Fact Editor, this fact is listed as pdisk.sparse:
<fact name="pdisk.sparse" value="false" type="Boolean" />
Actual Size: The actual (sparse) size (measured in MB) of this virtual disk.
In the Fact Editor, this fact is listed as pdisk.size.actual:
<fact name="pdisk.size.actual" value="8192" type="Integer" />
Max vDisks: This fact represents the maximum number of vDisks that are allowed concurrent access to this pDisk. Its value is set to 1 by default. To allow multiple instances of the pDisk, you need to set this value accordingly. A value of -1 indicates that an unlimited number of vDisks have access.
One practical application of this setting is for specifying the pDisks in an OCFS2 environment. If you are using OCFS2, change this value of this fact to match the number of hosts, with each host representing an OCFS2 node.
In the Fact Editor, this fact is listed as pdisk.vdisks.max:
<fact name="pdisk.vdisks.max" value="1" type="Integer" />
In order to allow multiple instances of the pDisk, this value has to be set to some positive number other than 1.
The Physical Disk Policies Tab
The tab opens a page that contains a policy viewer for each of the policies associated with a Grid object.
NOTE:You can edit a policy by right-clicking a policy icon, selecting and clicking the icon.
The Physical Disk Health Debugger Tab
The Health Debugger is a common Admin view in the Orchestration Console for most Grid objects. For information about this tool, see Section A.3, Health Debugger.
The Physical Disk Constraints/Facts Tab
To support constraining a VM’s provision actions based on more than one disk’s repository (that is, more than just resource.vm.repository), the pDisk can be referenced in constraints. The pDisk constraints are used to assign VM hosts during actions such as provisioning, building, or migrating. You can write constraints against attributes of disks (such as the repository where the pDisk resides) and against the available VM host repositories.
The Constraints/Facts tab opens a page that shows all of the effective constraints and facts for a Grid object. Each Grid object has an associated set of facts and constraints that define its properties. In essence, by building, deploying, and running jobs on the Orchestration Server, you can individually change the functionality of any and all system resources by managing an object’s facts and constraints. The Orchestration Server assigns default values to each of the component facts, although they can be changed at any time by the administrator, unless they are read-only. Facts with mode r/o have read-only values, which can be viewed (using the edit pencil icon) but changes cannot be made.
IMPORTANT:Several custom facts for the pDisk object can be added at discovery time, and they vary according to the VM technology that manages the respective pDisk. These facts are documented in the NetIQ Cloud Manager Orchestration Developer Reference.
For more information about using the Fact Editor on this page to rename the Physical Disk object, see Section 7.2.5, Virtual Disk Object Naming and Renaming.
Physical Disk Object Naming and Renaming
Some resource names are generated by the Orchestration Server and can therefore have generic, arbitrary names such as mysql-pDisk1, mysql-pDisk2, and so on. A Physical Disk (pDisk) you name at creation time might also change later in its purpose or facilities.
The object’s display name is visible in the Orchestration Console interface and in optional zos and zosadmin commands. As the number of these pDisk objects grows in your grid, you might find it helpful or necessary to rename them, assigning more meaningful, intuitive names to suit the purpose of the object.
NOTE:Resource object groups (that is, the folders that contain these pDisk objects) can also be renamed. Objects such as jobs, events, and users cannot be renamed.
A pDisk object’s name is stored in the ${objectType}.displayname fact, which exists on every Grid object type, even those objects that cannot be renamed.
You can rename a pDisk object in the Orchestration Console by using one of three methods:
-
Right-click the pDisk object in the Explorer tree, then select to allow editing of the display name.
-
Triple-click the pDisk object in the Explorer tree to allow editing of the display name.
-
In the Constraints/Facts page, select the pDisk object .displayname fact and then open the Fact Editor to specify a new value for the fact.
As you use one of these methods, notice that the fact value is pre-populated with the ${objectType}.id fact. This functions as the name value for the object name until you decide to change it.
NOTE:Even after being renamed, the pDisk object retains its associated resource ID in the .id fact. This is not editable.
For more information about making the Resource object display names visible from the zos or zosadmin command line, see the NetIQ Cloud Manager 2.1.5 Orchestration Server Command Line Reference.