12.7 Mapping
A map is a collection of values and keys defined in a CSV or text file. You can enrich your data by using maps to add additional information to the incoming events from your source device. This additional information can be used for correlation and reporting.
You can create your custom maps in addition to the default maps available. You can use event mapping, which allows you to add additional data to an event by using data already present in the event and by referencing and pulling data from an outside source. For more information, see Section 12.8, Event Configuration and Section 12.8.1, Event Mapping.
NOTE:In order to do mapping, your configuration.xml file must be pointing to a communication server that has DAS_Binary and DAS_Core connected to it. This is normally the case by default, as long as the communication server and DAS processes are running.
The tab allows you to:
Mapping works together with the Referenced from Map Data Source setting for individual fields under Section 12.8, Event Configuration. You can map by using a string or number range. The following are the default maps available:
-
AccountIdentity: Contains information about identities and the accounts associated with them. The keys are UserName, UserDomain, and CustomerName (for MSSPs). This map is populated from information in the Account and Identity tables in the Sentinel database.
-
Asset: Contains the data from the map data source file asset.csv. The asset.csv is automatically generated from asset data from Sentinel Database when an asset Collector is run. This file can also be populated manually. The keys are PhysicalAssetName and CustomerName (for MSSPs).
-
AssetToRegulation: Contains the data from the map data source file AssetToRegulation.csv. This file must be populated manually.
-
CustomerHierarchy: Generally used for Managed Security Service Providers (MSSPs). This file can be used to organize customers into a four-level hierarchy. It contains data from the customerhierachy.csv. This file must be populated manually. The key is CustomerName.
-
IpToCountry: Contains the data from the IpToCountry.csv map data source file. This file must be populated manually.
-
IsExploitWatchlist: Contains the data from the exploitDetection.csv map data source file. (vulnerabilities and threats). The exploitDetection.csv file is automatically generated from Advisor and Vulnerability data from the Sentinel Database when either an Advisor feed is completed or a vulnerability Collector is run. The keys are IP, AttackName, DeviceName, and CustomerName (for MSSPs).
To view maps in the GUI:
-
Navigate to the Admin tab and select Map Data Configuration from the Navigation pane or click the Map Data Configuration button
 .
.
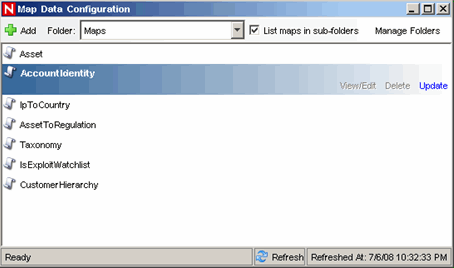
The main Mapping GUI displays a listing of all of the maps that have been defined for the system.
NOTE:Default Sentinel maps cannot be edited or deleted.
12.7.1 Adding Map Definitions
-
Navigate to the tab and select from the navigation pane or click the Map Data Configuration button.
-
Click .
-
If you are creating a new map folder, click New Directory. Specify a folder name.
-
Ensure that the folder you want to provide your map definition into is selected. (that is, the folder indicates that it is open).
-
Specify your map name.
-
Click Next.
The Map Type field box is disabled.
-
Select either or .
-
Local File: Allows you to browse for your file on your local file system on the machine where the Sentinel Control Center was launched.
-
Remote File: Allows you to select from existing map source data files on the server where DAS is running. Remote file points to <install_directory>/data/map_data.

-
-
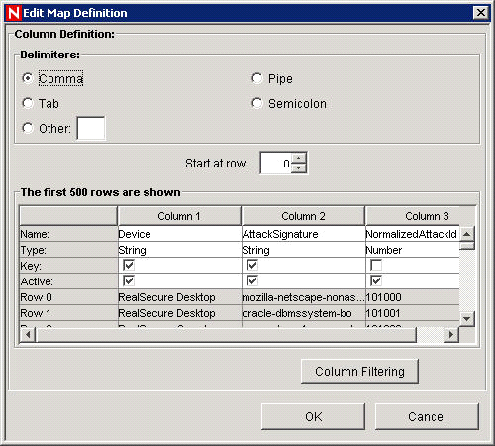
Select your map definition file, then click .
Only the first 500 rows of the map appear in the interface.
-
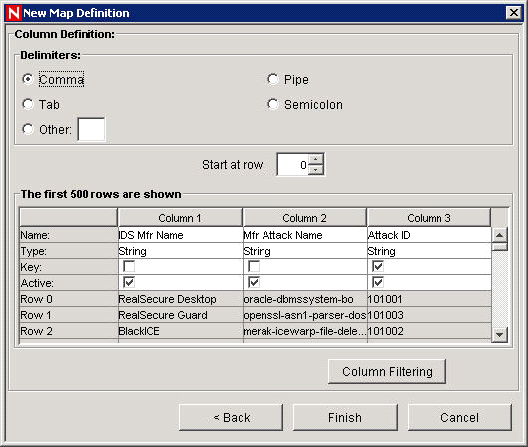
In the New Map Definition window, set the following:
-
Delimiter: The option are Pipe, Comma, Semicolon, Tab and Other. Specify the delimiter of the data in rows of the map data source file.
-
Start at row: Specify the number of rows to skip from the top of the map data source file.
-
Column names: Specify the column name.
-
Column types: The currently supported column types are:
-
String: A group of characters used as a single object by a computer. A string might consist of a single letter, word, or number. The word FINANCE or IP address 192.168.2.40 might be a string. A string can also consist of a combination of words, spaces, and numbers. The street address of 1313 LION DOG TOWER could be a string.
-
Number Range: A range of numbers. For example, 10 to 200 are represented as 10-200. To use the range map functionality, a map definition must have exactly one key column and the key column must be of type NumberRange. If there are any other key columns, or if the key column is of a different type, the mapping service does not consider the map to be a range map.
-
-
Active columns: When a column is marked as active, the data in the column is distributed to processes by using maps. All key columns must be active. Only active columns (but not key columns) can be selected as the Map Column under the Event Configuration tab.
-
Key columns: A unique identifier for the row of data in the map data. If more than one column is selected as a key, the overall key of the map includes all of the columns selected as keys.
-
Column filtering: A row can be explicitly included or excluded based on matching criteria for a particular column. This can be used to exclude rows from the map source data that are not needed or will interfere with your mapping.
As you configure each setting and filter, the data table automatically updates to allow you to preview your data and to ensure that your data is being parsed as expected.
-
-
After you finish configuring all parameters and filters for the definition, click Finish.
-
If you selected Local File in Step 7, you are prompted to upload your file to the Remote Files virtual folder located at <install_directory>\data\map_data.
-
Specify a filename and click .
12.7.2 Adding a Number Range Map Definition
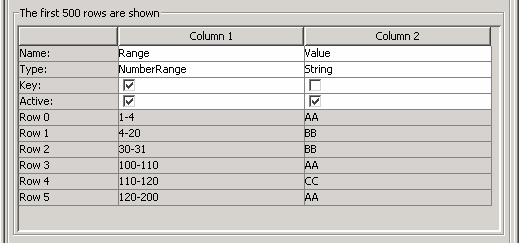
To use the range map functionality, a map definition must have exactly one key column and the key column must be of type NumberRange. If there are any other key columns, or if the key column is of a different type, the mapping service does not consider the map to be a range map.
To create a range map, select a single column to be the key of the map and select NumberRange as the type of the column. The format of the data in a column of type NumberRange must be m-n, where m is the minimum number in the range and n is the maximum number in the range (that is, 10-200). The maximum number in the range is not included in the range (that is, [m,n)). This means a range of 10-200 only keys off numbers equal to 10 to 199. An example set of data is with the first column as the key:
1-2,AA
2-4,AA
4-12,BB
10-20,BB
30-31,BB
100-200,AA
110-120,CC
Figure 12-10 Number Range Map Definition
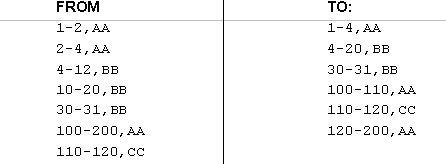
The example table is transformed to:
Figure 12-11 Table Transformation
An example event configuration on the above map might look like:
Figure 12-12 Event Configuration
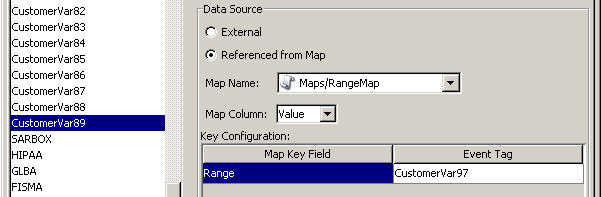
In this example, CustomerVar97 is expected to contain a numeric value or is of a type that can be converted to a numeric value, such as an IP or Date.
When you look into the example range map, the value in CustomerVar97 takes the range map and searches for the range that the value belongs in (if any). Some examples and their results are:
CustomerVar97 = 1; CustomerVar89 will be set to AA
CustomerVar97 = 4; CustomerVar89 will be set to BB
   CustomerVar97 = 300; CustomerVar89 will not be set
Internally, Sentinel converts IP addresses and dates to an integer for tags of the type IPv4 and Date.
IPv4 tags are:
-
TargetIP (dip)
-
InitIP (sip)
Date tags are:
-
CustomerVar11 to CustomerVar20 (cv11 to cv20)
-
DateTime (dt)
-
ReservedVar11 to ReservedVar20 (rv11 to rv20)
-
DeviceEventTime
-
SentinelProcessTime
-
BeginTime
-
EndTime
For more information on meta tags, see Sentinel 6.1 Rapid Deployment Event Fields
in the Sentinel 6.1 Rapid Deployment Reference Guide.
For example, for the table below, column 1 is numerical range equivalent to an IP range of 10.0.0.0 to 10.0.2.255.
167772160-167772415,AAA
167772416-167772671,BBB
167772672-167772927,CCC
Using the same setup as the previous example, if:
-
The Event Tag is set to TargetIP and key column set to column 1 (range)
-
Map Column is set to column 2 (value). The output values are for CustomerVar89.
Figure 12-13 Number Range Map Definition
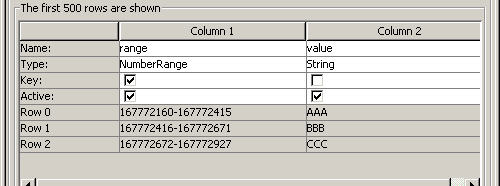
Figure 12-14 Event Configuration
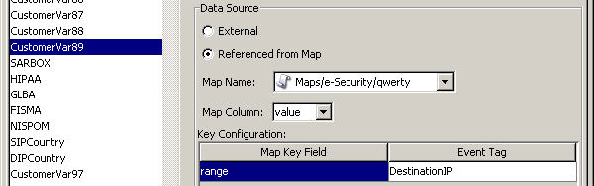
If an event contains a target IP of 10.0.1.14 (equivalent to a numerical value of 167772430), the output for the CustomerVar89 column within the event is BBB.
Sentinel supports the following number ranges:
-
Range from negative number to negative number (for example, “-234—34”)
-
Range from negative number to positive number (for example, “-234-34”)
-
Range from positive number to positive number (for example, “234-236”)
-
Single number range (negative) (for example, “-234”). In this case, the minimum and the maximum are both “ -234”.
-
Single number range (positive) (for example, “234”). In this case, the minimum and the maximum are both “234”.
-
Range from negative number to max number (for example, “-234-”). In this case, the minimum is “-234” and the maximum is (2^63 - 1).
-
Range from positive number to max number (for example, “234-”). In this case, the minimum is “234” and the maximum is (2^63 - 1).
NOTE:In all cases, the min must be less than or equal to the max (for example, “-234- -235” is not valid).
12.7.3 Editing Map Definitions
-
Navigate to the tab and select from the navigation pane or click the button.
-
Expand the folder of interest.
-
Select a map definition and click .
The editing function is disabled for map definitions that are under the UNMANAGED ITEMS folder.
The edit function allows you to:
-
Set your delimiters
-
Activate or deactivate a column
-
Set your column keys
-
Set a column filter
-
Set which row to start your map
-
Rename your columns
-
-
After making your changes, click .
12.7.4 Deleting Map Definitions
-
Navigate to the tab and select from the navigation pane or click the button.
-
Expand the folder of interest.
-
Select the map definition to be deleted.
-
Click .
NOTE:Default Sentinel maps cannot be edited or deleted.
12.7.5 Updating Map Data
Updating allows you to replace the map source data file of a map on the server running DAS with another file. Your new map source data file must have the same delimiter, number of columns, and overall structure as the existing map data source file in order for the map to function properly after the update. The new map source data file should only differ from the existing file by the values that appear in the columns. If the new map source data file has a different structure than the existing file, use the Edit feature to update the map definition.
Map updates can be performed on demand from the Sentinel Control Center. To set up an automated process to update map data, you can run an equivalent process from the command line using map_updater.sh or map_updater.bat.
There are two map locations: the location referenced by the Event Map Configuration (which is a user-defined location) and the location where Sentinel stores its internal representation of the map (<install_directory>/data/map_data). The internal representation of the map should never be manually updated.
Updating Map Data from the Sentinel Control Center
-
If you have not already done so, create a file containing the new map source data.
This file can be generated (for example, from a data dump script), created manually from scratch, or be an edited version of the existing map data source file. If needed, you can obtain the existing map data source file from one of the following locations:
<install_directory>/data/map_data
-
Navigate to the tab and select from the navigation pane or click the button.
-
Expand the folder of interest, select the mapping to be updated, then click .
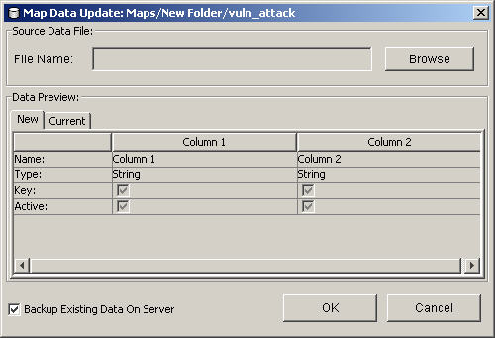
-
Select the new map data source file by clicking Browse and selecting the file with the new map data.
After you select the file, the data from the new map data source file displays under the New tab. The map data you are replacing is under the Current tab.
-
Deselect or leave the default setting for Backup Existing Data On Server.
Enabling this option results in a backup of the existing map data source file being put in the <install_directory>/data/map_data folder. The prefix of the name of the backup map data source file is the name of the existing map data source file. The end of the filename contains a set of random numbers followed by the .bak suffix. For example: vuln_attacks10197.bak.
-
Click .
The data from the new map data source file is uploaded to the server, replacing the contents of the existing map data source file. After the source data is completely uploaded, the map data is regenerated and distributed to map clients (For example, Collector Manager).
Updating Map Data by Using the Command Line
-
If you haven’t already done so, create a file containing the new map source data.
This file can be generated (for example, from a data dump script), created manually from scratch, or be an edited version of the existing map data source file. If needed, you can obtain the existing map data source file from one of the following locations
<install_directory>/data/map_data
-
Log into the Sentinel database.
-
Find the UUID for the map in the MD_CONFIG table (refer to the CONFIG_ID column for the appropriate map listed in the VALUE column).
-
On the Sentinel Server machine, log in as esecadm.
-
Run the following command:
map_updater.sh <uuid> <source path> [nobackup]
-
The data from the new map data source file is uploaded to the server, replacing the contents of the existing map data source file. After the source data is completely uploaded, the map data is regenerated and distributed to map clients (for example, Collector Manager).
Unless the optional -nobackup argument is added, the previous map data is saved in a backup file on the server. Enabling this option results in a backup of the existing map data source file being put in the <install_directory>/data/map_data folder. The prefix of the name of the backup map data source file is the name of the existing map data source file. The end of the filename contains a set of random numbers followed by the .bak suffix. For example: vuln_attacks10197.bak.