C.1 Access Control Using PAM UserGroup as IDM Entitlements
A PAM UserGroup (UG) defines a users' membership who get's privileged access on the servers. The PAM UserGroup object can be associated with a PAM Rule object to define a user’s privileged access to servers based on the UserGroup membership. In the PAM driver, UserGroup is defined as the Entitlement object. From the IDM RBPM(UserApp), the UserApp administrator can query the PAM Server via with driver and get the lists of UserGroups defined on the PAM system. On the UserApp, the administrator can create Roles/Resources and these can be associated with any of the queried UserGroup entitlements. These Roles and Resources can be associated with an IDM WorkFlow for the approval process. Any UserApp user can request for the created Roles/Resources and when they are granted, the PAM driver updates the UserGroup membership with the user's ID on the PAM server.
In addition, on the PAM server along with UserGroup object, other PAM objects such as HostGroup, AccessTime, Command can also be associated with the PAM Rule object to define more specific access to servers based on the requirement.
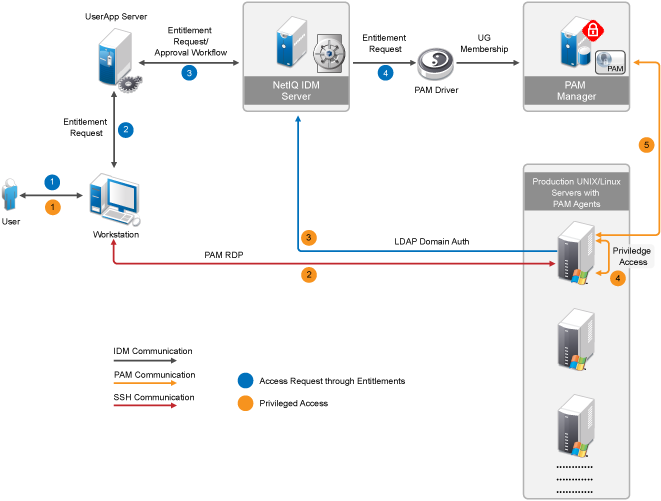
The user request and approval process flow are as depicted in the following diagrams:
Figure C-1 Access Provisioning to UNIX/Linux Servers (SSH) Using PAM and PAM Driver
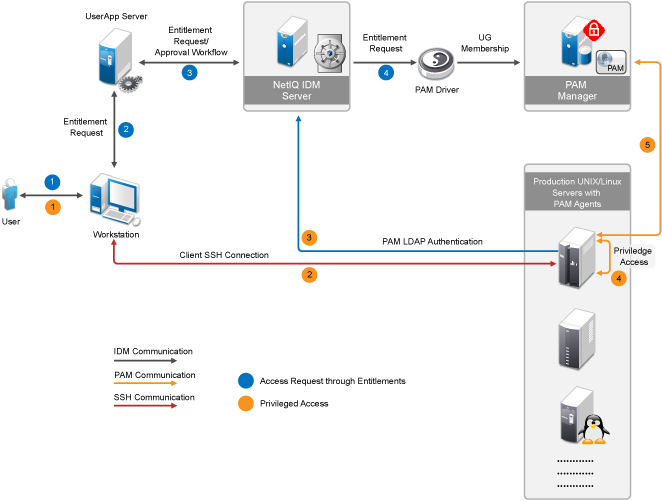
Figure C-2 Access Provisioning to Windows Servers (RDP) Using PAM and PAM Driver
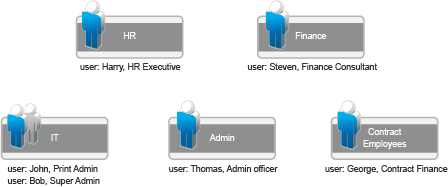
Let us take a simple organization structure and see how to define PAM objects and provide access control to various servers used in the organization. let us assume that the organization has various departments, as shown in the following diagram:
Figure C-3 Organization Structure - Example
The details of the steps are as described in the following example.
C.1.3 Configure PAM
Log in to PAM at https://<pumManagerDNSorIP> as admin and perform the following procedure:
-
Configure PAM to authenticate users from LDAP server (eDirectory):
-
Go to Home > Command Control > Privileged Accounts, click Add Account Domain, and provide values for the following fields, as specified:
-
Name: LDAP-Auth-Domain
-
Type: LDAP
-
Profile: NetIQ eDirectory
-
LDAP URL: <IP of the eDirectory server where IDM is running>
-
Base DN: ou=users,o=data
-
Account: admin
-
User DN: cn=admin,ou=sa,o=system
-
Password: <eDirectory admin password>
-
-
Go to Home > Framework User Manager > Users > Account Settings. In the drop-down list, select LDAP-Auth-Domain. Click Finish.
-
-
A sample PAM Configuration to provide the access control to the servers in the various departments is provided in the samples folder. Import the sample PAM configuration file, npumExportSettings-Entitlements.xml, from the samples/ folder:
-
Open the npumExportSettings-Entitlements.xml file in a text editor and copy it to the clipboard.
-
Go to Home > Command Control > Import Settings and paste it in the field. Click Finish.
-
After the import, you can find various PAM objects, such as Rule objects, UserGroup objects, and HostGroup objects, as shown in the following figure:

The following PAM objects are created:
-
HostGroup objects: These objects defines various groups of hosts based on the department. For example the HostGroup 'HR-Servers' would contain the servers belonging to the employees in the HR department and only they should be getting access to those servers.
-
UserGroup objects: These objects represents the groups to which user can get membership. For example, the UserGroup 'Admin Officer' would contain the members of the Administration department.
-
Commands objects: These objects defines the privileged commands that a user can get to run. For example, in the sample there is command called 'printerCommands' which has sample list of printer commands.
-
AccessTime objects: These objects define privileged access time duration. For example, in the sample there is an object 'AT-Contract' with allowed timings from 8am to 5pm on days except, Saturday and Sunday.
-
Rule objects: These are the objects where all of the above mentioned objects are used to define the access policies. For example, the object 'RL-Finance-Contractors' defines that any user having the membership to the UserGroup 'Contract Finance', the server that is being accessed is in the HostGroup 'Finance-Servers' and the time of access is as per the timings defined in the AccessTime 'AT-Contract', then provide the user with access to the privileged account, 'fin-contract-user' on the servers belonging to the Finance department.
-
-
NOTE:
-
For providing privileged access to Windows server, AccountDomain objects and the corresponding Credential objects should be created under the PrivilegedAccounts container in the Command Control. For more information, see
Adding an Account Domain
in the NetIQ Privileged Account Manager Administration Guide. -
User accounts must be created on the Production servers (see Figure C-1 and Figure C-2). The account name must be consistent with the user requesting for the Roles/Resources through RBPM/UserApp. Drivers for Linux and UNIX can be used to create local accounts on the UNIX/Linux servers.
To avoid creation of user accounts on every server, you can configure Windows servers with LDAP Domain authentication and UNIX/Linux servers with PAM-LDAP authentication.
C.1.4 Creating Roles/Resources in UserApp
-
Log in as uaadmin (UserApp admin) to the UserApp URL: http://<user_app_ip>:8180/IDMProv/.
-
Import the PAM Entitlements. PAM UserGroup objects are defined as the IDM Entitlements objects for the PAM driver.
Go to Roles and Resources > Configure Roles and Resources Settings > Entitlement Query Settings and click Refresh. This queries the UserGroup objects from the PAM server via the PAM driver.
-
Create role/resource objects in the Role/Resource Catalog and associate them with PAM UserGroup Entitlement. All the UserGroups that were queried from the PAM server are listed for entitlement selection, as shown in the following figure.
