1.6 Sample Use Cases
This section describes the sample use cases of PAM Driver for Identity Manager:
1.6.1 Access Control Using PAM UserGroup or UserRole as IDM Entitlements
A PAM UserGroup (UG) or UserRole defines a users' membership who get's privileged access on the servers. The PAM UserGroup or UserRole object can be associated with a PAM Policy object to define a user’s privileged access to servers based on the UserGroup or UserRole membership. In the PAM driver, UserGroup or UserRole is defined as the Entitlement object. From the IDM RBPM(UserApp), the UserApp administrator can query the PAM Server via with driver and get the lists of UserGroups or UserRoles defined on the PAM system. On the UserApp, the administrator can create Roles/Resources and these can be associated with any of the queried UserGroup or UserRole entitlements. These Roles and Resources can be associated with an IDM WorkFlow for the approval process. Any UserApp user can request for the created Roles/Resources and when they are granted, the PAM driver updates the UserGroup or UserRole membership with the user's ID on the PAM server.
In addition, on the PAM server along with UserGroup or UserRole object, PAM policy can be configured to define more specific access to servers based on the requirement.
NOTE:The following use cases are described using the CommandControl engine. The same functional concept applies to the AccessControl engine.
The user request and approval process flow are as depicted in the following diagrams:
Figure 1-2 Access Provisioning to UNIX/Linux Servers (SSH) Using PAM and PAM Driver
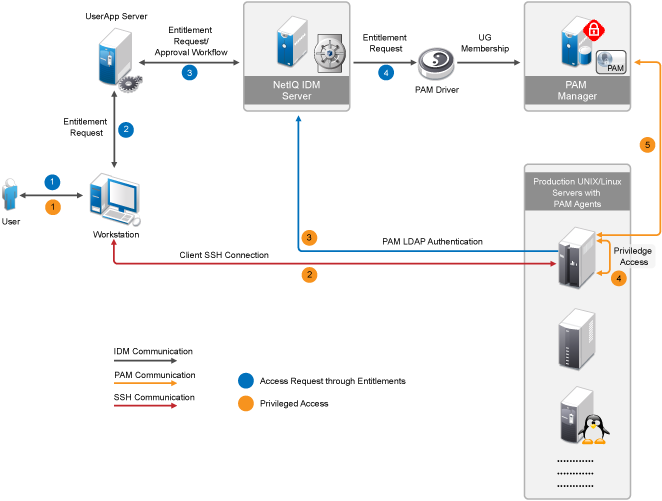
Figure 1-3 Access Provisioning to Windows Servers (RDP) Using PAM and PAM Driver

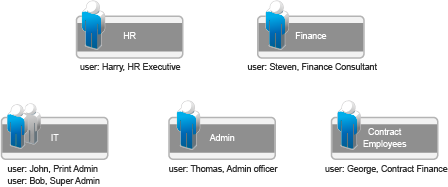
Let us take a simple organization structure and see how to define PAM objects and provide access control to various servers used in the organization. let us assume that the organization has various departments, as shown in the following diagram:
Figure 1-4 Organization Structure - Example
The details of the steps are as described in the following example.
Setting up PAM and IDM
To set up PAM and IDM:
-
Install IDM 4.8, iManager, and Designer. For more information, see the NetIQ Identity Manager Documentation Web site.
-
Install PAM Framework Manager on a SLES machine.
For example: https://<PUMManagerDNSorIP>
For more information, see the NetIQ Privileged Access Manager Documentation Web site.
-
Install PAM Agents on the UNIX/Linux and Windows servers to which privileged access are to be provided to the users. For more information, see the NetIQ Privileged Access Manager Documentation Web site.
-
Upload sample user objects using the sample-users.ldif file.
Creating the PAM Driver using Designer
To create the PAM driver using Designer, see Section 4.0, Creating a New Driver.
Configure PAM
Log in to PAM at https://<pumManagerDNSorIP>/pam as admin and perform the following procedure:
-
Configure PAM to authenticate users from LDAP server (eDirectory):
-
Go to , click next to , and provide values for the following fields, as specified:
-
: Enter the domain name.
For example, if your Active Directory domain is DC=pamdomain, DC=com, Domain name = pamdomain
-
: Enter the DNS name.
For example, netiq.com
-
Port: Enter the port number to connect to this resource.
-
SSL: Select SSL to enable SSL communication to the directory server.
-
Base DN: Click to display the domain name.
-
Scope: Enter the scope for the user.
-
Search Credential: This credential is used to fetch the user details from the directory server.
-
User Name: Enter the account name of the domain user.
For example: administrator
-
User DN: Enter the complete name of the domain user.
For example: CN=administrator,CN=Users,DC=netiq,DC=com
-
Anonymous: Select this option to enable anonymous access to the LDAP directory.
-
Password: Enter the password for the domain user account.
-
-
Click to save the resource details.
-
Go to Home > Framework User Manager > Users > Account Settings. In the drop-down list, select LDAP-Auth-Domain. Click Finish.
-
-
A sample PAM Configuration to provide the access control to the servers in the various departments is provided in the samples folder. Import the sample PAM configuration file, npumExportSettings-Entitlements.xml, from the samples/ folder:
-
Open the npumExportSettings-Entitlements.xml file in a text editor and copy it to the clipboard.
-
Go to Home > Command Control > Import Settings and paste it in the field. Click .
-
After the import, you can find various PAM objects, such as Rule objects, UserGroup or UserRole objects, and HostGroup objects, as shown in the following figure:
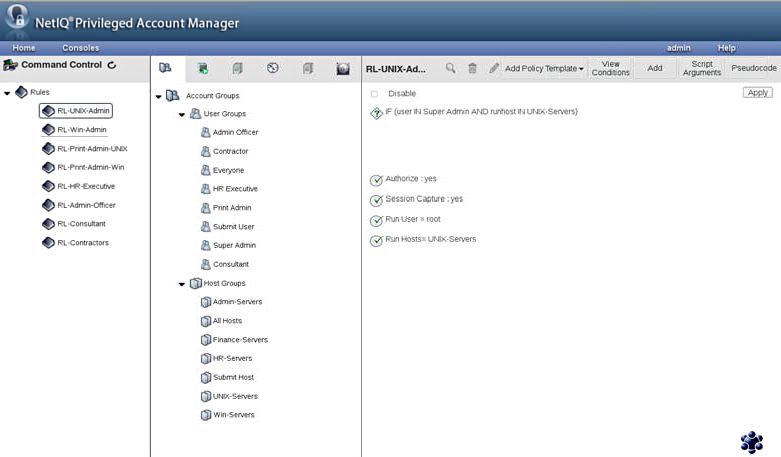
The following PAM objects are created:
-
HostGroup objects: These objects defines various groups of hosts based on the department. For example the HostGroup 'HR-Servers' would contain the servers belonging to the employees in the HR department and only they should be getting access to those servers.
-
UserGroup objects: These objects represents the groups to which user can get membership. For example, the UserGroup 'Admin Officer' would contain the members of the Administration department.
-
Commands objects: These objects defines the privileged commands that a user can get to run. For example, in the sample there is command called 'printerCommands' which has sample list of printer commands.
-
AccessTime objects: These objects define privileged access time duration. For example, in the sample there is an object 'AT-Contract' with allowed timings from 8am to 5pm on days except, Saturday and Sunday.
-
Rule objects: These are the objects where all of the above mentioned objects are used to define the access policies. For example, the object 'RL-Finance-Contractors' defines that any user having the membership to the UserGroup or UserRole 'Contract Finance', the server that is being accessed is in the HostGroup 'Finance-Servers' and the time of access is as per the timings defined in the AccessTime 'AT-Contract', then provide the user with access to the privileged account, 'fin-contract-user' on the servers belonging to the Finance department.
-
-
NOTE:
-
For providing privileged access to Windows server, AccountDomain objects and the corresponding Credential objects should be created under the PrivilegedAccounts container in the Command Control. For more information, see the NetIQ Privileged Access Manager Administration Guide.
-
User accounts must be created on the Production servers (see Figure 1-2 and Figure 1-3). The account name must be consistent with the user requesting for the Roles/Resources through RBPM/UserApp. Drivers for Linux and UNIX can be used to create local accounts on the UNIX/Linux servers.
To avoid creation of user accounts on every server, you can configure Windows servers with LDAP Domain authentication and UNIX/Linux servers with PAM-LDAP authentication.
Creating Roles/Resources in UserApp
-
Log in as uaadmin (UserApp admin) to the UserApp URL: http://<user_app_ip>:8180/IDMProv/.
-
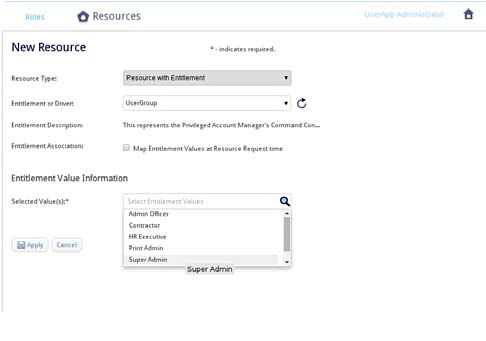
Import the PAM Entitlements. PAM UserGroup or UserRole objects are defined as the IDM Entitlements objects for the PAM driver.
Go to Roles and Resources > Configure Roles and Resources Settings > Entitlement Query Settings and click . This queries the UserGroup or UserRole objects from the PAM server via the PAM driver.
-
Create role/resource objects in the Role/Resource Catalog and associate them with PAM UserGroup or UserRole Entitlement. All the UserGroups or UserRole that were queried from the PAM server are listed for entitlement selection, as shown in the following figure.
Getting Privileged Access
-
An UserApp user can now log in to the UserApp URL and request for the roles/resources. When the role/resource is approved, the PAM driver adds the respective user as the member of the corresponding UserGroup or UserRole.
Now, the user can get the privileged access to the servers. For example, if user bob gets membership to 'Super Admin' UserGroup or UserRole, then he has root access to the UNIX servers, lnx-finance-server-01.mycompany.com, solaris-it-webserver.mycompany.com, and hp-it-webserver.mycompany.com. For example:
# ssh bob@solaris-it-webserver.mycompany.com # id
This will return uid as bob.
# usrun su
this will return uid as root.
Also, as 'Super Admin', bob has Administrator access to the Windows servers which he can access from PAM RDP relay page by performing the following procedure:
-
Open the following URL in the Internet Explorer:
https://<PUM_manager_ip>/rdprelay
Login as bob, with password is bob123, as specified in the sample ldif file.
-
After successful login, bob can view the servers to which he has access. Click any server to start a Remote Desktop session with Administrator privileges. As per the use case, bob will have access to the Windows servers - win2k8-hr-server-01.mycompany.com and win2k8-admin-server-01.mycompany.com.
-
-
Either Admin can revoke the role/resource assignment or the user can delete the assigned role/eesource. This triggers the Role/Resource Revoke process and the PAM driver triggers the removal of the user's UserGroup or UserRole membership.
1.6.2 Access Control Using SSH Relay and RDP Relay Features of PAM
This solution is based on the Credential Vault feature of PAM. With the Credential Vault, a PAM administrator can create Account Domains (servers) for UNIX SSH servers and corresponding accounts called credentials for those servers under the respective domains. Similarly for Windows servers, account domain and the corresponding accounts can be created as credentials objects.
These credentials are consumed in the Rule Objects in PAM to provide the elevated access to users.
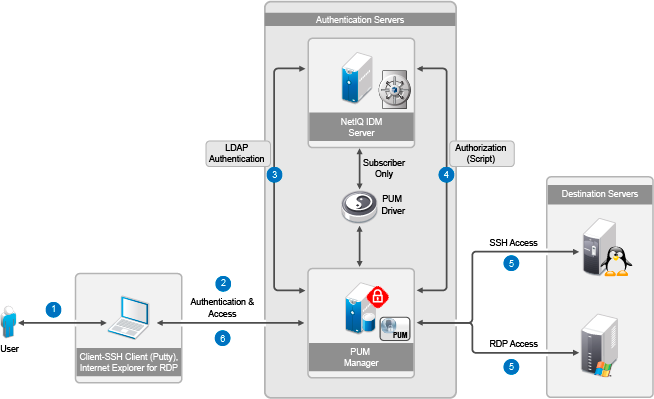
To integrate PAM with IDM, the corresponding Credential Vaults eDirectory objects can be created and managed from IDM and these would be synced to PAM by the PAM driver. Since PAM supports user authentication from an LDAP directory, an IDM user can become a PAM user by configuring PAM users to be authenticated to the eDirectory server and the access authorization to the servers would be made by PAM. eDirectory groups are created which defines the users' group membership and the group class's schema is extended with another attribute to add accounts of the hosts as members to it. By doing this, the user's group membership defines the users' privileged access to various hosts i.e. UNIX and Windows servers. So basically, for authorizing a user with privileged access to the servers, a PAM Script object which is associated with a PAM Rule object, queries the eDirectory group objects for the user's and host-account membership.
Figure 1-5 Access Control Using PAM in Relay/Proxy Mode
The details of the steps are as described in the following example.
Setting up IDM
To set up IDM:
-
Install IDM 4.8, iManager, and Designer. For more information, see the NetIQ Identity Manager Documentation Web site.
-
Extend eDirectory schema (customSchema.sch) using iManager.
-
Ensure that a password policy is associated with the user and the servers containers for synchronization of passwords to PAM. In this use case, the users container is ou=users,o=data and the servers container is ou=PUM,ou=users,o=data. Note that, with IDM 4.8 installation, the container ou=users,o=data is associated with the Default Password policy, which is utilized in this use case.
Setting up PAM
To set up PAM:
-
Install PAM v2.4, or later Framework Manager on a Linux machine.
For example, https://<pumManagerDNSorIP>.
For more information, see the NetIQ Privileged Access Manager Documentation Web site.
-
Have a Windows server (example: windows-server-01) and a Linux server (example: linux-server-01), which are the destination servers to which privileged access would be provided to IDM/eDirectory users.
Creating the PAM Driver Using Designer
To create the PAM driver using Designer, see Section 4.0, Creating a New Driver.
Adding eDirectory Objects Using the Sample LDIF File
After the objects are added to eDirectory, corresponding PAM Credential Vault objects will be created on the PAM Server, which can be verified from the PAM UI.
To add eDirectory objects using the provided sample LDIF file:
-
Extend eDirectory schema (customSchema.sch) using iManager.
-
Modify the attributes of the sample objects in the sample-npumRelay.ldif file.
You can modify the IP addresses of the ldap account domains, user passwords, and so on. Note that the server names should be resolvable if DNS names are used.
-
Upload the user objects using the sample-users.ldif file.
-
Upload the eDirectory objects using the sample-npumRelay.ldif file.
-
After the objects are uploaded successfully, they will be synced to PAM via the PAM driver. You can see this, by logging in to the PAM Framework Manager (https://<PUMManagerDNSorIP>) as admin, in the Home > Enterprise Credential Vault > Credential Vaults > Windows/LDAP screen.
The following objects are created:
-
eDirectory User objects: john, bob
-
eDirectory Group objects: unixAdminGrp, winAdminGrp
-
PAM Credential Vault objects: PAM-IDM with credential admin, linux-server-01 with root account, windows-server-01 with Administrator account
Configuring PAM and the PAM Sample Export File
-
Configure PAM Framework Manager to authenticate users from LDAP server (eDirectory) on which IDM is running:
-
Log in to PAM (https://<pumManagerDNSorIP>/pam) as admin.
-
Configure PAM to authenticate users from LDAP server(eDirectory).
-
Go to , click next to , and provide values for the following fields, as specified:
-
: Enter the domain name.
For example, if your Active Directory domain is DC=pamdomain, DC=com, Domain name = pamdomain
-
: Enter the DNS name.
For example, netiq.com
-
Port: Enter the port number to connect to this resource.
-
SSL: Select SSL to enable SSL communication to the directory server.
-
Base DN: Click to display the domain name.
-
Scope: Enter the scope for the user.
-
Search Credential: This credential is used to fetch the user details from the directory server.
-
User Name: Enter the account name of the domain user.
For example: administrator
-
User DN: Enter the complete name of the domain user.
For example: CN=administrator,CN=Users,DC=netiq,DC=com
-
Anonymous: Select this option to enable anonymous access to the LDAP directory.
-
Password: Enter the password for the domain user account.
-
-
Click to save the resource details.
-
Go to Home > Framework User Manager. Click Users > Account Settings. In drop-down list, select and click .
-
-
-
Import the custom scripts and modify them:
-
Open the npumExportSettings-Relay.xml file in a text editor and copy it to the clipboard.
-
Go to Home > Command Control >Import Settings, and paste it in the field. Click .
-
After the import, two PAM script objects, SSH-Relay-Script and RDP-Relay-Script, appear under Home > Command Control > Scripts and two PAM Rule objects, SSH-Relay-Script and RDP-Relay-Script, appear under Home > Command Control > Rules.
-
Double-click each script to modify the LDAP (eDirectory) information, such as server IP, adminDN, admin credentials, and baseDN. LDAP information is located in the section of the scripts called ### CUSTOMIZE SECTION ####. Following is the snippet from the script:
### CUSTOMIZE SECTION ####
my $ldap_url = "ldaps://<idm_server_ip>";
my $ldap_user = "<admin_dn>";
my $ldap_pwd = "<admin_password>";
my $ldap_user_base = "<user_container_dn>";
my $ldap_host_base = "<unix/windows_servers_container_dn>";
my $ldap_acc_grp_base = "<groups_container_dn>";
my $driver_name = "<pum_driver_dn>";
NOTE:The custom script expects the Windows and UNIX servers containers to be different, that is, the value of the variable $ldap_host_base.
-
Getting Privileged Access
NOTE:
-
The values are based on the sample file.
-
RDP-Relay-Rule gets executed for RDP Relay. In this rule, is set as and Run Host is set as . With these settings, in the RDP relay page, after the user successfully logs in, the user is prompted for account and the IP/DNS address of the server to which user wants the privileged access. This behavior is different from the usual RDP relay, where the Windows server access are listed based on the privileges defined by the rules.
Verify that users john and bob are provisioned with privileged access to the servers:
-
SSH Relay: bob is a member of the unixAdminGrp group, and gets privileged access to all the UNIX servers that are part of this group. In this case, root account on linux-server-01 is a member this group, so bob can get root access to this server via PAM by running the below command:
# ssh -t -p 2222 bob@<pumServerIP> root@linux-server-01
Enter the eDirectory password of bob, which is bob123 in our example.
After successful login, bob gets a root access shell to linux-server-01. Note that bob did not need to provide the root password of the Linux server.
bob enters his eDirectory credentials and gets authenticated to the PAM server, which in turn authorizes bob with root access to the UNIX server, linux-server-01, without asking for root password.
-
RDP Relay: john is a member of the winAdminGrp group and gets privileged access to all the Windows servers that are part of this group. In this case, Administrator account on windows-server-01 is member of this group, so john can get Administrator privileges to this server via PAM by performing the following steps:
-
Open the following URL in Internet Explorer 9 or above:
https://<pumServerIP>/rdprelay
-
Log in as john with password john123. john is authenticated to PAM using eDirectory credentials.
-
After successful login, john will be prompted to specify values in two fields, and . Enter the account name and the IP address of the Windows server to which you have privileged access. In this example, user name is and host name is be windows-server-01.
After successful login, john gets Remote Desktop access to windows-server-01. Note that john did not need to provide the Administrator password of the Windows server.
-