4.6 Incremental Imaging
Incremental imaging enables you to schedule recurring incremental synchronizations that capture only files that change over time.
Incremental imaging introduces the following image-related entities:
-
Base (or full) image: A standalone entity that can be restored without additional files or data; contains complete workload information available at the time of capture.
-
Increment: A point-in-time delta representing only changes occurring since the capture of the last full image or increment. You can restore a specific point-in-time state of an image by selecting the required increment during deployment. Applying an increment to the base image requires that all intervening increments be available.
-
Differential: An aggregate of multiple increments. You can create an image differential by consolidating multiple consecutive increments into one.
4.6.1 Automatically Capturing Image Increments
Capturing image increments involves setting up a Capture Image job with incremental synchronizations enabled.
-
Discover the workload source and the target image server. If they are already discovered, refresh their details (right-click > ) to ensure that Portability Suite has the most up-to-date information about them.
-
Using the task in the pane, start a new image capture job with the required source and target, then click to start the window.
-
In the window, click , then in the Job Configuration dialog box, click the tab. See Scheduling and Synchronization.
-
Select the
-
Click to set up the required recurrence for full and incremental synchronizations.
-
Set the number of required Rolling Increments.
This determines the number of incremental images that are stored at a given time. When this number is exceeded, the oldest increment is merged with the base image to form a new base.
-
Click and wait for the conversion to complete.
On completion, the Servers view lists the new image under the corresponding Flexible Image Server:

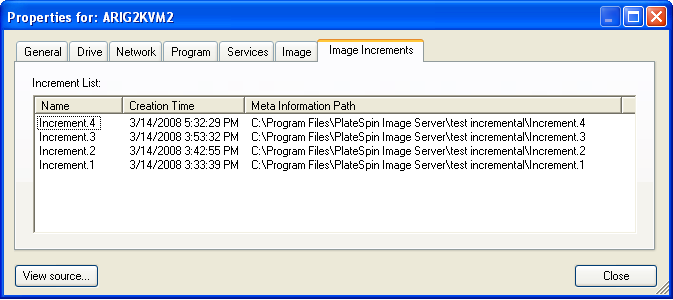
4.6.2 Viewing Increments
To view all increments associated with an image:
-
In the Servers view, right-click the required image and select .
-
Click the tab.
A list of all increments associated with the image is displayed. This includes each increment’s name, creation date and time, and the path to the file containing its meta information.
4.6.3 Selecting an Increment to Deploy with an Image
To deploy an image with a specific increment:
-
In the Tasks pane, click . The Action window opens.
-
Select the image and the target image server, then click .
-
Configure the conversion as job as described in Deploying a Flexible Image.
-
Under in the window, click
-
In the dialog box, deselect and select the increment to be deployed.
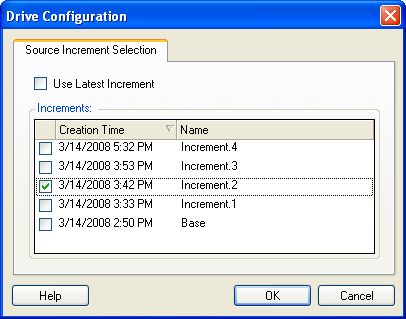
-
Click .
-
Click to start the conversion.
Portability Suite deploys the image, using the base image and all increments up to and including the one selected.
4.6.4 Consolidating Increments
Increment consolidation replaces two or more increments with a single, merged image increment. You can consolidate only consecutive increments.
-
In the Servers view, right-click the required image and select .
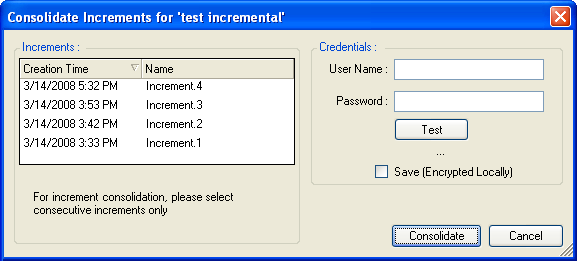
-
Select any number of consecutive increments to consolidate by holding down the Ctrl key while selecting with the mouse or the arrow keys.
-
Enter valid credentials for the image and test them.
-
Click .
The increments are replaced with a single differential image. This image appears as an increment in the list of increments, but its name includes the IDs of all the consolidated increments. For example, Increment.2-4.
4.6.5 Applying Increments to the Base Image
Use this feature to update a base image to include one or more subsequent increments. Applying an increment merges all preceding increments with the base image.
-
In the Servers view, right-click the required image and select .
-
Select the increment to apply.
All increments created before the selected increment are also applied.
-
Type valid credentials for the image and test them.
-
Click .
Portability Suite applies the selected increments to the base image, replacing it with a new, updated image.
4.6.6 Deleting Increments
You can delete captured image increments if required. Deleting an increment results in the removal of all increments created after the selected increment.
-
In the Servers view, right-click the required image and select .
-
Select the increment you want to delete.
-
Enter valid credentials for the image and test them.
-
Click .
Portability Suite removes the selected increments.