3.2 Relocating PlateSpin Forge and Reassigning Its IP Addresses
Relocating your PlateSpin Forge appliance involves changing the IP addresses of its components to reflect the new environment. These are the IP addresses you specified during the initial setup of the appliance (see your Forge Getting Started Guide).
The procedure varies depending on the appliance version (1 or 2). For information on how to determine the appliance version of your unit, see “Determining your Unit’s Appliance Version” in your Forge Getting Started Guide.
3.2.1 Forge Relocation Procedure for Appliance Version 2
Before starting the relocation procedure:
-
Pause all replication schedules, ensuring that at least one incremental has run for each workload:
-
In your PlateSpin Forge Web Client, select all workloads, click , then click .
-
Ensure that the status is displayed for all the workloads.
-
The specifics of the relocation process vary depending on whether the new IP address of the appliance at the target site is known (scenario 1) or unknown (scenario 2).
Scenario 1 - Relocating Forge (New IP Address Known)
-
Launch the Forge Appliance Configuration Console (ACC): open a browser and go to http://<Forge_IP_address>:10000.
-
Log in using the forgeuser account and click .
-
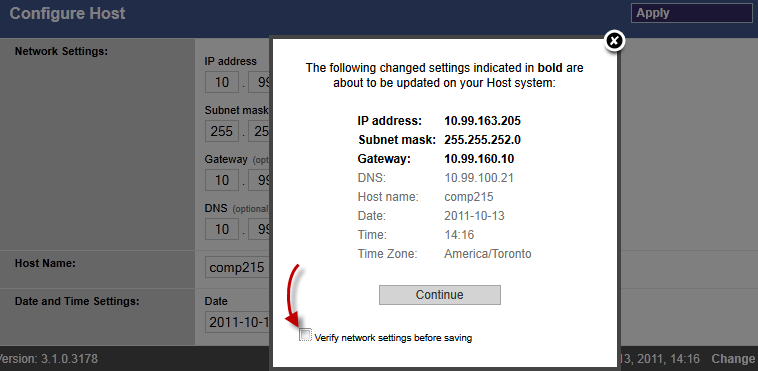
Enter the new network parameters and click .
-
In the confirmation popup window, ensure that the new settings are correct, deselect the , then click .
-
Wait for the configuration process to complete and for the browser window to display the Configuration Successful popup window.
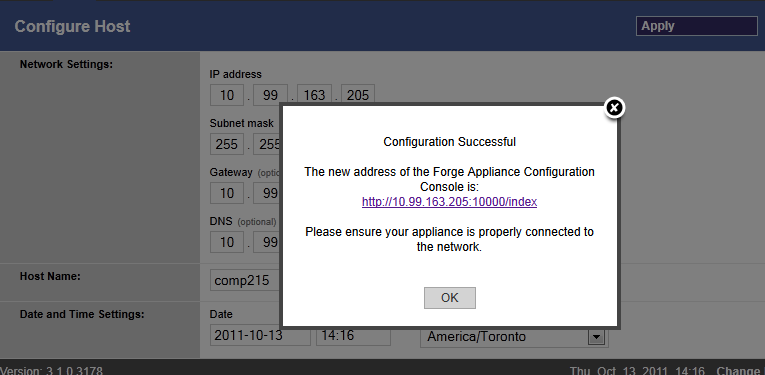
NOTE:The link in the popup window for the new ACC address will not work until you now physically disconnect your appliance and connect it to the new subnet.
-
Shut down the appliance:
-
Shut down the Forge Management VM. See Starting and Shutting Down the Forge Management VM.
-
Shut down the Appliance Host:
-
At the Forge Console, switch to the ESX Server console by pressing Alt-F2.
-
Log in as the superuser (user root with the associated password).
-
Type the following command and press Enter:
shutdown -h now
-
-
Power the appliance down.
-
-
Disconnect your appliance, move it to the new site, attach it to the new subnet, and power it on.
The new IP address should now be valid.
-
Launch the ACC and log in using the forgeuser account, click , specify the required parameters, then click .
-
Verify that the setting are correct, click , and wait for the process to complete.
NOTE:If you configured the Forge VM to use DHCP, do the following after the relocation:
1. Determine the Forge VM’s new IP address (use the VMware client program to access the Forge VM and look it up in the VM’s Windows interface. See Launching the VMware Client and Accessing the Forge Management VM).
2. Use the new IP address to launch the PlateSpin Forge Web Interface and refresh the container (click
 ).
).
-
Resume the paused replications.
Scenario 2 - Relocating Forge (New IP Address Unknown)
-
Pause all replications. See Step 1.
-
Shut down the appliance:
-
Shut down the Forge Management VM. See Starting and Shutting Down the Forge Management VM.
-
Shut down the Appliance Host:
-
At the Forge Console, switch to the ESX Server console by pressing Alt-F2.
-
Log in as the superuser (user root with the associated password).
-
Type the following command and press Enter:
shutdown -h now
-
-
Power the appliance off.
-
-
Disconnect your appliance, move it, attach to the new network, then power it on.
-
Set up a computer (notebook computer recommended) so that it is able to communicate with Forge at its current IP address (the IP address at the old site), then connect it to the appliance.
See Appliance v2 Configuration Procedure Using the Forge ACC in your Getting Started Guide.
-
Launch the Forge Appliance Configuration Console (ACC): open a browser and go to http://<Forge_IP_address>:10000.
-
Log in using the forgeuser account and click .
-
Enter the new network parameters and click .
-
In the confirmation popup window, ensure that the new settings are correct, deselect the , then click .
-
Wait for the configuration process to complete and for the browser window to display the Configuration Successful popup window.
NOTE:The link in the popup window for the new ACC address will not work until you now physically disconnect your appliance and connect it to the new subnet.
-
Disconnect the computer from the appliance and connect the appliance to the new subnet.
The new IP address should now be valid.
-
Launch the ACC and log in using the forgeuser account, click , specify the required parameters, then click .
-
Verify that the setting are correct, click , and wait for the process to complete.
NOTE:If you configured the Forge VM to use DHCP, do the following after the relocation:
1. Determine the Forge VM’s new IP address (use the VMware client program to access the Forge VM and look it up in the VM’s Windows interface. See Launching the VMware Client and Accessing the Forge Management VM).
2. Use the new IP address to launch the PlateSpin Forge Web Interface and refresh the container (click
).
-
Resume the paused replications.
3.2.2 Forge Relocation Procedure for Appliance Version 1
-
Pause all replication schedules, ensuring that at least one incremental has run for each workload:
-
In your PlateSpin Forge Web Client, select all workloads, click , then click .
-
Ensure that the status is displayed for all the workloads.
-
-
Shut down the Forge Management VM. See Starting and Shutting Down the Forge Management VM.
-
Shut down the Appliance Host:
-
At the Forge Console, switch to the ESX Server console by pressing Alt-F2 (to switch back to the Forge Console, press Alt-F1).
-
Log in as the superuser (root and the associated password).
-
Type the following command and press Enter:
shutdown -h now
-
Power the appliance off.
-
-
Move the appliance to the new location, set up the hardware, make the required cable connections, then power the appliance on.
-
Update the appliance network configuration:
-
At the Forge console, log in as the superuser (root and the associated password).
-
Update the settings for the appliance host as required. You can use DHCP, but only if a static IP lease is enabled. For multiple appliance environments, assign unique hostnames to the appliances to avoid hostname conflicts.
-
Update the and domain affiliation settings for the Forge Management VM as required.
-
Select , review the updates, then select again.
-
-
Update the network settings for the paused replications; in your PlateSpin Forge Web Client, do the following for each paused workload:
-
Access the Replication Settings section in the paused workload’s protection details.
-
Update the value to reflect the network change.
-
Save the settings.
-
-
Resume replications: in your PlateSpin Forge Web Client, select all workloads, click , then click .