1.2 Appliance Configuration Procedure
The initial setup and configuration of the PlateSpin Forge appliance is a one-time procedure consisting of the following steps:
-
Configuring the appliance host (VMware ESX, which is the hypervisor component of the product).
-
Configuring the Forge Management VM (a Windows virtual machine with application logic running on the host).
-
Activating your product license.
For your convenience, a Configuration Worksheet is included in your appliance documentation; fill it out before starting this procedure.
The initial configuration procedure for your appliance will vary depending on the appliance version.
1.2.1 Determining your Unit’s Appliance Version
You can determine the appliance version of your Forge unit by using one of the following methods:
-
Forge Web Client: Look up the appliance version number in the PlateSpin Forge Web Interface’s page. You can only do this if you are reconfiguring Forge.
-
Local Configuration Interface Type: Connect a monitor to the appliance and power it on. If the system displays the blue screen of the Forge Console, your appliance version is 1. If the system displays the ESX configuration screen, your appliance version is 2.
-
Remote Configuration Interface: Using a Web browser and the IP address of your Forge unit, attempt to launch the Forge Appliance Configuration Console (ACC) as described in Appliance Version 2 Configuration Procedure Using the Forge ACC (Step 2 through Step 4). If you are able to connect, your appliance version is 2.
1.2.2 Appliance Version 1 Configuration Procedure Using the Forge Console
The initial setup and configuration of the PlateSpin Forge appliance is a one-time procedure. Record all pertinent information on the printed Configuration Worksheet in case you need to contact PlateSpin Technical Support with any setup issues.
IMPORTANT:Unsupported modifications of the PlateSpin Forge or Management VM, including running other virtual machines on PlateSpin Forge, can impact its performance and might violate the End User License Agreement, voiding your warranty.
To fully configure PlateSpin Forge, you need to configure the hardware and the Management VM (the software).
-
Perform the preparatory steps described in Before You Begin.
-
Upon initial power-on, ensure that the PlateSpin Forge Configuration dialog box is displayed.
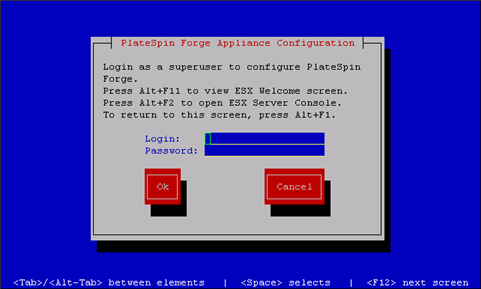
-
Type root in the field and password in the field. Select .
The dialog box is displayed. You must change the default password before proceeding.
-
Type a new password in the field and again in the field. Select .
The system confirms the password change.
-
Select .
You are logged out so that you can log back in with your new password.
-
Log back in.
The VMware ESX EULA dialog box is displayed. You must accept the end user license before continuing.
-
Select , then select .
See the VMware Web Site for the latest end user license agreement.
The PlateSpin Forge EULA dialog box is displayed.
-
Select , then select .
The PlateSpin Forge Host Configuration dialog box is displayed.
-
Specify the address, , and IP address you want to assign to the Appliance Host. Optionally, you can also enter a , but you will need to reboot the appliance.
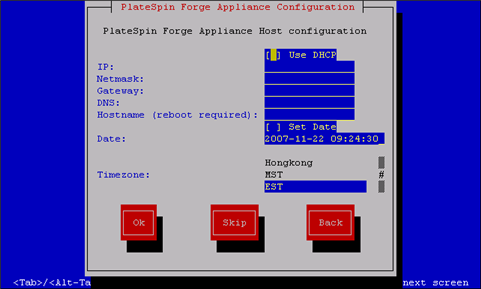
You can also use DHCP, but assigning a static IP address is recommended. It is also highly recommended to assign hostnames to the appliances in multiple-appliance environments to avoid hostname conflicts.
-
Select , specify a date and time, select a , then select .
The PlateSpin Forge Host Credentials dialog box is displayed. This is where you enter the credentials you want to use to access the ESX server, which is the hypervisor layer of the appliance.
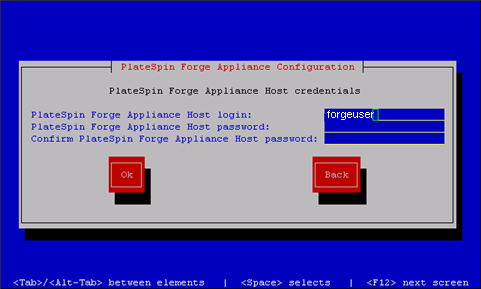
-
Specify a login name in the field, type a password, confirm by retyping the password, then select . This creates a new ESX user that is a member of the root group. Unlike the root user, the new user has SSH permissions on ESX.
The Management VM network settings dialog box is displayed.

-
Deselect and provide the Management VM address, , address, and (optionally) a . The IP address entered here is used to access the PlateSpin Forge Web Client.
You can also use DHCP, but assigning a static IP address is recommended.
-
(Optional) Type the name of a DNS server in the field and provide a .
-
Click .
The Appliance Configuration dialog box prompts whether or not to join a workgroup or domain.
-
Select to open the Join PlateSpin Forge Management VM to Workgroup or Domain dialog box:

Joining a domain allows you to give selected domain users permissions for the application.
-
Do one of the following:
-
Type a domain name, user, and password, or type a workgroup. If the domain fields are populated, the field is ignored. Select .
-
Leave the fields empty and click to proceed to the next step and use WORKGROUP as the default workgroup name.
A Configuration Review dialog box is displayed with a summary of the parameters you have selected. Use the information to verify your settings.
If necessary, select to display an error message or to exit the configuration interface. Select to edit previous settings.
-
-
Select .
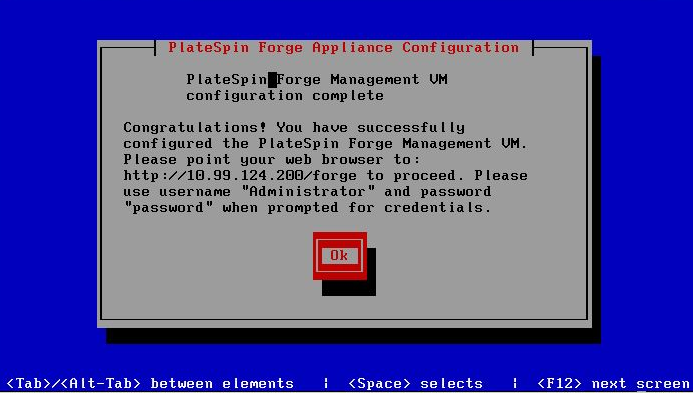
A configuration progress dialog box is displayed. Configuration can take several minutes. A final dialog box is displayed confirming the configuration’s success or failure. If the process is successful, the dialog box presents a URL you can use to access the PlateSpin Forge Web Client. Record this URL for future use.
-
Select .
1.2.3 Appliance Version 2 Configuration Procedure Using the Forge ACC
To begin the installation and configuration of the appliance, you must connect directly to it through another computer and use the browser-based Appliance Configuration Console (ACC) utility. Consider using a notebook computer for flexibility and mobility.
-
Perform the preparatory steps described in Before You Begin.
-
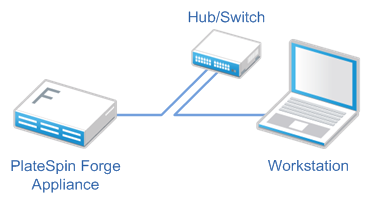
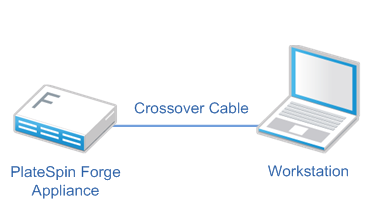
Connect your computer to the appliance. You can do this in two ways:
-
Connection through a Network Switch: Connect both units to a network switch or a hub through an Ethernet network cable:
-
Direct Connection: Connect your PlateSpin Forge appliance and the computer directly through a crossover cable:
-
-
Turn on the power of the PlateSpin Forge appliance. Wait at least 10 minutes for the system to fully start before trying to connect.
-
Assign the computer an IP address, in the 192.168.1.x range and an associated subnet mask of 255.255.255.0 (or any IP address/subnet mask combination, making sure that the computer is able to ping the appliance at its default IP address, 192.168.1.200).
NOTE:Do not use the following IP addresses:
-
192.168.1.200 - used by the hypervisor
-
192.168.1.210 - used by the Forge VM (assigned by an automatic appliance configuration utility).
-
-
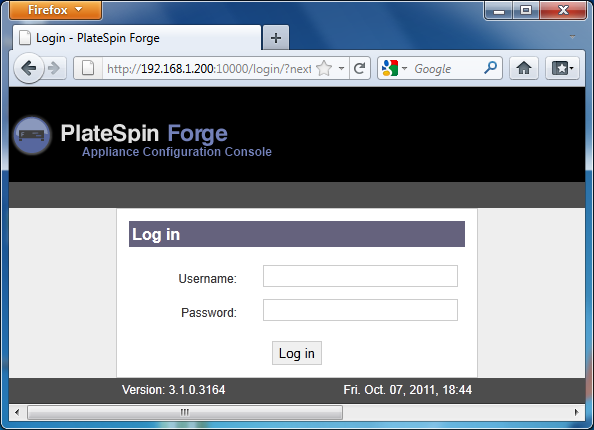
Open a supported Web browser and go to the Forge Appliance Configuration Console (ACC) at http://192.168.1.200:10000.
NOTE:Depending on your browser, you might have to type the entire URL, including the protocol (http://) in the browser’s address bar.
The system prompts you to log in.
-
Log in using the root account (password: password).
The system redirects you to the Change Password page.
-
Change the password for the root account as well as for the forgeuser account.
-
Log out of the ACC.
-
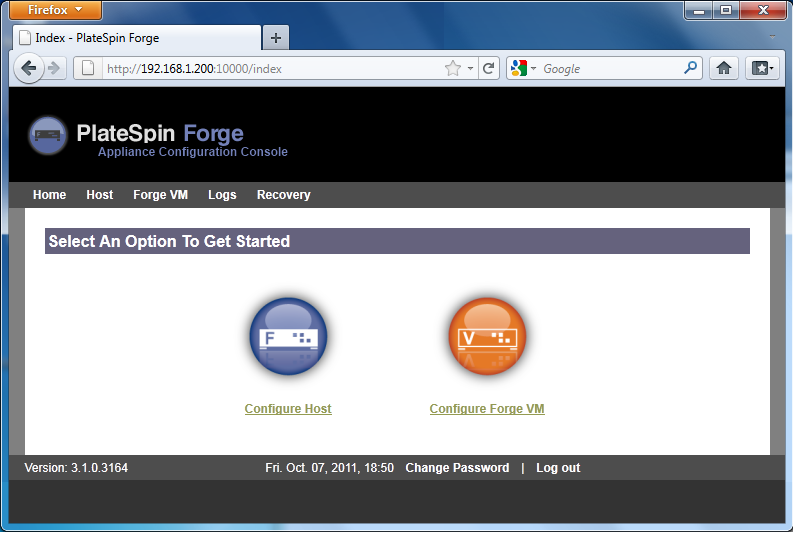
Log in using the forgeuser account using the password you set in Step 7.
The system prompts you to configure the host or the Forge virtual machine:
-
Click .
The system displays the Configure Host screen:
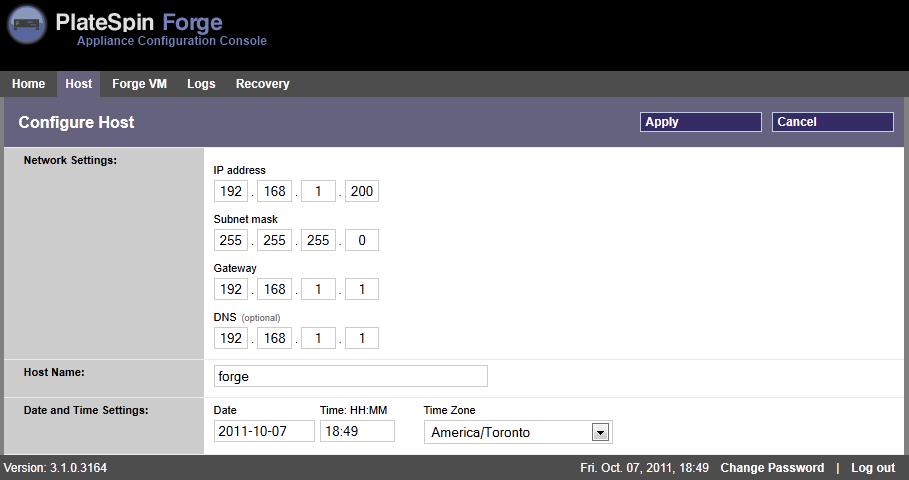
NOTE:You must first configure the appliance host. Do not attempt to configure the Forge VM before this.
-
Enter the appropriate settings and click .
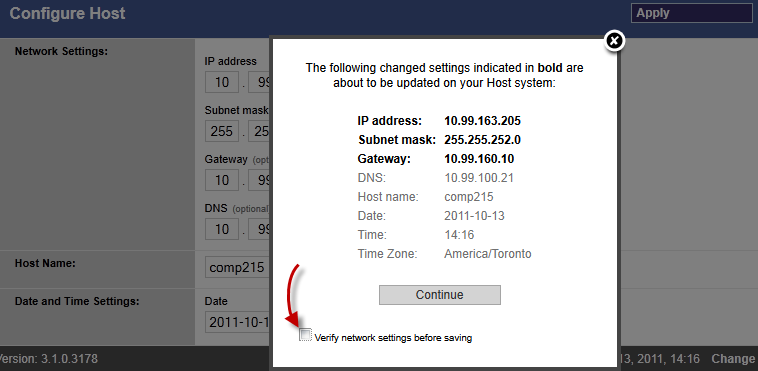
The system displays a summary of the configuration parameters you specified:
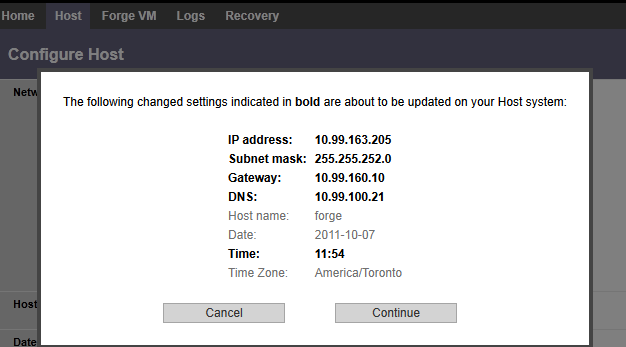
NOTE:If you are reconfiguring the appliance (if it is not the first time you are performing this procedure), the system prompts you to verify if the new connection works. If the check fails, the Forge IP address is reverted.
-
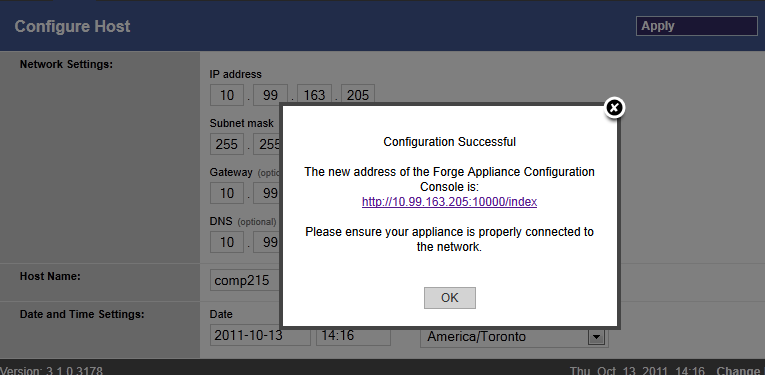
Click .
The system displays a progress indicator, and when the configuration is complete, confirms its success:
-
Disconnect the computer and connect the appliance to the production network (where the new IP address will be valid).
-
From the computer, go to http://<appliance_IP>:10000
(If you are using the same computer, make sure to change its IP address to one that is valid in your network).
-
Log in using the forgeuser account.
-
Click Configure Forge VM.
The system displays the Configure the Forge VM page:
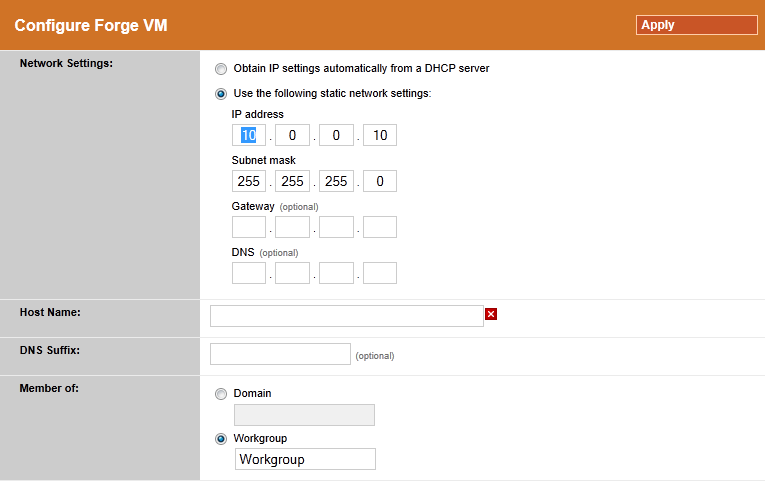
-
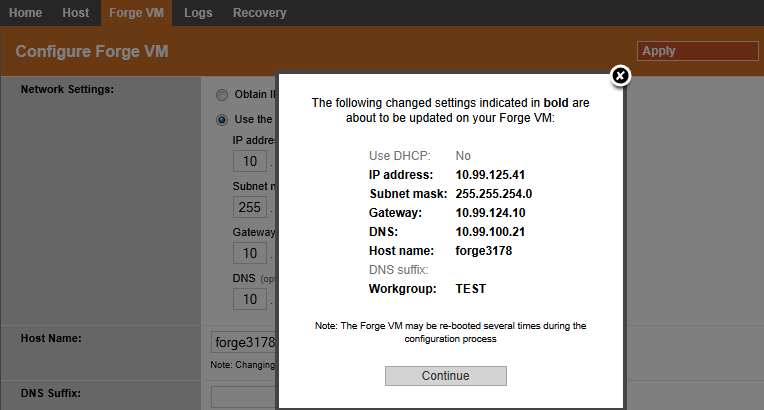
Enter the appropriate settings and click .
The system displays a summary of the configuration parameters you specified:
-
Click and wait for the VM configuration to complete.
The system displays a progress indicator, and when the configuration is complete, confirms its success:
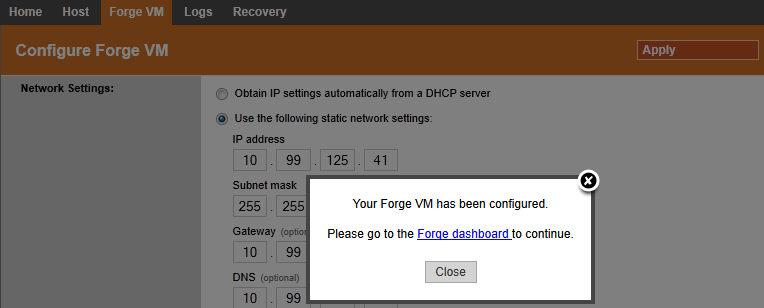
-
Click the Forge Dashboard link to connect to the Forge UI at http://<appliance_IP>/forge. Use the default credentials for the Forge VM (username: Administrator, password: password).