21.1 About the Workload Dialog

You plan each transformation through the Workload dialog. It contains information about the original workload, the proposed workload, and the transformation status. This dialog allows you to modify the proposed workload and the transformation state for the workload.

In the Workload dialog, the font colors for Proposed values indicate states for the data:

  • Light Gray: The Proposed field values are light gray (dimmed) if the section has not yet been edited directly. Each Proposed field value is inherited from its source workload’s imported or discovered value. In the Transformation Plan section, each field value is inherited from its parent batch, wave, or project value.

  • Gray: The Proposed field values are gray if the section has been edited directly and the value matches the displayed Original value. The Proposed values can be modified if the Edit action is enabled for the section.

  • Blue italics: The field value has been modified from its imported or discovered value.

    If the section in the Workload dialog has not been edited directly, any changes to the Proposed default or imported values have been made indirectly. Otherwise, the changes might have been made directly or indirectly. The source and history of changes to field values are not tracked.

  • Red: The section heading is in a red boldface font if errors or warnings exist for any of its fields. The red error condition displays next to the field label. For example, an error exists if a required value is missing.

The dialog allows you to view or modify the following information for the workload transformation:

21.1.1 Header

The Workload dialog header provides the following information about the workload:

  • FQDN (fully qualified domain name)

  • Project name

  • Wave name or <wave not assigned>

  • Batch name or <batch not assigned>

21.1.2 Workload IDs and Discovery Address

Mouse over any of the objects in the Workload dialog header area to view the following IDs for the selected workload:

  • Transformation ID

  • Original Workload ID

  • Proposed Workload ID

  • Migration Server Workload ID

    This value is known after a PlateSpin Migrate server has been assigned. It is used for matching workloads in the database of the specified PlateSpin Migrate server.

  • Discovery Address

    This is the IP address used for discovery and communications with the workload.

21.1.3 URL for the Workload dialog

Click the Navigation URL icon in the upper right corner of the Workload dialog to show the URL to the selected workload transformation. You can open the link in a new tab, or copy the URL to the clipboard. You can also email the copied URL to stakeholders to allow them to go directly to the selected page. Log in is required for those users to gain access.

21.1.4 Errors and Warnings

If errors or warnings exist, the Workload dialog reports the total number that are associated with the workload transformation. For sections that contain errors or warnings, the section title and the field values of missing or invalid information appear in a red font.

Errors exist

Warnings exist

NOTE:A Retry option is available for failed states that are recoverable conditions.

21.1.5 Status and Retry

The Status indicates in which state the workload is in its transformation workflow. Figure 21-1 shows the user responsible for setting the status, the various workload states, and the workflow for the transformation process. The thick lines show the default next state available for each state. See Table 21-1 for a description of each workload state and its possible next states.

The Transformation Workflow diagram represents the overall logical flow of states in a workload transformation. Some states are not available, depending on whether the workload transformation is set to Automated Mode or Planning Mode. For example, after an automated cutover is completed successfully, the migration job is complete and you cannot reopen the same migration job.

Some states are associated with the start date or cutover date for the workload’s assigned batch. The state reports a Warning if that date has passed, but the expected action has not yet occurred.

NOTE:A Retry option is available for failed states that are recoverable conditions.

Figure 21-1 The Transformation Workflow

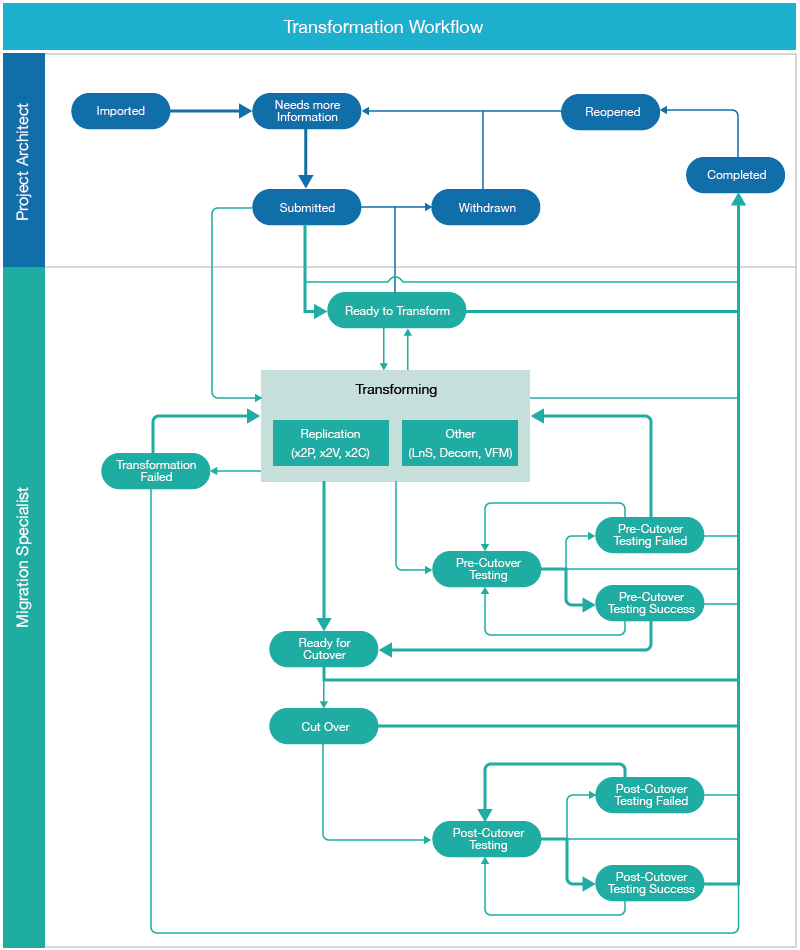
Table 21-1 State Descriptions

State

Description

  • Imported

The workload information has been imported as an original workload and a proposed workload. You have not yet modified the imported information. The workload is unlicensed until you begin to edit the workload information.

  • Needs Additional Info

You have modified the imported workload information directly in the Workload dialog or with a Batch Edit action. Some required values might be missing, or there might be errors to resolve. Edits include setting the schedule for the workload, modifying its proposed workload configuration, or adding required values.

  • Ready to Submit

All required values are present and there are no errors to resolve. A red Warning notice appears in the Status column if the start date for its assigned batch has passed.

  • Submitted, Waiting for Start Date

The workload has been submitted for transformation, and the start date for its assigned batch is a future date. When the start date occurs, the workload’s status automatically changes to Ready to Transform. The Migration Specialist can manually change the workload’s status from Submitted to Transforming before the start date.

  • Ready to Transform

The workload is ready for transformation, and the start date for its assigned batch has passed.

Withdrawn

In Automated Mode, the submitted workload has been withdrawn because it needs changes for the planned transformation before the transformation process can continue.

  • Transforming

The Migration Specialist has begun the transformation process for the workload, such as replication methods (x2P, x2V, or x2C) or other methods (LnS, Decom, and VFM).

  • Transformation Failed

The transformation from original workload to proposed workload has been attempted and failed.

  • Ready to Cutover

The transformed workload is ready, waiting for the Cutover Date.

  • Pre-Cutover Testing

The transformed workload tests are in progress.

Pre-cutover testing can be selected at any time after the first full replication and before the Cutover Date arrives or Cutover starts.

  • Pre-Cutover Testing Succeeded

The transformed workload test succeeded, and the workload is ready for cutover.

  • Pre-Cutover Testing Failed

The transformed workload test failed. Repeat the transformation or the re-test the workload.

  • Cut Over

The workload has been cut over to its target network.

  • Post-Cutover Testing

After the cutover, tests on the cutover workload are in progress.

  • Post-Cutover Testing Succeeded

The tests on the cutover workload succeeded.

  • Post-Cutover Testing Failed

The tests on the cutover workload failed. Re-test the workload if needed.

Completed

The workload transformation process is completed.

Reopened

A completed workload transformation has been reopened because it needs changes for the planned transformation before the transformation process can continue.

21.1.6 Migration Sub Status

During automated migration, the PlateSpin Migrate server reports migration state events for the workload, referred to as its Migration Sub Status. You can search on Sub Status states in the Advanced Search dialog.

For a list of reportable migration state events, see Section C.19, Migration Sub Status.

21.1.7 Discovery Status and Rediscovery

When a PlateSpin Migrate Connector is available to the project, the header area displays the discovery status of the workload below the Status.

After a successful discovery, a Rediscovery option is available. You might initiate rediscovery if you make manual changes to the source workload, such as adding NICs or modifying its assigned datastores. See Section 20.7, Rediscovering Workloads.

21.1.8 Last Modified

The Last Modified field shows the time stamp of the last modifications made directly in the Workload dialog, or indirectly by actions performed through import, discovery, and changes to the proposed workload or status.

21.1.9 License State

View the license state in the lower right corner of the header area of the Workload dialog. Mouse over the Licensed (green) icon to view the license date.

Licensed

Not licensed

License is not available

21.1.10 Transformation Plan

The Transformation Plan panel allows you to specify the following information for the workload transformation:

  • Project: The parent project for the workload.

  • Wave: The parent wave for the specified batch.

  • Batch: The parent batch scheduled for this workload.

  • Start Date: The planned start date for the workload transformation. The date must fall in the execution window for its parent batch, and occur before the cutover date.

    • Time: Specify the time of day to begin workload replication for the migration. The time is based on the time zone of the PlateSpin Migrate server that you will use to execute the migration.

      NOTE:The actual start time might be delayed by a few minutes, based on the PlateSpin Migrate Connector polling interval for the PlateSpin Migrate server. The default interval is 5 minutes (300 seconds).

  • Cutover Date and Time: The planned cutover date for the workload transformation. The date must fall in the execution window for its parent batch.

    • Time: Specify the time of day to begin the cutover execution. The time is based on the time zone of the PlateSpin Migrate server that you will use to execute the migration.

      If the Cutover Date is the same as the Start Date, the Cutover Time must be after the Start Time.

      NOTE:The actual start time might be delayed by a few minutes, based on the PlateSpin Migrate Connector polling interval for the PlateSpin Migrate server. The default interval is 5 minutes (300 seconds).

  • Transformation Method: The transformation method to use for this workload. The options depend on the workload type of the original workload. See Section 19.3, Workload Transformation Methods.

  • Migration Server: The Migration Server resource that will be used to migrate the original workload to the proposed workload. Before you can select a Migration Server, you must first create Migration Server resources for your project in Resources > Migration Servers. See Section 25.0, Managing Migration Server Resources.

    NOTE:Migration Server selection is disabled if you enable Automated Migration.

    You can save a Migration Server resource in an incomplete state without a URL and credentials. In this case, the Migration Server field displays the Migration Server resource name and the Not configured state in the Transformation Plan panel. When you later deploy the migration server in your environment, you should update the Migration Server resource with its URL and credentials. The resource state is automatically updated for all of its associated workloads.

  • Automated Migration: Select the check box to enable the load-balanced automated assignment of migration jobs to PlateSpin Migrate servers. In Automated Mode, you can use Automated Migration as an alternative to assigning a specific Migration Server resource to each workload.

    The Migrate Connector uses round-robin load-balancing to distribute workload migration jobs evenly across all of the PlateSpin Migrate servers in your project. It detects all currently running Migrate servers for the round-robin. When it receives a new workload migration request, the Connector assigns the workload to the next Migrate server in the sequence with available capacity and licenses.

    After the workload is assigned to a Migrate server, a link to the workload in PlateSpin Migrate is available in the workload’s Workload dialog. You can follow the link to go directly to the workload on the assigned Migrate server.

    NOTE:For Windows Cluster migration to target VMware hosts, the PlateSpin Migrate server must meet the prerequisites described in Preparing for Migration of Windows Clusters in the PlateSpin Migrate 12.2.1 User Guide. If you use Automated Migration, ensure that all Migrate servers for the project satisfy these prerequisites.

  • On Hold: Select the check box to put the workload in an On Hold state, where the workflow cannot progress. Deselect the option to remove the hold. Workloads in an On Hold state are dimmed in the Workloads list.

    NOTE:The On Hold option in PTM also sets the Pause Replication Schedule option in PlateSpin Migrate for automated migration. It can be controlled from either product interface.

21.1.11 Migration Settings

The Migration Settings panel provides information about the default behaviors for the replication environment. This panel is available only for automated migration.

General Settings

  • Disk Copy Method: The method used to create an exact copy of volume data from the source disk to the target disk. Options for the data transfer are:

    • Block with Driver: A data transfer method that dynamically installs a special driver on the source workload to facilitate volume data transfer at the block level. It leverages snapshots if they are available. PlateSpin Migrate requires this option for all Linux workloads.

      IMPORTANT:A reboot is required when the driver is installed on the source workload.

    • Block without Driver: A driverless data transfer method for Windows workloads. It leverages snapshots if they are available, or it uses a driverless synchronization with an MD5-based replication.

    • File: A data transfer method for Windows workloads that copies data and replicates changes on a file-by-file basis.

  • Install Driver: If you select Block with Driver as the disk copy method, you can specify when in the migration process to install the driver on the source workload.

    NOTE:Installing the block-based driver requires a reboot of the source workload.

    • Prepare: Installs the required data transfer software on the source workload and creates a target workload in preparation for the workload replication.

    • First Replication: Installs the required data transfer software on the source workload and begins the first full replication of the workload.

  • Compression Level: Specify level of compression to apply to workload data before its transmission for replications to the target workload.

    • Fast: Consumes the least CPU resources on the source, but yields a lower compression ratio.

    • Optimal: (Recommended) Consumes optimal CPU resources on the source and yields an optimal compression ratio.

    • Maximum: Consumes the most CPU resources on the source, but yields a higher compression ratio.

    • None: No compression.

  • Perform daily incremental replication: Select the check box to enable daily incremental replication to the target workload.

    • Time: Specify the time of day to run the incremental replication job. The time is based on the time zone of the PlateSpin Migrate server that you will use to execute the migration. The default run time is 1:00 a.m. in the time zone of the PlateSpin Migrate server.

  • Encrypt data: Select the check box to enable encryption of data for transmission.

  • Pause workflow: Select the check box enable the workflow to pause between the migration configuration and the workload prepare process.

  • Automatic cutover: Select the check box to enable the automatic cutover of the workload when the cutover date is reached.

  • Perform replication with test cutover: Select the check box to enable an incremental replication before executing the test cutover.

  • Perform replication with cutover: Select the check box to enable an incremental replication before executing the cutover.

  • Shut down source during cutover: Select the check box to enable the shut down of the source workload during the cutover.

  • Shut down target during cutover: Select the check box to enable the shut down of the target workload during the cutover.

Replication Network

  • Network: Select the network resource assigned to the target host machine.

  • MTU: The Maximum Transmission Unit setting in bytes that represents the largest packet size that can be used on the replication network. Valid values are 68 to 65535. For example, most Ethernet networks support an MTU setting of 1500 bytes. On a VPN, the MTU value is typically smaller than 1500 bytes.

    Specify an MTU setting that matches the smallest MTU setting on the replication network path between the source workload and the target workload. If a packet is larger than the MTU value of an interface, the packet might be split into smaller packets, or it might be dropped. Both packet fragmentation and retransmission introduce latency and congestion that can dramatically increase the replication time. Tuning a workload’s MTU value for its replication network helps avoid these conditions, which optimizes the transmission performance and minimizes replication time.

  • Use DHCP to get network address details: This setting is enabled by default. Deselect the check box to specify static IP addresses, then specify the network address settings for the replication network.

    • IP Address: IPv4 format.

    • Subnet Mask: IPv4 format.

    • Default Gateway: IPv4 format.

    • DNS Servers: IPv4 format. For multiple entries, specify one DNS server per line.

21.1.12 Workload

The Workload panel displays the original workload configuration that was imported or re-imported using the Spreadsheet Import feature. Initially, the proposed workload has the same configuration. You can edit the configuration of the proposed workload.

Workload Details

  • Host Name: The simple host name (or machine name) for the workload, not its FQDN. Example: sqlserver10

  • Domain Name: The name of the domain that the proposed workload will join. Examples: digitalair.com, paris.digitalair.com

  • Admin Credentials: (Optional) Select the Credentials resource to use to authenticate to a specified source workload.

  • Operating System: The specified value from the OS Types list.

  • Architecture: This value is inherited from the specified operating system.

  • Description: (Optional) A textual description of the workload, such as information about migration constraints or dependencies.

  • Workload Type: Cloud, Physical, or Virtual. This value is inherited from the transformation method.

Workload Resources

  • Amount of RAM: The amount of memory for the workload in MB, GB, TB, PB, EB, ZB, or YB.

  • # Sockets: The number of sockets installed on the workload.

  • # Cores per Socket: The number of cores in each socket. The total number of cores for the workload is the cores per socket times the number of sockets.

Windows Settings

The Windows Settings area is available for Windows virtual workloads.

  • Domain or Workgroup: Specify whether the Windows workload is a member of a domain or a workgroup, then specify the name.

    • Domain: Specify its domain name, such as PARIS or paris.digitalair.com.

    • Workload: Specify its workgroup name, such as WORKGROUP.

  • Domain Credentials: If you specified Domain, select the Credentials resource for the domain administrator account needed to join the workload to the existing domain.

21.1.13 Location

The Location panel provides information about where the proposed workload resides in the network:

Host

  • Environment: The environment resource assigned to the workload.

  • Cloud Provider: (Type: Cloud) The cloud provider that hosts the workload:

    • Amazon Web Services

    • Microsoft Azure

    • Rackspace

    • vCloud

    • Google

  • Hypervisor: (Type: Virtual) The type of hypervisor that hosts the workload’s VM:

    • Citrix XenServer

    • Linux KVM

    • Microsoft Hyper-V

    • SUSE Xen

    • VMware

  • Host: (Type: Virtual) The Host resource to use for the target host.

  • Site: The geographic location or facility where the workload network resides. Example: London

  • Hardware: The vendor or model of hardware used by the workload. Example: Dell PowerEdge

  • Enclosure: The location of the workload in the data center. Example: Rack A-31

  • Slot: The slot number in the rack for the host machine. Example: 8

Virtual Machine Settings

  • VM Name: The name of the VM used for the workload. The default value is the host name of the workload.

  • Resource Pool: (VMware) Select the Resource Pool resource where the target VM will be created on the VMware host.

  • VM Config Datastore: The Datastore resource that contains the VM configuration file.

  • Path on Datastore: The path to the VM configuration file.

  • Install VMware Tools: (VMware) Specify whether to install VMware tools on the target virtual workload running on a VMware host.

21.1.14 Network Interfaces

The Network Interfaces panel defines information about each NIC on the workload. You cannot delete the source NIC information provided during the import, but you can add, edit, and delete other NICs for the target workload.

You must have at least one NIC for the source workload and one NIC for the target workload. You cannot delete the last remaining NIC in the list. You must create another NIC first, and then delete the unwanted NIC.

If you have multiple NICs on the source workload, specify which NIC to use for replication.

  • Interface Name: The name for the NIC. Example: eth0

  • Network: The network resource assigned to the workload. If you have multiple NICs, this setting is required for each NIC.

  • MAC Address: (Planning Mode) MAC address of the source workload NIC in the format of 00-00-00-00-00-0c.

    For proposed workloads, the MAC address is assigned by the target workload. The address is not tracked for planning.

  • VLAN ID: The network VLAN that carries the workload traffic.

  • Connect on boot: The NIC is automatically set to connect to the network on boot.

  • Use DHCP to get network address details: This setting is enabled by default. Deselect the check box to specify a static IP address, then specify the network address settings for the target network.

    • IP Address: IPv4 format.

    • Subnet Mask: IPv4 format.

    • Default Gateway: IPv4 format.

    NOTE:If the source workload or target workload is located in a different internal (private) network behind a network address translation (NAT) device, it might be unable to communicate with its counterpart to replicate the workload. On the affected workload, ensure that you specify a public IP address for the NIC you use for replication.

  • Use DHCP to get name servers: Specify whether the DNS name is acquired from the DHCP server in the associated network. This option is enabled by default. If you use static IP addresses, deselect this option, then provide the following information:

    • DNS Servers: IPv4 format. For multiple entries, specify one DNS server per line. You can specify a Primary, Secondary, and Advanced DNS server.

    • Search Domains: FQDN of one or more search domains.

  • Use for Replication: On the Network Interfaces panel, specify whether to use the NIC for replication communications. The default value is Yes. At least one of the NICs must be enabled for replication.

21.1.15 Testing Network Interfaces

The Testing Network Interfaces panel is available for Transformation Types that support testing. the panel is shown for workloads in Planning mode, as appropriate for tracked external migrations and manual external migrations.

Use this panel to define information about each NIC on the workload for a testing environment. You cannot delete the source NIC information provided during the import, but you can add, edit, and delete other NICs for the target workload.

For information about setting network options, see Section 21.1.14, Network Interfaces.

21.1.16 Storage

The Storage panel defines information about the storage mapping strategy and about the mounted volumes on the workload. You cannot modify information for the source workload. To update the source workload disk and volume information, you can rediscover the source workload if you are using auto-discovery, or update the Bulk Import Spreadsheet and import the workload again using the Spreadsheet Import.

Storage Mapping Strategy

The mapping strategy translates the layout of storage disks and volumes from the source workload to a proposed layout in the destination storage location. In Planning mode, you can keep the resulting proposed layout, or modify the disk details for a custom mapped solution.

  • Same as source: Storage objects for the target volumes and disks will be configured in the destination storage location using the same layout, size, and format as the source workload. For the proposed workload, you can select a datastore and path for target VMware environments, and define a remote path for SAN and NAS devices.

  • Custom: In Planning Mode, you can add, edit, and remove volume groups, volumes, disks, and partitions. You can also restore the settings to the Same as Source settings for the original volumes and disks.

Volumes Tab

The Volumes tab allows you to view and configure the proposed volume layout on the proposed workload from a volume perspective.

  • Volumes: A tree-view list of volumes and volume groups on the proposed workload.

    • Name: The name of the volume group or its member volumes.

    • File System: The file system format for the partition, such as Ext3, Linux-swap, NTFS, unallocated, extended, and so on.

    • Size: The total amount of space in the units specified that are allocated to the volume group or its child volumes. The unused amount of space available in the volume or volume group displays below the size.

    • Cluster Size: (Windows) For NTFS volumes, specifies the block allocation size.

    • Type: The type of storage object and file system for the selected volume:

      Example Storage Types:

      • Dynamic Mirrored

      • Dynamic RAID 5

      • Dynamic Simple

      • Dynamic Spanned

      • Dynamic Striped

      • Local

      • NAS

      • SAN

      • Swap

      • System

      • Volume

      Example File System Types:

      • NTFS

      • Ext4

    • Mount Point: The path on the workload where the volume can be mounted, such as K: or /mnt/data2. The volume might be mounted or unmounted.

    • Datastore: The name of the VM datastore to use for the volume. The remote path to the virtual disk file in the datastore appears under the datastore name.

    • Path on Datastore: For a datastore, specify the path on the datastore for the volume.

    • Remote Path: The remote path for a SAN or Network Attached Storage.

    • Devices: The devices and partitions used by the selected volume group or volume.

Disks Tab

The Disks tab allows you to view and configure the proposed disk and partition layout on the proposed workload.

  • Disks: A tree-view list of disks and partitions on the proposed workload.

    • Name: The name of the parent disk and its child partitions.

    • Size: The total amount of space in the units specified that is allocated to a disk and its partitions. The amount of unallocated available space displays below the size.

    • Volume: The name of the volume that resides on the child partition.

    • Type: The type of storage object as disk or partition. The Partition type includes the file system format, such as Ext3, Linux-swap, NTFS, unallocated, extended, and so on.

    • Datastore: The name of the VM datastore to use for the disk. The path to the virtual disk file in the datastore appears under the datastore name.

  • Disk Details: Select a partition in the Disks list to view or modify details about its disk and volume for the proposed workload.

    • Type: The type of storage object (disk or partition).

    • Size: The total amount of space allocated to a disk or partition in the units specified.

    • Name: The name of the volume or volume group, such as Network_Share_11-T1.

    • Mount Point: The path on the workload where the volume can be mounted, such as K: or /mnt/data2. The volume might be mounted or unmounted.

    • Volume: The name of the volume that resides on the partition.

    • Unallocated: The amount of free space available in the disk or partition in the units specified.

  • Virtual Disk Details: Select a partition in the Disks list to view or modify details about its virtual disk and volume for the proposed workload. Customizing the mapped disk or volume is optional.

    • Datastore: The name of the VMware datastore for the target VM to use.

    • Path on Datastore: The path to the virtual disk file (.vmdk) in the selected datastore.

    • Disk Provisioning: The virtual disk provisioning policy to use on VMware for the virtual disk.

      • Thin Disk: Creates a disk in a space-efficient sparse disk format that can grow to the size is provisioned at creation time.

      • Thick Disk: Creates a virtual disk in a type of thick virtual disk that supports clustering features such as fault tolerance. Space required for the virtual disk is allocated at creation time.

21.1.17 Applications

The Applications panel identifies the applications installed on the workload. You can add or remove applications for the proposed workload.

21.1.18 Custom Fields

The Custom Fields panel allows you to specify values for the Custom Fields 1-7 that are defined for the project. Custom Fields are available only if they are defined for the project and the project is selected in the Global Project Selector when you open the Workload dialog.

21.1.19 Transformation History

The Transformation History panel displays the most recent workflow state changes, migration sub-state changes, or user-provided notes for the workload. Each state change triggers an entry. You can also enter user notes to be logged, such as manual changes and actions performed for the workload.

The Transformation History can distinguish whether the action was initiated by a User, a Migrate server, or a Connector (if you assign a dedicated User object for the Connector login credentials).