5.3 Prerequisites for Migration to Azure Cloud
5.3.1 Planning For Migrating Workloads to Azure
PlateSpin Migrate allows you to use the PlateSpin Migrate Web Interface to migrate Windows and Linux workloads to Microsoft Azure. For a list of supported workloads, see Supported Workloads For Migration to Microsoft Azure.
NOTE:
-
Migration of Microsoft Azure source workloads to Microsoft Azure target containers is not supported.
-
Migration of Linux workloads to an Azure target is restricted to workloads with only a single NIC.
Consider the following points before you use the PlateSpin Migrate Web Interface to migrate workloads to Azure:
-
Migration of Windows cluster workloads is not supported because Microsoft Azure does not support Windows clusters.
-
Migration of UEFI workloads is not supported.
-
The PlateSpin Migrate Client does not support migration of workloads to Microsoft Azure. You can use only the PlateSpin Migrate Web Interface to migrate the workloads to Microsoft Azure.
-
PlateSpin Migrate supports Azure VM sizes with up to 64 data disks. For the maximum instance size in a selected Azure Region, Migrate will use one data disk for the OS disk replication in the PlateSpin Replication Environment. After migration, this disk becomes the OS disk, and you can add a data disk.
Each data disk must have a maximum size of 1TB (1024 GB).
-
Migrate recommends an Azure VM instance size that meets or exceeds the source workload's settings for cores, memory, data disks, and NICs. However, you can choose a smaller or larger instance size based on your requirements for the target workload, as limited by the maximum instance sizes available in the selected Azure Region.
-
The size of the disk created on the Azure VM is the size of the source disk partition plus about 1 GB because of the granularity of available disk sizes on Azure.
-
You need an OS license for the migrated target workload. For Azure target workloads, you must provide Azure with the license information or Microsoft will charge you for the OS license.
-
For each target Azure subscription, you must enable programmatic deployment for the PlateSpin Migrate Replication Environment VM. See Enabling an Azure Subscription to Deploy the Replication Environment VM.
-
Ensure that the PlateSpin Server host displays the correct time for the time zone it is in. If the time on the PlateSpin Server host is incorrect, the cutover process fails with a 403 forbidden error.
5.3.2 About Azure User Password for Azure Target Containers
Provide a valid password for the Microsoft Azure user when you add the Azure target container. Ensure that you update the password for the container if you modify it in Azure. Workload migrations can fail in the following conditions:
-
If the stored password for the Azure user is invalid, workload migrations to the Azure target container fail with an authentication error message from Migrate.
-
If the stored password for the Azure user expires in Microsoft Azure, workload migrations to the Azure target container fail with a Password Is Expired error message from Azure. On the Azure Target Container page, the Password tooltip displays the Password Is Expired error message.
-
If the Azure user modifies the password in the Microsoft Azure portal while migration tasks are running, the tasks will fail when the next connection to Azure is requested because the stored password is no longer valid. The workload migrations fail with an authentication error message from Migrate.
To resolve failed migrations to Azure:
-
(Conditional) If the Azure user’s password expired, log in to the user account in the Microsoft Azure portal, then use the Azure Self-Service Password Reset to set a new password.
-
Log in to the PlateSpin Migrate Web Interface, then go to the Target Containers page.
-
Update the password that is stored for the Azure user for any affected Azure target containers.
-
Rerun any failed workload migrations to the affected Azure target containers.
5.3.3 Requirements for Migrating Workloads to Azure
PlateSpin Migrate uses the Microsoft Azure Resource Manager for migrating workloads to Microsoft Azure. The PlateSpin Migrate server can be installed on-premise where the source workloads reside or beginning with PlateSpin Migrate 12.2, in the Microsoft Azure cloud itself. Based on the location of your PlateSpin Migrate server, review the following sections:
Azure Non-Cloud Based Migrate Server
Before you use PlateSpin Migrate to migrate workloads to Microsoft Azure, ensure that the following cloud access prerequisites are correctly configured and available:
-
A Microsoft Azure Account and a subscription for your account
-
An Application ID required to access Microsoft Azure
-
An Azure Active Directory user created as a contributor for the subscription
-
A Virtual Network with a Subnet different from the default Gateway Subnet
-
The minimum network-related prerequisites for a successful migration are:
-
The source and the target workload must be able to communicate with the PlateSpin Migrate server on port 443. The target workload is the replica of the source workload that will reside in Microsoft Azure.
-
The PlateSpin Migrate server must be able to communicate with the Microsoft Azure API endpoint on port 443.
-
The PlateSpin Migrate server must be able to communicate with the source workloads on the ports that are used for DCOM, WMI, and RPC.
-
The target workload must be able to reach the source workload on port 3725 (default). The direction of this connection can be reversed (source to target), and the port number is configurable. For information about changing the default settings, see Section 2.0, Planning Your Workload Migrations.
-
For information about setting up your Azure cloud account to work with PlateSpin Migrate, see PlateSpin Migrate Best Practices for Migrating Windows Workloads to Microsoft Azure
on the PlateSpin Migrate Resources Webpage.
For information about enabling an Azure subscription to deploy the replication environment VM, see Enabling an Azure Subscription to Deploy the Replication Environment VM.
Azure Cloud Based Migrate Server
Before you use PlateSpin Migrate to migrate workloads to Microsoft Azure, ensure that the following cloud access prerequisites are correctly configured and available:
-
A Microsoft Azure account that will be charged for the Azure costs and used to manage the Migrate server
-
A PlateSpin Migrate Server license
-
Install the Migrate Agent on the source workload to connect to the PlateSpin Migrate server on port 443 to register the workload. To install the Migrate Agent, launch the PlateSpin Migrate Web Interface and click the Downloads tab. For information about the Migrate Agent, see Section E.0, Migrate Agent Utility.
-
Open ports 443 and 3725 for outbound traffic. The PlateSpin Migrate Server uses secure SSL for communications with the workloads you want to migrate.
-
An Azure Active Directory user created as a contributor for the subscription
-
Specify Static as the allocation method for the public IP address of the Migrate server to ensure that the IP address does not change when the server is restarted.
NOTE:A change in IP address on the PlateSpin Server breaks the heartbeat communications with source workloads.
You cannot specify the actual IP address assigned to the public IP resource. Azure allocates and reserves an IP address from a pool of its available IP addresses in the Azure location where you deploy the Migrate server. The address persists through server restarts. Azure releases the IP address only when you delete the resource or change the resource’s allocation method to Dynamic.
NOTE:The cloud based Migrate server does not require a site-to-site VPN connection between your local datacenter and Microsoft Azure Portal.
For information about setting up your Azure cloud account to work with PlateSpin Migrate, see PlateSpin Migrate Best Practices for Migrating Windows Workloads to Microsoft Azure
on the PlateSpin Migrate Resources Webpage.
For information about enabling an Azure subscription to deploy the Migrate server in Azure Cloud, see Deploying a Migrate Server in the Azure Cloud.
5.3.4 Enabling an Azure Subscription to Deploy the Replication Environment VM
PlateSpin Migrate must be able to programmatically deploy a PlateSpin Migrate Replication Environment VM during the replication of workloads to Azure. The required VM image is available in the Azure Marketplace. You must enable programmatic deployment of the image for each subscription that will perform migrations with PlateSpin Migrate.
NOTE:All migrations for the target subscription will fail until you enable the subscription to deploy the Replication Environment VM.
To enable programmatic deployment of the Replication Environment VM:
-
Go to the Microsoft Azure Portal and log in to your Azure account.
-
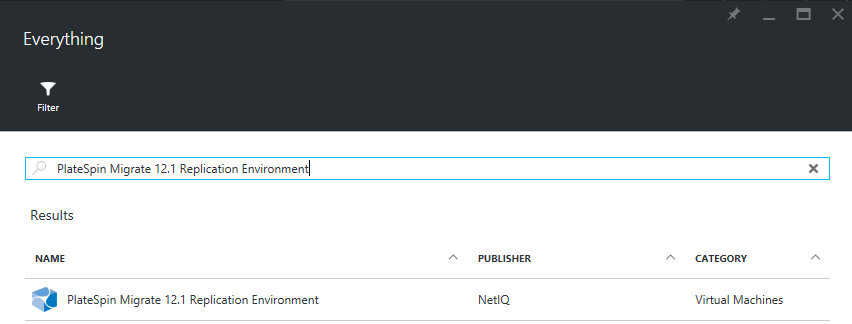
In the portal menu, click New, then search for the PlateSpin Migrate 12.x Replication Environment image in the Azure Marketplace.
-
In the Results panel, select the PlateSpin Migrate 12.x Replication Environment.
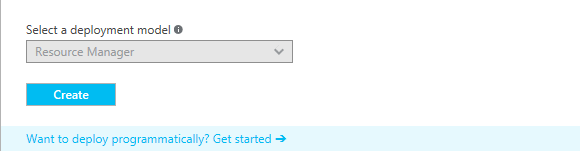
-
At the bottom of the PlateSpin Migrate 12.x Replication Environment page under Select a deployment model, click Want to deploy programmatically? Get Started.
-
On the Configure Programmatic Deployment page, read the Terms of Use.
-
For each subscription that will perform migrations with PlateSpin Migrate, change its status from Disable to Enable.
-
Click Save.
5.3.5 Deploying a Migrate Server in the Azure Cloud
PlateSpin Migrate 12.2 enables you to deploy the Migrate server in the Azure Cloud. To enable the deployment of the Migrate Server in Azure Cloud and assign relevant permissions, do the following:
-
Go to the Microsoft Azure Portal and log in to your Azure account.
-
In the portal menu, Select Marketplace, then click New.
-
Under New, search for PlateSpin.
-
On the PlateSpin Migrate Server page, view the deployment options and related prices.
-
Select the appropriate deployment model, then click Create.
-
Configure Basics and Size settings.
-
In Settings, specify Static as the assignment method for the public IP address:
-
In the Settings panel under Network, select Public IP address.
-
In the Choose public IP address panel, select Create New.
-
In the Create public IP address panel, specify migrate-server-ip as the name and Static as the assignment method.
-
Click OK.
Azure allocates and reserves an IP address from a pool of its available IP addresses in the Azure location where you deploy the Migrate server.
-
-
Review settings and approve the purchase.
5.3.6 Azure Networking Guidelines
Consider the following guidelines when you are migrating workloads to Microsoft Azure.
Windows Workloads with Multiple NICs
For Windows workloads with multiple NICs, Azure configures the VM with a default gateway that is associated with the primary network interface. Azure removes the gateway information for all secondary NICs, which limits their communications to the same subnet as the primary interface.
To enable a secondary NIC to communicate outside its own subnet, you can use the Windows route add command to add a different gateway entry for the secondary NIC in the routing table. See Configure Windows VMs
in Create a VM with Multiple NICs on the Microsoft Azure website.
Private and Public IP Addresses for Workloads Connected on an Azure VPN
Each Azure VM has both a public IP address and a private IP address for communications from machines outside the Microsoft Azure cloud environment. Azure automatically associates these IP addresses with the primary network interface for the VM.
You can use the Microsoft Remote Desktop client to connect remotely to the Azure VM. Specify the IP address as follows:
-
Private IP address: Use the VM’s private IP address if your machine is part of the address space for the Azure VPN.
-
Public IP address: Use the VM’s public IP address if your machine is not part of the address space for the Azure VPN.
You can alternatively use the Connect option in the Microsoft Azure portal from a machine with an address space that is not part of the Azure VPN. This option automatically launches the Microsoft Remote Desktop client configured to connect to the VM’s public IP address for the primary NIC.
NOTE:This portal operation fails if your machine is in the address space of the Azure VPN.