7.12 Handling a Workload’s Storage Media and Volumes
PlateSpin Migrate provides mechanisms for configuring your migration job to handle your workload volumes and their physical or virtual layout in the target infrastructure.
NOTE:PlateSpin Migrate does not support NSS file system and EVMS volumes.
Workload Virtualization (X2V)
When virtualizing a workload, you can select which volumes you want included on the target and manage their free space sizes. You can also control how physical disk arrangement on your source is propagated on the peer virtual machine according to the target virtualization platform’s storage media configuration and virtual disk handling features and capabilities.
Workload Deployment to Physical Hardware
When you are migrating workloads to physical hardware, you can select which source volumes to include and size, and which target disks to repartition and populate.
RAID Storage
PlateSpin Migrate supports RAID (Redundant Array of Independent Disks) storage, which it treats like any other storage hardware. As long as the associated storage controller driver is present, PlateSpin Migrate successfully completes the migration. PlateSpin Migrate does not support software implementations of RAID.
SAN Storage
PlateSpin Migrate supports SAN storage. As long as the driver for the associated host bus adapter (HBA) is present, PlateSpin Migrate successfully completes the migration. PlateSpin Migrate treats SAN LUNs like any other disk with logical volumes.
NAS
PlateSpin Migrate supports Network Attached Storage (NAS) systems. PlateSpin Migrate treats NAS like any other disk with logical volumes.
Windows Dynamic Disks
PlateSpin Migrate supports Windows dynamic disks, including mirrored, striped, spanned, and RAID 5 configurations.
PlateSpin Migrate treats dynamic disks like it treats any other logical volume. When you are converting workloads that have dynamic disks, the disks on the target workload are created as basic disks, which you can use to remove unnecessary or obsolete dynamic disk configurations. After the migration, you can upgrade the required disks on your targets from basic to dynamic disks.
Linux Logical Volumes
PlateSpin Migrate supports logical volumes of Linux workloads. If Logical Volume Manager (LVM) is installed on your Linux source, you can use several LVM1 and LVM2 features to better manage your target workload’s volume layout and organization.
You can set up your workload migration job to:
-
Re-create logical volumes of the source on the target, or create logical volumes on the target even if the source is not using LVM.
-
Create new volume groups on the target that are not on the source, or omit volume groups from the target that are present on the source.
-
Rename volume groups on the target.
-
Distribute volumes to different volume groups and disks.
NOTE:PlateSpin Migrate does not support:
-
Copying LVM snapshots and LVM mirrors. You can create LVM snapshots and mirrored logical volumes on the target after the migration completes.
-
Migration of Linux workloads with encrypted volumes.
Storage layout and volume configuration settings depend on the job configuration mode (Advanced or Wizard), migration type, target virtualization platform, and source operating system.
The following topics provide additional information:
7.12.1 Storage Layout and Volume Configuration
To access drive configuration options:
-
In the of the Migration Job windows, click .

Settings vary depending on the target system.
Windows X2P Drive Configuration
Use these settings to select the volumes to copy during the migration:

|
|
Select the volumes to be copied during the migration. To resize the volume during the migration, specify the desired amount of free space. PlateSpin Migrate automatically adjusts . To resize the volume during the migration, specify the desired size. PlateSpin Migrate automatically adjusts . Select which hard drive the volume will be copied to on the physical target machine. Click this column to determine if an existing vendor partition should remain intact during the migration. If the partitions are not selected, PlateSpin Migrate permanently removes the partitions from the server. |
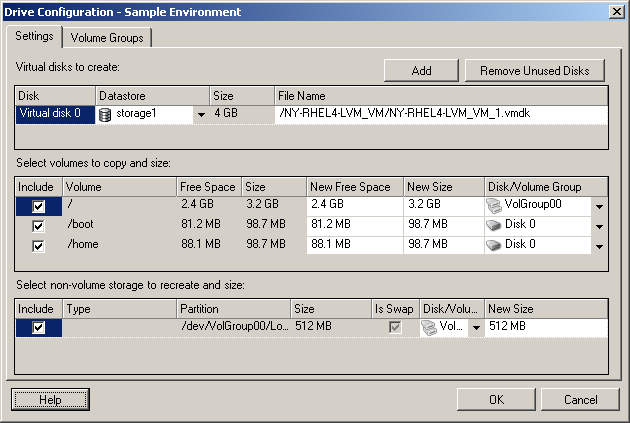
Linux Drive and LVM Volume Configuration
Use these settings to select the volumes and non-volume source spaces to copy and size during the migration. If LVM is installed on the source, a tab provides you with corresponding options.
Handling Linux Disks and Volume Groups
The PlateSpin Migrate Client provides you with Linux-specific user interface elements that provide you with options to properly handle your Linux storage.
Note the following sequence of steps that you must take for properly configuring and mapping newly-added disks and volume groups.
-
After adding a new disk, go to the tab and map the required volume group name by selecting the option.
See Linux Drive and LVM Volume Configuration (Volume Groups Tab).
-
Specify Size in Allocation for Volume Group Box
-
For each added disk, specify the required size in the corresponding field.
After the system focus shifts away from the field, the size of the newly-added disk is updated dynamically.
Linux Drive and LVM Volume Configuration (Settings Tab)
Use these settings to select source volumes to copy, non-volume source spaces to re-create and size, and target disks to repartition and populate.
|
|
Select the volumes or non-volume source spaces to be copied or re-created and sized during the migration. To resize the volume during the migration, enter the desired amount of free space. PlateSpin Migrate automatically adjusts . To resize the volume during the migration, enter the desired size. PlateSpin Migrate automatically adjusts . Select which hard drive or volume group the volume will be copied to on the physical target machine. For each disk, click the corresponding cell in this column to select existing vendor partitions to preserve during the migration. If the partitions are not selected, PlateSpin Migrate permanently removes them from the server. |
Linux Drive and LVM Volume Configuration (Volume Groups Tab)
Use these settings to manage volume groups.
|
|
Creates a volume group on the target machine that is not present on the source machine. Renames a volume group that is being copied from the source to the target. Deletes a volume group so that it is not created on the target machine. The volumes assigned to the volume group can be reassigned to other locations by using the tab (by default, they are assigned to disk). To allocate space on disks to a volume group, select the volume group, then select the disks to include in it. Specify the amount of space to be allocated to it on each included disk. |
Target VM-Specific P2V/V2V Drive Configuration
When you configure a peer-to-peer virtualization job, the job configuration window provides access to settings specific to the target virtualization platform.
This section includes the following information:
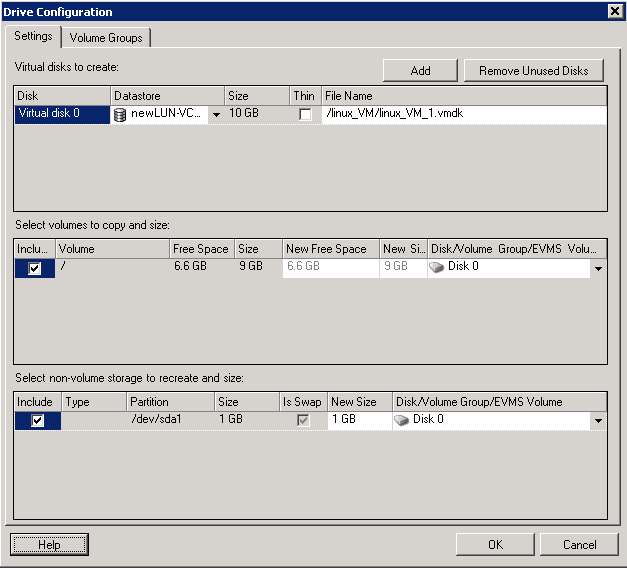
Drive Configuration: VMware ESX
The following are drive configuration settings specific to VMware ESX:
|
|
|
: Select the datastore volume on the ESX server where you want to place the vmdk files. : Select the volumes to be copied during the migration. : To resize the volume during the migration, specify the desired amount of free space. PlateSpin Migrate automatically adjusts New Size. : To resize the volume during the migration, specify the desired size. PlateSpin Migrate automatically adjusts New Free Space. : Assign the volume to a disk or, if LVM is enabled, to a volume group. The volume will be copied to this disk or volume group on the target machine. : Select any non-volume disk partitions that should be created on the target machine (for example, a Linux swap partition). : To resize the non-volume partition during the migration, specify the desired size. |
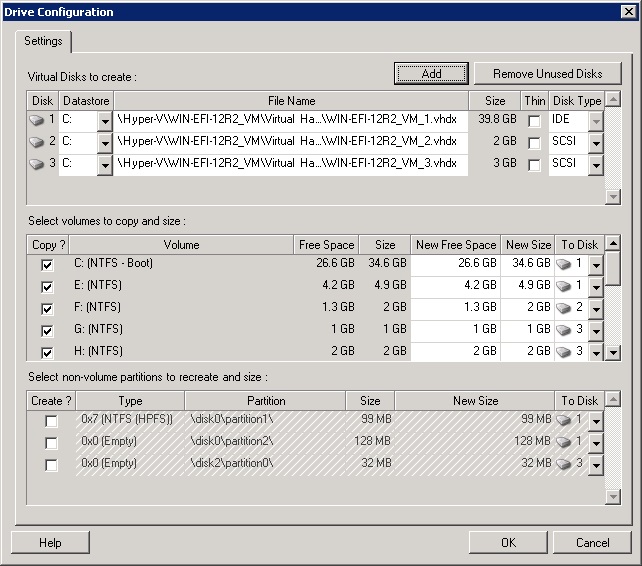
Drive Configuration: Hyper-V
The following are drive configuration settings specific to Hyper-V:
|
|
|
Select the datastore volume on the Hyper-V server where you want to place the .vhd and .vhdx files. : A Generation 1 disk containing the System/Boot volume should be on an IDE disk. (You can create a maximum of three IDE disks.) NOTE:For a Generation 1 disk, the values of second and third disk are chained. For example, if you select the third disk (from the top of the list) as , the second disk autoselects as . If you select the second disk as a then the third disk autoselects to . : Select the volumes to be copied during the migration. : To resize the volume during the migration, specify the desired amount of free space. PlateSpin Migrate automatically adjusts New Size. : To resize the volume during the migration, specify the desired size. PlateSpin Migrate automatically adjusts New Free Space. : Assign the volume to a disk or, if LVM is enabled, to a volume group. The volume is copied to this disk or volume group on the target machine. : Select any non-volume disk partitions that should be created on the target machine (for example, a Linux swap partition). : To resize the non-volume partition during the migration, specify the desired size. |
7.12.2 Volume Configuration in Server Sync
When you are using Server Sync to synchronize two Windows or Linux workloads, PlateSpin Migrate provides you with the capability to specify the required mapping between source volumes and existing volumes on the target. See Synchronizing Workloads with Server Sync.
To access volume configuration options in a Server Sync job:
-
Start the migration job. For information about starting a migration job, see Section 3.8.1, Setting a Migration Job.
-
In the section of the Migration Job window, do one of the following:
-
On Windows: Click .
-
On Linux: Click .
-
-
Configure the Server Sync volume configuration options.
The following topics provide information about Server Sync volume configuration options specific to Windows and Linux workloads.
Server Sync Volume Configuration (Windows)
A Server Sync job for Windows workloads provides detailed drive and volume information for both the source and the target, and enables you to specify the required mapping.
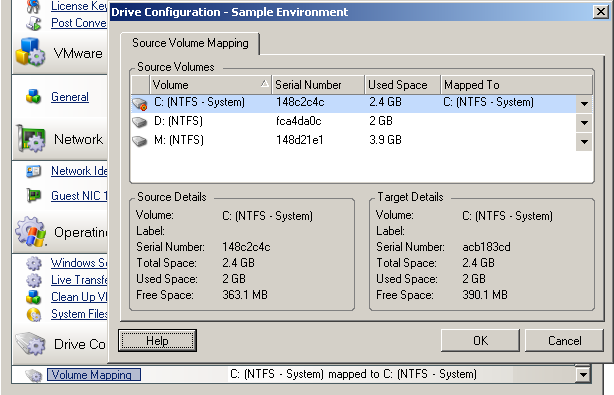
|
|
Map each volume on the source to an existing volume on the target. |
Server Sync Volume Configuration (Linux)
A Server Sync job for Linux workloads provides detailed mount point and volume information for both the source and the target, and enables you to specify the required mapping.
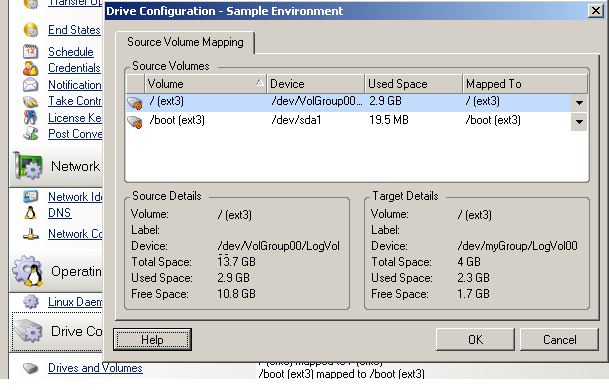
|
|
Map each volume on the source to an existing volume on the target. |