7.10 Configuring Target Virtual Machines
For jobs that involve workload virtualization, PlateSpin Migrate provides a mechanism for specifying target VM configuration options, such as providing a target VM name and a configuration file path, selecting a datastore to use, and allocating virtual memory, in accordance with the features and capabilities of the selected virtualization platform.
If you have resource pools configured on your target virtualization platform, you can select a resource pool for your VM to be assigned to.
NOTE:If your target VMware ESX server is part of a fully automated Distributed Resource Scheduler (DRS) cluster (a cluster with its VM migration automation level set to , the newly created target VM’s automation level is changed to for the duration of the migration. This means that your target VM might power up on a different ESX server from the one initially selected, but migration is prevented from automatic execution.
To specify target VM configuration options:
-
Start the migration job. For information about starting a migration job, see Section 3.8.1, Setting a Migration Job.
-
In the Virtual Machine Configuration section of the Migration Job window, click .
-
Specify the values for the configuration options and click .
For more information about the virtual machine configuration options, see Section 7.10.1, Virtualization Platform-Specific Virtual Machine Configuration Options
7.10.1 Virtualization Platform-Specific Virtual Machine Configuration Options
PlateSpin Migrate displays target virtual machine configuration options specific to the selected target and also provides access to advanced configuration options.
Virtual Machine Configuration: VMware ESXi 5
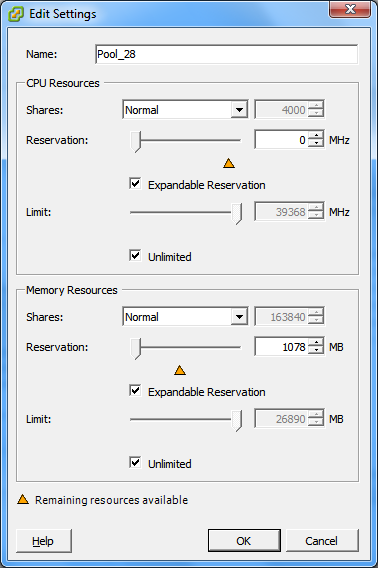
The following are configuration options specific to VMware vSphere 5 (applicable to all VMs under the containing resource pool).
|
|
Specify the display name for the new virtual machine.
(these are similar to CPU resource settings, but apply to memory resources) |
Virtual Machine Configuration: VMware ESX 4.1
The following are configuration options specific to VMware ESX systems prior to vSphere 5. To access settings that control resource pools, the number of CPUs, and CPU scheduling affinity, click
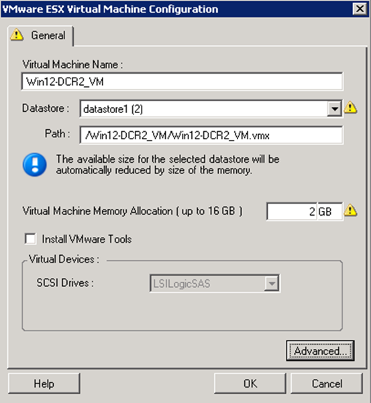
Specify the display name for the new virtual machine. Select the datastore where you want to create the *.vmx file. Specify a name and the directory path for the virtual machine’s *.vmx configuration file. Specify a value for the amount of virtual RAM to be assigned to the virtual machine. Enable this option to install VMware tools during the migration process (recommended). Select either or (the recommended option). : Click this button to view or modify advanced VM configuration settings. |
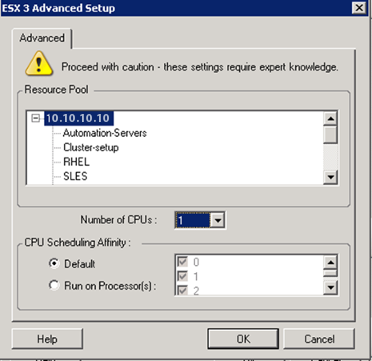
If required, assign your target VM to a resource pool. When no resource pool is specified, the VM is assigned to the root resource pool. Select the required number of CPUs to assign to the target VM. For example, you can convert a single-processor workload to a multi-processor VM, or a multi-processor workload to a single-processor VM. Represents which ESX Server processors the virtual machine can run on (if your ESX Server is a multiprocessor system). Specify the required processor or select (recommended). For details, see your VMware documentation. |
Virtual Machine Configuration: Microsoft Hyper-V
The following are configuration options specific to Hyper-V 2012 systems.
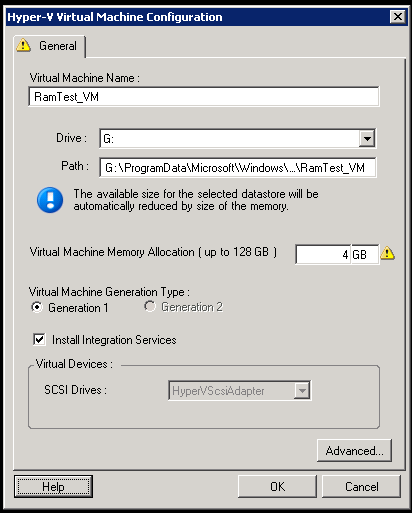
Specify the display name for the new virtual machine. Select the datastore where you want to create the *.vmx file. Specify a name and the directory path for the virtual machine’s *.vmx configuration file. Specify a value for the amount of virtual RAM to be assigned to the virtual machine. Select one of the following generations type for the new virtual machine:
This option is displayed only for Hyper-V machines. Enable this option to install integration services during the migration process (recommended). Select either or (the recommended option). : Click this button to view or modify advanced VM configuration settings. |
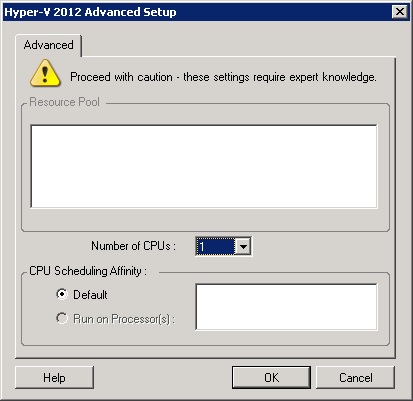
Select the required number of CPUs to assign to the target VM. For example, you can convert a single-processor workload to a multi-processor VM, or a multi-processor workload to a single-processor VM. NOTE:For Generation 1, you can create four legacy network cards and eight synthetic network cards (if integration service is enabled). For Generation 2, you can create eight 8 synthetic network cards. Represents which Hyper-V Server processors the virtual machine can run on (if your Hyper-V Server is a multiprocessor system). Specify the required processor or select (recommended). For details, see your Hyper-V documentation. |
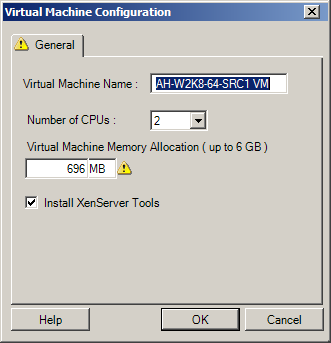
Virtual Machine Configuration: Citrix XenServer
The following are configuration options specific to Citrix XenServer.
|
|
Specify the display name for the new virtual machine. Select the number of CPUs to assign to the target VM. For example, you can convert a single-processor workload to a multi-processor VM, or a multi-processor workload to a single-processor VM. Specify a value for the amount of virtual RAM to be assigned to the virtual machine. Enable this option to install XenServer Tools during the migration process (recommended). |