11.4 Modifying Element and Alarm Menus

Custom options can be created for element or alarm menus. These menu options can be attached to specific objects or alarms based on criteria matching and can perform scriptable actions in the Operations Center console, or on the server. Possible options include:

  • Creating trouble tickets by selecting one or more alarms in an Alarms dialog box

  • Running a program on the server that copies important alarms to a SQL database

  • Displaying online help for a particular piece of equipment or rule name within an alarm

  • Launching an element-specific management system on the user’s workstation for a particular class of managed element

By default, options display in groups in the menu as follows:

  • Navigation: Contains options open the Properties dialog box and to jump to different views.

  • System: Contains system operations.

  • User Defined: Contains user-defined operations. Add new menu options the Create Operation dialog box in the Operations Center console.

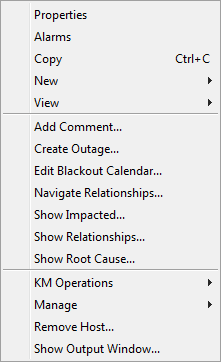
Figure 11-2 Right-Click Menu Example. Navigation menus show in the upper section. System menus show in the middle section, and user defined menus show in the bottom section.

The following sections explain how to modify alarm and element menus:

11.4.1 Creating New Operations Through the Operations Center Console

To create a custom operation:

  1. In the Explorer pane, expand Administration > Server.

  2. Right-click Operation Definitions, then select Create Operation to open its dialog box.

  3. Define the operation using the parameters defined in the following fields:

    Name: Name of the menu definition. This does not display in the Operations Center console.

    Menu Text: The option name to display on the menu.

    Context: Select Element or Alarm to identify the object type associated with the new menu option. Select Both to associate the menu option with matching alarms and elements.

    Match By: Attaches the new menu option to an element or alarm menu if the following conditions are met:

    • Distinguished Name (DName): Element DName matched by the end of the string. To match an element exactly, specify the element’s full DName. As DNames are segmented from specific to general, you can match groups of elements by specifying part of the distinguished name.

    • Distinguished name expression: A combination of DName and regular expression that can be used to further define the name of the element or alarm. A regular expression is a pattern that matches a set of strings. Regular expressions can be constructed by using various operators to combine smaller expressions.

    • Name: The label given to the element or alarm.

    • Name expression: A combination of a given name and regular expression to be used to further define a matching name of an element or alarm.

    • Class name: Element class name that attaches the new menu option to an entire class of elements such as routers. For more information, see Section 11.2, Determining an Element’s Class Name.

    • Class name expression: A combination of class name and a regular expression used to further define the name of the class.

    • Script: A script to run. Specify the script fragment, or call a script use a load statement to run from the script library. The script must evaluate to True or False. For more information about the Script Library, see the Operations Center Scripting Guide.

    Permission: The access privilege for the menu option: View, Access, Manage, or Define.

    Type: Select one of the following actions to perform when the new menu option is selected:

    Operation: The command line used to select the response to the new menu item. Specify a script or a command to run another process. For example, add the word Hello as an element menu option. When Hello is selected, the operation runs the “tests/hello” script from the script library on the Operations Center server. To run the Hello element menu option, enter:

    operation=load("tests/hello")
    

    This executes the Hello element menu option, as shown in the following code located in the Operations.ini file:

    [Hello]
    description=Say Hello to user
    target=dname:
    context=element
    permission=view
    type=script
    

    In addition, you can use the operation function to launch a Web page, to show a JSP component, and so on. The /OperationsCenter_install_path/database/examples/Operations.ini file contains examples on how to execute any additional commands.

  4. Click Check Syntax to validate the syntax of the operation defined.

  5. If the type selected is Prompt, use the following Prompt options to define the prompts to display before the operation executes:

    Dialog Box Title: Title to display in the Prompt dialog box.

    Prompt #X: Text message to show in the Prompt dialog box.

    Multiline Prompt Field: Select this check box to allow the user to enter more than one line of text in response to the prompt message.

  6. Click Add to define more than one prompt for the operation.

    Additional parameters for another prompt display.

  7. Click Create.

    The new menu item displays in applicable menus.

11.4.2 Adding New Menu Items in the Operations.ini File

While this is not a recommended practice, new operations can be created by manually editing the Operations.ini file.

To add a new menu option using the Operations.ini file:

  1. Do one of the following:

    • Create a text file containing the new menu items.

    • Copy and modify the /OperationsCenter_install_path/database/examples/Operations.ini file.

  2. Save the file as Operations.ini in the /OperationsCenter_install_path/database/shadowed directory.

    To make the new menu actions accessible, you do not need to restart the Operations Center server. However, in some cases you need to log out and log back in to the Operations Center console for the changes to be visible.

11.4.3 Adding Colored Menu Operations

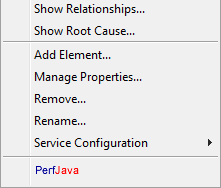
One way to make a custom operation stand out in the menu is to use colored text. Figure 11-3 shows the PerfJava operation in blue and red text.

Figure 11-3 Custom Operation – Create colored operations that stand out on the menu.

To configure colored menu options:

  1. Copy and open the /OperationsCenter_install_path/database/examples/Operations.ini file in a text editor.

  2. Add the following text:

    [PerfJava]
    context=element
    description=<HTML><BODY><B><FONT COLOR="Blue">Perf</FONT><FONT COLOR="Red">Java</FONT></B></BODY></HTML>
    operation=// @debug off\r\r\r\r\n\tapplet.getAppletContext().showDocument( new java.net.URL('http://perfdata/perfjava/applet/ChartAPI.html?hostname=' + element.name + '&title=PerfJava'), 'PerfJava')
    permission=view
    target=dnamematch:ms_server.*
    type=clientscript
    

    Substitute the italicized text with your operation name and colors. It is assumed you understand the other options (context, permission, target, type) which are explained in Step 3.

  3. Save the file as Operations.ini in the /OperationsCenter_install_path/database/shadowed directory.

11.4.4 Optimizing Alarm Selection

Before an operation is initiated on a set of alarms, a request is made to the server to check which operations are allowed for the alarms. This is necessary to update toolbar buttons and alarm menus. It can take a several minutes to display the menu when multiple alarms are selected.

To optimize performance:

  1. Set the following parameter in the /OperationsCenter_install_path/html/applet_params.xml file:

    <param name="AlarmPanel.performanceToolbarMode" value="true"/>
    

    Setting the parameter to True allows the menu to display to display before the request is made to discover operations for the alarm set. However, some alarm toolbar buttons (Close, Acknowledge, and Assign) remain disabled until the allowed operations are returned and a menu is created.