4.2 Creating and Deleting Property Pages and Properties
Property pages define a list of properties available as a tab in the Properties dialog box for the elements defined by matching rules in behavior models. Property pages act as a library of definitions that can be linked to one or more behavior models.
A specific type of property page called the SLA Metric Computed property page defines properties for the SLA Metric Catalog and is automatically associated with every element with the class SLA Metric Class that belongs to the behavior model called SLA Metric Model. The SLA Metric Computed property page is designed to generate an SQL query that retrieves custom properties for an element based on data in an external data source. Properties can be added to SLA Metric Computed property page but the existing properties cannot be edited or deleted and the page itself cannot be deleted. For more information about the SLA Metric Catalog, see the Operations Center 5.6 Service Level Agreement Guide.
To manage properties, review the following sections:
4.2.1 Creating a Property Page
-
In the Explorer pane, expand > , then select the folder where the new property page should be added.
-
Right-click the folder where you want to create a property page, then select to open its dialog box.
-
Specify the name of the property page in the field.
-
Specify the name used for the property page in the Properties dialog box in the field.
-
(Optional) To specify a folder to be used in the Properties dialog box, specify folderName|pageName.
For example, Boston|Headquarters|Contacts shows a Contacts property page under a list in the Properties dialog box for associated elements.
-
Enter a description for the property page in the field.
-
(Optional) In the field, enter the text to display at the top of the Properties dialog box before property fields to provide additional information to the user or prompt a user for the information to be given.
If null, no prompt displays before the property fields.
-
Define properties as required.
For more information, see Defining Properties for a Property Page.
-
Click to create the property page.
A new element displays in the hierarchy for the page definition:

4.2.3 Defining Properties for a Property Page
One or more properties can be defined for a property page. Properties are defined when creating the property page.
Understanding Property Types
Table 4-3 describes the different types of custom properties. The property types are listed in alphabetical order.
Table 4-3 Property Types
|
Property Types |
Mask |
Attribute Options |
Automatic Validation Rules |
|---|---|---|---|
|
Choice (combo box) |
N/A |
|
Validation rules can be specified optionally, if the combo box is designated as editable. For examples, see Working with a Multiple Choice Property. |
|
Computed Property |
N/A |
|
|
|
Computed Property (2 fields) |
N/A |
|
|
|
Currency |
$####.## |
|
|
|
Date |
MM/DD/YY (and 12 other allowable) |
|
|
|
Duration/Elapsed Time (computed property) |
N/A |
|
|
|
Email Address |
None |
|
|
|
Function |
N/A |
|
|
|
HTML Page |
N/A |
|
|
|
HTML Text |
N/A |
|
|
|
ID |
###–##–#### |
|
|
|
IP Address |
###.###.###.### |
|
|
|
Number |
N/A |
|
|
|
Text |
None |
|
|
|
Text Area |
N/A |
|
|
|
Telephone |
(###)###–#### |
|
|
|
URL |
None |
|
|
|
Zip Code |
#####–#### |
|
|
Creating a Property
-
From the Create Property Page dialog box, click
 Create Property to open the Add Property dialog box:

-
Specify a name and description for the property in the and fields.
To make the property available as search criteria when finding elements, select the check box. For more information, see Using Classes and Properties to Enhance Finding Elements.
Property names cannot include the space character or the following special characters:
< > # % " ’ { } ( ) [ ] | \ ^ `)
-
Click .
The dialog box to define the property type opens:

-
Specify a name to display for the property in the field.
-
Click the drop-down list, then select the type of property.
Select from the list described in Understanding Property Types.
-
(Optional) Do any of the following to set property options in the section:
-
To indicate that this property is a key of a CIM class, select the check box.
This option is not used by Operations Center but can be referenced by user scripts or applications.
-
To hide this property on the property page, select the check box.
-
To allow this property to override another property in a parent class, specify the property name to override in the field.
-
-
(Optional) Do one of the following:
-
Specify a default value for the property in the field.
The default property is not entered automatically on an element’s property page. It is necessary to edit the property by placing the cursor in the property field.
-
To enter the Operations Center default value in the property, click .
-
-
Specify the appropriate symbols or edit the default symbols to define a formatting and validation rule for the property value in the field as defined in the following table:
Symbol
Description
#
Any valid number.
’
Escape character, used to escape any of the special formatting characters.
U
Any character. All lowercase letters are mapped to upper case.
L
Any character. All upper case letters are mapped to lower case.
A
Any character or number.
?
Any character.
*
Anything.
#H
Any hex character (0–9, a–f or A–F).
When a mask is defined, you are automatically specifying the exact number of characters expected for the property value.
Leave the field empty if you do not want to use a mask for the property value.
-
To make the property a required field, click the check box.
-
Click .
The dialog box to specify validation rules opens. Validation options are based on the type selected.
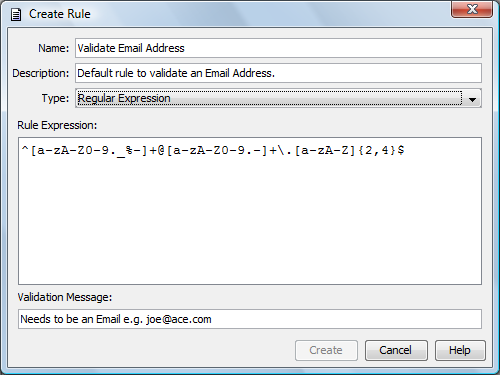
In the following example, the rule verifies a valid IP address is entered:

-
Define validation and computational rules as required in the list.
Rules are applied to the property value in the order they are listed in the list. Use the
 Up and Down arrows to sort the rules.
For more information, see Defining Validation or Computational Rules for a Property.
-
To create a rule based on another rule, click
 (), select the rule, then click
  () to specify new criteria.
-
To edit a rule, select the rule, then click
() to open the Edit Rule wizard.
For more information, see Defining Validation or Computational Rules for a Property.
-
To delete a rule, select the rule, then click
 ().
().
The rule is removed from the list.
-
Click to save the property page.
The property displays in the section of the Create Property dialog box:

Adding Separator Lines to Group Sets of Properties in the Property Page
Adding a Separator Between Two Properties
-
In the Create Property Page dialog box, select a property in the section.
-
Click
 ().
().
A line displays after the property selected in the previous step.
Adding a Separator to an Existing Property Page
-
Right-click a Property page in the Explorer pane, then select to open the Status property page.
-
Click Property Page in the left pane to update the page.
-
Select a property in the section.
-
Click
().
A line displays after the property selected in the previous step.
Defining Validation or Computational Rules for a Property
Each property definition can have one or more validation rules but only one or computational rules. These can be used to further restrict acceptable values for a property or to perform a mathematical calculation to produce the value.
To define validation rules for a property:
-
From the Edit Property dialog box, click until you reach the Validation Rules dialog box:

-
Click
Create New Validation Rule to create a new validation rule:
-
Click the drop-down list, then select the syntax type for the validation rule:
Regular Expression: Specifies how to look for a specified pattern in text and how what processing occurs when a pattern match is found.
Macro Expression: Specifies how to look for a pattern in text using a statement that contains some variable parameter information and what processing occurs when a pattern match is found.
Script Expression Specifies how to validate using a script expression.
Date Range: Validates the selected date matches the rule parameters (, , or ).
After you select the syntax type, the dialog box options update to match it.
-
Complete the rule parameters as defined in the following table:
Validation Rule Types
Input Types
Rule Parameters
Date Range
Text
Date
-
Lower Bound
-
Upper Bound
-
Date Format (used if Text input type)
Regular Expression
Any
-
Regular Expression
-
Invalid Value Message
Script Expression
Any
-
Script Expression
-
Invalid Value Message
Macro Expression (Velocity)
Any
-
Macro Expression
-
Invalid Value Message
-
-
Enter the error message to display when the data does not meet the validation rule in the field.
-
Click .
4.2.4 Working with a Multiple Choice Property
The Choice property type enables creating a multiple choice property that displays in a service model element property page. Only one value can be selected from the drop-down list. When configuring the Choice property, it is necessary to specify the values to display in the drop-down list.
When configuring the drop-down list, specify the following:
-
Displays as the property value until a different value is selected or entered.
-
Configuring Fixed vs. Dynamic Values
Fixed values that display in the drop-down list, or Dynamic values that are generated using the names of child elements related to a specified parent element. These values are generated when an element’s property page displays.
-
Storing and Displaying Different Property Values
The Display Name, the part of a property value that displays in the property page, and the Stored Value, the part of a value that is stored in the configuration storage database.
-
Whether a value for the property is required (Required property).
-
User Entry of a Multiple Choice Property Value
Whether a property value can be entered directly in an element’s property page ().
Specifying a Default Value
When configuring a property, specifying a default value is optional. This value is used for the property until it is changed.
A default value can provide guidance for an expected property value. For example, specify <operating system> as the default value for a property named Operating System. For a multiple Choice property type, the default value should be a choice that displays in the drop-down list. Note that default values satisfy the Required property restriction when a user saves a property page.
To set a default value, enter a string value in the field in the Add Property dialog box.
Configuring Fixed vs. Dynamic Values
When defining the values for the multiple Choice property type, you can select one of the following:
-
Fixed: Specify a fixed list of values that display in the drop-down list for the property in the property page. Fixed is the default setting, and One, Two, Three, and Four are the default choices that appear in the drop-down list unless you change them.
Use the option when there is a predefined list of possible values for a property that rarely changes, such as computer operating systems, usernames, or corporate locations. For example, assume there is a finite list of lab locations for your company. Create a multiple Choice property named Lab Name that includes all of the lab locations.
-
Dynamic: Use to select a parent element whose first-level child element names display in the drop-down list for the property. The dynamic list ensures that all new child elements related to the selected parent automatically display in the drop-down list.
Each multiple choice value appears in a separate line in the drop-down list and only one value can be selected.
To configure fixed values or a drop-down list:
Creating a List of Fixed Values for the Property
-
In the Add Property dialog box, select the radio button.
-
Replace the default One, Two, Three, Four text with the values that should appear in a drop-down list for this property.
When you edit the property, these fixed values display as choices in the drop-down list.
-
Click .
The following illustrates configuring a new Multiple Choice property containing a fixed list of values:

The following illustrates selecting from a fixed list of values in a Service Model element property page:

Generating a Drop-down List
If the list of values for a property can change over time, consider defining a Dynamic multiple Choice property based on element names that exist in the hierarchy. As an example of an element with dynamic children, assume the business processes associated with the element are expected to change over a few months as new procedures are put in place. You could define the property Req. Process to display all the child elements of the element. When a new process is added, it automatically displays in the drop-down list for the multiple choice property.
To generate a drop-down list using the children of a specific parent element:
-
In the Add Property dialog box, select the radio button.
-
Click , then select a parent element (such as Supply Chain).
When users edit the property, the selected element’s children display as choices in the drop-down list.
The following illustrates configuring a new Multiple Choice property containing a dynamic list of the child elements of Supply Chain:

The following illustrates viewing child elements under Supply Chain:

The following illustrates selecting from a dynamic list of values generated from the child elements under Supply Chain in a Service Model element property page:

Storing and Displaying Different Property Values
Typically, the value displayed for a property is the same as the value stored in the configuration storage database. For each value defined for a multiple Choice property, you can define a displayed value and a corresponding different value that is stored in the configuration storage database.
Displaying One Set of Values
To display one set of values in the property page and store a different set of values in the configuration storage database:
-
In the Add Property dialog box, select the check box.
-
To specify the displayed value and the stored value, enter an expression in the field.
The expression should be in the form: (.*)symbol(.*). The data before the symbol displays in the property page and the data after the symbol is the stored value. The default is (.*)::(.*) where (.*) indicates all data and :: is the separator. This option is available when using both fixed values and dynamic values.
As an example, a list of system usernames might change over time, but the associated user IDs that are stored by the system remain constant. Assume Lisa Smith married and changed her name to Lisa Jones. The Username property value displayed in the property page might change from Lisa Smith to Lisa Jones, but her fixed, unique user ID, 123456, should remain the same.
Defining the Values Displayed
To define the values displayed in the property page and the stored values:
-
In the section, under , specify a value consisting of two parts: 1) the display value and 2) the stored value.
Separate the values using the default regular expression string of “::” (double colon string).
Using the previous example, enter:
Lisa Jones::123456
Lisa Jones displays in the property’s drop-down list, but the stored value is 123456.
-
Select the check box.
This ensures only the display names are shown in the drop-down list. If this check box is deselected, both the display names and stored values are shown in the drop-down list.
The following illustrates configuring a new multiple Choice property to use a fixed value pair in which the values stored differ from those displayed in the property page:

The following illustrates selecting the values for a property that is configured to display one value in the property page and to store a different value in the configuration storage database:

Requiring a Property Value
When defining a multiple Choice property, decide whether the property is required, which requires selecting a property value prior to saving property value changes entered on the property page. Note that if a Default value is specified, it satisfies the property option.
To specify a required property:
-
In the Add Property dialog box, select the check box.
By default, the check box is not selected, so a property value is not required.
User Entry of a Multiple Choice Property Value
Another feature of a multiple Choice property is allowing users to directly enter a property value in the property page. This allows greater flexibility in determining a property value for an element, but it can have a negative impact on standardization of data.
To allow users to enter a value for a multiple Choice property:
-
In the Add Property dialog box, select the check box.
By default, this option is not selected, meaning users cannot enter property values; they must select a value from the drop-down list.
The option to make the property editable is applicable for Fixed and Dynamic values. The exception is if you choose to display and store different values, then the property cannot be edited in the property page.
When the Separate values into display name and stored value check box is selected, the check box is not available.
4.2.5 Working with HTML Pages or Text
To create custom properties that display HTML pages or text, create two custom property pages. One page contains a HTML Page (or HTML Text) property type that contains a specific Web page URL (or HTML text). The other page contains a TextArea property that displays the Web page (or HTML text). Use a common property name to link the two pages. If you enter a different URL in the first property, the displayed Web page updates automatically in the second property.
A subset of HTML is supported for this feature, so some HTML code might not be rendered in the page displayed using the HTML custom properties.
The following example steps through the process of creating two custom properties to display a Web page. Change the Web page content by changing the URL.
To display a Web page as a custom property:
-
Create a property page named Web Page.
-
In this page, create and name a property named Page1 that is the HTML Page type.
If creating HTML text, select the type.

-
Specify the page height=500 and width=100.
-
Select .
-
Copy and rename the Web Page property page to Web Page Edit.
-
Edit Web Page Edit and change the Page1 property type to TextArea:

-
To attach both new custom property pages to an element, right-click a service model element, then select .
-
Click the Browse icon, then select both and .
-
Click .
-
Right-click the same service model element, then select .
-
Click .
-
Enter the URL, and then click .
Alternatively, if displaying HTML text, enter the HTML text here. It displays in the corresponding HTML Text type property:
![[Text type property]](../graphics/scm_prop_webeditchng_a.png "[Text type property]")
-
To verify the setting, click the property.
For the example in the above illustration, the Google home page displays:
![[Managed Objects home page]](../graphics/scm_prop_webpage_a.png "[Managed Objects home page]")
4.2.6 Configuring Macro Expressions
Operations Center macro expressions use Velocity, which is a third party package provided by the Apache Organization and bundled into Operations Center for macro expressions. Documentation for Velocity is available at http://jakarta.apache.org/velocity.
Macro expressions use the following syntax rules:
-
No spaces are used in macro expressions.
-
The notation for a variable consists of a leading “$” character following by a VTL identifier. A VTL identifier must start with an alphabetic character.
-
Characters in a macro expression are limited to:
-
Alphabetic characters (a–z or A–Z)
-
Numeric characters (0–9)
-
Hyphen (–)
-
Underscore (_)
-
Example of a Macro Expression
The following is an example of a macro expression for a computed property that generates an e‑mail address by concatenating the first initial of the ContactFirstName property with the ContactLastName property and uses the CompanyDomain property after the @ symbol:
#if( ${ContactFirstName} && ${ContactFirstName.length()} > 0 )
${ContactFirstName.substring(0,1).toLowerCase()}${ContactLastName.toLowerCase()}@${CompanyDomain}
#else
E‑mail address not computed
#end
ContactFirstName and ContactLastName are both text properties. CompanyDomain is a text property such as NetIQ.com.
If no ContactFirstName is provided, the e‑mail address displays the message: “E‑mail address not computed.”
Using Script Expressions
Script expressions can be used within macro expressions for validation rules and computed fields for custom properties. Also, predefined scripts can be saved and used in macro expressions. This is useful if you are more familiar with NOC Script than with macro expressions.
The following example creates a computed field script expression consisting of an element name concatenated with the text “IS GOOD!”:
Creating the Custom Property
-
Create a custom property named Good Check.
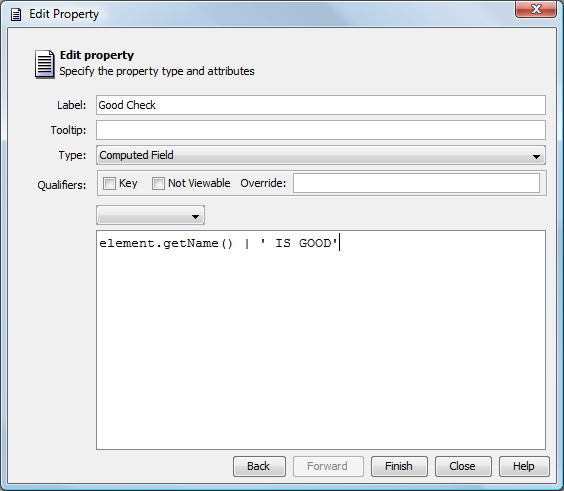
-
Select as the property type.
-
Select from the drop-down list.
-
In the text area enter:
element.getName() + ' IS GOOD! '
-
Click .
Testing the Custom Property
-
Attach the custom property page to a service model element.
-
Open the custom property page and the field should display the element name and the words “IS GOOD!”:

Creating the Validation Rule
Assume a property value is valid only if it contains an asterisk (*). Create a validation rule that uses a script expression to check the property value entered by a user.
To create a validation rule:
-
In the same custom property page as above, define a new property named Validation Check.
-
Select for the property type.
-
Click to display the validation rules.

-
Create a validation rule, then select for the validation rule type.
-
In the text area, enter:
valueText.indexOf( '*' ) != –1
-
Click and save the new property.
Testing the Validation Rule
-
Apply the new custom property page to a service model element.
The property is red and marked with an exclamation point until a valid value (containing an asterisk in this example) is entered.

