6.5 Relationship Browser Configuration Presets
The Relationship browser includes several global layout configurations, called presets. Define configuration presets at the following levels:
-
Global: A configuration available to all users.
-
User: A configuration defined by a user and available only to that user.
-
Element: A configuration setting saved and applied only to the current element in view.
To define configuration presets, review the following sections:
6.5.1 Updating the Relationship Browser Configuration for the Current Element
It is possible to customize and save Relationship Browser settings for individual elements. This saved configuration is called an element preset.
A customized element preset takes precedence over global and user presets when displaying the element’s relationship diagram. If no element preset exists, user presets take priority over global presets.
Modifying Configuration Settings
To modify configuration settings for the currently selected element:
-
Do one of the following in the Relationship browser to open the Edit Element Layout Properties dialog box:
-
In the sidebar, click
 Edit Element Layout Properties.
-
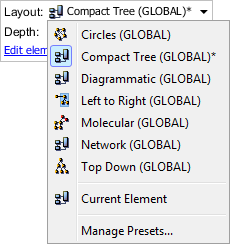
In the Control Panel, click the Edit element layout link.

-
-
In the sidebar, select a layout type:
-
-
The Style and other settings in the dialog box vary depending on the selected layout type.
If necessary, update these settings. For more information to select the appropriate link, see Using Layout Rendering Features.
-
Do one of the following:
-
Click to apply selections to the current view, but keep the dialog box open.
-
Click to save the settings and close the dialog box.
-
Saving the Relationship Browser Layout
There are two ways to save the displayed view for the current element. Save the layout for the element only or save it for the class to which the element belongs. Saving a class layout automatically applies the saved layout to all elements in that class. If the option is used, that layout displays when the Relationship browser is open for the element. In other words, the saved element layout takes priority over the class layout.
-
To save the Relationship Browser layout for the current element only, right-click the browser background, then select .
This saved layout is displayed when the Relationship browser is open for the element.
-
To save the Relationship Browser layout for the class to which the element belongs, right-click the browser background, then select .
This saved layout is displayed for any element in the class, unless a different layout was saved using the option.
6.5.2 Working with Global and User Presets
To change the default global and user presets, use the Control Panel in the upper left corner of the Relationship browser or use the sidebar icons.
Figure 6-3 Relationship Browser Control Panel
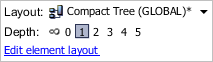
Figure 6-4 Sidebar Controls

The following sections describe how to change both global and user presets as well as other Relationship Browser settings:
Applying a Global or User Preset
The first step is selecting an existing global or user preset to see what it looks like when applied to an element in the Relationship browser.
To apply a global or user preset, do one of the following in the Relationship browser:
-
In the sidebar, click
 Layout Preset, then select a preset from the drop-down list.
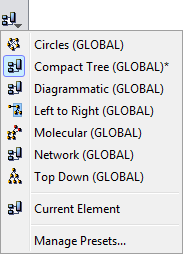

HINT:The Layout Preset icon changes based on the current layout type selected.
-
In the Control Panel, click the current Layout selection, then select a preset from the drop-down list.
The diagram updates using the selected preset. The next step is modifying the global or user preset.
Modifying the Settings for a Preset
-
Do one of the following in the Relationship browser to open the Manage Layout Presets dialog box:
-
In the sidebar, click
Layout Preset, then select from the drop-down list.
-
In the Control Panel, click the current Layout selection, then select from the drop-down list.

-
-
Click the drop-down, then select the preset to modify.
The settings update in the dialog box.
-
Edit the settings in the dialog box.
The settings vary by layout style (, , and so on).
For more information, see Using Layout Rendering Features.
-
To save the edited preset, do one of the following:
-
To apply the settings and keep the dialog box open, click .
-
To save the settings and close the dialog box, click .
-
Editing the Preset Name, Display Type or Global/User Setting
-
In the Manage Layout Presets dialog box, click
 Edit Preset to open its dialog box:

-
Specify the name for the preset in the field.
-
Click the drop-down list, then select the layout type.
For more information, see Using Layout Rendering Features for details on the different types.
-
To select a preset type, do one of the following:
-
Select the radio button to make this layout available to all users.
-
Select the radio button to make this layout available in the user’s library of presets.
-
-
Click to update the preset.
6.5.3 Creating and Deleting Presets
In some situations, creating a preset is preferable to modifying an existing preset. Review the following sections to create or delete a preset:
Creating a Preset
-
Do one of the following in the Relationship browser to open the Manage Layout Presets dialog box:
-
In the sidebar, click
Layout Preset, then select from the drop-down list.
-
In the Control Panel, click the current Layout selection, then select from the drop-down list.
-
-
In the Manage Layout Presets dialog box, click
 New Preset to open the Create Preset dialog box:

-
Specify the name for the new preset in the field.
-
Click the drop-down list, then select the layout type.
-
To select a preset type, do one of the following:
-
Select the radio button to make this layout available to all users.
-
Select the radio button to make this layout available in the user’s library of presets.
-
-
Click .
The new preset displays as the current preset in the Manage Layout Presets dialog box.
-
In the Manage Layout Presets dialog box, select the layout style (, , and so on).
The settings on the right side of the dialog box update.
For more information, see Using Layout Rendering Features.
-
Edit the settings in the dialog box, which vary by layout style.
For more information, see Using Layout Rendering Features.
-
Do one of the following:
-
To apply the preset and keep the dialog box open, click .
-
To save the preset and close the dialog box, click .
-
Deleting a Preset
-
Do one of the following in the Relationship browser to open the Manage Layout Presets dialog box:
-
In the sidebar, click
Layout Preset, then select from the drop-down list.
-
In the Control Panel, click the current Layout selection, then select from the drop-down list.
-
-
In the Manage Layout Presets dialog box, click the drop-down list, then select the preset.
The settings update in the dialog box.
-
Click
 Delete to open a confirmation dialog box.
-
Click to confirm the deletion.
The preset is removed.