3.1 Assigning Elements by Matching Properties
This section explains how to assign elements to a service model using criteria, such as element or class names. The last four sections are optional procedures that are referenced from within the first section’s steps:
3.1.1 Assigning Elements to a Service Model
To assign elements to a service model using the Elements property page:
-
In the Explorer pane, right-click a service model element, then select Properties.
-
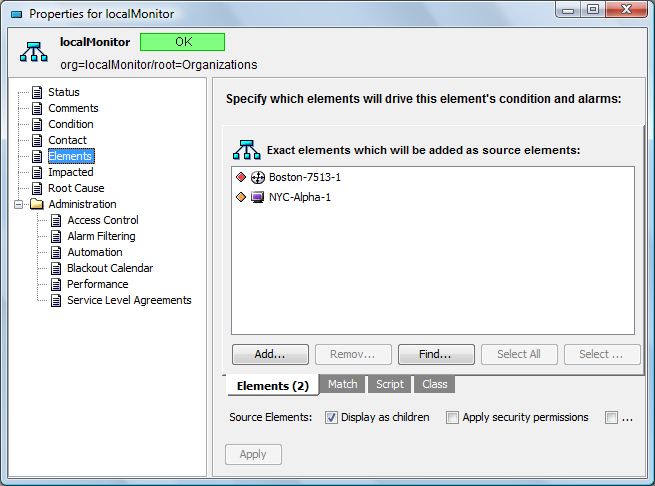
In the left pane, click Elements to update the property page:
-
Click one of the following tabs to specify a method to select elements (each one requires a different set of criteria to locate matching elements):
Elements: Selects specified elements.
For instructions, see Matching by Specific Elements, then return here to Step 4.
Match: Selects elements based on a regular expression or LDAP-style syntax. The match is based on the element’s full DName.
For instructions, see Matching by Expression or Section A.0, LDAP Expression Syntax for Searching and Matching, then return here to Step 4.
Script: Selects elements based on a script written using the NOC Script language. The entire text in the window must evaluate to either True or False for a given object. Only administrators with programming experience should use this feature. It is reserved for situations that require statements that exceed the complexity of an element expression, or that require validation of a property other than an element’s DName.
For instructions, see Matching by Script Expression, then return here to Step 4.
For more information about NOC Script, see the Operations Center 5.6 Scripting Guide.
Class: Selects elements based on element class name.
For instructions, see Matching by Class, then return here to Step 4.
-
Select the following check boxes as appropriate to determine the behavior for elements created for this service model:
Display as children: Displays source elements as linked children under the service model.
Apply security permissions: Applies the source element’s security permissions to the element created for the service model.
Halt alarm contributions: Stops the propagation of alarms from the source element up to the service model.
-
Specify an algorithm to determine the element’s state.
For instructions, see Specifying the Algorithm to Determine an Element’s Condition. Then, return here to Step 6.
-
Click Apply to add the new element to the service model hierarchy.
-
Click New to add another element to update the Add Service Model Element dialog box.
3.1.2 Matching by Specific Elements
Matching by elements enables you to select specific elements as source elements for the service model.
To match specific elements:
-
From the Add Service Model Element dialog box, click the Elements tab to update the dialog box.
-
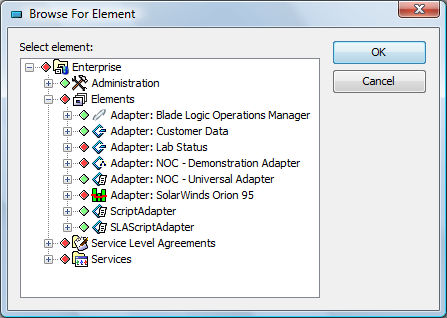
Click Add to navigate to an element to open the Browse for Element dialog box:
-
In the Browse for Element dialog box, navigate to the elements you want to use, then click OK.
These are exact element selections. Child elements are not selected automatically when their parents are selected.
Use Ctrl+click or Shift+click to select multiple elements at once. The selected elements display in the Add Element dialog box:

-
To search for an element, click Find on the Add Service Model Element dialog box to open the Find dialog box.
For more information about finding elements, see
Using Find to Search for Elements
in the Operations Center 5.6 User Guide. -
Return to Step 4.
3.1.3 Matching by Expression
Match by expression uses regular expressions or LDAP-style syntax. All element expression matches are based on an element’s DName. Each element has a unique DName, which displays by right-clicking an element, then selecting Properties. The DName displays at the top of the property page.
For information about using LDAP expressions, see Section A.0, LDAP Expression Syntax for Searching and Matching.
To match elements using an expression:
-
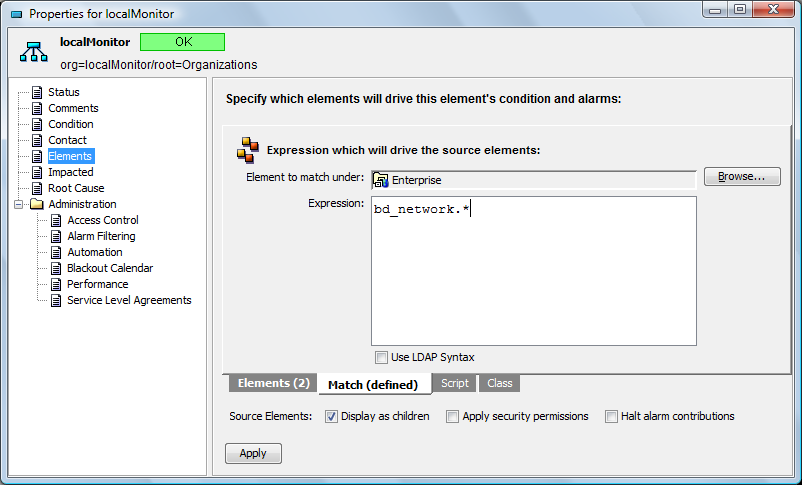
From the Add Service Model Element dialog box, click the Match tab to update the Add Service Model Element dialog box.
-
Click Browse and select the element for the match search.
Only the children of the selected element are eligible for matching.
-
Enter the expression in the Expression field.
-
To use LDAP syntax, select the Use LDAP Syntax check box.
-
To add the matching element to the service model, click Apply.
-
Click New to add another element.
IMPORTANT:Deleting an adapter deletes all regular expressions used to match elements associated with the adapter. (These expressions can be viewed in the Match tab on the Elements property page for a service model element.) Before deleting an adapter, you might want to copy these regular expressions if it is necessary to re‑create them later.
-
Return to Step 4.
3.1.4 Matching by Script Expression
Script expressions should be reserved for situations that require statements that exceed the complexity of an element expression or that require validation of a property other than an object’s DName. Only administrators with a programming background should use script expressions because they are very powerful. An improperly written script can consume enough resources to severely impact the Operations Center server.
The script language expected is NOC Script and the entire text within the window must evaluate to True or False. For more information about creating scripts and scripts available in the Script Library, see the Operations Center 5.6 Scripting Guide.
To match elements using a script expression:
-
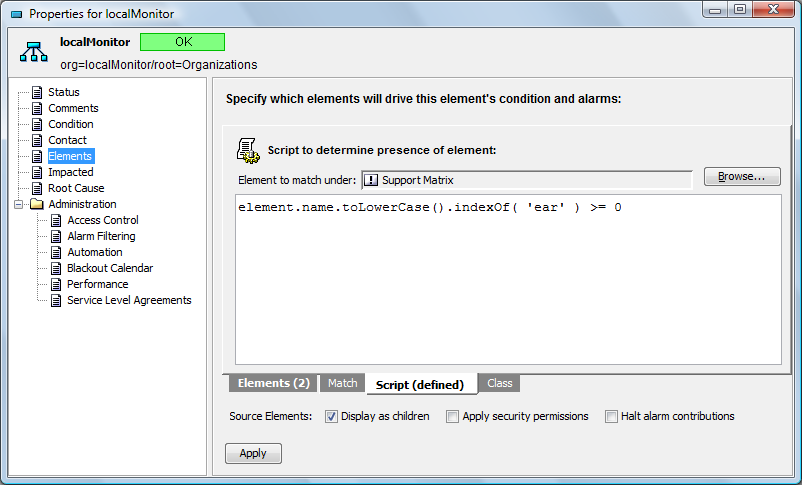
From the Add Service Model Element dialog box, click the Script tab to update the Add Service Mode Element dialog box:
-
Click Browse and select the parent element for the match search.
Only the children of the selected element are eligible for matching.
-
Paste or enter the script code in the main field.
The script language expected is NOC Script.
The script must result in a True or False output for elements in the selected element branch.
-
To add the matching element to the service model, click Apply.
-
Click New to add another element.
-
Return to Step 4.
3.1.5 Matching by Class
Match by class allows you to search for elements based on their class name. For ways to determine an element’s class name, see Determining an Element’s Class Name
the Operations Center 5.6 Server Configuration Guide.
To match elements by class:
-
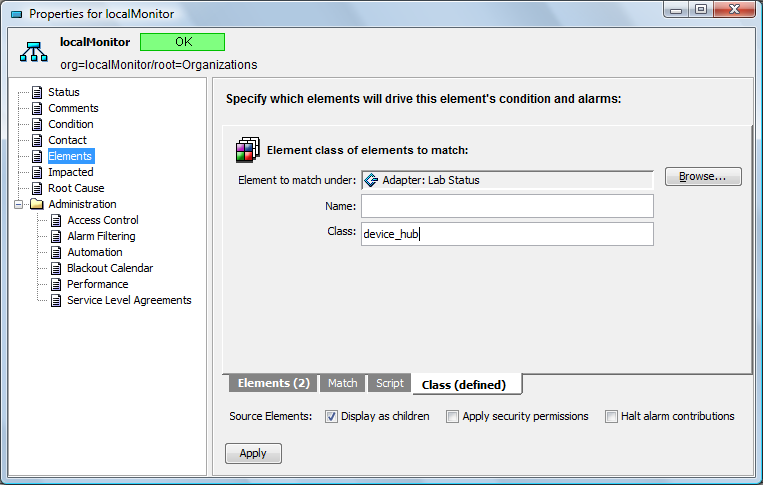
From the Add Service Model Element dialog box, click the Class tab to update the Add Service Model Element dialog box:
-
Click Browse and select the parent element for the match search.
Only the children of the selected element are eligible for matching.
-
Specify the name of the specific element to be found in the Name field.
Leave the Name field blank to find all elements in the specified class.
-
In the Class field, specify the class name to match.
Org is the default class name for a service model.
HINT:The element to match defaults to Enterprise. Selecting a more specific element reduces the processing requirements.
-
To add the matching element to the service model, click Apply.
-
Click New to add another element.
-
Return to Step 4.