7.2 Configuring Servers for Distributed Searching and Reporting
To configure a search initiator for distributed search, you must first enable distributed searching on the search initiator server.
After you enable distributed search, you need to add target servers to the search initiator server. If you know the administrator username and password for the target server, you can add the target server directly from the search initiator.
If you do not know the administrator username and password for a target server, you can set up the search initiator with an opt-in password that allows administrators of target servers to add their target servers to the search initiator. When you do this, administrators of target servers do not need to share their usernames and passwords with you. You must share the opt-in password with the target server administrator.
7.2.1 Enabling Distributed Search
-
Log in to the search initiator as an administrator.
-
Click > .
-
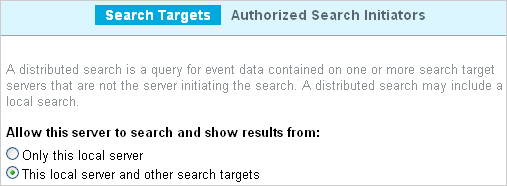
Select .
-
Do one of the following to add target servers to your search initiator:
-
If you are the administrator of the search initiator and you know the administrator username and password on the target server, continue with Section 7.2.2, Adding a Search Target Server by Using the Administrator Credentials.
-
If you are the administrator of the search initiator and you do not know the administrator username and password on the target server, you can set an opt-in password to allow administrators of target servers to add their target servers to the search initiator. Continue with Section 7.2.3, Adding a Search Target Server by Using the Opt-in Password.
-
7.2.2 Adding a Search Target Server by Using the Administrator Credentials
If you are the administrator of the search initiator and you know the administrator username and password on the target server, you can add the target server while you are logged in to your search initiator server.
IMPORTANT:You should ensure that the target server that you add is able to communicate with the search initiator. The target server should be able to communicate through TCP/IP. The IP address or hostname of the target server must be accessible through firewalls, NATs, etc. You can use the ping command to ensure that there is communication from both ways. If there is a communication failure between the servers, an error is displayed in the extended status page. For more information, see Section 7.4, Managing the Distributed Search Results.
-
Log in to the search initiator as an administrator.
-
Click > .
-
Click the link.
-
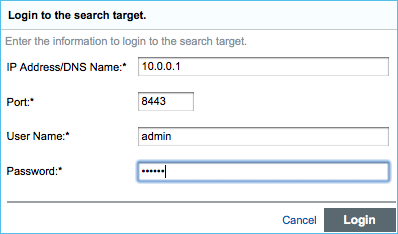
Specify the following information:
-
IP Address/DNS Name: IP address or the DNS name of the target server.
-
Port: Port number of the target server. The default port number is 8443. The target server and search initiator do not need to be on the same port.
-
User Name: User name to log in to the target server. This must be a user with administrator privileges.
-
Password: Password associated with the user name.
-
-
Click .
The Confirm Certificate page is displayed.
-
Verify the Certificate information, then click .
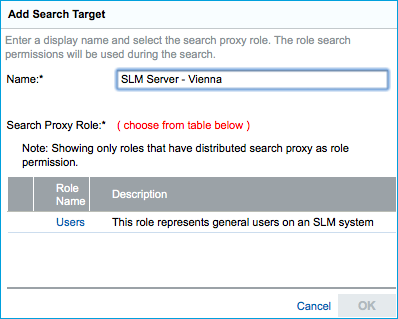
The Add Search Target page is displayed. It lists the various proxy roles on target server.
-
In the field, specify a descriptive name that you want to give to the search target.
This helps you to easily identify the target server by a name instead of by its IP address or DNS name.
-
Select a search proxy role that you want to assign to the search initiator.
When the search initiator makes search requests to the target server, the proxy role's security filter is used when performing the search. Only events that pass the proxy role's security filter are returned to the search initiator server.
Only roles that have the Proxy for Authorized Search Initiators permission are listed. This permission is required for the target server to accept and process incoming search requests from the search initiator server.
-
Click .
The server information is listed in the list.
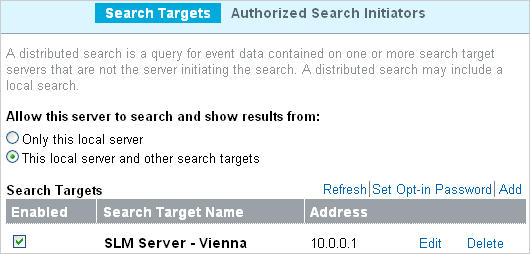
You can now search events or view event reports from the target server. For more information, see Section 7.3, Searching for Events and Section 7.6, Running Reports.
7.2.3 Adding a Search Target Server by Using the Opt-in Password
In organizations where administrative control of Sentinel Log Manager servers is decentralized, it might violate the security policy to share administrator passwords. However, Sentinel Log Manager allows you to share a limited-purpose opt-in password to add target servers, which is more secure than requiring full administrator credentials. If you are not the administrator of the target server, you can set an opt-in password in the search initiator server, then provide the opt-in password to the target server administrators to allow them to opt in to the search initiator server.
When a target server opts in to the search initiator, a message is sent to the search initiator server requesting that it be added to the list of target servers maintained by the search initiator server. The request authorizes the search initiator to access event data on the target server. The search initiator requires an opt-in password to verify that the opt-in request has originated from a valid target server. During the opt-in process, the search initiator and the target server exchange the appropriate password, which allows the target server to authenticate the search requests from the search initiator.
This procedure is similar to adding a target server, but it is done from the target server instead of the search initiator server.
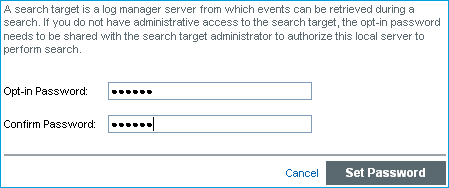
Setting the Opt-In Password
-
Log in to the search initiator as an administrator.
-
Click > .
-
Select .
-
Click .
-
Specify the opt-in password, then click .
-
Continue with Authorizing a Search Initiator Server to add the target server to the search initiator.
Authorizing a Search Initiator Server
-
Log in to the target server as an administrator.
-
Click > .
-
Select the tab.
-
Check the box.
-
Click the link.
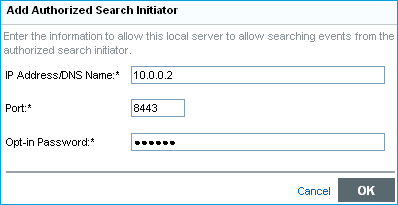
The Add Authorized Search Initiator page is displayed.
-
Specify the following information:
-
IP Address/DNS Name: The IP address or the DNS name of the search initiator.
-
Port: Port number of the search initiator. This is the port number on which the search initiator listens for incoming opt-in requests. The default port number is 8443.
-
Opt-in Password: The opt-in password that you configured on the search initiator. You must obtain this password from the administrator of the search initiator.
-
-
Click .
The Confirm Certificate page is displayed.
-
Verify the certificate information, then click .
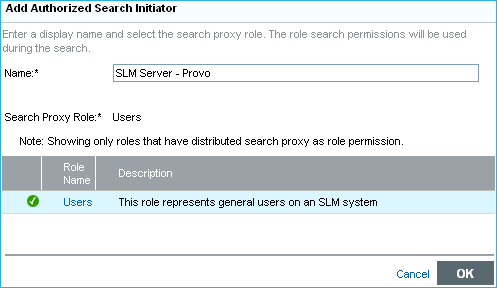
The Add Authorized Search Initiator page is displayed that lists the various proxy roles on the search target servers.
-
In the field, specify a descriptive name that you want to give to the search initiator server.
This helps you to easily identify the search initiator server by a name instead of by its IP address or DNS name.
-
Select a proxy role that you want to assign to the search initiator.
When the search initiator makes search requests to the target server, the proxy role's security filter is used when performing the search. Only events that pass the proxy role's security filter are returned to the search initiator.
Only roles in the target server that have the Proxy for Authorized Search Initiators permission are listed. This permission is required for the target server to accept and process incoming search requests from the search initiator.
-
Click OK.
The search initiator is added to Authorized Search Initiators list and is enabled by default.
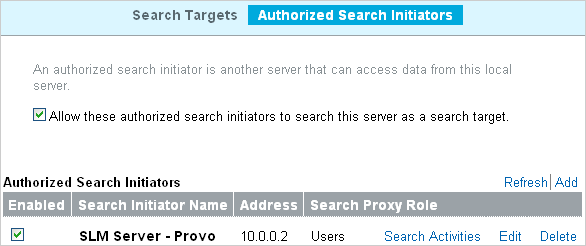
NOTE:Also, the target server gets added under the Search Targets list in the search initiator server. Alternatively, you can click the link to see the target server in the Search Targets list.