3.1 Configuring Policies to Check the Integrity of the Client Machine
You can configure a client integrity check policy to verify if the prescribed software (such as firewall and antivirus software) is installed on the client machine. You can configure different policies for Windows, Linux, and Macintosh machines, then specify applications that must be present in the client machines in order to pass the client integrity check.
A category that you have configured can be deleted only if it is not assigned to any of the security levels.
3.1.1 Selecting the Operating System
-
In the Administration Console, click > .
-
Select from the section.

-
Select the operating system.
Next, you must configure a category of software that needs to be present in the client machine.
-
Continue with Configuring the Category.
For more information on exporting and importing client integrity check policies, see Section 3.1.5, Exporting and Importing Client Integrity Check Policies.
3.1.2 Configuring the Category
A category is a group of similar software. For example, a firewall category can contain a list of firewalls such as the Windows Firewall and ZoneAlarm firewall. You can configure multiple software categories for a single client integrity check policy.
When multiple categories are configured for an operating system, if one of the enabled category does not exist on the client, the client integrity check fails.
-
To add a new category, click .
-
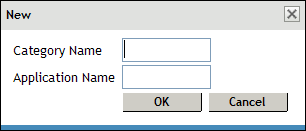
Specify a name for category and a name for the application in the and the fields, then click .
-
Select the newly added category, then click .
-
To disable a category that is already enabled, select the category, then click .
-
To delete a category, select the category, then click .
-
Click to save your modifications, then click on the Configuration page.
-
Continue with Configuring Applications for a Category.
3.1.3 Configuring Applications for a Category
A category consists of group of applications. You can add more than one application under a category. A client workstation is checked for the presence of any one of the software items in the category. If at least one of the enabled application definition exists on the system, the client integrity check passes.
-
To configure or add applications to a category, click the category.

-
To add a new application, click .
-
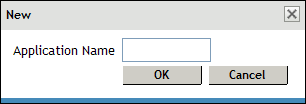
Specify an application name, then click .
-
Select the newly added application, then click .
NOTE:To enable an application you must have already enabled the category that the application is part of.
-
To disable an application that is already enabled, select the application, then click .
-
To delete an application, select the application, then click .
-
Click to save your modifications, then click on the Configuration page.
-
Continue with Configuring Attributes for an Application.
3.1.4 Configuring Attributes for an Application
After you have added an application to a category, you must configure the attributes for each of these applications. These attributes can be in the form of RPMs, processes, registry keys, or executable files. The client integrity check detects the presence of these attributes.
-
To add a new attribute, click , specify an attribute name, then click .
-
Click the application to add application details and attributes.

-
Specify details for the attributes. The following table lists the attributes for applications on different operating systems:
Operating System
Attribute Type
Attribute Name
Linux
RPM
Name: Specify the name of the RPM that must be present on the client machine.
Version: Specify the version of the RPM that must be present on the client machine.
Process
Name: Specify the name of the process that must be present on the client machine.
Owner: Specify the owner of the process.
Absolute File
Name: Specify the name and absolute path of the file that must be present on the client machine.
HashMD5: Specify the MD5 checksum value of the absolute file. To calculate the MD5 checksum value of an absolute file located in your local system, click to select the file. The MD5 checksum value of the selected file is displayed.
To calculate the MD5 checksum value for an absolute file that is on another system, remotely connect to that system, calculate the MD5 value, then copy the value in the field.
NOTE:You can also copy the file from the remote system to the local system, then calculate the MD5 checksum by using the option. However, this might change the MD5 value of the file during the process. If you want to use this method, then ensure that the file size and file contents did not change during the process.
Macintosh
Package
Name: Specify the name of the software package that must be present on the client machine.
Version Specify the version of the software package.
Process
Name: Specify the name of the executable file that must be present on the client machine.
Owner: Specify the owner of the process.
Absolute File
Name: Specify the name and absolute path of the file that must be present on the client machine.
HashMD5: Specify the MD5 checksum value of the absolute file. To calculate the MD5 checksum value of an absolute file located in your local system, click to select the file. The MD5 checksum value of the selected file is displayed.
To calculate the MD5 checksum value for an absolute file that is on another system, remotely connect to that system, calculate the MD5 value, then copy the value in the field.
NOTE:You can also copy the file from the remote system to the local system, then calculate the MD5 checksum by using the option. However, this might change the MD5 value of the file during the process. If you want to use this method, then ensure that the file size and file contents did not change during the process.
Windows
Process
Name: Specify the name of the executable file that must be present on the client machine.
RegistryKeyName: Specify the registry key name. When you add this name, make sure that you also specify a value for .
ValueName: Specifies the value for RegistryKey configured. The data found in this key value should be the absolute path of the folder where the process file is present.
Version: Specify the version of the software process that must be running in the client machine.
NOTE:The version attribute specifies the Windows Explorer file version number.
RegistryKey
Name: Specify the name and absolute path of the registry key that must be present on the client machine.
Value Name: Specify the name of the registry key value.
Value Data: Specify a data for the registry key value. This data can be for registry type REG_BINARY, REG_DWORD, REG_DWORD_LITTLE_ENDIAN, REG_MULTI_SZ, or REG_SZ. The value for REG_DWORD and REG_DWORD_LITTLE_ENDIAN is hexadecimal or decimal. The value of a REG_MULTI_SZ or REG_SZ can be a string value or, numeric or alphanumeric. The value of REG_BINARY can be binary or hexadecimal.
The Value name and Value data are separated by a comparison operator such as =, >. <, <=, >=. You must always use = with a string or with the registry type REG_BINARY. You can use any comparison operator with other registry types
For example, if the registry key name is specified as RegKey with a Value Name of RegValue, a comparison operator of =, and a Value Data of RegData, the client integrity check process looks for the presence of RegKey with a value name RegValue = value data RegData on the client machine. If the registry is present with the specified values, the client passes the client integrity check.
NOTE:Registry keys are not case sensitive, and they can contain either a single backslash (\) or double backslash (\\).
For example: One of the registry key descriptions is HKEY_Local_Machine\\Software\\Symantec. It can also be written as HKEY_Local_Machine\Software\Symantec.
Absolute File
Name: Specify the name and absolute path of the file that must be present on the client machine.
Version: Specify the version of the absolute file that must be running on the client machine.
HashMD5: Specify the MD5 checksum value of the absolute file. To calculate the MD5 checksum value of an absolute file located in your local system, click to select the file. The MD5 checksum value of the selected file is displayed.
To calculate the MD5 checksum value for an absolute file that is on another system, remotely connect to that system, calculate the MD5 value, then copy the value in the field.
NOTE:You can also copy the file from the remote system to the local system, then calculate the MD5 checksum by using the option. However, this might change the MD5 value of the file during the process. If you want to use this method, then ensure that the file size and file contents did not change during the process.
Service
Name: Specify the display name of the service.
Status: Specify the status of the process in the client machine. The status of the process can be or .
-
To delete an attribute, select the attribute, then click .
-
Click to save your modifications, then click on the Configuration page.
-
To continue with configuring a connection and traffic policy for a client, proceed with Section 3.2, Configuring Client Security Levels.
3.1.5 Exporting and Importing Client Integrity Check Policies
You can export the client integrity check policy configuration into an XML file and import it back into the server.
You can modify the exported file without violating the schema format to include anew configuration. The new configuration is included when the file is imported.
Exporting Client Integrity Check Policies
-
In the Administration Console, click > .
-
Click in the Policies section. The Client Integrity Check Policies page is displayed.
-
Select the policies that you want to export, then click . This exports the configuration for all the platforms, categories, and applications.
-
Specify a filename for the XML document that saves the configuration.
-
Specify a location to save the XML file.
-
Click to save.
Importing Client Integrity Check Policies
-
In the Administration Console, click .
-
Do one of the following:
-
If you want to import the client integrity check policy configuration to an individual server, select the server, then click .
-
If you want to import the client integrity check policy configuration of a cluster, select the cluster, then click .
-
-
Click in the Policies section.
-
Click .
-
Browse and select the XML file that contains the saved client integrity check policies configuration.
-
Click .
-
To save your modifications, click , then click on the Configuration page.