2.1 Understanding RBAC in Access Manager
Role-based access control (RBAC) provides a convenient way to assign a user to a particular job function or set of permissions within an enterprise, in order to control access. As an administrator, you probably have defined a set of roles for your needs. Your roles might include Employee, Student, Administrator, Manager, and so on. You might have Web resources that you want available to all employees, or only to managers, as shown in Figure 2-1.
Figure 2-1 Traditional RBAC

Access Manager supports core RBAC functionality by providing user role mapping and the mapping of roles to resource rights and permissions. User role mapping is a primary function of a Role policy. Role mapping to resource rights is accomplished through Authorization policies and role settings in J2EE and SSL VPN environments. When creating a role, you assign users to the role, based on attributes of their identities. You also specify the constraints to place on the role.
Figure 2-2 RBAC Using a Policy

As shown in Figure 2-2, during user authentication, the system checks the existing Role policy to determine which roles that a user must be assigned to. After authentication, assigned roles can be used as evaluated conditions of an Authorization policy.
Java applications and Web server applications can also be configured to use roles for access control. For these applications you can use Access Manager to assign the users to the required roles. You can then use the J2EE agent to forward the user’s assigned roles to the Java application, or use Access Gateway Identity Injection policies to inject the assigned roles into the HTTP header that is sent to the Web server.
The following examples describe ways to use roles in Access Manager.
2.1.1 Assigning All Authenticated Users to a Role
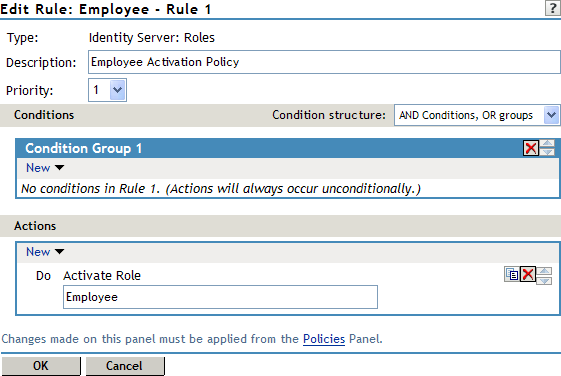
The system assigns users to roles when they authenticate. The following example illustrates a Role policy that creates an Employee role. All authenticated users are assigned to the role of Employee, because it does not include any conditions (see Creating an Employee Role).
Figure 2-3 Employee Role Policy

Role assignment audit events can be created during authentication to the Identity Server. You enabled this on the Logging page in the Identity Server configuration when you enable the or options.
2.1.2 Using a Role to Create an Authentication Policy
The simplest implementation of RBAC policies is to include roles as evaluated conditions when creating Authorization policies.
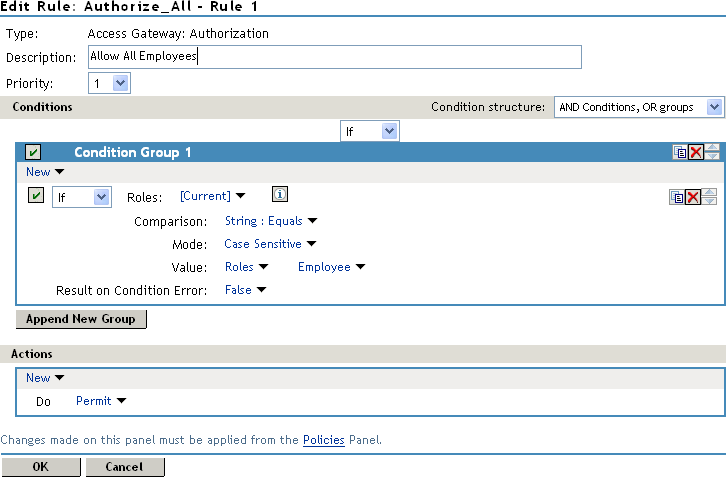
Suppose you belong to a company of 300 employees, and ten of them are managers. You can assign all employees to an Employee role, and make it a condition of an Authorization policy with no restrictions. Such a policy would permit access to Web resources intended for all employees, as shown in the following example:
Figure 2-4 Employee Authorization Policy

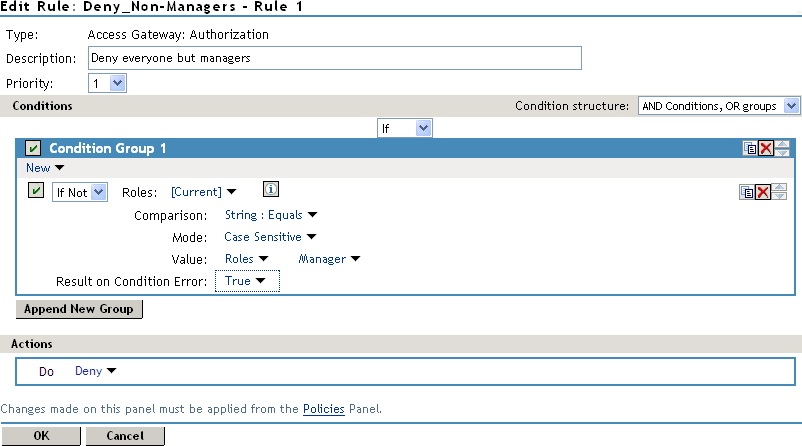
For more sensitive Web resources intended only for managers, you might create a role called Manager. (See Creating a Manager Role). The Manager role might be a condition of an Authorization policy that denies access to any employee that has not been assigned to the Manager role when the user authenticated. The following example illustrates this. Notice that the operand for the governing condition logic is set to If Not.
Figure 2-5 Manager Authorization Policy

After you have created the Authorization policies, you need to assign the policies to the resources they were designed to protect.
See Assigning an Authorization Policy to a Protected Resource
in the NetIQ Access Manager 3.1 SP5 Access Gateway Guide and Assigning a Web Authorization Policy to the Resource
or Assigning an Enterprise JavaBeans Authorization Policy to a Resource
in the NetIQ Access Manager 3.1 SP5 J2EE Agent Guide.
2.1.3 Using Prioritized Rules in an Authorization Policy
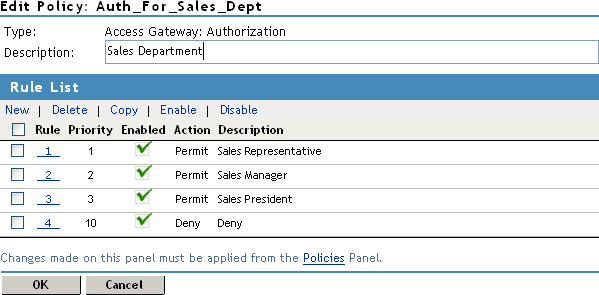
In another policy example, you might create an Authorization policy for the Sales Department and set up a list of rules that evaluate whether a user has been assigned to one of the roles associated with the department, and then deny access if the user has not been assigned to any of them, as shown in the Rule List page for the Authorization policy below:
Figure 2-6 Authorization Policy with Multiple Rules

In this example, you specify a first-priority rule with a condition that allows access if a user has been assigned to the role of Sales Representative. You add rules for users assigned to the a role of Sales Manager, Sales Vice President, and so on. You then create a lowest-priority rule that contains no conditions, and an action of Deny. This policy denies any user who has not been assigned a Sales department role. When users do not meet the conditions of the rules, the user is denied access by the lowest-priority rule.
For more information on using roles in Authorization policies, see Section 3.0, Creating Authorization Policies.