7.9 Configuring an Authentication Response for a Service Provider
The Liberty and SAML 2.0 protocols support slightly different options for configuring how you want the Identity Server to respond to an authentication request from a service provider. The SAML 1.1 protocol does not support sending an authentication request. However, you can configure an Intersite Transfer Service (see Section 7.11, Using the Intersite Transfer Service) to trigger a response from the Identity Server.
When the Identity Server receives an authentication request from a trusted service provider, the request contains the conditions that the Identity Server needs to fulfill. The Authentication Response page allows you to configure how you want the Identity Server to fulfill the binding and name identifier conditions of the request, or for SAML 1.1, respond to the Intersite Transfer Service. For configuration information, see one of the following:
The Defaults page allows you to specify which contract is used when the authentication request specifies a class or type rather than a contract. For more information, see Section 3.5, Specifying Authentication Defaults.
When the service provider sends an authentication request that specifies a specific contract, you need to ensure that the Identity Server has a the contract matches the expected URI. For information on how to configure such a contract, see Section 3.5.2, Creating a Contract for a Specific Authentication Type.
7.9.1 Configuring the Liberty Authentication Response
After you create a trusted service provider, you can configure how your Identity Server responds to authentication requests from the service provider.
-
In the Administration Console, click > > > > > .

-
Select the binding method.
If the request from the service provider does not specify a response binding, you need to specify a binding method to use in the response. Select to provide an increased level of security by using a back-channel means of communication between the two servers. Select to use HTTP redirection for the communication channel between the two servers. If you select , you might want to require the signing of the authentication requests. See Section 7.2.1, Configuring the General Identity Provider Options.
-
Specify the identity formats that the Identity Server can send in its response. Select the box to choose one or more of the following:
-
Persistent Identifier Format: Specifies that a persistent identifier, which is written to the directory and remains intact between sessions, can be sent.
-
Transient Identifier Format: Specifies that a transient identifier, which expires between sessions, can be sent.
If the request from the service provider requests a format that is not enabled, the user cannot authenticate.
-
-
Use the button to specify whether a persistent or transient identifier is sent when the request from the service provider does not specify a format.
-
To specify that this Identity Server must authenticate the user, disable the option. When the option is disabled and the Identity Server cannot authenticate the user, the user is denied access.
When this option is enabled, the Identity Server checks to see if other identity providers can satisfy the request. If one or more can, the user is allowed to select which identity provider performs the authentication. If a proxied identity provider performs the authentication, it sends the response to the Identity Server. The Identity Server then sends the response to the service provider.
-
Enable the option if you want to allow the service provider to query the Identity Server for a list of its Web Services. For example, when the option is enabled, the service provider can determine whether the Web Services Framework is enabled and which Web Service Provider profiles are enabled.
-
Click twice, then update the Identity Server.
7.9.2 Configuring the SAML 2.0 Authentication Response
After you create a trusted service provider, you can configure how your Identity Server responds to authentication requests from the service provider.
-
In the Administration Console, click > > > > > .

-
Select the binding method.
If the request from the service provider does not specify a response binding, you need to specify a binding method to use in the response. Select to provide an increased level of security by using a back-channel means of communication between the two servers. Select to use HTTP redirection for the communication channel between the two servers. If you select , you might want to require the signing of the authentication requests. See Section 7.2.1, Configuring the General Identity Provider Options.
-
Specify the identity formats that the Identity Server can send in its response. Select the box to choose one or more of the following:
-
Persistent: Specifies that a persistent identifier, which is written to the directory and remains intact between sessions, can be sent.
-
Transient: Specifies that a transient identifier, which expires between sessions, can be sent.
-
E-mail: Specifies that an e-mail attribute can be used as the identifier.
-
Kerberos: Specifies that a Kerberos token can be used as the identifier.
-
X509: Specifies that an X.509 certificate can be used as the identifier.
-
Unspecified: Specifies that an unspecified format can be used and any value can be used. The service provider and the identity provider need to agree on the value that is placed in this identifier.
-
-
Use the button to select the name identifier that the Identity Server should send if the service provider does not specify a format.
If you select E-mail, Kerberos, x509, or unspecified as the default format, you should also select a value. See Step 5.
IMPORTANT:If you have configured the identity provider to allow a user matching expression to fail and still allow authentication by selecting the option, you need to select as the default value. Otherwise the users who fail the matching expression are denied access. To view the identity provider configuration, see Defining User Identification for Liberty and SAML 2.0.
-
Specify the value for the name identifier.
The persistent and transient formats are generated automatically. For the others, you can select an attribute. The available attributes depend upon the attributes that you have selected to send with authentication (see Section 7.6.1, Configuring the Attributes Obtained at Authentication). If you do not select a value for the E-mail, Kerberos, X509, or Unspecified format, a unique value is automatically generated.
-
To specify that this Identity Server must authenticate the user, disable the option. When the option is disabled and the Identity Server cannot authenticate the user, the user is denied access.
When this option is enabled, the Identity Server checks to see if other identity providers can satisfy the request. If one or more can, the user is allowed to select which identity provider performs the authentication. If a proxied identity provider performs the authentication, it sends the response to the Identity Server. The Identity Server then sends the response to the service provider.
-
When the option is enabled, the Identity Server sends the Identity Server session time out value to the service provider in the assertion.
-
You can manually set the assertion validity time for the SAML service provider in the field to accommodate clock skew between the service provider and SAML Identity Server (IDP).
-
Click twice, then update the Identity Server.
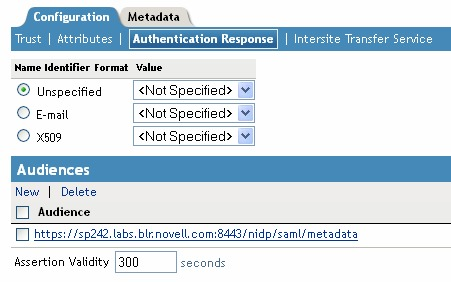
7.9.3 Configuring the SAML 1.1 Authentication Response
You can specify the name identifier and its format when the Identity Server sends an authentication response. You can also restrict the use of the assertion.
When an identity provider sends an assertion, the assertion can be restricted to an intended audience. The intended audience is defined to be any abstract URI in SAML 1.1. The URL reference can also identify a document that describes the terms and conditions of audience membership.
-
In the Administration Console, click > > > > > .
-
To specify a name identifier format, select one of the following:
-
E-mail: Specifies that an e-mail attribute can be used as the identifier.
-
X509: Specifies that an X.509 certificate can be used as the identifier.
-
Unspecified: Specifies that an unspecified format can be used and any value can be used. The service provider and the identity provider need to agree on what value is placed in this identifier.
-
-
To specify the format of the name identifier, select an attribute.
The available attributes depend upon the attributes that you have selected to send with authentication (see the Attributes page for the service provider).
-
To configure an audience, click .
-
Specify the value.
The Provider ID, which can be used for the audience, is displayed on the Edit page for the metadata.
-
You can manually set the assertion validity time for the SAML service provider in the field to accommodate clock skew between the service provider and SAML Identity Server (IDP).
-
Click twice, then update the Identity Server.