7.11 Using the Intersite Transfer Service
-
Section 7.11.1, Understanding the Intersite Transfer Service URL
-
Section 7.11.2, Specifying the Intersite Transfer Service URL for the Login URL Option
-
Section 7.11.3, Using Intersite Transfer Service Links on Web Pages
-
Section 7.11.4, Configuring an Intersite Transfer Service Target for a Service Provider
7.11.1 Understanding the Intersite Transfer Service URL
The Intersite Transfer Service is used by an identity provider to cause authentication to occur at a service provider that it trusts. The URLs for accessing the Intersite Transfer Service are different for each supported protocol (Liberty, SAML 1.1, and SAML 2.0). The Novell Access Manager identity and service provider components use the following format of the Intersite Transfer Service URL:
<identity consumer URL>?PID=<entityID>&TARGET=<final_destination_URL>
The <identity_consumer_URL> is the location of where the authentication request can be processed. For an Access Manager Identity Server, the URL is the Base URL of the server that is providing authentication, followed by the path to the protocol application being used for federation. For example:
SAML 1.1: https://idp.sitea.novell.com:8443/nidp/saml/idpsend
SAML 2.0: https://idp.sitea.novell.com:8443/nidp/saml2/idpsend
Liberty: https://idp.sitea.novell.com:8443/nidp/idff/idpsend
If a third-party server is providing the authentication, search its documentation for the format of this URL.
The <entityID> is the URL to the location of the metadata of the service provider. The scheme (http or https) in the <entityID> must match what is configured for the <identity_consumer_URL>. For SAML 1.1 and SAML 2.0, search the metadata for its entityID value. For Liberty, search the metadata for its providerID value. Novell Identity Servers acting as service providers have the following types of values:
SAML 1.1: https://idp.siteb.novell.com:8443/nidp/saml/metadata
SAML 2.0: https://idp.siteb.novell.com:8443/nidp/saml2/metadata
Liberty: https://idp.siteb.novell.com:8443/nidp/idff/metadata
If you are setting up federations with a third-party service provider, search its documentation for the URL or location of its metadata.
The <final_destination_URL> is the URL to which the browser is redirected following a successful authentication at the identity provider. If this target URL contains parameters (for example, TARGET=https://login.provo.novell.com:8443/nidp/app?function_id=22166& amp;Resp_Id=55321 &Resp_App_Id=810&security_id=0), it must be URL encoded to prevent the URL from being truncated.
Examples with all three parts:
-
SAML 1.1: https://idp.sitea.novell.com:8443/nidp/saml/idpsend?PID=https://idp.siteb.novell.com:8443/nidp/saml/metadata&TARGET=https://eng.provo.novell.com/saml1/myapp
-
SAML 2.0: https://idp.sitea.novell.com:8443/nidp/saml2/idpsend?PID=https://idp.siteb.novell.com:8443/nidp/saml2/metadata&TARGET=https://eng.provo.novell.com/saml2/myapp
-
Liberty: https://idp.sitea.novell.com:8443/nidp/idff/idpsend?PID=https://idp.siteb.novell.com:8443/nidp/idff/metadata&TARGET=https://eng.provo.novell.com/liberty/myapp
If you are configuring an Intersite Transfer Service URL for an Identity Server that is the identity provider and the service provider is either another Identity Server or a third-party server, you can simplify the Intersite Transfer Service URL to the following format:
<identity consumer URL>?id=<user_definedID>
For configuration information, see Configuring an Intersite Transfer Service Target for a Service Provider.
7.11.2 Specifying the Intersite Transfer Service URL for the Login URL Option
Liberty and SAML 2.0 support a single sign-on URL. Because SAML 1.1 does not support a single sign-on URL, you need to specify the Intersite Transfer Service URL in the option on the authentication card for the SAML 1.1 identity provider:
Figure 7-3 SAML 1.1 Authentication Card
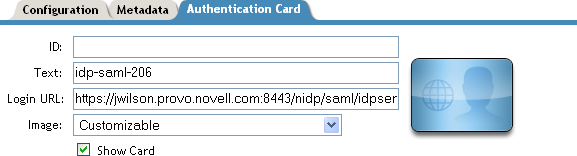
In order for a card to appear as a login option, you must specify a and select the option. Figure 7-4 illustrates a possible configuration that requires the Intersite Transfer Service for the SAML 1.1 protocol.
Figure 7-4 Federated Identity Configuration
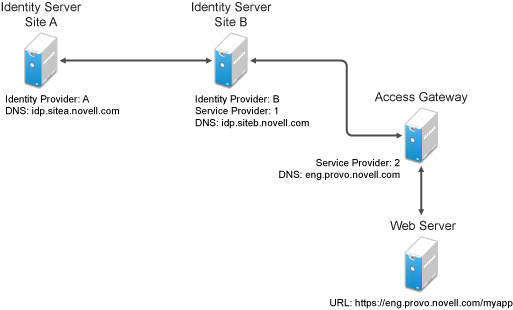
If you want a card to appear that allows the user to log in to Site A (as shown in Figure 7-3), you need to specify a value for the option.
Using the DNS names from Figure 7-4, the complete value for the option is as follows:
https://idp.sitea.novell.com:8443/nidp/saml/idpsend?PID=https://idp.siteb.novell.com:8443/nidp/saml/metadata&TARGET=https://idp.siteb.novell.com:8443/nidp/app
The following happens when this link is invoked:
-
The browser performs a Get to the identity provider (Site A).
-
If the identity provider (Site A) trusts the service provider (Site B), the identity provider prompts the user for authentication information and builds an assertion.
-
The identity provider (Site A) sends the user to the service provider (Site B), using the POST or Artifact method.
-
The service provider (Site B) consumes the assertion and sends the user to the TARGET URL (the user portal on Site B).
To configure the settings for the intersite transfer service, see Section 7.10.2, Modifying the Authentication Card for SAML 1.1.
7.11.3 Using Intersite Transfer Service Links on Web Pages
The Intersite Transfer Service URL can be used on a Web page that provides links to various protected resources requiring authentication with a specific identity provider and a specific protocol. Links on this Web page are configured with the URL of the Intersite Transfer Service of the identity provider to be used for authentication. Clicking these links directs the user to the appropriate identity provider for authentication. Following successful authentication, the identity provider sends a SAML assertion to the service provider. The service provider uses the SAML assertion to verify authentication, and then redirects the user to the destination URL as specified in the TARGET portion of the Intersite Transfer Service URL.
Below are sample links that might be included on a Web page. These links demonstrate the use of SAML 1.1, SAML 2.0, and Liberty formats for the Intersite Transfer Service URL:
SAML 1.1: <a href="https://idp.sitea.novell.com:8443/nidp/saml/idpsend?PID=https://idp.siteb.novell.com:8443/nidp/saml/metadata&TARGET=https://eng.provo.novell.com/saml1/myapp">SAML1 example</a>
SAML 2.0: <a href="https://idp.sitea.novell.com:8443/nidp/saml2/idpsend?PID=https://idp.siteb.novell.com:8443/nidp/saml2/metadata&TARGET=https://eng.provo.novell.com/saml2/myapp">SAML2 example</a>
Liberty: <a href="https://idp.sitea.cit.novell.com:8443/nidp/idff/idpsend?PID=https://idp.siteb.novell.com:8443/nidp/idff/metadata&TARGET=https://eng.provo.novell.com/liberty/myapp">Liberty example</a>
Figure 7-5 illustrates a network configuration that could use these sample links.
Figure 7-5 Using the Intersite Transfer Service URL
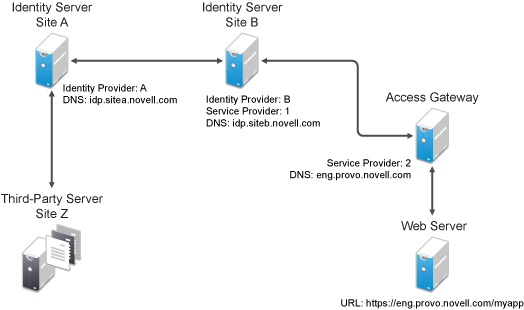
In this example, Site Z places links on its Web page, using the Intersite Transfer Service URL of Site A. These links trigger authentication at Site A. If authentication is successful, Site A sends an assertion to Site B. Site B verifies the authentication and redirects the user to the myapp application that it is protecting.
To access Access Manager intersite transfer URL with a specific contract, modify the web URLs to the following format:<identity server login URL>?id=<contract>&target=<identity consumer URL>?PID=<entityID>&TARGET=<final_destination_URL>
The <identity_server_Login_URL> is the location of where the authentication request can be processed. and the <contract_Authentication Card_IDP> is contract authentication card Identity Provider. For example: https://idp.sitea.novell.com:8443/nidp/app/login
Modified Web URL Example
https://idp.sitea.novell.com:8443/nidp/app/login?id=formLogin&target=https%3A%2F%2Fidp.sitea.novell.com%3A8443%2Fnidp%2Fsaml2%2Fidpsend%3FPID%3Dhttps%3A%2F%2Fidp.siteb.novell.com%3A8443%2Fnidp%2Fsaml2%2Fmetadata%26TARGET%3Dhttps%3A%2F%2Feng.provo.novell.com%2Fsaml2%2Fmyapp
7.11.4 Configuring an Intersite Transfer Service Target for a Service Provider
If you have created Web pages that have links that specify a Intersite Transfer Service URL (see Using Intersite Transfer Service Links on Web Pages), you can have the Identity Server control the TARGET parameter.
-
Click > > > , or > > .
-
Fill in the following:
ID: (Optional) Specify an alphanumeric value that identifies the target.
If you specified an ID for the target, you can use this value to simplify the Intersite Transfer URL that must be configured at the service provider. This is the <user_definedID> value in the following format for the Intersite Transfer URL.
<identity consumer URL>?id=<user_definedID>
The ID specified here allows the Identity Server to find the service provider’s metadata. The option on this page allows you to omit the TARGET parameter from the Intersite Transfer URL.
Target: Specify the URL of the page that you want to display to users when they authenticate with an Intersite Transfer URL.The behavior of this option is influenced by the option.
If you are using the target ID as part of the Intersite Transfer URL and did not specify a target in the URL, you need to specify the target in this field.
Allow any target: If this option is selected, the user can use the target that was specified in the Intersite Transfer URL. If this option is not selected, the target value in the Intersite Transfer URL is ignored and the user is sent to the URL specified in the option.
-
Click twice.
-
Update the Identity Server.
7.11.5 Configuring Whitelist of Target URLs
Redirection, which is required by many applications and services, inherently brings in a security risk. Redirects are dangerous because unsuspecting users who are visiting trusted sites can be redirected to malicious sites that exploit the users' trust. A new featured, called whitelist, has been added that restricts target URLs to specific domains..
The whitelist feature allows you to restrict target URLs to URLs which match the domains in the whitelist. Any target URLs that use a domain that is not in the list are blocked and the user receives the following error message: The request to provide authentication to a service provider has failed (outsidedomain.com-89F57BF823DFE551).
-
Click > > > , or > > .
-
In the , click .
-
Enter the domain name, then click .
The domain name must be a full domain name, such as www.novell.com. Wildcard domain names, such as www.novell.*.com, do not work.
-
To edit an existing domain name, click the name, modify the name, then click .
-
To delete an existing domain name, select the check box by the domain, click , then click to delete or to close the window.
-
Click .
-
Update the Identity Server.