2.13 HP OpenView Operations for UNIX
The HP OpenView Operations for UNIX Integration (referred to as OpenView) is Operations Center’ component for integrating with the HP OpenView Operations product line from Hewlett-Packard.
OpenView supports configurations where the management server can reside on the same or different machine as the Oracle database. The OpenView integration supports both configurations.
The integration relies on efficient sampling of the different database tables for retrieving new and updated message and server data. The OpenView messages contain a number of time stamps that record the message state-transitions that can be extracted for recording business metrics.
Configure the OpenView integration to enable or disable management functions (e.g., acknowledging alarms) within the Operations Center environment. There are three possible integration strategies:
-
OpenView Server Install Integration strategy: Install Operations Center and configure the HP OpenView Operations for UNIX adapter on the host OpenView server. This configuration enables management functions and does not require installing an ORB on the management server.
-
OVOORB Integration strategy: Install the OVOORB on each OpenView server. This strategy enables management functions. For more information, see Section 10.0, ORB Installation.
-
View only Integration strategy: Install Operations Center and configure the HP OpenView Operations for UNIX adapter. This strategy disables management functions and does not require installing an ORB on the management server.
2.13.1 Integrating Operations Center with HP OpenView Operations for UNIX
Review this section to determine the best strategy for integrating Operations Center with management servers. If there is a default OpenView installation (in a lab for example), proceed directly to the next section, Section 2.13.2, Quick Start for default OpenView Installations, to begin working with the integration immediately.
To integrate OpenView Operations for UNIX:
-
Define the integration requirements which can include management functions and field values to extract from messages in order to gather business metrics and create element views in Operations Center.
Use the default OpenView hierarchy XML file shipped with the integration as a template to define customizable views.
-
Identify (or create) the OpenView user for the integration.
Either define access to nodes and messages based on the user’s responsibility matrix, and let Operations Center inherit these responsibilities, or use the integration in an enterprise-wide configuration which allows access to all of the nodes and messages.
Most implementations create an OpenView user named Formula and assign some or all of the responsibilities to this user based on the implementation-specific requirements.
-
Optionally install the OVOORB software on each OpenView server.
For more instructions, see Section 10.0, ORB Installation.
-
Create an adapter for each instance of HP OpenView Operations.
For more instructions, see Section 5.1, Creating an Adapter.
-
Modify the HP OpenView adapter properties.
For more instructions, see Section A.15, HP OpenView Operations for UNIX.
2.13.2 Quick Start for default OpenView Installations
The integration adapter properties default values match the default OpenView Installation.
To integrate OpenView using the default OpenView installation:
-
Create an adapter for the HP OpenView Operations system.
For more instructions, see Section 5.1, Creating an Adapter.
-
Set the DB Host adapter property equal to the hostname of the Oracle database server.
-
Set the DB Pass adapter property equal to the password of the Oracle user specified when configuring the adapter.
The default adapter property value is OpC_op.
-
Start the adapter.
2.13.3 View-only Integrations
To create a view-only integration:
-
Create an adapter for the HP OpenView Operations system.
For instructions, see Section 5.1, Creating an Adapter.
-
Verify that the following properties are specified: DB Host, DB Name, DB Poll, DB Port, DB Type, and DB User.
-
Leave the following properties unspecified (empty): OVO Password and OVO Server.
-
Start the adapter.
2.13.4 Hierarchy File and Alarm Fields
The integration ships with a default hierarchy file, DefaultOVOHierarchy.xml. The file contains a list of all of the available alarm fields that the Operations Center XML generator can evaluate.
2.13.5 Historical Alarms
Historical alarms are acknowledged alarms that exist on the OpenView server.
To display only real-time alarms and hide all acknowledged alarms in Operations Center:
-
Create an alarm filter in the Operations Center console to display only alarms that are not acknowledged (where Acknowledged equals False).
For more information see Filtering Alarms the Operations Center 5.0 User Guide.
2.13.6 Alarm Counts
The following status bars in the Operations Center view display alarm counts:
-
The filter bar displays the total number of active alarms by severity regardless of alarm ownership:

-
The title bar identifies the total number of active alarms by severity with regard to alarm ownership:

These counts do not include alarms owned by the current and other users.
-
The status bar identifies the total number of active alarms regardless of alarm ownership.
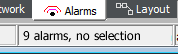
It is located at the bottom of the window and shows a single tally of all alarms.
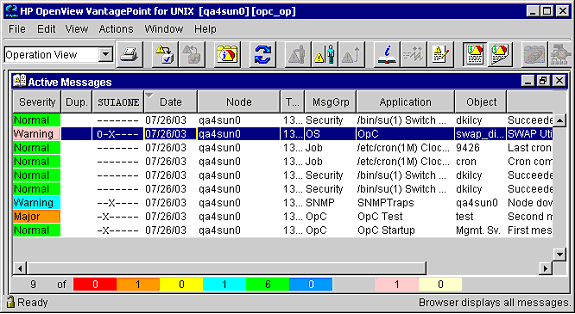
For example, assume nine active alarms are the responsibility of an OpenView user. There are no messages owned by this or any other user. Figure 2-8 shows the Operations Center view for these nine alarms:
Figure 2-8 Alarms View
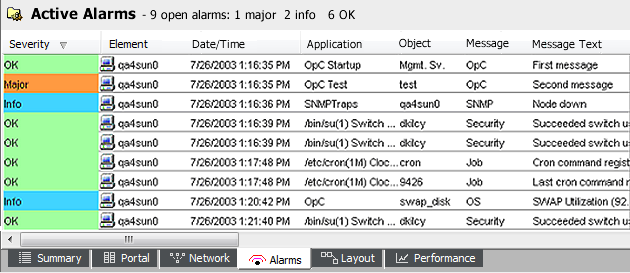
Both the Filter and Title Bar show 1 MAJOR alarm, 2 INFO alarms and 6 OK alarms. The Status bar shows the total number of alarms equals 9.
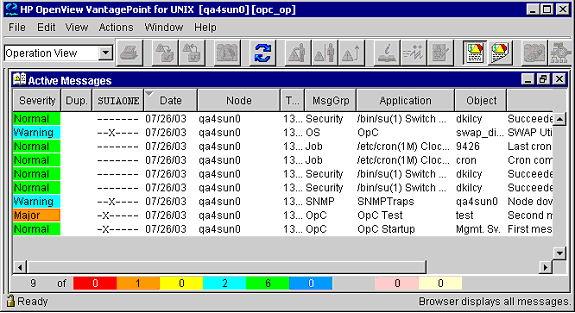
Figure 2-9 shows the alarm counts from OpenView’s Message Browser. It shows 1 MAJOR alarm, 2 INFO alarms and 6 Normal (OK) alarms, the same as Operations Center. Note the 2 ownership counts (the pink and white counters) both show 0.
Figure 2-9 OpenVieew Message Browser shows the same alarms as Operations Center
Now, assume the operator right-clicks the INFO alarm with the message SWAP Utilization (92.00%) is greater than 80.00% and then clicks from the drop-down menu. The operator claims ownership of the alarm. The alarm remains in the browser. The new counts are shown in Figure 2-10.
In Figure 2-9, the filter bar shows 1 MAJOR alarm, 2 INFO alarms and 6 OK alarms. The status bar also shows the total number of alarms, 9 (1 + 2 + 6). Neither indicator changes based on alarm ownership.
However, note that the title bar count changed. It now shows 1 MAJOR alarm, 1 INFO alarm, and 6 OK alarms. Alarm ownership affects these counts. When the operator claimed ownership of the alarm, the number of INFO alarms in the title bar count decreased by 1. Note that the alarm is still visible in the view.
In Figure 2-10, OpenView’s message browser alarm counts show 1 MAJOR alarm, 1 INFO alarm, and 6 OK alarms. Note the “owned by me” counter (the pink one) increased by 1.
Figure 2-10 OpenView Message Browser: The pink “owned by me” counter increased after the alarm ownership changed
To summarize:
-
Alarm ownership affects the title bar counts.
-
The filter and status bars in Operations Center display the total number of alarms, regardless of alarm ownership.
-
Operations Center does not display the “owned by me” and “owned by others” counter displayed in the OpenView message browser window.
2.13.7 Alarm Operations
The following operations are available for all alarms:
-
Properties: Shows all the details about a single message.
-
Print: Sends output to printer.
-
Additional management right-click alarm operations are available to the user depending on the integration strategy selected when integrating HP OpenView Operations for UNIX (see Adding Custom Alarm Properties).
To enable these additional management operations, one of the following must occur:
-
An existing Operations Center server installation is on the same machine as the OpenView management server.
-
The OVOORB must be deployed.
To configure Operations Center on the OpenView Management Server, do the following as necessary:
Configuring Right-Click Alarms on Solaris
To configure right-click alarms on Solaris:
-
Add /OperationsCenter_install_path/lib/libopc.so to the LD_LIBRARY_PATH environment variable on the management server machine.
Configuring Right-Click Alarms on HP-UX
To configure right-click alarms on HP-UX:
-
Add /OperationsCenter_install_path/lib/libopc.sl to the SHLIB_PATH environment variable on the management server machine.
2.13.8 Management Operations
If configured, additional management operations listed in Table 2-22 are available to users. The OpenView administrator must grant permissions for these operations to OpenView users. The administrator must assign the Manage permission to the user.
Table 2-22 HP OpenView Operations for UNIX – Alarm Operations
|
Operation |
Description |
|---|---|
|
Acknowledge |
Acknowledges an active alarm. Available if the alarm is unacknowledged. |
|
Delete |
Removes an inactive alarm. Available if the alarm is acknowledged. |
|
Add Annotation |
Adds an annotation to an active alarm. The annotation feature enables documenting actions and reading through actions that were already performed. |
|
Escalate |
Forwards the active alarm (message) to the escalation server. Message escalation must be configured by the OpenView administrator. |
|
Own |
Claims ownership of the message. Available if the alarm is not owned by a user. |
|
Disown |
Disowns the message, if the message is currently owned by the assigned user. |
|
Start Operator Action |
User-initiated action to resolve an event that triggered a message. If an operator-initiated action has been configured for the message, the operation is available only if an action is defined in the OpenView message template. |
|
Start Automatic Action |
Performs an automatic action by the management server. If an automatic action has been configured for this message, the operation is displayed. |
To access these operations, right-click an alarm and select the operation in the view.
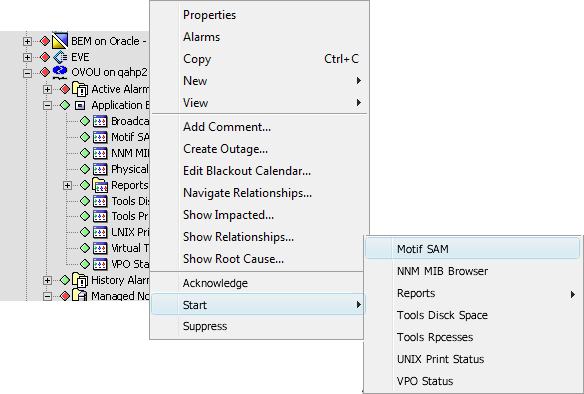
2.13.9 Executing OVO Applications
The HP Operations for UNIX adapter provides right-click options for the execution of OVO applications. Applications can be run against the element node or directly from the application element.
Execute an OVO Application Against Multiple Nodes
To execute an OVO application against multiple nodes:
-
In the pane, expand , then select an OVO adapter.
-
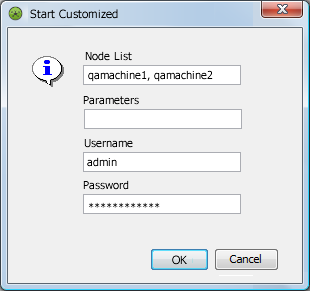
Right-click an application element, then click to open the Start Customized dialog box:
-
In the field, enter element nodes.
Separate each entry with a comma.
-
In the field, specify any program arguments or options.
-
In the and fields, enter the user name and password.
-
Click to execute the selected application.
Executing an OVO Application from an Element Node
To execute an OVO application from an element node:
-
In the pane, expand , then select an OVO adapter.
-
Right-click an element.
-
Click , then click an application.
The application is executed against the associated element node.
Available options vary depending upon the applications set up in the OVO management system.