3.5 Tideway Foundation
Tideway Foundation is an automated application dependency mapping tool used to index, model and map IT infrastructures. The integration with Operations Center enables automating the creation and maintenance of business service maps. When an incident occurs, use Foundation’s up-to-date dependency maps to rapidly identify the root cause. Other business applications affected by the incident can be instantly identified, allowing fixes to be prioritized based on the criticality of the business process impacted.
While it is not recommended to run Tideway Foundation adapters in a clustered environment; if you do, it is necessary to create an adapter instance for each clustered server—when the same adapter instance is started and running from more than one clustered server, elements data is surfaced inconsistently.
Use the following steps to create a Tideway Foundation adapter. Follow the links to sections that provide more detailed information:
3.5.1 Integrating Tideway Foundation
To create a Tideway Foundation adapter:
-
Place the opencsv‑1.7.jar file in the /OperationsCenter_install_path/classes/ext directory.
This file can be downloaded from: http://mirrors.ibiblio.org/pub/mirrors/maven/net.sf.opencsv/jars/opencsv-1.7.jar
-
Edit the FoundationHierarchy.xml file to customize the adapter hierarchy structure.
For instructions, see Section 3.5.3, Using the Hierarchy File to Select Data.
-
Create a Tideway Foundation adapter in Operations Center.
For instructions, see Section 5.1, Creating an Adapter.
-
Specify the Hierarchy File location and configure other adapter properties.
For instructions, see Table A-40, Tideway Foundation Adapter Properties.
-
Continue to Section 3.5.2, Creating an Appliance Definition and Section 3.5.3, Using the Hierarchy File to Select Data.
3.5.2 Creating an Appliance Definition
After starting the adapter, create definitions for appliances that are used to monitor traffic.
To create an appliance definition:
-
In the pane, expand > the adapter element.
-
Right-click , then click to open the Add Appliance dialog box:
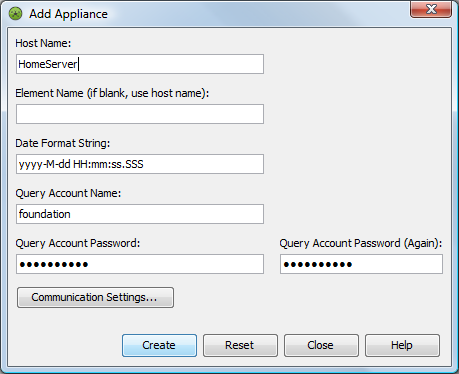
-
Specify the following information to access the server hosting the appliance:
Host Name: The IP address or host name where the appliance is installed.
Element Name: A display name used for the appliance definition. Especially useful if an IP Address is the hostname.
Date Format String: The date format to use.
Query Account Name: The Tideway account name.
Query Account Password: The corresponding account password.
-
Click to define custom communication settings for the appliance.
These settings monitor the downstream connection between the appliance and the client.
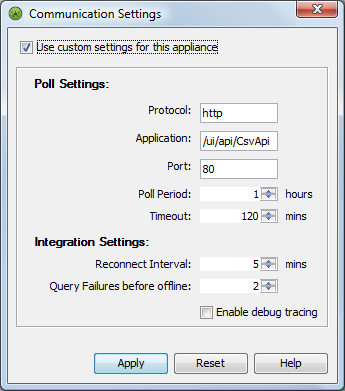
-
Select .
-
Fill in the Poll Settings:
Protocol: The type of protocol used by the appliance.
Application: The application URL.
Port: The port number used by the appliance.
Poll Period: The duration of each polling performance. The recommended setting is 5 hours.
Timeout: The maximum number of minutes to attempt to perform a poll.
-
Fill in the Integration Settings:
Reconnect Interval: The number of seconds between attempts to reconnect to the appliance.
Query Failures before offline: The maximum number of query failures permitted before going offline.
-
Leave deselected.
If selected, a large amount of data is logged in the formula.trc file. Only select this option when asked by Support for troubleshooting.
-
Click to save changes.
-
Click on the Add Appliance dialog box to add the new appliance.
The new appliance is added under the Elements, Tideway Foundation Adapter, Administration element. The adapter automatically explores the traffic across the switch to perform initial discovery.
3.5.3 Using the Hierarchy File to Select Data
The Tideway adapter hierarchy file (FoundationHierarchy.xml) can obtain the following information from Tideway and display it in Operations Center:
-
Hosts
-
Software Instances
-
Business Application Instances
-
Subnets
-
Switches
If you are unfamiliar with the XML-based HierarchyFile structure used with various adapters, see Section 9.0, Using the HierarchyFile.
In addition, relationships between Software Instances, Business Applications Instances and Hosts can be displayed in Operations Center. The following relationships can be shown:
-
Hosts belonging to a Business Applications Instances
-
Software Instances belonging to a Business Applications Instances
-
Software Instances belonging to a Host
-
Hosts belonging to a Software Instance
-
Business Application Instances belonging to Hosts
-
Business Application Instances belonging to Software Instances
Understanding the <generator> Tag
In the hierarchy file, the <generator> tag is used to dynamically create Operations Center elements from elements discovered in a different management system, such as Tideway Foundation. The field attribute compares specified fields in the incoming data with a target value, as a way to filter and select data.
Table 3-5 lists the valid field attributes and the corresponding Tideway nodes:
Table 3-5 Corresponding XML Field Attributes and Tideway Nodes
|
Field Attribute |
Tideway Node |
|---|---|
|
host.name |
Host name |
|
service.SPVI |
Software Instance Name |
|
service.BAI |
Business Application Instance in the format: Business App. Name/Business App. Type/Product Version |
|
service.Host |
Host Name |
|
BAI |
Business Application Instance Name |
|
SUBNET |
Subnet Range |
|
SWITCH |
Switch |
Relationships between nodes can be displayed by nesting <generator> tags in the Tideway hierarchy file. The <generator> tag field attributes that can create these relationships are the service types: service.SPVI, service.BAI. and service.Host.
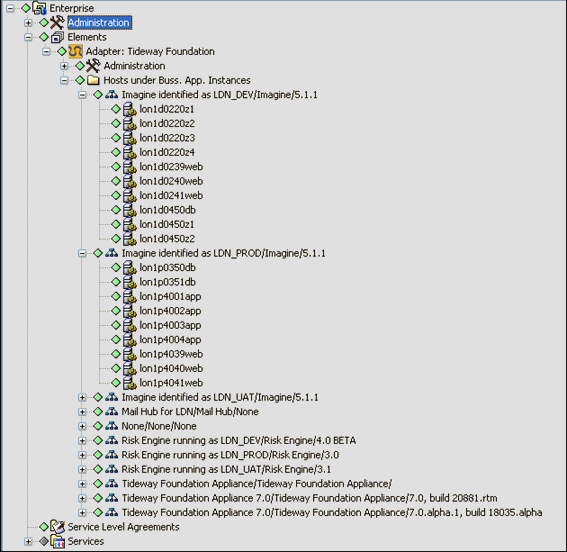
For example, to show hosts that exist under a Business Application Instance, place the following entry in the Tideway hierarchy file:
<group class="gen_folder" name="Hosts under Buss. App. Instances">
  <generator class="formula_organizations" field="service.BAI" >
    <generator
class="admin_automation_server"
field="service.Host"
            />
  </generator>
</group>
The result in the Operations Center console is similar to Figure 3-4:
Figure 3-4 Operations Center console Showing a Business Application Instance
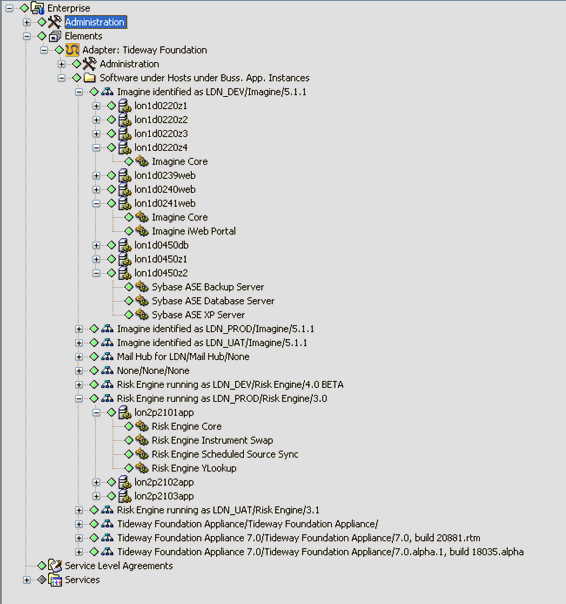
Another example shows the Software Instances that exist beneath the hosts (under Business Application Instances):
<group class="gen_folder" name="Software under Hosts under Bus. App. Instances">
  <generator class="formula_organizations" field="service.BAI" >
    <generator class="admin_automation_server" field="service.Host">
      <generator class="admin_automation" field="service.SPVI"/>
    </generator>
  </generator>
</group>
The resulting hierarchy is shown in Figure 3-5:
Figure 3-5 Operations Center Console Showing Software Instances
Nesting in any order is allowed for the service node. For example, service.BAI can be nested under service.Host.
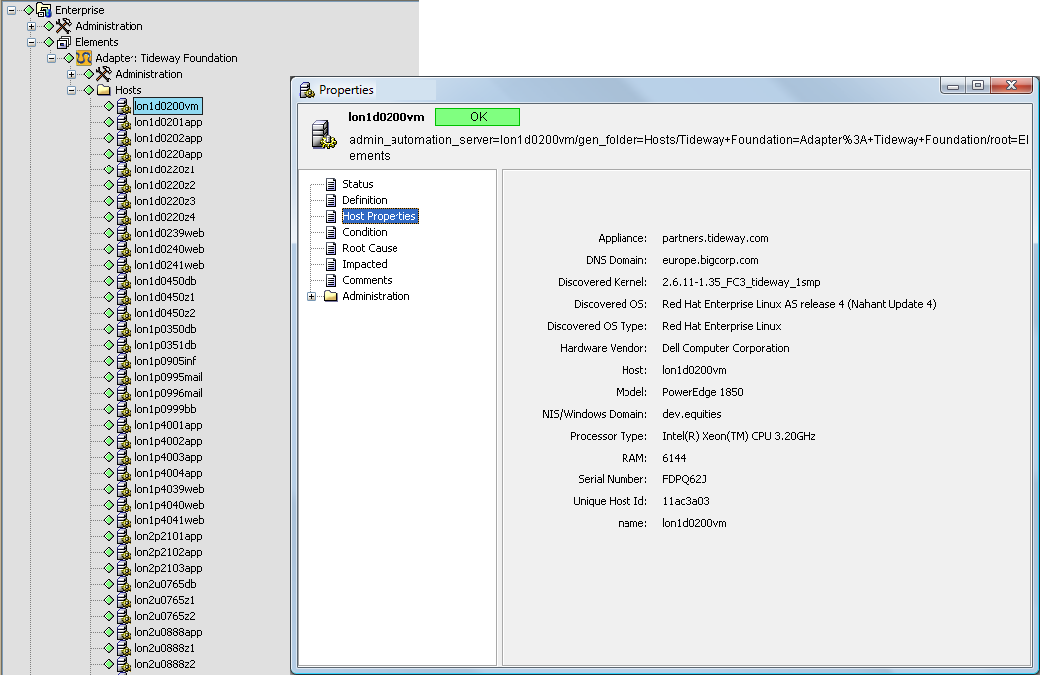
Displaying Host Properties
The properties of a host can be viewed if both of the following apply:
-
A hierarchy file with a <generator> tag contains a field attribute with a value of service.Host or host.name.
-
The tag is not nested within another <generator> tag.
To view the Host Properties page, right-click a host node in the element hierarchy, click , then click in the left pane of the properties window.
For example, assume the following data is entered in the hierarchy file:
<group class="gen_folder" name="Hosts">
<generator class="admin_automation_server" field="service.Host" />
</group>
The resulting property page is shown in Figure 3-6:
Figure 3-6 Property Page