5.4 Clustering SSL VPN by Using an L4 Switch
You configure the SSL VPN cluster to be behind a Layer 4 (L4) switch because it is essential in order to assign multiple SSL VPN servers to the same configuration. You can use the same L4 switch for SSL VPN server clustering, Identity Server clustering, and Access Gateway clustering, provided that you use different virtual IP addresses.
You can either have a cluster of traditional SSL VPN servers by using L4 switches and Access Gateways or you can have a cluster of ESP-enabled SSL VPNs by using the L4 switch. In a cluster, policies such as the client integrity check policies, traffic policies, and client policies are common to all the cluster members. However, each of the secondary members of the cluster must have specific listening IP addresses for Kiosk mode and Enterprise modes and a specific subnet mask and subnet addresses configured for Enterprise mode.
Make sure that the base URL of SSL VPN is resolvable with its own IP address as well as the public IP address of the L4 switch. The Identity Server should be able to resolve the base URL of SSL VPN to the virtual IP address of the SSL VPN cluster.
5.4.1 Configuring a Cluster of ESP-Enabled SSL VPNs
When you configure a cluster of SSL VPNs behind an L4 switch, the client contacts the VIP of the L4 switch.
Figure 5-1 Cluster of SSL VPNs behind an L4 switch,
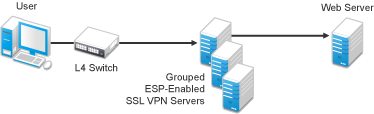
To configure a cluster of ESP-enabled SSL VPNs behind an L4 switch:
-
Install the ESP-enabled SSL VPN servers and import them into the same administration console.
For more information on installing ESP-enabled SSL VPNs, see
Installing the ESP-Enabled SSL VPN
. -
Verify that the health of all the imported SSL VPNs is displayed as green or yellow.
For more information on verifying the health, see
Verifying That Your SSL VPN Service Is Installed
. -
Configure the L4 switch, gateway details, and Audit event in the SSL VPN server.
For more information on configuring the L4 switch and gateway details, see Section 2.3, Configuring the IP Address, Port, and Network Address Translation. For more information on configuring the Audit events, see Section 6.2, Enabling SSL VPN Audit Events.
-
Import the traffic policies into the server. For more information on importing the traffic policies, see Exporting and Importing Traffic Policies.
-
Create a cluster of SSL VPNs.
For more information on creating a cluster, see Section 5.3.1, Creating a Cluster of SSL VPN Servers.
-
Assign all SSL VPN servers to the cluster.
For more information, see Section 5.3.2, Adding an SSL VPN Server to a Cluster. The configuration details specific to a cluster, such as the client integrity check policies, traffic policies, and client policies are propagated to all the cluster members.
-
In the Administration Console, click > > then select the Gateway configuration page. Configure specific listening IP addresses for Kiosk mode and Enterprise modes. Make sure that each of the cluster members are assigned with different IP pools for Enterprise Mode.
For more information, see Section 2.3, Configuring the IP Address, Port, and Network Address Translation.
-
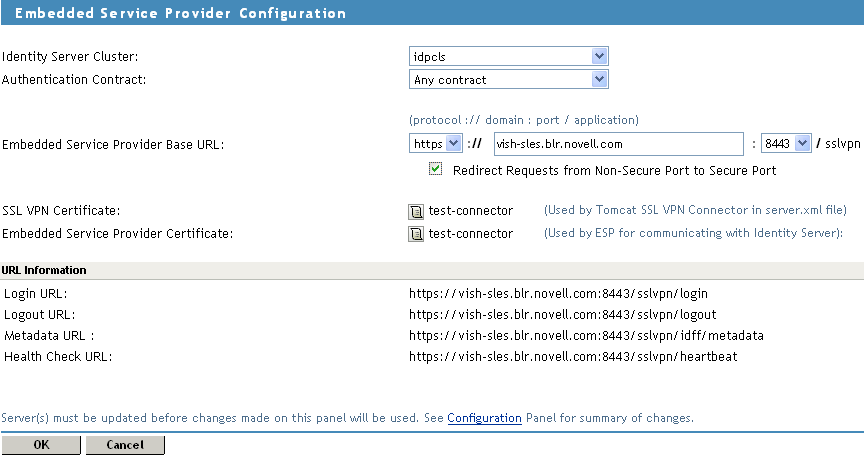
Select the Authentication Configuration link and configure the Embedded Service Provider
-
In the Embedded Service Provider Base URL, if you select HTTPS as the protocol, create and use a custom certificate.
-
Restart the Tomcat server when prompted.
-
To save your modifications, click then click on the Configuration page.
5.4.2 Configuring a Cluster of Traditional SSL VPNs by Using an L4 Switch
To configure a cluster of traditional SSL VPNs
-
Install the traditional SSL VPN servers and import them into the same administration console.
For more information on installing ESP-enabled SSL VPNs, see
Installing the ESP-Enabled SSL VPN
in the NetIQ Access Manager 3.2 SP1 Installation Guide. -
Verify that the health of all the imported SSL VPNs is displayed as green or yellow.
For more information on verifying the health, see
Verifying That Your SSL VPN Service Is Installed
in the NetIQ Access Manager 3.2 SP1 Installation Guide. -
Configure the L4 switch, gateway details, and Audit events in the SSL VPN server that you want to mark as primary.
For more information on configuring the L4 switch and gateway details, see Section 2.3, Configuring the IP Address, Port, and Network Address Translation. For more information on configuring the Audit events, see Section 6.2, Enabling SSL VPN Audit Events.
-
Import the traffic policies into the server.
For more information on importing the traffic policies, see Exporting and Importing Traffic Policies.
-
Create a cluster of SSL VPNs.
For more information on creating a cluster, see Section 5.3.1, Creating a Cluster of SSL VPN Servers.
-
Assign all SSL VPN servers to the cluster.
For more information, see Section 5.3.2, Adding an SSL VPN Server to a Cluster.
-
In the Administration Console, click > > then select the Gateway configuration page. Configure specific listening IP addresses for Kiosk mode and Enterprise modes. Configure specific listening IP addresses for Kiosk mode and Enterprise modes. Make sure that each of the cluster members are assigned to different IP pools for Enterprise mode. For more information, see Section 2.3, Configuring the IP Address, Port, and Network Address Translation.
-
Accelerate the SSL VPN server by using the Access Gateway.
For more information, see Section 2.2, Accelerating the Traditional NetIQ SSL VPN.
-
To save your modifications, click then click on the Configuration page.