2.2 Accelerating the Traditional NetIQ SSL VPN
NOTE:If you have installed the ESP-enabled SSL VPN, skip this section and make sure that you have completed Section 2.1, Configuring Authentication for the ESP-Enabled NetIQ SSL VPN.
If you have installed the traditional SSL VPN, this is a mandatory configuration in order to accelerate the SSL VPN.
2.2.1 Configuring the Default Identity Injection Policy
The SSL VPN requires a user credential profile consisting of the following elements:
-
Username and password information
-
A proxy session cookie
-
The roles assigned to the current user for authentication information
Each element added to the custom header requires a name with an “X-” prefix. The name you enter is specific to the application using the custom header, and might be case sensitive. You need to obtain this information from the application before creating the custom header. The Access Gateway injects these headers into the SSL VPN.
The SSL VPN requires the following three headers:
-
Authentication header containing the credential profile with a username and password
-
Custom header containing a proxy session cookie element named X-SSLVPN-PROXY-SESSION-COOKIE
-
Custom header containing roles for current user element, named X-SSLVPN-ROLE
You can configure the Access Gateway to inject the client IP address as a custom header along with the other three headers. This custom header should be named X-SSLVPN-CLIENTIP. This enables logging of the client IP address for SSL VPN. This is an optional configuration and is not enabled by default. If it is not enabled, the SSL VPN reports it to the Audit server as a connection accepted from Unknown Host.
To add this header to the SSL VPN policy:
-
In the Administration Console, click > s > .
-
(Conditional) If you have not created the SSL VPN default policy, click . Then click .
-
In the list of policies, click > 1.
-
In the section, click , then select .
-
Fill in the following values:
Custom Header Name: Specify .
Value: Select .
-
Click twice.
-
Click .
2.2.2 Injecting the SSL VPN Header
The example in this section explains how to accelerate a SSL VPN in a path-based multi-homing configuration.
Before you begin, make sure you have already created a proxy service and an authentication procedure. For more information on creating a proxy service and authentication procedure, see Configuring a Reverse Proxy
in the NetIQ Access Manager 3.2 SP1 Setup Guide.
-
In the Administration Console, click > > > [Name of Reverse Proxy].
-
In the section, click .
-
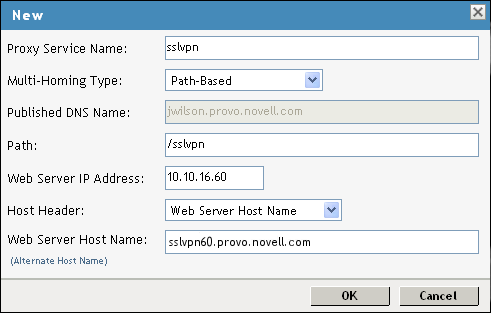
Fill in the following fields:
Proxy Service Name: Specify a name for the proxy service.
Multi-Homing Type: Specify the method for finding a second resource on the reverse proxy. For this example configuration, has been selected.
Published DNS Name: This field is populated by default with the published DNS name.
Path: Specify the path to the SSL VPN resource. This must be /sslvpn.
Web Server IP Address: Specify the public IP address of the SSL VPN.
Host Header: Select which hostname is forwarded to the Web server in the host header. If your SSL VPN has a DNS name, select .
Web Server Host Name: Specify the DNS name of the SSL VPN.
-
Click .
-
To configure the default Identity Injection policy and protected resources, click the newly added proxy service.
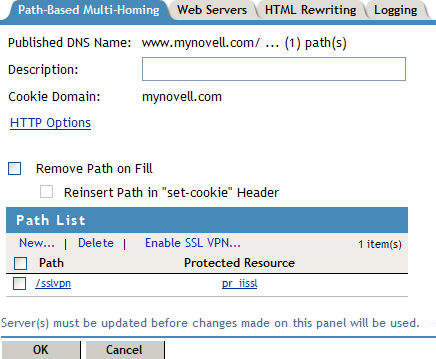
-
In the section, make sure the is .
-
In the section, select the check box, then click .
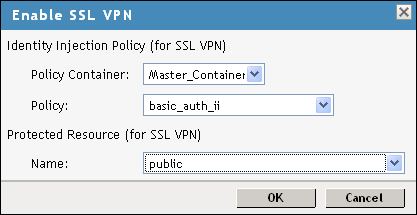
-
Fill in the following fields:
Policy Container: Select a policy container from the list.
Policy: Select from the drop-down list. A policy pop-up appears. Click in the pop-up, then click .
The default SSL VPN policy injects both the username and password in the authentication header. If you do not want the password to be pushed to the authentication header, configure a policy with a username and a string constant. For more information on configuring policies, see
Creating Identity Injection Policies
in the NetIQ Access Manager 3.2 Policy Guide.You can also configure the SSL VPN policy to inject the client IP address, so that the IP address can then be included in log entries. For more information, see Section 2.2.1, Configuring the Default Identity Injection Policy.
Name: Select from the drop-down list.
-
Click to close the pop-up.
-
Click the tab.
-
Specify 8080 in the field, then click .
-
In the section, click the name of the parent proxy service of the newly created SSL VPN proxy service. This host does not have a multi-homing value.
-
Select the tab.
-
Select from .
-
Select an authentication contract from the drop-down list.
The user is assigned the timeout value of the contract used for authentication, and not the default timeout value.
-
In the section, ensure that the URL is .
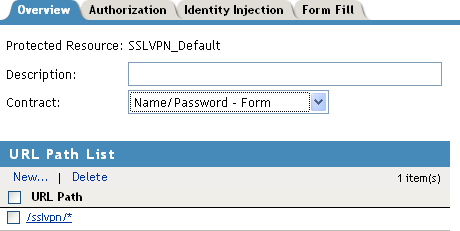
IMPORTANT:Make sure that you configure the URL as given above. Any variation leads to the failure of SSL VPN service.
-
Click then click .
-
On the Configuration page, click.
-
On the Access Gateways page, click .
-
To update the Identity Server, click > .
-
Click .
-
(Optional) If you have not already configured the SSL VPN details, proceed with Section 2.3, Configuring the IP Address, Port, and Network Address Translation.