7.1 Installing the ESP-Enabled SSL VPN
When SSL VPN is deployed without the Access Gateway, an Embedded Service Provider (ESP) component is installed along with the SSL VPN server. This deployment is called an ESP-enabled NetIQ SSL VPN. This deployment requires the Administration Console and the Identity Server to be installed before the SSL VPN server is installed.
7.1.1 Deployment Scenarios
For installing the ESP-enabled version of SSL VPN, you have the following deployment scenarios:
Deployment Scenario 1: Installing SSL VPN on a Separate Machine
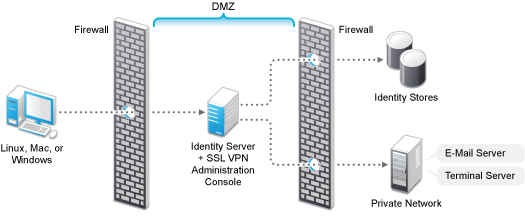
This deployment scenario consists of a demilitarized zone where the Identity Server and SSL VPN are deployed separately, without the Access Gateway. For installation instructions for this scenario, see Installing the ESP-Enabled SSL VPN. In this scenario, SSL VPN will be accessible on port 8443. When it is accessed on port 8080 it will be redirected to port 8443.
Figure 7-1 Deployment Scenario 1
Deployment Scenario 2: Installing SSL VPN and the Identity Server on the Same Machine
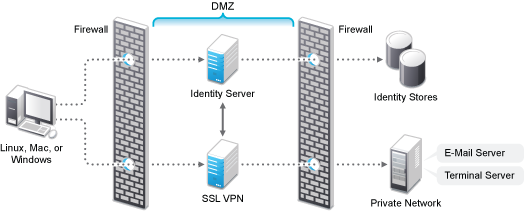
This deployment scenario consists of a demilitarized zone where the Identity Server and SSL VPN are on a single machine. The Access Gateway is deployed separately. For installation instructions for this scenario, see Installing the ESP-Enabled SSL VPN. In this scenario, SSL VPN will be accessible on secure port 3443. When this port is accessed on a non-secure port 3080, it will be redirected to port 3443.
Figure 7-2 Deployment Scenario 2
Deployment Scenario 3: Installing SSL VPN and the Administration Console on the Same Machine
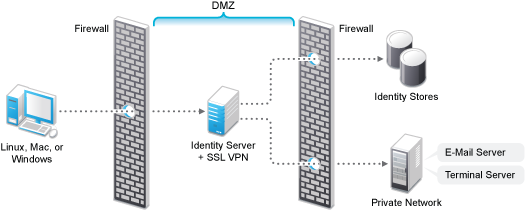
This deployment scenario consists of a demilitarized zone where the SSL VPN, and Administration Console are on the same machine and Access Gateway and the Identity servers are deployed separately. For installation instructions for this scenario, see Installing the ESP-Enabled SSL VPN. In this scenario, SSL VPN will be accessible on secure port 8443. When this port is accessed on a non-secure port 8080, it will be redirected to port 8443.
Figure 7-3 Deployment Scenario 3
Deployment Scenario 4: Installing SSL VPN, the Administration Console, and the Identity Server on the Same Machine
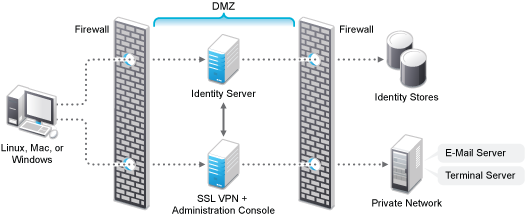
This deployment scenario consists of a demilitarized zone where the Identity Server, SSL VPN, and Administration Console are on the same machine and Access Gateway is deployed separately. For installation instructions for this scenario, see Installing the ESP-Enabled SSL VPN. In this scenario SSL VPN will be accessible on secure port 3443. When this port is accessed on a non-secure port 3080, it will be redirected to port 3443.
Figure 7-4 Deployment Scenario 4