2.5 Configuring Protected Resources for Specific Applications
-
Section 2.5.1, Configuring Protected Resource for a SharePoint Server
-
Section 2.5.2, Configuring a Protected Resource for a SharePoint Server with an ADFS Server
-
Section 2.5.3, Configuring a Protected Resource for Outlook Web Access
-
Section 2.5.4, Configuring a Protected Resource for a Novell Vibe 3.3 Server
-
Section 2.5.5, Protecting Kerberized Resources with Kerberos Constrained Delegation
-
Section 2.5.6, Configuring Access to the Filr Site through Access Manager
2.5.1 Configuring Protected Resource for a SharePoint Server
You can protect a SharePoint server as a domain-based or a path-based multi-homing resource on the Access Gateway. When you protect a SharePoint server on Access Gateway, you might see issues with rewriting if the published DNS name is not the same as the DNS name of the original server. Also, if you access SharePoint folder by using non-browser clients such as Microsoft Network Place, Nautilus in SUSE Linux Enterprise Server (SLES), or the MAC finder, you might see issues because these WebDAV clients do not support 302 redirection for authentication. You must modify the authentication procedure to prevent redirection on initial authentication or redirection to Identity Server when the user session expires.
For more information about how to configure a protected resource for a SharePoint server, see Protecting SharePoint 2010.
2.5.2 Configuring a Protected Resource for a SharePoint Server with an ADFS Server
If your SharePoint server is configured to use an ADFS server and you want to create a protected resource for the SharePoint server, you need to configure the following Access Manager features. The instructions assume that you have a functioning SharePoint server and a functioning Access Manager system:
Configuring a Custom Contract
ADFS requires a different format for a contract URI than the format used in the default contracts. It expects the URI to conform to the format of a URL. You need to create a custom contract.
-
In the Administration Console, click Devices > Identity Servers > Servers > Edit > Local > Contracts
-
Click New, then fill in the following fields:
Display name: Specifies the name of the authentication contract.
URI: Specifies a value that uniquely identifies the contract from all other contracts. No spaces can exist in the URI field. For SharePoint, specify the following format for the URI:
https://<baseurl>/name/password/uriReplace <baseurl> with the base URL of your Identity Server. If the DNS name of your Identity Server is idp-50.amlab.net, the URI would have the following format:
https://idp-50.amlab.net:8443/nidp/name/password/uri
Methods and Available Methods: Move a name/password method to the Methods list. We recommend Secure Name/Password - Basic, but you can use Name/Password - Basic.
Do not configure a password expiration servlet. This contract is going to be used with non-redirected login, which prevents all redirection, including redirection to a password expiration service.
For more information about other options, see
Configuring Authentication Contracts
in the NetIQ Access Manager 3.2 SP3 Identity Server Guide. -
Click Next.
-
Configure a card for the contract by filling in the following:
Text: Specify the text that is displayed on the card to the user.
Image: Specify the image to be displayed on the card. To use an existing image, select an image from the drop-down list. To add an image to the list, click Select local image.
Show Card: Determine whether the card is shown to the user, which allows the user to select and use the card for authentication. If this option is not selected, the card is only used when a service provider makes a request for the card.
-
Click Finish, then OK.
-
Update the Identity Server and the Access Gateway.
-
Continue with Creating a Reverse Proxy Service.
Creating a Reverse Proxy Service
-
In the Administration Console, click Devices > Access Gateways > Edit > [Name of Reverse Proxy].
-
In the Proxy Service List section, click New.
-
Fill in the following fields:
Proxy Service Name: Specify a display name for the proxy service that the Administration Console uses for its interfaces.
Multi-Homing Type: Select Domain-Based as the multi-homing method that the Access Gateway should use to identify this proxy service.
Published DNS Name: Specify the DNS name you want the public to use to access the SharePoint server. This DNS name must resolve to the IP address you set up as the listening address.
If the DNS name of the reverse proxy is the same as the DNS name of the SharePoint server, no rewriting configuration is required. If they are different, there is a high probability that the application will respond incorrectly to user requests.
Web Server IP Address: Specify the IP address of the IIS Web server with the SharePoint server.
Host Header: Select the Web Server Host Name option.
Web Server Host Name: Specify the DNS name of the SharePoint server that the Access Gateway should forward to the Web server.
For more information about how to create a reverse proxy, see Section 2.2, Managing Reverse Proxies and Authentication
-
Click OK.
-
Continue with Configuring Multiple Protected Resources.
Configuring Multiple Protected Resources
If your SharePoint server has been configured for multiple domains, you need to create three protected resources to enable single sign-on. The server has two ways to access the home page. You need to create a protected resource for each of these paths, and then a protected resource for the other pages. These protected resources should have a configuration similar to the following:
|
SharePoint Page |
URL Path |
Contract |
Authentication Procedure |
|---|---|---|---|
|
home page |
default.aspx |
custom |
Normal |
|
root |
/ |
custom |
Normal |
|
all others |
/* |
custom |
Non-redirected login |
For single sign-on, all the protected resources need to specify the same contract. When assigning the contract for the /* resource, the contract needs to be configured to use non-redirected login for its authentication procedure. When a user first accesses the SharePoint server, the users are directed either to the home page or the root of the server. From either of these locations, the users can be redirected to the Identity Server for authentication. After the users have authenticated and the SharePoint server requests authentication for access to any of the other pages, these pages need to be configured to use non-redirected login.
-
In the Proxy Service List, click the name of the Proxy Service you created, then click Protected Resources.
-
To create a protected resource for the home page:
-
In the Protected Resource List, click New, specify a name such as homepage, then click OK.
-
For the home page of the SharePoint server, specify the following values:
Authentication Procedure: Select the custom contract you created.
URL Path: Click /* and replace it with default.aspx, then click OK twice.
-
-
To create a protected resource for the root page:
-
In the Protected Resource List, click New, specify a name such as root, then click OK.
-
For the root of the SharePoint server, specify the following values:
Authentication Procedure: Select the custom contract you created.
URL Path: Click /* and remove the asterisk, then click OK twice.
-
-
To create a protected resource for all other pages:
-
In the Protected Resource List, click New, specify a name such as allothers, then click OK.
-
For all other pages of the SharePoint server, specify the following values:
Authentication Procedure: Select the custom contract you created.
URL Path: Leave the default value.
-
Click the Edit Authentication Procedures icon on the Authentication Procedure line.
-
Click the name of your custom contract, then fill in the following:
Non-Redirected Login: Select this option.
Realm: Specify a name that your users associate with the SharePoint server. This name is displayed when the user needs to reauthenticate.
For more information about this feature, see Section 2.4.2, Configuring an Authentication Procedure for Non-Redirected Login.
-
-
Click OK three times.
In the Protected Resource List, you should have three protected resources that use the same Authentication Procedure.
For information about configuring protected resources, see Section 2.4.1, Setting Up a Protected Resource.
-
Click Access Gateways, then update the Access Gateway.
-
(Conditional) If you have limited your users to one session, modify this limitation:
-
Click Devices > Identity Servers > Edit.
-
Increase the value of the Limit user sessions option.
-
Click OK, then update the Identity Server.
-
2.5.3 Configuring a Protected Resource for Outlook Web Access
If you want to protect your Outlook Web Access server with the Access Gateway, you need to configure the following Access Manager features. The instructions assume that you have a functioning Outlook Web Access server and a functioning Access Manager system:
Configuring a Protected Resource for Outlook Web Access
The following instructions assume that you have a basic setup with at least one reverse proxy and proxy service. If you don’t have this basic setup, see Section 2.2, Managing Reverse Proxies and Authentication and complete a basic setup before continuing.
-
In the Administration Console, click Devices > Access Gateways > Edit > [Name of Reverse Proxy].
-
In the Proxy Service List section, click New.
-
Specify a name for the proxy service, then click OK.
-
Click the newly added proxy service. Fill in the fields:
Proxy Service Name: Specify a display name for the proxy service, which the Administration Console uses for its interfaces.
Published DNS Name: Specify the DNS name you want the public to use to access your site. This DNS name must resolve to the IP address you set up as the listening address.
Multi-Homing Type: Select the multi-homing method that the Access Gateway should use to identify this proxy service.
Web Server IP Address: Specify the IP address of the IIS Web server.
Host Header: Select the Web Server Host Name option.
Web Server Host Name: Specify the DNS name of the Outlook Web Access server that the Access Gateway should forward to the Web server.
-
Click OK.
-
Continue with Configuring an Authentication Procedure.
Configuring an Authentication Procedure
-
Click Access Gateways > Edit > [Name of Reverse Proxy] > [Name of Proxy Service] > Protected Resources.
-
Click New, then specify a display name for the resource.
-
(Optional) Specify a description for the protected resource. You can use it to briefly describe the purpose for protecting this resource.
-
Select an authentication contract. If you want to enable non-redirected login, select Name/Password - Basic as the authentication contract.
-
(Optional) If you want to enable non-redirected login, click the Edit Authentication Procedure icon, then click the contract that you have added to specify the following information:
Non-Redirected Login: Select the option to enable non-redirected login.
Realm: Specify the security realm configured for the IIS server running the Outlook Web Access server.
To check the security realm configured for the IIS server, open the IIS Administration Console, right-click the Outlook Web Access Server the Access Gateway is protecting, then select Properties. The Directory Security tab contains the Security realm field.
-
Create protected resource:
-
In the Protected Resource List, click New, specify a name such as root, then click OK.
-
Specify the following values:
Authentication Procedure: Select the contract you created.
URL Path: Make sure that /* is selected. If you have configured Outlook Web Access as a path-based service, then click the URL path and add the path name of the service. For example, /owa/*, where owa is the path name.
Click OK twice.
-
-
Create a second protected resource:
-
In the Protected Resource List, click New, specify a unique name, then click OK.
-
Specify the following values:
Authentication Procedure: Do not select any authentication procedure because the URL path is a public resource.
URL Path: Specify /exchweb/*as the URL path. If you have configured Outlook Web Access as a path-based service, click the URL path and add the path name of the service. For example, /owa/exchweb/*, where owa is the path name.
Click OK twice.
-
-
Click OK.
-
In the Protected Resource List, ensure that the protected resource you created is enabled.
-
If you want to enable single sign-on, then configure Identity Injection or Form Fill policy, depending on the Outlook Web Access configuration. For more information, see Configuring Identity Injection.
-
Continue with Configuring a Rewriter Profile.
Configuring a Rewriter Profile
-
In the Administration Console, click Devices > Access Gateways > Edit > [Name of Reverse Proxy] > [Name of Proxy Service] > HTML Rewriting.
-
Click New in the HTML Rewriter Profile List.
-
Configure a Word profile:
-
Specify a name for the profile, select Word as the search boundary, then click OK.
-
Click New in the Variable or Attribute Name to Search for Is section, then specify value.
-
Click OK.
-
Select Rewrite Inbound Query String Data.
-
Select Rewrite Inbound Post Data.
-
Select Rewrite Inbound Headers.
-
Ensure that Enable Rewrite Actions remains selected.
-
-
(Optional) If you have configured the path-based multi-homing service, do the following:
-
Add the following content types for the And Document Content-Type Header Is option in the Word profile:
-
text/x-component
-
extension/htc
-
-
Configure the following options for Strings to Search for Is:
-
Specify Search as /exchange and Replace With as $path/exchange
-
Specify Search as /exchweb and Replace With as $path/exchweb
-
-
-
To save your changes to browser cache, click OK.
-
Use the up-arrow button to move your profile to the top of the HTML Rewriter Profile List.
-
To apply your changes, click the Access Gateways link, then click Update > OK.
Configuring Identity Injection
You must configure an Identity Injection policy to enable single sign-on with the Outlook Web Access server that has basic authentication configured. This Identity Injection policy should be configured to inject an authentication header. For information about creating this policy, see Configuring an Authentication Header Policy
in the NetIQ Access Manager 3.2 SP3 Policy Guide.
Configuring Form Fill
You can configure a Form Fill policy to prepopulate fields in the form when you log into the Outlook Web Access first time and then save the information in the completed form to the config store for subsequent logins. For information about how to create this policy, see Creating Form Fill Policies
in the NetIQ Access Manager 3.2 SP3 Policy Guide.
Enabling the Auto Submit option requires additional entries apart from the username and password fields. To enable the Auto Submit option:
-
In the Administration Console, click Policies > Policies > <Policy Name>.
-
In the Edit Policy page, add the following details under Fill Options:
Input Field Name
Input Field Type
Input Field Value
Data Conversion
destination
Hidden
String Constant : http://<webserver IP/owa> (when Web server is configured for http.)
String Constant : https://<webserver IP/owa> (when Web server is configured for https.)
None
flags
Hidden
String Constant : 0
None
forcedownlevel
Hidden
String Constant : 0
None
isUt8
Hidden
String Constant : 1
None
trusted
Radio Button
String Constant : 0
None
-
Under the Submit Options section, select the Enable JavaScript Handling check box.
-
Enter document.cookie="PBack=0; path=/" in the Statements to Execute on Submit field.
-
Click OK and apply the changes.
2.5.4 Configuring a Protected Resource for a Novell Vibe 3.3 Server
The following sections explain how to configure the Access Gateway with a domain-base multi-homing service. The instructions assume that you have a functioning Novell Vibe 3.3 server on Linux and a functioning Access Manager system (3.2 or higher) with a reverse proxy configured for SSL communication between the browsers and the Access Gateway.
The Novell Vibe server needs to be configured to trust the Access Gateway to allow single sign-on with Identity Injection and to provide simultaneous logout. You also need to create an Access Gateway proxy service and configure it.
For information about other possible Access Gateway configurations, see “Teaming 2.0: Integrating with Linux Access Gateway”.
Configuring the Novell Vibe Server to Trust the Access Gateway
To use Novell Vibe as a protected resource of an Access Gateway and to use Identity Injection for single sign-on, the Teaming server needs a trusted relationship with the Access Gateway. With a trusted relationship, the Teaming server can process the authorization header credentials. The Teaming server accepts only a simple username (such as user1) and password in the authorization header.
This section explains how to set up the trusted relationship and how to enable simultaneous logout, so that when the user logs out of Teaming, the user is also logged out of the Access Gateway.
To configure the trusted relationship:
-
Log in to the Novell Vibe server.
-
Stop the Teaming server with the following command:
/etc/init.d/teaming stop
-
Run the installer-teaming.linux script.
-
Follow the prompts, then select Reconfigure settings.
-
Follow the prompts, then select Advanced installation.
-
Follow the prompts, selecting the defaults until the Enable Access Gateway option appears, then type Yes.
-
In the Access Gateway address(es) section, include the IP address of the Access Gateway that is used for the connection to the Teaming server.
If the Access Gateway is part of a cluster, add the IP address for each cluster member. Wildcards such as 164.99.*.* are allowed.
When you specify IP addresses in this option, Novell Vibe logins are allowed only from the specified addresses. Also, if authorization header credentials are not present or are incorrect, the user is prompted for login by using Basic Authentication.
-
When prompted for the Logout URL, specify the URL of the published DNS name of the proxy service plus /AGLogout.
For example, if the published DNS name of the proxy service is vibe.doc.provo.novell.com, specify the following URL:
https://Vibe.doc.provo.novell.com/AGLogout
-
When you are prompted to use the Access Gateway for WebDAV connections, specify No.
-
Follow the prompts to complete the reconfiguration process.
-
Start the Vibe server with the following command:
/etc/init.d/teaming start
-
Continue with Configuring a Domain-Based Multi-Homing Service for Novell Vibe.
Configuring a Domain-Based Multi-Homing Service for Novell Vibe
The following instructions describe how to set up a domain-based service to protect the Novell Vibe server. In this example, the published DNS name of the service is Vibe.doc.provo.novell.com. Users would access the Vibe server with a URL similar to http://Vibe.doc.provo.novell.com.
To configure a domain-based service for Vibe, complete the following tasks:
Configuring the Domain-Based Proxy Service
You must create a new reverse proxy before you configure the domain-based proxy service. Configure the Vibe domain as the primary proxy service and enable SSL between browser and the Access Gateway. For more information about how to create a new reverse proxy, see Section 2.2.1, Creating a Proxy Service.
-
In the Administration Console, click Devices > Access Gateways > Edit > [Name of Reverse Proxy].
-
In the Reverse Proxy List, click New, then specify the following details:
Proxy Service Name: Specify a display name for the proxy service that the Administration Console uses for its interfaces.
Multi-Homing Type: Select Domain-Based.
Published DNS Name: Specify the DNS name you want the public to use to access your site. This DNS name must resolve to the IP address you set up as the listening address. For example, vibe.doc.provo.novell.com.
Web Server IP Address: Specify the IP address of the Vibe server.
Host Header: Select the Forward Received Host Name option.
Web Server Host Name: Specify the DNS name of the Vibe server.
-
Click OK.
-
Click the newly added proxy service, then select the Web Servers tab.
-
Change the Connect Port to 8080.
If the Novell Vibe server has port forwarding enabled, you do not need to change from the default port 80.
-
Click TCP Connect Options.
-
Change the value of Data Read Timeout option to 300 seconds.
This longer timeout is needed for file uploads.
-
Click OK.
-
Continue with Configuring Protected Resources.
Configuring Protected Resources
You must configure an Identity Injection policy to enable single sign-on with the Novell Vibe server. This Identity Injection policy should be configured to inject the authentication credentials into the authorization headers.
-
In the Administration Console, click Policies > Policies.
-
Select the policy container, then click New.
-
Specify a name for the policy, select Access Gateway: Identity Injection for the type, then click OK.
-
(Optional) Specify a description for the injection policy. This is useful if you plan to create multiple policies to be used by multiple resources.
-
In the Actions section, click New, then select Inject into Authentication Header.
-
Fill in the following fields:
User Name: Select Credential Profile > LDAP User Name.
Password: Select Credential Profile > LDAP Password.
-
Click OK twice.
-
Click Apply Changes.
For more information about how to create such a policy, see
Configuring an Authentication Header Policy
in the NetIQ Access Manager 3.2 SP3 Policy Guide.Assign this policy to the protected resources. You need to create two protected resources, one for HTML content and one for WebDAV and AJAX content.
-
Click Access Gateways > Edit > [Name of Reverse Proxy] > [Name of Proxy Service] > Protected Resources.
-
Create a protected resource for HTML content:
-
In the Protected Resource List, click New, specify a name, then click OK.
-
(Optional) Specify a description for the protected resource. You can use it to briefly describe the purpose for protecting this resource.
-
Specify a value for Authentication Procedure. For example, select the Secure Name/Password - Form contract.
-
In the URL Path List, remove the /* path and add the following two paths:
/teaming/*
/ssf/*
-
Click OK.
-
-
Create a protected resource for WebDAV and AJAX content:
-
In the Protected Resource List, click New, specify a unique name, then click OK.
-
(Optional) Specify a description for the protected resource. You can use it to briefly describe the purpose for protecting this resource.
-
Click the Edit Authentication Procedure icon.
-
In Authentication Procedure List, click New, specify a name, then click OK.
-
Specify details in the following fields:
Contract: Select the Secure Name/Password - Form contract, which is same contract that you selected for the HTML content protected resource.
Non-Redirected Login: Select this option.
Realm: Specify a name that you want to use for the Teaming server. This name does not correspond to a Vibe configuration option. It appears when the user is prompted for credentials.
Redirect to Identity Server When No Authentication Header is Provided: Deselect this option.
-
Click OK twice.
-
For the Authentication Procedure, select the procedure you just created.
-
In the URL Path List, remove the /* path and add the following paths:
/ssfs/*
/ssf/rss/*
/ssf/atom/*
/ssf/ical/*
/ssf/ws/*
/ssr/*
/rest/*
The /ssfs/* path is for WebDAV content and the /ssf/rss/* path enables non-redirected login for RSS reader connections.
-
Click OK.
-
-
In the Protected Resource List, ensure that the protected resources you created are enabled.
-
To apply your changes, click Devices > Access Gateways, then click Update.
-
Continue with Configuring a Rewriter Profile.
Configuring a Rewriter Profile
-
In the Administration Console, click Devices > Access Gateways > Edit > [Name of Reverse Proxy] > [Name of Proxy Service] > HTML Rewriting.
-
In HTML Rewriter Profile List, click New.
-
Specify a name for the profile, select Word as the search boundary, then click OK.
-
In the And Document Content-Type Header Is section, click New, then specify the following type:
application/rss+xml
-
In the Variable or Attribute Name to Search for Is section, click New, then specify the following as the variable to search for:
value
-
Click OK.
-
Ensure that Enable Rewrite Actions remains selected.
-
Click OK.
-
In HTML Rewriter Profile List, move the Word profile you created to be the first profile in the list, and move the default profile to be the second profile in the list.
-
Click OK.
-
To apply your changes, click Devices > Access Gateways, Update.
-
Continue with Creating a Pin List.
NOTE:If Vibe is configured to send the binary content in the JSON format, you must disable the HTML Rewriter to prevent errors.
Creating a Pin List
Configure the Access Gateway to bypass the published URL of the proxy service:
-
In the Administration Console, click Devices > Access Gateways > Edit.
-
Click Pin List in the configuration page.
-
Click New, then specify the published DNS name of the proxy service. For example, vibe.doc.provo.novell.com.
-
Select Bypass as the Pin type.
-
Click OK.
-
To save the configuration changes, click Devices > Access Gateways, then click Update.
NOTE:If you do not want Access Manager to cache site information, do not create a Pin List. Instead, you should configure Access Manager to forward cache control headers to the browser. This is the recommended configuration for Novell Vibe. For information about how to forward cache control headers to the browser, see Section 6.2, Controlling Browser Caching.
2.5.5 Protecting Kerberized Resources with Kerberos Constrained Delegation
Constrained Delegation and Protocol Transition are extensions of the Kerberos protocol (version 5). Protocol Transition allows a service to obtain a Kerberos service ticket to itself on behalf of the user without authenticating the user in Active Directory. Constrained Delegation allows a service to obtain the service tickets to a restricted list of services on behalf of the user.
For more information about the KCD technology, see Kerberos Protocol Transition and Constrained Delegationhttp://go.microsoft.com/fwlink/?LinkId=122608.
You can set up the Access Gateway with KCD in Active Directory. After this configuration, any authenticated Active Directory user can access Kerberized Web resources without logging in to the Active Directory domain.
This section discusses the following:
Architecture
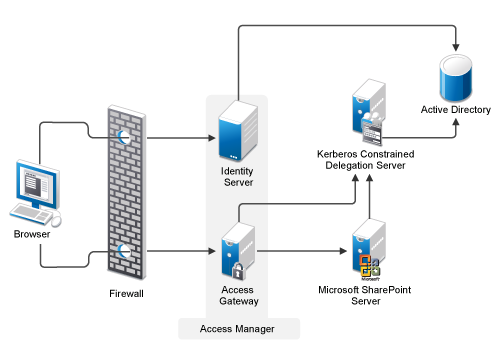
The following diagram illustrates the architecture of the Access Manager Delegated Kerberos design:
-
Access Manager (Identity Server and Access Gateway) is deployed in front of the SharePoint server. The Access Gateway intercepts all requests from the browser to the SharePoint server.
-
The Access Gateway prompts the user for authentication at the Identity Server.
-
The Access Gateway requests KCD to generate a service ticket for the SharePoint server on behalf of the authenticated user through Constrained Delegation and Protocol Transition extensions.
Advantages
The following are the advantages of KCD implementation:
-
KCD is a more secure protocol. It delegates identities only to specified services.
-
KCD can transition non-Kerberos incoming authentication protocol to Kerberos so that the user can be granted or denied access to the kerberized services.
Limitations
The following are the limitations of KCD implementation:
-
Does not support the cross-domain transition.
-
It is supported only on Windows Access Gateway.
-
Requires additional setup configuration.
Prerequisites
Ensure that you meet the following requirements before implementing the KCD configuration:
-
The Access Gateway is installed on Windows Server 2008.
-
The domain controller in the internal network must be running Windows Server 2008.
-
The LDAP user store must be part of the same Active Directory forest as of the Access Gateways and Identity Servers.
-
In the Access Gateway machine, allow the Kerberos port (88) from the Windows Firewall Outbound rules.
Setting Up the Access Gateway with KCD
Setting up the Access Gateway with KCD consists of:
Adding the Access Gateway to the Active Directory Domain
Perform the following steps on the Access Gateway machine to add the Access Gateway to domain on Windows Server 2008:
-
Click Start > right-click Computer > click Manage.
-
Click Change System Properties in Server Manager.
-
Select the Computer Name tab and click Change.
-
In the Member Of section, select Domain, specify the name of the domain to join, and then click OK.
-
Click OK > Apply > Close.
-
Restart the Access Gateway.
-
Proceed with Enabling KCD with the Access Gateway.
Enabling KCD with the Access Gateway
Delegation is not enabled by default for any user account. You need to enable it manually by adding services in Active Directory User or computer's properties. This section explains the steps to enable KCD with the Access Gateway.
-
Open the Active Directory Users and Computers folder in your Domain Controller.
-
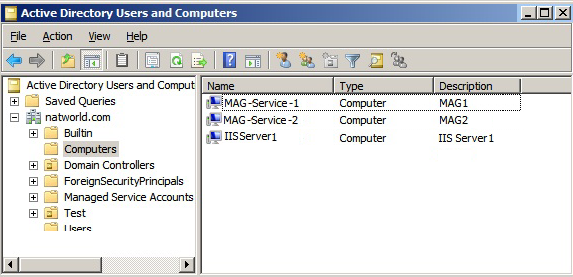
Select Computers > Access Gateway computer.
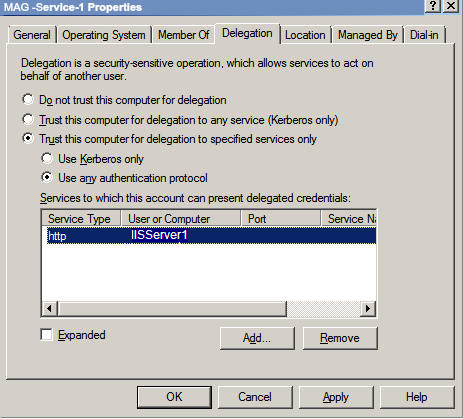
For example, MAG -Service-1 as shown in the following image:
-
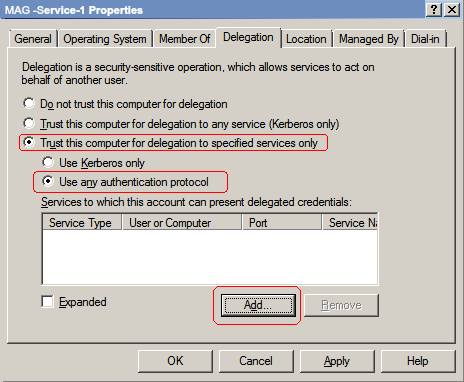
Right-click and select Properties > Delegation.
-
Select the Trust this user for delegation specified services only and the Use any authentication protocol options.
-
Specify the services in Services to which this account can present delegated credentials.
-
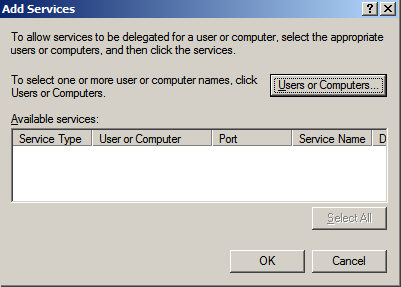
Click Add.
-
Click Users or Computers to select the computer hosting these services.
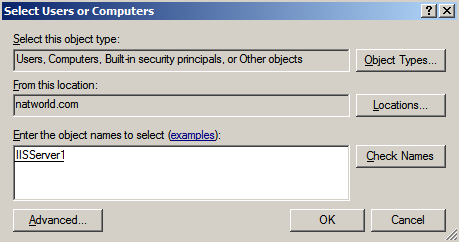
NOTE:Constrained Delegation does not support services hosted in other domains even though there is a trust relationship to those domains.
-
Add services on the selected server.
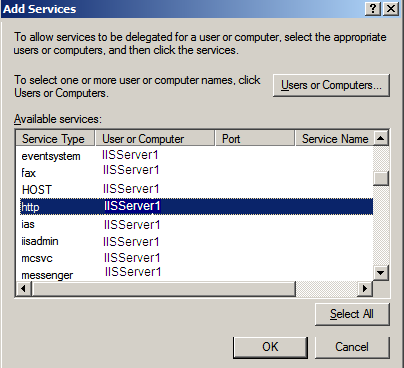
-
Review and apply these settings in the Delegation tab.
Configuring the Access Gateway for KCD
To protect your kerberized Web resources with the Access Gateway and enable single sign-on by using KCD, do the following:
-
Create a reverse proxy service. See,Creating a Reverse Proxy Service.
-
Configure an Identity Injection policy. See, Configuring Identity Injection.
All instructions assume that you have implemented Kerberos in your environment, such as Active Directory domain with IIS servers configured for Integrated Windows authentication.
Creating a Reverse Proxy Service
-
In the Administration Console, click Devices > Access Gateways > Edit > [Name of Reverse Proxy].
-
In the Proxy Service List section, click New.
-
Specify the following details:
Proxy Service Name: Specify a display name for the proxy service that the Administration Console uses for its interfaces.
Multi-Homing Type: Select Domain-Based as the multi-homing method that the Access Gateway should use to identify this proxy service.
Published DNS Name: Specify the DNS name you want the public to use to access the kerberized server. This DNS name must resolve to the IP address you set up as the listening address.
If the DNS name of the reverse proxy is same as the DNS name of the kerberized server, no rewriting configuration is required. If they are different, there is a high probability that the application will respond incorrectly to user requests.
Web Server IP Address: Specify the IP address of the IIS Web server.
Host Header: Select the Web Server Host Name option.
Web Server Host Name: Specify the DNS name of the kerberized server that the Access Gateway should forward to the Web server.
NOTE:This is a mandatory configuration because Delegated Kerberos in Access Gateway takes the service name from this field to request for a service ticket from the KCD server.
For more information about how to create a reverse proxy, see Section 2.2, Managing Reverse Proxies and Authentication
-
Click OK.
-
Continue with Configuring Identity Injection.
Configuring Identity Injection
You must configure an Identity Injection policy to enable single sign-on with the kerberized Web Access server that has basic authentication configured. This Identity Injection policy should be configured to inject a Kerberos ticket. For information about creating this policy, see Configuring an Identity Injection Policy
and Configuring an Inject Kerberos Ticket Policy
in the NetIQ Access Manager 3.2 SP3 Policy Guide.
2.5.6 Configuring Access to the Filr Site through Access Manager
For information about configuring Access Manager to configure a protected resource for a Novell Filr server, see Allowing Access Manager to configure a protected resource for a Novell Filr server