4.1 Using the Object View
The Object view is designed to let you browse for and locate objects in the directory. Once you have selected the objects with which you want to work, you can then specify the tasks to perform on those objects. Open the Object view by selecting the View Objects icon in the Header frame.
The Object View includes the following tabs in the Navigation frame, each of which give you a different way to browse for and locate directory objects:
4.1.1 Tree
The Tree tab lets you browse a directory tree with a look and feel similar to ConsoleOne™. Tree view uses both the Navigation frame and the Content frame to provide its functionality.
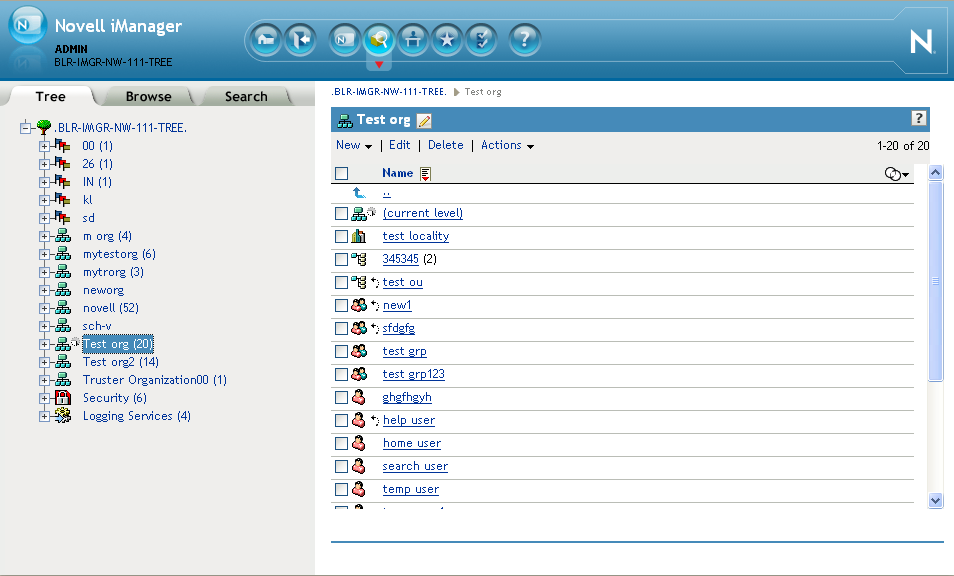
Figure 4-1 The Tree Tab in iManager’s Object View
Tree View Navigation Frame
In the Tree view, the Navigation frame displays the directory structure in the familiar ConsoleOne format. The Navigation frame displays Container, including Volume (file system), objects. Click on the plus and minus icons to expand and collapse the container objects and browse the directory tree.
By default, Tree View displays up to 100 subordinate objects per container, but you can change this setting in the Object View Preferences.
Tree View Content Frame
Selecting one of the container objects in the Navigation frame causes the Content frame to display all the objects in that container. The Content frame is where you actually manipulate directory objects. The Content frame includes a header from which you can select from among several available actions:
Bread Crumbs: At the very top of the Content frame, Tree view provides a bread crumb feature that lets you navigate along the containers in the current context.
Title Bar: The Content frame’s title bar displays the name of the currently selected container object. Click the Pencil icon to edit the properties of this container.
Object List Header: The object list header provides access to the following:
-
Menu Bar: The Content frame’s menu bar provides access to the object-related actions you can perform. Options include the following:
-
: Opens a dropdown menu of “create” tasks.
-
: Opens the property book for the selected objects so you can modify their attributes. Selecting multiple objects of the same type lets you set attributes for all the objects to the same value.
NOTE:You can also open a leaf object’s property book by selecting it in the object list. Selecting a container object in the object list opens the selected container and displays all that container’s subordinate. To edit the attributes of a container object, you must select its checkbox, then click .
-
: Deletes the selected objects. To select an object to edit, select its checkbox in the object list.
-
: Opens a dropdown menu of supported tasks for the selected objects. To perform a task, select it from the dropdown menu and provide the required information.
NOTE:If you have configured RBS, the Actions menu displays only those tasks in your assigned roles.
-
-
: To the right of the menu bar, Tree view lists the number of objects in the current page and the total number of objects in the selected container.
-
: The checkbox in the header functions as a “select all” checkbox for the current page of objects.
-
: Directly above the Object list is a “Name” column heading and a sort icon
 . Click either of these to toggle the object sort between ascending and descending alphabetical order.
-
: At the far right of the header, under the object count, is the object filter icon
 . Select this icon to create a filter that limits the objects displayed in the object list. You can filter on object type and object name, as needed.
Select to display container objects in the Object List regardless of the defined filter.
Select Advanced Filter to open the Advanced Filter dialog that lets you create a filter using almost any object attribute. For more information, see Advanced Selection.
NOTE:When a filter is active, the filter icon changes to a colored icon
 , and the filter setting is listed next to the icon. If you configure an advanced filter, iManager displays a checkmark icon
  next to the filter icon.
Object List: The Content frame’s object list displays all objects in the container currently selected in the Navigation frame. By default, the object list displays 100 objects on a page, but you can change this setting in the Object View Preferences.
To perform an action on an object, select its checkbox, then select the action from the Object List header. Select the (current level) object to perform an action on the container in which you are currently browsing.
Select the double-period object to navigate up one level to the parent container.
IMPORTANT:Tree view does not support selecting objects across multiple pages in the object list. If you need to do this, use Object View’s Browse tab to perform the multiple object action. For more information, see Browse.
4.1.2 Browse
The Browse tab leverages a user interface and functionality similar to the Object Selector to provide a directory browsing tool. For information on navigating the Browse user interface, see Using the Object Selector.
Figure 4-2 The Browse tab in iManager’s Object View
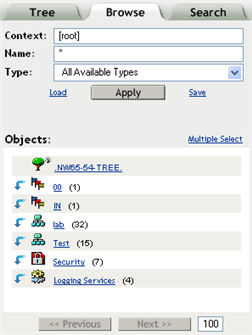
The Browse tab uses only the Navigation frame to provide its functionality. It includes the following primary components:
Object Filter: Located at the top of the Navigation frame, the object filter lets you limit the objects displayed in the object list. Once defined, click to use the filter.
IMPORTANT:The object filtering in the Browse tab only applies to directory objects. It does not filter file system objects, even though they might be visible in the Browse tab.
The object filter uses the following fields:
-
Context: Displays only those objects in the specified context. This is identical to opening the container from the object list.
-
Name: Displays only those objects that conform to the specified name filter. Use the asterisk (*) wildcard to specify a partial name. For example: ldap*, *cert, *server*.
-
Type: Displays only those objects of the type specified.
NOTE:If you select a specific object type, a plus icon [+] appears that lets you open the Advanced Selection tool, from which you can specify additional, attribute-level filter settings. For more information, see Advanced Selection.
-
Load/Save: These two links let you load a previously defined filter definition and save the current filter so it can be re-used, respectively.
Multiple Select / Single Select: Located above the right side of the object list, this link lets you toggle between selecting a single object or multiple objects against which you want to perform a task. The default option is Single Select. For more information, see Selecting and Filtering Objects.
Object List: Displays a list of directory objects, as defined by the criteria in the Object Filter. By default, the object list displays 100 objects on a page, but you can change this value in the Object View Preferences. Use the Previous and Next buttons to navigate between object pages. You can navigate amongst the objects in the object list by doing the following:
-
 Select the down arrow icon next to a container object to open that container and view its objects in the object list.
-
 Select the up arrow icon at the top of the object list to view the contents of the current container’s parent. This moves you up one level in the directory tree.
-
Select an object, either container or leaf, to open a window with the available tasks for that type of object. Selecting a task opens that tasks UI in the Content frame.
4.1.3 Search
The Search tab is similar to the Browse tab, but instead of displaying a tree structure in the Navigation frame, it displays only those objects resulting from the specified search.
Figure 4-3 The Search tab in iManager’s Object view
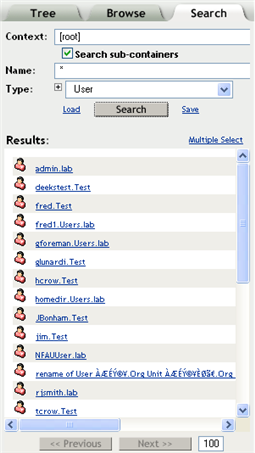
The Search tab uses only the Navigation frame to provide its functionality. It includes the following primary components:
Object Search: Located at the top of the Navigation frame, the object search lets you define the search criteria. Once defined, click to perform the specified search operation.
IMPORTANT:The object filtering in the Search tab only applies to directory objects. It does not filter file system objects, even though they might be visible in the Search tab.
You can define your search using the following fields:
-
Context: Specifies the starting container for the search operation. If you want the search to include subordinate containers, select .
-
Name: Defines the object name filter for this search. Use the asterisk wildcard to specify a partial name. For example: ldap*, *cert, *server*.
-
Type: Defines the object type filter for this search. iManager only displays objects of the specified type.
NOTE:If you select a specific object type, a plus icon [+] appears that lets you open the Advanced Selection tool, from which you can specify additional, attribute-level filter settings. For more information, see Advanced Selection.
-
Load/Save: These links let you load a previously defined search definition and save the current search so it can be re-used, respectively.
Multiple Select / Single Select: Located above the right side of the results list, this link lets you toggle between selecting a single object or multiple objects against which you want to perform a task. The default option is Single Select. For more information, see Selecting and Filtering Objects.
Results List: Displays the results of the search operation. By default, the object list displays 100 objects on a page, but you can change this value in the Object View Preferences. Use the Previous and Next buttons to navigate between results pages. Select an object, either container or leaf, to open a window with the available tasks for that type of object. Selecting a task opens that tasks UI in the Content frame.
NOTE:The Search tab does not let you navigate objects, such as opening container objects, in the results list. If you want to be able to do this, use the Tree tab or the Browse tab.