3.1 Creating the Driver in Designer
You create the Ellucian Banner driver by importing the driver’s configuration file and then modifying the configuration to suit your environment. After you have created and configured the driver, you need to start it.
NOTE:You should not create driver objects by using the new Identity Manager 4.0 and later configuration files through iManager. This method of creating driver objects is no longer supported. To create drivers, you need to use the new package management features provided in Designer.
3.1.1 Importing the Current Driver Packages
The driver packages contain the items requ ired to create a driver, such as policies, entitlements, filters, and Schema Mapping policies. These packages are only available in Designer and can be updated after they are initially installed. You must have the most current version of the packages in the Package Catalog before you can create a new driver object.
To verify that you have the most recent version of the driver packages in the Package Catalog:
-
Open Designer
-
In the toolbar, Left Click Help > Check for Package Updates
-
Left Click OK to update the packages or Left Click OK if the packages are up-to-date
-
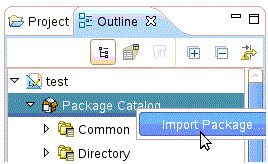
In the Outline view, Right Click the Package Catalog
-
Left Click Import Package
-
Select any Ellucian Banner driver packages
Or
Left Click Select All to import all of the packages displayed.
NOTE:By default, only the base packages are displayed. Deselect Show Base Packages Only to display all packages.
-
Click OK to import the selected packages, and then click OK in the successfully imported packages message.
-
After the current packages are imported, then continue with section,Section 3.1.2, Installing the Driver Packages
3.1.2 Installing the Driver Packages
After you have imported the current driver packages into the Package Catalog, you can install the driver packages to create a new driver.
-
In Designer, open your project.
-
Right-click on the Driver-set where you want to configure the Ellucian Banner driver, select and then . In the Driver Base Package Configuration screen, scroll down to find the Banner Base package. Left-click the box next to Banner Base.

-
Select Banner Base, and then Left Click next.
-
Select the optional features to install for the Ellucian Banner driver.
NOTE:By default “show Only applicable packages versions” will be selected as expected.
Select the optional Ellucian Banner User Package.

-
Left Click Next
-
(Conditional) If there are package dependencies for the packages you selected to install, you must install them to install the selected package. Left Click OK to install Package Dependencies.
NOTE:The dialog content may differ depending on the options selected.

-
On the “Install Common Settings” page, specify the User and Group containers in the Identity Vault where the driver will place users and groups.

-
On the “Install Ellucian Banner Base” page, specify a name for the driver that is unique within the driver set, and then click next.

-
On the “Install Ellucian Banner Base” page for Subscriber and Publisher Options enter values to configure the connections with BEIS.
-
Configure the Subscriber channel.
-
Select “Use” to turn on the Subscriber channel. Selecting “Use” will display the options to configure the Subscriber options.
-
Specify the URL of the BEIS server.
-
Specify the Authentication ID and Password for the BEIS server.
-
Communicating with the BEIS Web Service requires a certificate from BEIS to enable SSL. See Section B.2, Configuring the Subscriber Channel
-
-
Configure the Publisher Channel
-
Configure the Host name (or IP address) and port the driver will listen on for BEIS requests.
-
Select Yeson to enable Username/Password authentication to the Publisher channel. You may then specify the Username and Password the Publisher will expect.
-
Select Yeson See Section B.1, Configuring the Publisher Channel for information on how to configure HTTPS security on the Publisher channel.
-

-
-
On the page configure the Remote Loader settings. Selecting Yes to displays the fields to configure the Remote Loader. See “Identity Manager 4.0.2 Remote Loader Guide” for information on how to configure the Remote Loader .

-
The page configures policies that enable the Identity Reporting Module. See the “Identity Reporting Module Guide” for information on configuring Managed System Information .

-
Set Banner Password Settings to configure how new user passwords will be generated.
-
Selecting “Random Password” to have the password policy generate a random password. Select the number of letters and the number of digit characters to be included in the password.
-
Select “Attribute Value from User” to use the value of an attribute on the user as the password. The attribute name is selected from the eDirectory namespace.
NOTE: Map a UDCIdentity attribute or BEIS extension attribute to an eDirectory attribute to support this policy. Ensure the eDirectory attribute is entered in the drver filter as “Notify” to prevent the password from being written to the eDirectory attribute.

-
-
On the page configure the settings for User Objects.
-
Attribute used to match Banner Users with eDirectory Users Select the attribute to use as the matching attributes.
-
UDCIdentifier Select this UDCIdentifier to use Banner’s unique object ID as the matching value.
-
CN Select CN to use the CN as the matching attribute.
-
-
CN Format CN Format lets you select from a set of pre-defined patterns for constructing the new user’s CN.
-
UDCIdentifier
-
First Initial + Last Name
-
First Name + Last Initial
-
First Name + Last Name
-
First Initial + Middle Initial + Last Name
-
Last Name + First Initial + Middle Initial
-
-
Set Unique ID attribute in eDirectory with generated CN value Setting this to ‘true’ will cause the generated CN value to also be store in the Unique ID attribute.

-
-
On the page configure the options to enable the Account Tracking policies.

-
Review the Summary.
-
Select .

NOTE:There is no screen during import to set authentication information. The Ellucian Banner driver requires separate server and authentication information for each channel.
3.1.3 Configuring the Driver
After importing the driver configuration file, you need to configure the driver before it can run. You should complete the following tasks to configure the driver:
-
Configure the driver properties: There are many settings that can help you customize and optimize the driver. The settings are divided into categories such as Driver Configuration, Engine Control Values, and Global Configuration Values (GCVs). Although it is important for you to understand all of the settings, your first priority should be to review the Section A.0, Driver Properties located on the Driver Configuration page. The Driver Parameters and the Global Configuration Values let you configure the Ellucian Banner login information and security credentials, and other parameters associated with the Publisher channel. These settings must be configured properly for the driver to start and function correctly. If you do not have the Driver Properties page displayed in Designer:
-
Open your project.
-
In the Modeler, right-click the driver connection, then select Properties.
-
Make any desired changes, then click OK to save the changes.
-
After the driver is created in Designer, it must be deployed to the Identity Vault. Proceed to Section 3.1.4, Deploying the Driver
-
-
Authentication: This panel is not used by the Ellucian Banner driver. Leave it blank,
Driver Configuration
-
Configure the driver parameters: The driver parameters panel contains driver-specific configuration.
-
Driver Options The Ellucian Banner driver does not use any Driver Options. This panel is intentionally blank.
-
Subscriber Options:
-
URL of the remote Ellucian Banner server Enter the IP address or URL of the BEIS listener.
Example 3-1 http://10.10.1.7:4041
NOTE:If you are configuring the driver to use SSL the URL must contain a DNS name. For example: https://prod.bannerservice.com:4041
-
Authentication ID Enter the authentication ID the driver should use when authenticating to the BEIS listener.
-
Authentication Password Enter the password corresponding to the authentication ID.
-
Truststore File Communicating with the BEIS Web Service requires securing the communication using SSL. See Section B.2, Configuring the Subscriber Channel for information on how to configure a secure connection to the BEIS Web Service.
-
Proxy host and port When a proxy host and port are used, specify the host address and the host port. For example: 192.10.1.3:18180. Choose an unused port number on your server. Otherwise leave this field blank.
-
-
Publisher Options:
-
Listening IP Address and Port Specify the IP address of the server where this driver is installed and the port that this driver listens on as an SPML Server. You may specify 127.0.0.1 if there is only one network card installed in the server. Choose an unused port number on your server. For example: 127.0.0.1:18180. The driver listens on this address for SPML requests, processes them, and returns a result.
-
Require Authentication Select to configure authentication information required by the Publisher channel.
-
Authentication ID Specify the Authentication ID to validate incoming SPML requests.
-
Authentication Password Specify the Authentication password to validate incoming SPML requests.
-
Accept HTTPS Connections Select to enable HTTPS connections.
-
KMO Name When this server is configured to accept HTTPS connections, this is the KMO name in eDirectory. The KMO name is the name before the ' - ' in the RDN. Leave this field blank when a keystore file is used (see below) or when HTTPS connections are not used.
-
Keystore File When this server is configured to accept HTTPS connections, this is the path and the name of the keystore file. For example: C:\security\keystore. Leave this field blank when a KMO name is used (see above) or when HTTPS connections are not used.
-
Keystore Password When this server is configured to accept HTTPS connections, this is the keystore file password. Leave this field blank when a KMO name is used (see above) or when HTTPS connections are not used.
-
Server Key Alias When this server is configured to accept HTTPS connections, this is the key alias. Leave this field blank when a KMO name is used (see above) or when HTTPS connections are not used.
-
Server Key Password When this server is configured to accept HTTPS connections, this is the key alias password (not the keystore password). Leave this field blank when a KMO name is used (see above) or when HTTPS connections are not used.
-
Content Type The HTTP request header will be set to this value on publisher results that are sent back to the requester.
-
Heartbeat Interval: Specify the length of time in seconds the between heartbeats emitted by the Ellucian Banner driver’s publisher channel.
-
-
-
Global Configuration Values (GCVs)
The GCVs are defined in Table A-5
After completing the configuration tasks, continue with Section 3.1.4, Deploying the Driver.
3.1.4 Deploying the Driver
After the driver is created in Designer, it must be deployed into the Identity Vault.
-
In Designer, open your project.
-
In the Modeler, right-click the driver icon or the driver connection, then select Live > Deploy.
-
Read through the deployment summary, and then click Deploy.
-
Read the success message, and then click OK.
-
Click Define Security Equivalence to assign rights to the driver.
The driver requires rights to objects within the Identity Vault. Create a user in eDirectory for the driver to use. Assign that user administrative rights to the objects that it will need to manage objects in eDirectory.
NOTE:Setting the Driver object’s Security Equivalence directly to the admin user is not recommended. Also, creating a new user for the driver and setting the new user object’s Security Equivalence to the Admin user is not recommended. Best practice is to assign specific administrative rights as needed by the driver to a user object created for the driver.
-
Click Add, then browse to and select the object with the correct rights.
-
Click OK twice.
-
-
Click Exclude Administrative Roles to exclude users that should not be synchronized.
-
Click Add, then browse to and select the user object you want to exclude.
-
Click OK.
-
Repeat Step 6a and 6b for each object you want to exclude.
-
Click OK.
-
-
Click OK
3.1.5 Extending the Schema
The Ellucian Banner driver exposes several attribute which are not part of the base User schema in the Identity Vault. A set of Banner-specific attributes are provided in DIRXML-udcIdentityAuxClass. The Aux Class definition is contained in Banner.sch.
|
Attribute Name |
Definition |
Syntax |
Type |
|---|---|---|---|
|
udcMiddleName |
Stores the middle initial, or part of the middle name. |
CASE_IGNORE_ STRING |
Single-valued attribute. 8 characters are stored for this attribute. |
|
udcGender |
Stores the gender: male, female, unknown. |
CASE_IGNORE_ STRING |
Single-valued attribute. |
|
udcBirthDate |
Stores the birthdate: mmddyy |
CASE_IGNORE_ STRING |
Single-valued attribute. |
|
udcTaxID |
Stores a number. This could be the Social Security number. |
CASE_IGNORE_ STRING |
Single-valued attribute. |
|
udcIdentifier |
A unique key to identify the individual in the Ellucian system. The driver uses this as the association key to facilitate using AccessManager to secure Ellucian’s web applications. |
CASE_IGNORE_ STRING |
Single-valued attribute. |
|
udcInstitutionalRoles |
Role information from Ellucian HE. |
CASE_IGNORE_ STRING |
Multi-valued attribute. |
|
udcHomeSA |
Home Street Address |
CASE_IGNORE_ STRING |
Single-valued attribute |
3.1.6 Understanding Institutional Roles
Ellucian provides access to applications and data by the roles applied to the people in the Higher Education Institution. Any given person might have a number of roles. For example, a university student might also be a staff member. Ellucian provides 40 roles and also allows the users to add their own roles. The following list is some of the roles that Ellucian provides:
-
PROSPECTIVE
-
PROSPECTIVESTUDENT
-
APPLICANT
-
INSTITUTIONACCEPT
-
APPLICANT ACCEPT
-
STUDENT
-
ALUMNI
-
FRIENDS
-
STAFF
-
DEVELOPMENTOFFICER
-
FINANCE
-
FACULTY
-
BANNERINB
See the Ellucian HE Banner Identity Handbook for a complete list of Ellucian roles, their description and possible uses.
Role Attributes
|
Role |
Description |
|
|---|---|---|
|
Role Name |
Specifies the name of the Ellucian Role. |
Required. |
|
Context |
The name of the Ellucian component or system that created the role. Ellucian always sets Context to INTCOMP. |
Optional. |
|
Institution Name |
If present, it identifies the institution for which this role applies. |
Optional |
How Institutional Roles Work
Ellucian HE does not delete users from their system. Instead, roles are added to and removed from a user to represent their access rights. A user with no roles has no access to Ellucian applications or resources. Access to resources is based on the presence of roles. Therefore, the driver synchronizes all Role information to the udcInstitutionalRoles attribute in the Identity Vault. For each XML document Ellucian sends to the driver publisher channel, a complete list of the current roles on that user is provided. The driver publishes a <remove-all-values> command to clear the udcInstitutionalRoles attribute before publishing the new list of roles it received from Ellucian HE.
How Roles are Stored in udcInstitutionalRoles
UdcInstitutionalRoles is a multi-valued attribute and can contain a list of roles. The three role attributes are stored in a single value, separated by semicolons. The format is:
<Role Name>;<Context>;<Institution Name>.
Role Name is a required attribute. Context is an optional attribute. It is delimiting. A semi-colon is present even if the attribute is empty. Institution Name is also an optional attribute.
Example 3-2 For example, given a role of BasicPerson issued from Banner at Out Of State University, the driver will generate the following:
<add-attr attr-name="InstitutionRoles">
  <value>BASICPERSON;Banner;OutOfStateU</value>
</add-attr>
The Input Transformation on the base driver configuration contains a policy which will transform the XDS for a role to
<add-attr attr-name=”InstitutionalRoles”>
  <value>BASICPERSON</value>
</add-attr>
Use the and to control the the format of an Institutional Role attribute.
3.1.7 Starting the Driver
When a driver is first created, it is the stopped by default. Start the driver in order to begin synchronizing data between Banner and eDirectory. Identity Manager is an event-driven system, so after the driver is started, it will wait for events to be sent from BEIS or eDirectory for processing.
To start the driver:
-
In Designer, select the project view.
-
Click on the Ellucian Banner driver.
-
Click the green start icon.