9.2 Creating an XDS Input Document
In order to simulate a policy, you must have a valid XDS Input document. The policy consumes the input document and the results are displayed as if the policy was executed. The simulator provides a graphical editor, to help you create the input document. The editor is called the XDS Builder.
You access the XDS Builder by clicking the tab in the Policy Simulator.
For information on how to access the Policy Simulator, see Accessing the Policy Simulator.
Figure 9-1 XDS Builder
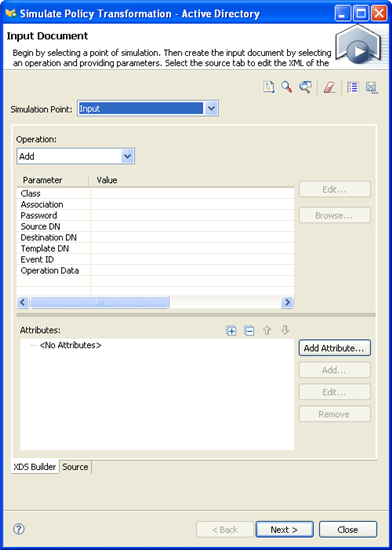
Click the tab in the Policy Simulator to display the input document in XML. The XDS Builder creates this input document. You can modify the XML by editing the XML directly or using the XDS Builder.
The XDS Builder allows you to select the operation type as well as provide the operation parameters, attributes, and values. XDS Builder saves the parameters and values of the simulator for the current Designer session. To make the simulator input available after Designer has been shut down, save the input document to disk.
After you have created the XDS input document, you need to analyze the results. For more information, see Section 9.5, Simulating a Policy.
The Policy Simulator has several different components. Each component helps create the input document to test the policy against.
9.2.1 Source
The Policy Simulator allows you to create the input document in XML without using the builder. The tab is an XML editor.
9.2.2 Import an XDS Document
The Policy Simulator allows you to import an existing input document to test the policy against.
-
In the toolbar, select
 .
.
-
Browse to and select the existing input document, then click .
-
Click to test the policy against this existing information.
Designer comes with sample input document files you can use. The files are located in the plug-in com.novell.designer.idm.policy\simulation. The events are Add, Association, Delete, Instance, Modify, Move, Query, Rename, and Status.
9.2.3 Use an Identity Vault Object As a Template
The Policy Simulator allows you to use an existing Identity Vault object to populate the input document.
-
In the toolbar, select
 .
.
-
If you are not logged in to the Identity Vault, specify the following information; otherwise skip to Step 3.
-
Specify the host name of the Identity Vault server.
It can be the IP address of the server or the DNS name of the server.
-
Specify a DN of a user object to authentication to the Identity Vault.
-
Specify the password of the user in Step 2.b, then click .
-
-
Browse to and select the desired object, then click .
If the simulation point is set to , , or , a warning message is displayed. (For more information about simulation points, see Simulation Point.) The warning message informs the user that the input document should be created by using the application’s attribute names and value formats. The XDS Builder converts the Identity Vault attribute names to the corresponding application attribute by using the Schema Map policy, as long as the driver references the Schema Map policy. However, the values for the attributes might be in an incorrect format.
-
Click if a warning message is displayed.
-
Click to test the policy against the object.
9.2.4 Use an Application Object As a Template
The Policy Simulator allows you to use an existing Application object to populate the input document.
-
In the toolbar, select
 .
.
-
Designer opens an Application Browser so you can browse to the object you want to use as a template.
Designer uses Independent Driver Services (IDS) to access the application. If you encounter an error while connecting to the application, use the IDS Trace view to see where the error occurred.
To open the IDS Trace view, right-click the driver object in the Outline view, then select . IDS trace must be loaded before connecting to the application in order to capture any error messages.
NOTE:Simulator access to application attributes is based on the rights granted to the application user specified in the driver configuration.
-
Browse to and select the desired object, then click .
The Simulator populates the input document based on the values in the selected application object.
-
Click to test the policy using the input document.
9.2.5 Clear All Parameters
The Policy Simulator allows you to clear all parameters, attributes, and values that have been set. You can create a new input document without launching the XDS Builder again.
-
In the toolbar, select
 .
.
-
Specify information to create a new input document.
9.2.6 Configuration Options
The Policy Simulator allows you to set configuration options for the simulation.
-
In the toolbar, select
 .
.
-
Specify the desired .
If you have XSL in your policy and you want to see the XSL trace results, specify a value. If the value is set to 0, no information is displayed. The range of the trace value is 0 to 4.
-
Specify the desired .
To set the results of the simulation, set a value in the field. The range of the trace value is 0 to 5.
-
Click .

9.2.7 Save the Input Document
The Policy Simulator does not store the input document for future sessions in Designer. If you want to use the input document for a later session in Designer, the input document must be saved.
-
In the toolbar, click
 .
.
-
Browse to a location where you want to save the file, then specify a filename.
-
Click to save the input document.
Novell® recommends that you do not save the input document in the same directory where Designer is installed or it might be overwritten during a Designer upgrade.
9.2.8 Simulation Point
The Policy Simulator allows you to select a policy set or group of policies to simulate with a specific operation.
Figure 9-2 Simulation Point in the Policy Simulator

You can select a Driver object, Publisher channel, Subscriber channel, policy, or rule as the simulation point. If you select a Driver object, Publisher channel, or Subscriber channel, the options are:
NOTE:If you want to test a single policy, launch the simulator from the selected policy. If you do select a specific policy or rule to test, the options are and .
9.2.9 Operation
The XDS Builder allows you to select the type of operation that the input document performs.
Figure 9-3 Operation Options in the XDS Builder
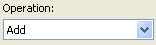
The available operations are:
|
Add |
Modify |
Remove Association |
|
Add Association |
Modify Association |
Rename |
|
Check Object Password |
Modify Password |
Status |
|
Check Password |
Move |
Sync |
|
Delete |
Query |
Instance |
|
Get Named Password |
Extended Query |
Depending upon which operation is selected, the XDS Builder displays different options and screens.
9.2.10 Parameter and Value
The XDS Builder allows you to define parameters and specify values for the selected operation. Each operation displays different parameters.
Figure 9-4 Parameters and Values in the XDS Builder
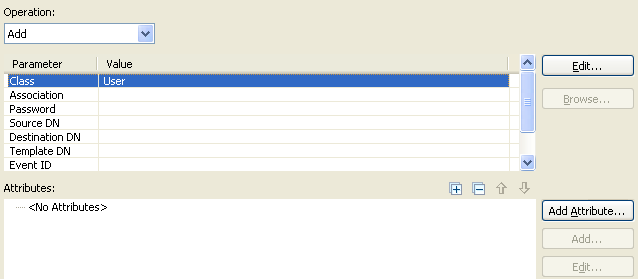
The list of parameters for each operation is set, and cannot be changed. You do not need to have each parameter defined for the simulation to work; just define the parameters that apply to your policy. You can edit the parameter value by double-clicking the value or selecting the value and clicking the button.
All parameter values are edited inline, with the exception of and parameters. Editing these parameters launches a dialog box that allows you to select a class name or edit the operation data.
Parameters that contain a reference to an object enable the button. Although these values can be edited inline, the button allows you to browse for an object in the application or the Identity Vault, depending on the current simulation point. For any Publisher channel or Input simulation point the button for any source parameters such as Source DN launches the application browser. While all destination parameters such as Destination DN launches the Identity Vault Browser.
Likewise, for any Subscriber channel or Output simulation point, the button for any source parameters such as Source DN launches the Identity Vault browser. However, the button for all destination parameters such as Destination DN, launches the application Browser.
Editing the parameter launches the application class browser when the Input, Output, or Schema Map inbound policy simulation point is selected. For all other simulation points, the Identity Vault class browser is opened. If the desired class is not included in the application or Identity Vault schema, it can be added during the simulation process. For more information about managing a schema in Designer, see Managing the Schema
in the Designer 3.0.1 for Identity Manager 3.6 Administration Guide.
Editing the parameter launches the Operation Data editor. For more information, see Section 9.3, Using the Operation Data Editor.
9.2.11 Attributes
The Input Document field allows you to add, edit, and remove attribute values for simulating operations.
Figure 9-5 XSD Input Document - Attribute Field

Working with Attribute Values
Because there are several different attribute types, the Attributes field provides different ways of manipulating attribute values.
-
Add a New Attribute: To add a new attribute to the attribute list, click . For more information, see Simulating the Adding of an Attribute.
-
Remove an Attribute: To remove an attribute from the attribute list, select the attribute, then click (or right-click the attribute, then select .)
-
Add an Attribute Value: To add another value to an existing attribute, select the attribute, then click (or right-click the attribute, then select .
-
Remove an Attribute Value: To remove a value from an exsiting attribute, select the value, then click (or right-click the value, then select .)
-
Change an Attribute Value: To change the value of an existing attribute, select an attribute value, then click (or double-click an attribute value.)
If the attribute uses a structured value, you can change each of the value components separately. You cannot modify the entire structured value at once.
If the attribute is an octet string, Simulator opens the Hex Editor to modify the value. For more information, see Section 9.4, Using the Hex Editor.
-
Identity Vault Schema When working with Identity Vault attributes with structured values, the Simulator displays customized Value editor dialog boxes that describe each of the structured value components. For example, adding a Facsimile Telephone Number attribute launches a Value Editor dialog box that asks for the Fax Number, Bit Count, and Parameters for the attribute, each of which is a component of the Facsimile Telephone Number structured value.
However, when working with an Application schema, the Simulator uses a generic structured value dialog box since it cannot know the type of data that comprises the structured value.
Simulating the Adding of an Attribute
-
Select in the field of the Simulator.
-
Double-click in the field of the Simulator.
-
Browse to and select the desired class, the click .
-
Click .
The icon launches the Identity Vault or application attribute browser, based on the simulation point.
-
Browse to and select the desired attribute, then click .
-
Specify the attribute value, then click .
Based on the attribute type, Simulator opens either the Value editor or the Hex editor so you can specify the attribute value.
-
Click in the Simulator to view the results of the Add operation with the specified attribute value.
Simulating the Modification of an Attribute
There are multiple events that cause an attribute to be modified. They are:
-
Add Value: Adds a new value to the attribute.
-
Remove Value: Removes a single value from the attribute.
-
Remove All Values: Removes all values stored in the attribute.
-
Remove: Removes the attribute.
When you are simulating a Modify operation, you need to select which event occurs to modify the attribute. The Simulator allows you to do that:
-
In the Policy Simulator, select in the field of the XDS Builder.
-
Double-click in the column.
-
Browse to and select the desired class, then click .
-
Click the button.
-
Browse to and select the desired attribute, then click .
-
Right-click the attribute, then select one of the modifying events:
-
Add Value
-
Remove Value
-
Remove All Values
-
Remove
You can add multiple events to a single attribute.
-
-
Click in the Policy Simulator to view the results of the Modify operation.
The Policy Simulator allows you to modify the values of the attribute and change the order of events that occur to an attribute. When you right-click an event in the field, you have additional options that allow to make these changes:
-
Add: Allows you to add content to the attribute value.
-
Change to Add Value/Change to Remove Value: Allows you to change the event from Add Value to Remove Value or vice versa.
-
Remove: Removes the selected event from the list of events to occur on an attribute.
-
Move Up: Moves the selected event up in the order of execution.
-
Move Down: Moves the selected event down in the order of execution.