3.1 Staging a Project for the First Time
You should ensure that all the applications and Identity Manager systems are up and running in the next stage before moving the configurations. You can stage projects using either packages or configuration files, as necessary in your environment.
3.1.3 First-Time Staging Process
To stage an Identity Manager project for the first time, complete the following steps:
-
Import any additional objects not modeled in Designer from eDirectory into an LDIF container. For more information on importing additional objects, see Importing Objects.
-
Compare and import any schema changes from the Identity Vault (eDirectory) to the schema in Designer:
-
Right-click .
-
In the Information pane, select .
-
Click .
-
Click .
-
-
(Optional) If you want to keep a backup of your first-stage project, you can export the existing project to an archive file:
-
Right-click the first-stage project and select .
-
Select the project you want to export.
-
Click and specify the name of the archive file you want to use, then click .
-
Click .
-
Click .
-
-
Copy the first-stage project to reuse it in the next stage:
-
In Designer, go to .
-
Right-click the first-stage project and select .
-
Enter the name for the second-stage project. We recommend you use a name that clearly indicates the project is used for the second stage of the staging process.
-
Click .
-
-
(Optional) After copying the existing first-stage project, you may want to rename the project to specify that the project is for the first stage. Complete the following steps to rename the first-stage project:
-
In the project view in Designer, right-click the first stage project and select .
-
Specify a new name for the project and click .
-
-
In the project view, expand the second-stage project and double-click .
-
Change the configuration of one of the Identity Vaults in your project.
-
In the Outline view or the Modeler, double-click the .
-
In the Configuration page, change the , , and settings to match those of the Identity Vault you want to use for the second-stage project.
-
Click to check the connectivity, then click .
-
If necessary, add more servers and associate those servers with the driver set.
-
-
(Optional) If your second-stage project uses one or more different connected systems, change the configuration of the connected system or systems of the second-stage Identity Vault. To change the system configuration, complete the following steps:
-
In the Modeler, double-click a driver or a driver line.
-
In the Driver Configuration page, change the authentication information in the tab.
-
In the Driver properties page, change the driver related information in the tab.
-
The driver parameters depend on the servers on which the drivers reside. Ensure that you change the driver parameters on multiple servers if you have multiple servers running a driver.
-
-
(Optional) If your second-stage project uses a different connected system or different configuration settings for provisioning, change the GCVs for the drivers and driver sets of the second-stage Identity Vault as necessary.
GCVs should be the only changes that you make on the drivers and the driver set along with the configuration. Your policies won’t change if they are properly designed.
-
Update all the GCVs that change with the environment, as necessary.
-
Move or add new GCVs to any new servers added in Step 7.d.
-
-
To ensure the integrity of your project, run the Project Checker:
-
Click .
-
In the Project Checker view, click the icon
 .
.
-
Review the results and correct any issues. For more information about using the Project Checker, see
Checking Your Projects
in the NetIQ Designer for Identity Manager Administration Guide.
-
-
Compare and import any schema changes from Designer into the second-stage the Identity Vault (eDirectory):
Compare the schema in Designer with the eDirectory schema and deploy:
-
Right-click .
-
In the Information pane, select .
-
Click .
-
Click .
-
-
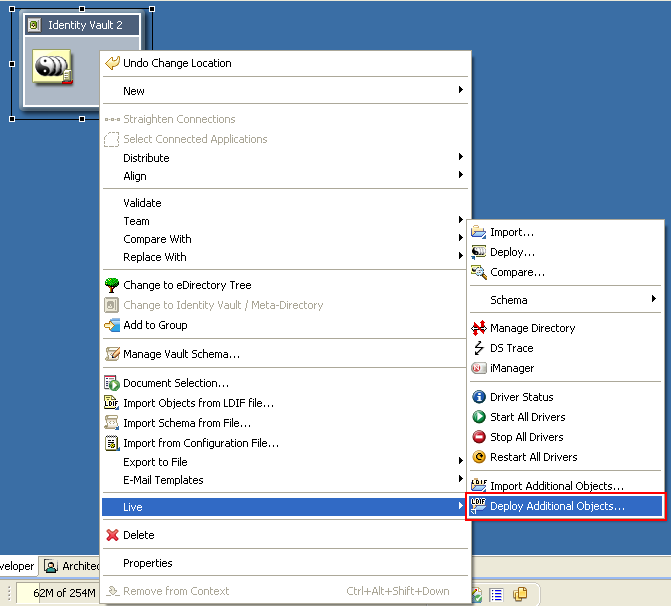
In the Modeler, right-click the Identity Vault and select to deploy additional objects gathered in the Prerequisites.
-
To deploy the Identity Vault, right-click
-
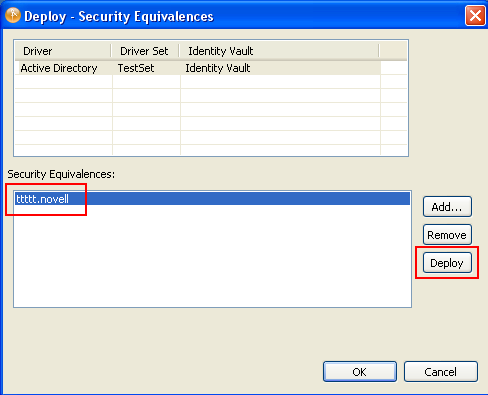
Deploy the appropriate Security Equivalences and Exclude Admin Roles objects for each driver. See Section 2.7, Rights for more information.
-
Repeat Step 7 through Step 14 for each Identity Vault in your project.