2.6 Identity Manager Objects

Designer provides the ability to develop Identity Manager projects even in offline mode. You can easily move your Identity Manager objects from one environment to another. You can also export and import projects into a simple configuration file, which can be stored for future use.

Some Identity Manager objects are not visible in a Designer project, even though they may be necessary for your Identity Manager installation. To ensure that you move all necessary objects from one stage to another, you should import any objects not modeled in Designer from eDirectory into an LDIF container, back up those objects by exporting the LDIF container to an external LDIF file, and then import the LDIF file to an LDIF container in the next stage.

2.6.1 Objects That Designer Models

You can model the following objects in Designer:

Object

Description

Driver Sets

A driver set is a container that holds Identity Manager drivers. Only one driver set can be active on a server at a time. As a result, all active drivers must be grouped into the same driver set.

Drivers

A driver provides the connection between an application and the Identity Vault. The driver is the connector that enables data synchronization and sharing between systems.

GCVs on Driver set and Drivers

Global configuration values (GCVs) are settings that are similar to driver parameters. GCVs can be specified for an individual driver as well as a driver set. If a driver does not have a GCV, the driver inherits the value for that GCV from the driver set.

Policies

Policies cover DirXMLScript, Entitlement, and XSLT.

Libraries

You need to provide a context if the library is outside the driver set.

Resource Objects

Resource objects are mapping tables, GCV resource, prompts, filter resource, or ECMA scripts. The resource objects allow you enhance the functionality of the drivers.

Provisioning Objects

Workflows, roles, resources, teams, etc.

Notification Templates

Notification templates enable you to customize and send e-mail messages that users receive when triggers occur.

Identity Vault Schema, Application Schema


Role Based Entitlements

Identity Manager allows you to synchronize data between connected systems. Entitlements allow you to set up criteria for a person or group that, once met, initiate an event to grant or revoke access to business resources within the connected system.

Named Passwords


Miscellaneous

Credential Application and Credential Repository

2.6.2 Objects That Designer Does Not Model

Object

Description

Organization (O), Organizational Unit (OU), Domain (DC), and Container (CN)

Ensure that these objects are created before deploy the project from Designer.

Import the containers that contain these objects. Include the following objects in the O, OU, DC, and CN objects:

  • All objects that are Security Equivalences objects for any drivers.

  • Objects that are used in any policies.

  • Objects that are used in any job configurations.

  • Objects that are used in GCVs.

Users

Ensure that these objects are created before you deploy the project from Designer, especially the admin users. The list of users can be collected in two different ways:

Import the containers that contain the user objects. The following objects must be included in the list:

  • Security Equivalences and Exclude Administrator Roles for all the drivers.

  • Static Members on groups and RBE policies.

  • Search identities and Membership Filter on Dynamic groups and RBE policies.

  • Users that are used in any policies.

  • Users that are used in any job configurations.

  • Users that are used in GCVs.

Groups

Ensure that the static and dynamic group objects are created before deploying them.

Import the containers that contain the groups. The following objects must be included in the list:

  • Groups that are used in any policies.

  • Groups that are used in any job configurations.

  • Groups that are used in GCVs.

Password Policies

Ensure that the policies are created before deploying them.

Indices

Ensure that indices are created before deploying them.

Custom Objects

User-defined objects ar not defined in Designer. Manually create them before deploying.

Import the containers that contain the custom objects. The following objects must be included in the list:

  • All custom objects that are Security Equivalences objects for all the drivers.

  • Custom objects that are used in any policies.

  • Custom objects that are used in any job configurations.

  • Custom objects that are used in GCVs.

Designer 3.5 and later allows you to import objects listed in the above table in LDIF format and then deploy them along with other objects that are being deployed.

NOTE:These objects are not modeled as drivers or driver sets in Designer. They can be modified by modifying the LDIF file that contains these objects in Designer. For more information, refer to Importing Objects.

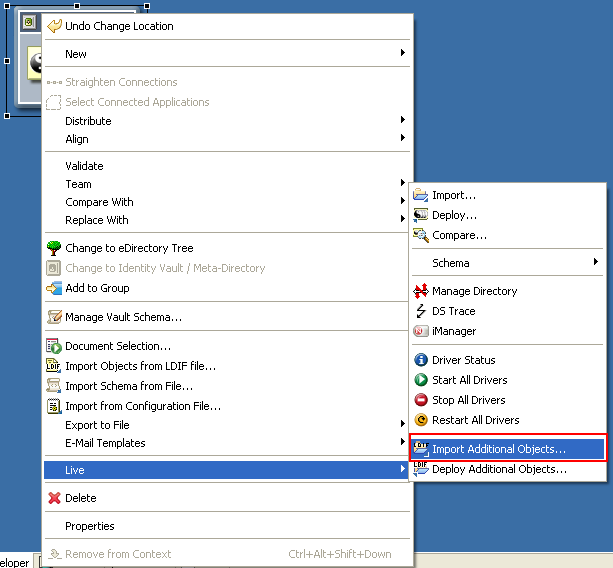
2.6.3 Importing Objects

Before copying a staged project, you should import any additional objects not modeled in Designer from eDirectory into an LDIF container. For information about objects not modeled in Designer, see Objects That Designer Does Not Model.

  1. In Designer, right-click Identity Vault and select Live > Import Additional Objects.

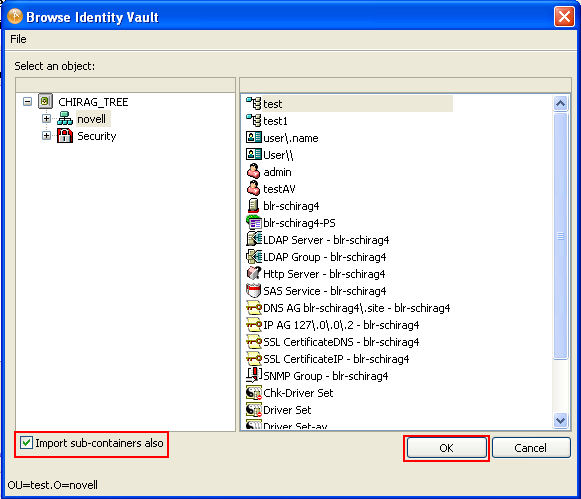
  2. Browse to and select the objects you want to add to the LDIF file.

    Or

    If you want to select all the objects in a container, select Import sub-containers also in the Browse Identity Vault dialog box.

  3. Click OK.

  4. Click Continue on the Import Dialog to import all the objects into Designer. These objects are stored in the LDIF container.

    NOTE:These objects are retrieved by an LDAP channel. If you are running the LDAP service on non-default ports, see Changing the LDAP Properties for more information.

  5. Repeat Step 1 through Step 4 for all the Identity Vaults in your projects.

You can edit the LDIF objects from the LDIF container. Go to the Outline View, expand the Identity Vault, then double-click the LDIF container.

The objects in the LDIF container are overwritten. To keep a record of the objects stored in the LDIF container, export the information of the LDIF container into an LDIF file. For more information about exporting LDIF objects to an LDIF file, see Exporting LDIF Container Objects to an LDIF File.

IMPORTANT:You should back up your project by using a version control system or export it to a file.

2.6.4 Exporting LDIF Container Objects to an LDIF File

To back up the objects currently stored in the LDIF container in your project, you can export those objects and store them in the LDIF file.

  1. In the Modeler, select Identity Vault > Live > Export to File > Additional Objects.

  2. In the window displayed, specify the name of the file into which objects stored in the LDIF container should be exported, then click Save or OK. The following window is displayed in a Windows environment.

    If there is no information in the LDIF container, a warning is displayed.

  3. If prompted, click OK.

2.6.5 Importing Objects from an LDIF File into an LDIF Container

You can import objects from an LDIF file to an LDIF container. This overwrites the existing objects in the LDIF container.

  1. In the Modeler, right-click the Identity Vault and select Import Objects from LDIF File.

  2. In the window displayed, select the file from which the LDIF objects should be imported, then click Open or OK.

  3. If prompted, click OK.

2.6.6 Deploying Additional Objects into eDirectory

Designer allows you to update objects that are already present in eDirectory. However, the current functionality does not support the deployment of forward references. To deploy these objects, you can either manually create the forward references in eDirectory or remove the references in the LDIF container. For more information about modifying LDIF container data, see Editing the LDIF Container Data by Using an Editor.

Designer allows you to update objects that are in eDirectory.

  1. In the Modeler, select Identity Vault > Live > Deploy Additional Objects.

  2. Select or deselect the objects by clicking the Select All icon, then click Deploy.

    If the objects are already present in eDirectory, a warning is displayed.

  3. If the objects are already in eDirectory, click Update Existing Objects in eDirectory to update them, click Deploy, then click OK.

    If there are no objects or the information is not in a proper format in the LDIF container, a warning is displayed.

2.6.7 Editing the LDIF Container Data by Using an Editor

Designer allows you to modify the LDIF objects by using different editors. Under the Identity Vault in the Outline view, right-click the LDIF container and select Open With > Designer Built-in Editor. You can also double-click the LDIF container to open the container.

You can then use the built-in editor to modify the LDIF data stored in the container.

2.6.8 Deleting the LDIF Container

Designer allows you to delete the LDIF container. Under the Identity Vault in the Outline view, right-click the LDIF container and select Delete.